1. Important Safeguards
When using electrical appliances, basic safety precautions should always be followed to reduce the risk of fire, electric shock, and injury to persons, including the following:
- Read all instructions before operating the roaster oven.
- Do not touch hot surfaces. Use handles or knobs.
- To protect against electrical shock, do not immerse cord, plugs, or the main unit in water or other liquid.
- Close supervision is necessary when any appliance is used by or near children.
- Unplug from outlet when not in use and before cleaning. Allow to cool before putting on or taking off parts.
- Do not operate any appliance with a damaged cord or plug, or after the appliance malfunctions or has been damaged in any manner. Contact customer service for examination, repair, or adjustment.
- The use of accessory attachments not recommended by the appliance manufacturer may cause injuries.
- Do not use outdoors.
- Do not let cord hang over edge of table or counter, or touch hot surfaces.
- Do not place on or near a hot gas or electric burner, or in a heated oven.
- Extreme caution must be used when moving an appliance containing hot oil or other hot liquids.
- Always attach plug to appliance first, then plug cord into the wall outlet. To disconnect, turn any control to "off", then remove plug from wall outlet.
- Do not use appliance for other than intended use.
- A short power-supply cord is provided to reduce the risks resulting from entanglement or tripping over a longer cord.
2. Product Components
The HEYNEMO 26QT Electric Roaster Oven includes the following components:
- 1x Roaster Oven Base
- 1x Removable Roasting Pan
- 1x Removable Roasting Rack
- 1x Self-Basting Lid

Figure 2.1: Components of the Roaster Oven. The image displays the roaster oven base, the removable inner pan, the liftable roasting rack, and the self-basting lid, illustrating how they fit together.
3. Setup and First Use
3.1 Unpacking
- Carefully remove the roaster oven and all its components from the packaging.
- Remove any packing materials, stickers, or labels from the appliance.
3.2 Initial Cleaning
- Before first use, wash the removable roasting pan, roasting rack, and lid in warm, soapy water. Rinse thoroughly and dry completely.
- Wipe the exterior of the roaster oven base with a damp cloth. Do not immerse the base in water.
3.3 Placement
- Place the roaster oven on a stable, heat-resistant, and dry surface, away from walls and other appliances to allow for proper ventilation.
- Ensure the power cord is not touching any hot surfaces or hanging over the edge of a counter where it could be pulled or tripped over.
3.4 Pre-use Burn-in (Recommended)
It is recommended to perform an initial burn-in cycle to eliminate any manufacturing odors. This process helps to cure the non-stick coating and remove any residual oils from the heating elements.
- Place the empty removable roasting pan and rack inside the roaster oven base. Secure the lid.
- Plug the roaster oven into a grounded electrical outlet.
- Turn the temperature control knob to the maximum setting (450°F).
- Allow the roaster to operate for approximately 30-60 minutes. Some smoke or odor may be present during this initial use; this is normal. Ensure the area is well-ventilated.
- After the burn-in cycle, turn the knob to "Off" and unplug the unit. Allow it to cool completely before cleaning again as per section 3.2.
4. Operating Instructions
4.1 Temperature Control
The roaster oven features a temperature control knob with settings ranging from 150°F to 450°F, including specific settings for "Defrost" and "Keep Warm".

Figure 4.1: Temperature Control Dial. This image shows the roaster oven's control knob, indicating temperature settings from 150°F to 450°F, along with 'Keep Warm' and 'Defrost' options.
4.2 Roasting
- Place the roasting rack inside the removable roasting pan.
- Place your food (e.g., turkey, chicken, ham) on the roasting rack. The 26QT capacity can accommodate a turkey up to 30 lbs.
- Cover the roaster oven with the self-basting lid.
- Plug in the unit and turn the temperature control knob to your desired roasting temperature (typically between 325°F and 450°F, depending on the recipe).
- The indicator light will illuminate during preheating and cycling.
- Cook until the food reaches the appropriate internal temperature.

Figure 4.2: Self-Basting Lid. This image highlights the self-basting lid, which circulates steam to keep food moist during cooking.
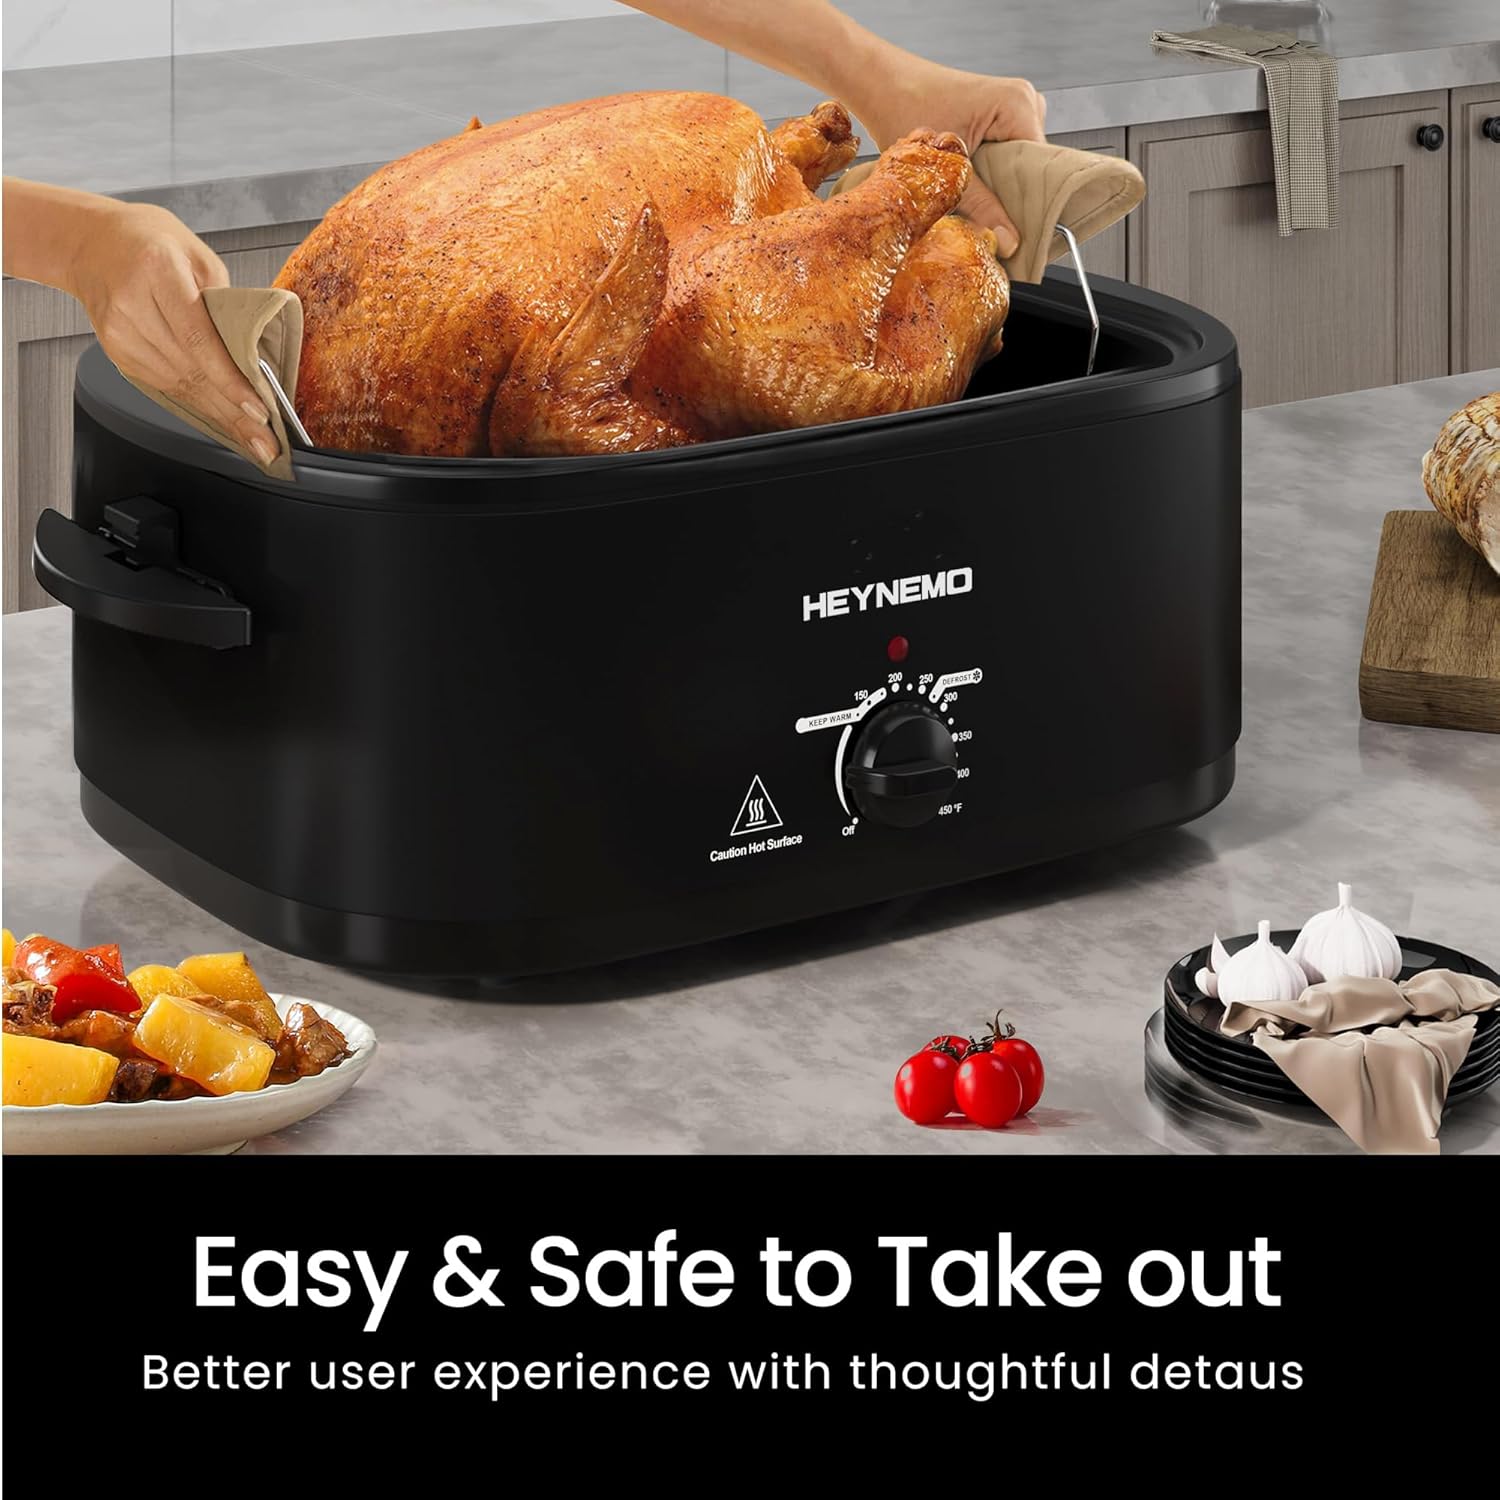
Figure 4.3: Easy Food Removal. This image demonstrates how to safely lift a cooked turkey out of the roaster oven using the removable rack and oven mitts.
4.3 Defrost Function
The "Defrost" setting allows for quick thawing of frozen foods.
- Place frozen food in the roasting pan, preferably on the rack.
- Set the temperature control knob to "Defrost" (approximately 275°F).
- Monitor the food closely to ensure even thawing and prevent cooking.

Figure 4.4: Quick Defrost Process. This image illustrates the steps for quickly defrosting a turkey using the roaster oven's defrost function, from frozen to marinated, then baked and ready to enjoy.
4.4 Keep Warm Function
The "Keep Warm" function maintains the perfect serving temperature for your cooked food without overcooking.
- Once cooking is complete, turn the temperature control knob to "Keep Warm" (approximately 150°F).
- Keep the lid on to retain heat and moisture.

Figure 4.5: Temperature Settings Overview. This image displays the progression from defrosting (275°F) to roasting (325°F-450°F) and finally to keeping warm (150°F) using the roaster oven's adjustable temperature control.
4.5 General Cooking Tips
- For best results, preheat the roaster oven to the desired temperature before adding food.
- Avoid frequently lifting the lid, as this releases heat and steam, extending cooking times. The self-basting lid is designed to minimize the need for manual basting.
- Always use oven mitts when handling hot parts of the roaster oven, including the lid, roasting pan, and rack. The handles on the base are cool-touch, but caution is advised.
Video 4.1: Roasting a Turkey. This video demonstrates the ease of roasting a turkey in the HEYNEMO electric roaster oven, showcasing the self-basting lid and the final cooked product.
5. Cleaning and Maintenance
5.1 Cleaning After Each Use
- Always unplug the roaster oven and allow it to cool completely before cleaning.
- The removable roasting pan, roasting rack, and lid are dishwasher safe for convenient cleaning.
- For stubborn food residue, soak the pan and rack in warm, soapy water before washing. A non-abrasive scrubber or sponge can be used. For very tough spots, a steel wool pad may be used on the enamel-on-steel pan, but use gently to avoid damage.
- Wipe the exterior of the roaster oven base with a damp cloth. Do not use abrasive cleaners or scouring pads on the exterior. Never immerse the base in water or any other liquid.
- Ensure all parts are thoroughly dry before storing.

Figure 5.1: Easy Cleaning. This image shows the removable roasting pan being cleaned under running water, emphasizing the ease of maintenance for the roaster oven's components.
5.2 Storage
- Store the cleaned and dried roaster oven in a cool, dry place.
- Ensure the power cord is neatly wrapped and not kinked.
6. Troubleshooting
If you encounter any issues with your HEYNEMO Electric Roaster Oven, please refer to the following common problems and solutions:
| Problem | Possible Cause | Solution |
|---|---|---|
| Roaster does not heat up. | Not plugged in; power outlet malfunction; temperature knob set to "Off". | Ensure the unit is securely plugged into a working outlet. Check the circuit breaker. Turn the temperature knob to a desired setting. |
| Indicator light is dim or not visible. | Normal operation; ambient light conditions. | The indicator light may appear dim in bright environments. It functions to show when the heating element is active. This is not a malfunction. |
| Lid appears to be melting or flaking. | Material degradation due to heat or defect. | Discontinue use immediately. This is not normal. Contact HEYNEMO customer service for assistance and potential replacement. |
| Food is drying out. | Lid lifted too often; cooking at too high a temperature; insufficient liquid. | Avoid frequently lifting the lid. Adjust cooking temperature. Ensure sufficient liquid is present in the pan if required by recipe. The self-basting lid helps retain moisture. |
If the problem persists after attempting these solutions, please contact HEYNEMO customer support.
7. Specifications
| Feature | Specification |
|---|---|
| Brand | HEYNEMO |
| Model Name | Electric Roaster Oven |
| Capacity | 26 Quarts (fits up to 30 lbs turkey) |
| Wattage | 1450 Watts |
| Temperature Range | 150°F to 450°F |
| Control Type | Knob |
| Material | Stainless Steel (exterior), Enamel-on-steel (roasting pan) |
| Color | Black |
| Product Dimensions (D x W x H) | 23.4" x 15.6" x 14.9" |
| Item Weight | 16.3 Pounds |
| UPC | 789889884870 |
| ASIN | B0D3PFS8GD |
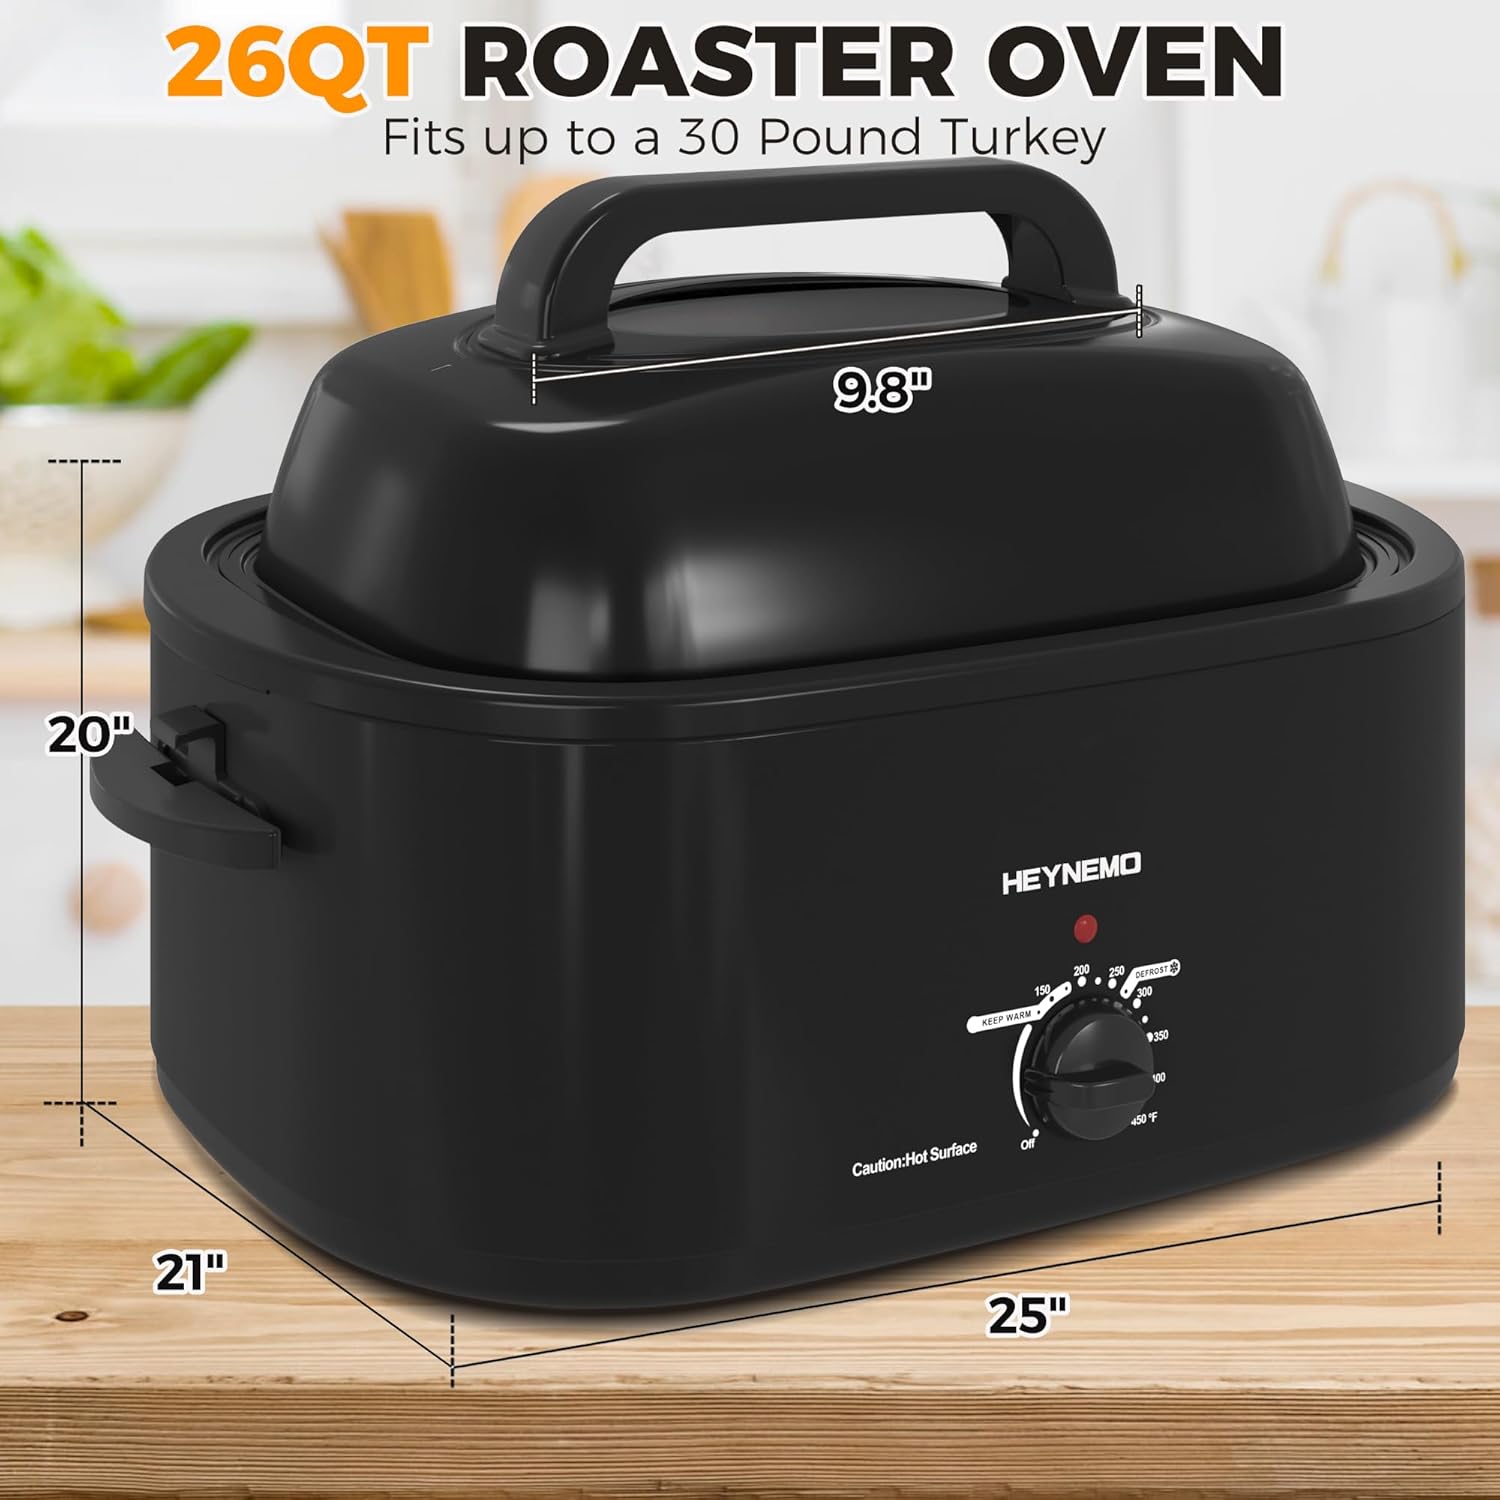
Figure 7.1: Product Dimensions. This image provides a visual representation of the roaster oven's dimensions, including length, width, and height.
8. Warranty and Support
8.1 Warranty Information
For detailed warranty information regarding your HEYNEMO 26QT Electric Roaster Oven, please refer to the warranty card included with your product or contact HEYNEMO customer service directly. Warranty terms and conditions may vary.
8.2 Customer Support
If you have any questions, require technical assistance, or need to report an issue with your product, please contact HEYNEMO customer support. Contact information can typically be found on the product packaging, the official HEYNEMO website, or through your retailer.