Introduction
This manual provides essential information for the installation, operation, and maintenance of your Samoser Refrigerator Defrost Heater and Thermostat Kit. This kit is designed as an aftermarket replacement for various GE, Hotpoint, and Kenmore refrigerator models, addressing common issues related to the defrost system.
The kit includes one defrost heater and one thermostat, as depicted in the product images. These components work together to prevent excessive frost buildup in your refrigerator's freezer compartment, ensuring efficient cooling and proper appliance function.
Important Safety Information
WARNING: Before attempting any installation, repair, or maintenance on your refrigerator, always disconnect the appliance from its power source by unplugging it or turning off the circuit breaker. Failure to do so can result in serious injury or electrical shock.
- Wear appropriate personal protective equipment, such as gloves, during installation.
- If you are unfamiliar with appliance repair procedures, it is recommended to seek assistance from a qualified technician.
- Ensure all connections are secure and properly insulated after installation.
- Keep children and pets away from the work area.
Product Components Overview

Image 1: Defrost Thermostat. This component senses the temperature of the evaporator coil and activates the defrost heater when frost buildup is detected. It measures approximately 1.1 inches in diameter.
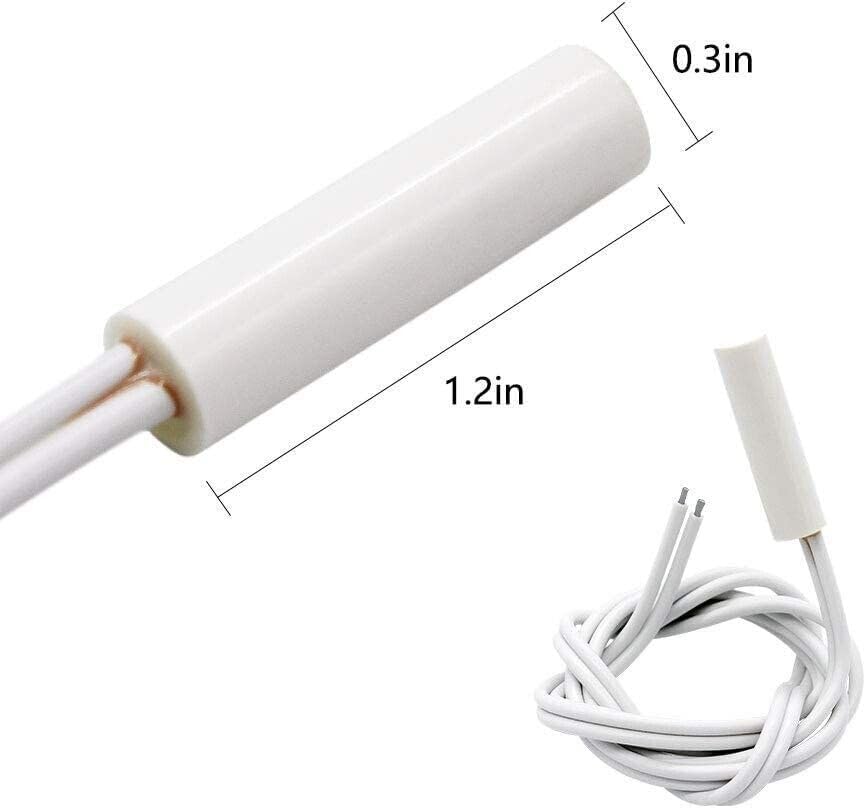
Image 2: Defrost Heating Element. This component generates heat to melt frost from the evaporator coils during the defrost cycle. The white cylindrical part measures approximately 1.2 inches in length.
Compatibility
This defrost heater and thermostat kit is an aftermarket replacement compatible with a wide range of GE, Hotpoint, and Kenmore refrigerator models. To ensure compatibility with your specific appliance, please verify your refrigerator's model number against the list below.
Tip: Use the "Ctrl + F" (Windows) or "Command + F" (Mac) function on your keyboard to search for your model number within this document.
Partial List of Compatible Models:
- GSE25GSHBCSS
- GSE25GSHECSS
- GSE25GSHHCSS
- GSE25GSHJCSS
- GSE25GSHKCSS
- GSE26HGEBHWW
- GSE26HGECHBB
- GSE26HGECHWW
- GSE26HMEBHES
- GSF25IGXBBB
- GSF25JGDSWW
- GSF25KGWABB
- GSF25KGWAWW
- GSF25KGWB
- GSF25LGWAWW
- GSF25XGREBB
- GSF25XGRECC
- GSF25XGREWW
- GSF25XGWABB
- GZS23HGECFBB
- GZS23HGECFWW
- GZS23HSEBFSS
- GCF23KGWABB
- GCF23KGWAWW
- GCF23KGWCBB
- GCF23KGWCWW
- GCF23KGWDBB
- GCF23KGWDWW
- GCG21IESAFBB
- GCG21IESAFWW
- GCG21SISAFSS
- GCG21YEMHFBB
- GSC23KSWDSS
- GSC23KSWHSS
- GSC23LGRCBB
- GSC23LGRCWW
- GSC23LGRDBB
- PSHS6RGXCDSS
- PSHS6TGXBDSS
- PSHS6TGXCDSS
- PSHS6VGXBDSS
- PSHS6VGXCDSS
- PSHS6YGXBDSS
- PSHS6YGXCDSS
- PSHS6YGZBESS
- PSHS9PGZBCSS
- PSHW6YGXBDSS
- PSHW6YGXCDSS
- PSHW6YGZBESS
- PSS26MGPABB
- PSS26MGPAWW
- PSS26MGPBBB
- PSS26MGPBWW
- PSS26MGSABB
- PSS26MGSAWW
- PSS27SGMABS
- PSS27SGMBBS
- PSS27SGMCBS
- PSS27SGMDBS
- PSS27SGNABS
- PSS27SGRDSS
- PSS27SGRESS
- TPS24BICGBS
- TPS24BIDABS
- TPS24BPCEBS
- TPS24BPCGBS
- TPS24BPCJBS
- TPS24BPDABS
- TPS24PBBEBS
- TPS24PBBGBS
- TPS24PBBJBS
- TPS24PBDABS
- TPX24BIDABB
- TPX24BIDAWW
- TPX24BPBEBB
- TPX24BPBEWW
- TPX24BPBGBB
- TPX24BPBGWW
- TFX25PPBEBB
- TFX25PPBEWW
- TFX25PPBGBB
- TFX25PPBGWW
- TFX25PRBEBB
- TFX25PRBEWW
- ESL25JFWEBS
- ESL25JFWFBS
- ESL25JFXALB
- ESL25JFXBLB
- ESL25JFXJLB
- ESL25XGPABS
- ESL25XGPCBS
- ESL25XGPDBS
- ESL25XGRBBS
- ESL25XGREBS
- DSS25KSRBSS
- DSS25KSRDSS
- DSS25KSRESS
- DSS25KSTASS
- DSS25KSTBSS
Setup and Installation
Replacing a refrigerator defrost heater and thermostat requires careful attention to detail. The following steps are general guidelines. Always refer to your specific refrigerator model's service manual for precise instructions and diagrams.
- Disconnect Power: Unplug the refrigerator from the wall outlet or turn off the circuit breaker supplying power to the appliance. This is a critical safety step.
- Access Freezer Compartment: Open the freezer door and remove all food items. You may need to remove shelves, ice maker components, and the rear panel of the freezer compartment to access the evaporator coil, defrost heater, and thermostat.
- Locate Components: Identify the existing defrost heater and thermostat. The defrost heater is typically a long, thin element located near or under the evaporator coil. The thermostat is usually clipped onto the evaporator coil tubing.
- Disconnect Old Components: Carefully disconnect the wiring from the old defrost heater and thermostat. Note the position and connection points of each wire.
- Remove Old Components: Unclip or unmount the old defrost heater and thermostat from their positions.
- Install New Components: Mount the new defrost heater and thermostat in the same locations as the old ones. Ensure the thermostat is securely clipped to the evaporator coil tubing for accurate temperature sensing.
- Connect Wiring: Connect the wiring to the new components, ensuring all connections are firm and correct. Refer to any diagrams or notes taken during disassembly.
- Reassemble: Reinstall the freezer rear panel, ice maker components, and shelves.
- Restore Power: Plug the refrigerator back into the wall outlet or turn on the circuit breaker.
- Test Operation: Monitor the refrigerator's performance over the next 24 hours to ensure proper defrost cycles and cooling.
Tools potentially required: Screwdrivers (Phillips and flathead), nut drivers, wire cutters/strippers, and possibly a multimeter for testing components.
Operation
The defrost heater and thermostat kit operates automatically as part of your refrigerator's defrost system. The thermostat monitors the temperature of the evaporator coil. When the coil temperature drops to a predetermined level (indicating frost buildup), the thermostat signals the defrost heater to activate.
The defrost heater then warms the evaporator coil, melting any accumulated frost. Once the coil reaches a specific temperature (indicating the frost has melted), the thermostat deactivates the heater, and the normal cooling cycle resumes. This cycle typically occurs several times a day to maintain optimal refrigerator performance and prevent ice accumulation that can block airflow and reduce cooling efficiency.
Maintenance
The defrost heater and thermostat are sealed components and do not require routine user maintenance. However, proper general maintenance of your refrigerator can help prolong the life of its components, including the defrost system:
- Keep Freezer Door Sealed: Ensure the freezer door gasket is clean and seals properly to prevent warm, moist air from entering, which can lead to excessive frost buildup.
- Avoid Overloading: Do not overload the freezer, as this can restrict airflow and hinder the defrosting process.
- Clean Condenser Coils: Regularly clean the condenser coils (usually located at the back or bottom of the refrigerator) to ensure efficient operation of the entire cooling system.
Troubleshooting
If your refrigerator is experiencing issues related to frost buildup or cooling after installing this kit, consider the following:
- Excessive Frost in Freezer: If frost continues to build up rapidly on the evaporator coils, it may indicate that the defrost heater or thermostat is not functioning correctly, or there might be an issue with the defrost timer or main control board. Double-check wiring connections.
- Refrigerator Not Cooling Properly: A heavily frosted evaporator coil can restrict airflow to the fresh food compartment, leading to inadequate cooling. If this kit was installed to address such an issue and it persists, other components of the defrost system or cooling system may need inspection.
- Freezer Too Warm: Similar to the above, a non-defrosting evaporator coil can lead to a warm freezer. Ensure the new components are correctly installed and functioning.
- Component Testing: If you have a multimeter, you can test the continuity of the defrost heater and the thermostat (when cold) to ensure they are electrically sound. Consult a repair guide for specific resistance values.
If troubleshooting steps do not resolve the issue, it is advisable to consult a qualified appliance repair technician.
Specifications
| Feature | Detail |
|---|---|
| Product Type | Refrigerator Defrost Heater and Thermostat Kit |
| Brand | Samoser |
| Material | Stainless Steel (for heater element) |
| Included Components | 1x Defrost Heater, 1x Thermostat |
| Thermostat Dimensions | Approximately 1.1 inches (diameter) |
| Heating Element Dimensions | Approximately 1.2 inches (length of white casing) |
| UPC | 604837531494 |
Warranty Information
Specific warranty details for this Samoser product are not provided in this manual. Please refer to the product packaging, your purchase receipt, or contact the seller directly for information regarding warranty coverage and terms.
Customer Support
If you have questions regarding the compatibility of this kit with your refrigerator model, or require further assistance with installation or troubleshooting, please contact the seller. We aim to resolve your inquiries within 24 hours.