1. Introduction
This manual provides detailed instructions for the safe and effective use of the Nuvance BGM-T1 Blood Glucose Meter. It is designed to assist users in monitoring their blood glucose levels accurately. Please read this manual thoroughly before first use and keep it for future reference.
The Nuvance BGM-T1 Blood Glucose Meter is intended for self-testing by people with diabetes to monitor blood glucose concentrations in fresh capillary whole blood samples drawn from the fingertip. It is not intended for the diagnosis of or screening for diabetes, nor for use on neonates.
This image features the Nuvance BGM-T1 blood glucose meter, highlighting its clear digital display showing a blood glucose reading. The design emphasizes its professional quality and utility for consistent blood sugar monitoring.
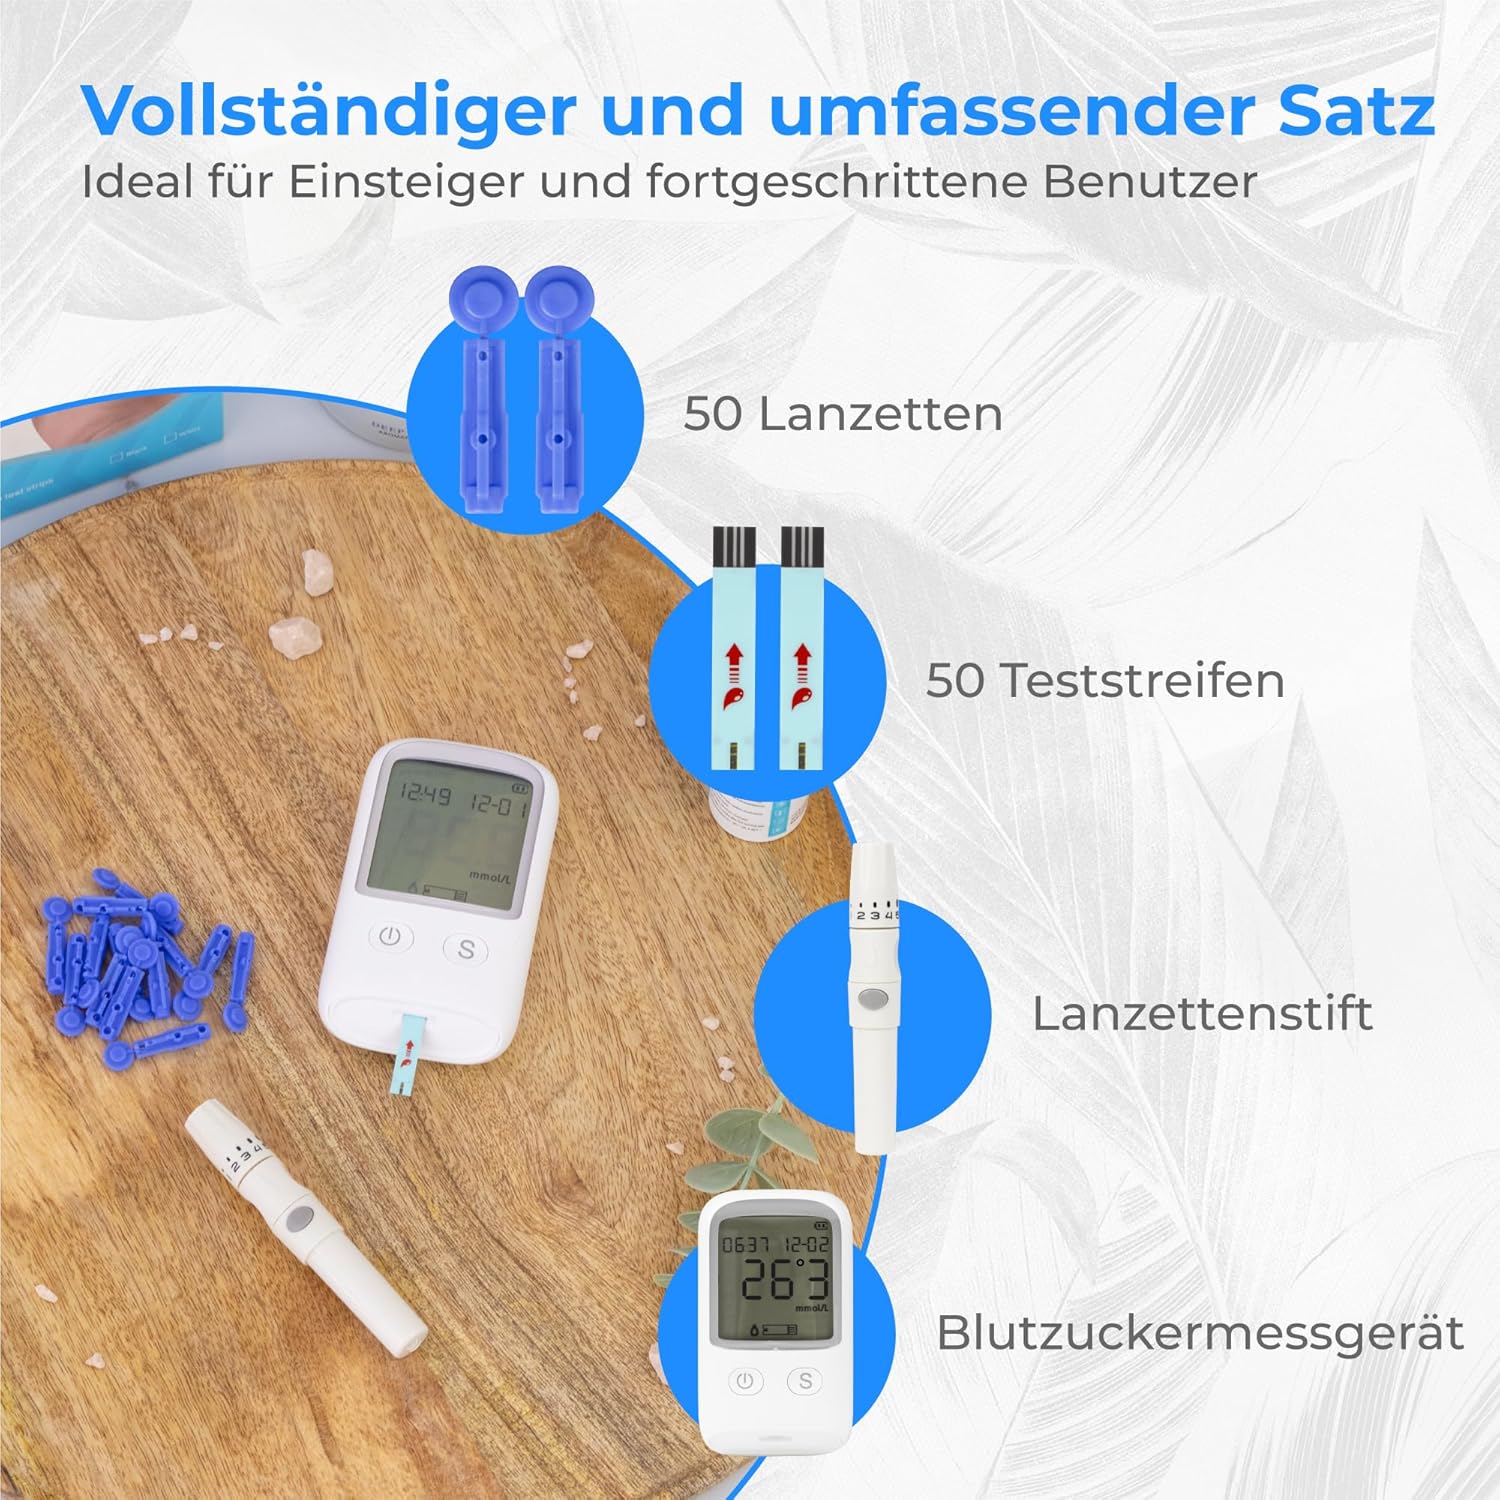
2. Package Contents
Verify that all items listed below are present in your Nuvance BGM-T1 Blood Glucose Meter Starter Pack:
- 1x Nuvance BGM-T1 Blood Glucose Meter
- 1x Lancing Device (Pickpen)
- 50x Test Strips
- 50x Lancets
- 1x User Manual (this document)

This image displays the full contents of the Nuvance BGM-T1 starter kit. It includes the blood glucose meter, a lancing device, a box of 50 test strips, a box of 50 lancets, and the user manual. All items are neatly arranged, indicating a complete package for blood glucose monitoring.
3. Setup
3.1. Installing Batteries
The Nuvance BGM-T1 meter uses alkaline batteries. Ensure they are correctly inserted according to the polarity markings in the battery compartment.
3.2. Setting Date and Time
Refer to the on-screen prompts or the dedicated settings section in the manual to set the correct date and time. Accurate date and time settings are crucial for tracking your blood glucose readings.
3.3. Preparing the Lancing Device
- Unscrew the cap of the lancing device.
- Insert a new sterile lancet firmly into the lancet holder.
- Twist off the protective cap from the lancet and save it for safe disposal.
- Replace the lancing device cap.
- Adjust the penetration depth by rotating the cap. Start with a shallower setting (e.g., 2-3) and adjust as needed for a sufficient blood sample.

This image illustrates how to adjust the penetration depth on the lancing device. The cap features numbered settings from 1 to 5, allowing users to select a comfortable and effective depth for blood sampling. A visual arrow indicates the direction to rotate the cap for adjustment.
4. Operating Instructions: Performing a Blood Glucose Test
Follow these steps carefully to perform an accurate blood glucose test:
Prepare Your Hands: Wash your hands thoroughly with warm, soapy water and dry them completely. This helps to ensure a clean sample and promotes blood flow.
Insert a Test Strip: Remove a test strip from its vial and immediately close the vial cap tightly. Insert the test strip into the meter's test strip port. The meter will turn on automatically and display a symbol indicating it is ready for blood application.

This image depicts the first step of a blood glucose test, where a user inserts a test strip into the designated port of the Nuvance BGM-T1 meter. The meter is shown powered on, ready to receive the blood sample.
Obtain a Blood Sample: Place the prepared lancing device firmly against the side of your fingertip. Press the release button to prick your finger. Gently squeeze your finger until a small drop of blood forms.
Apply Blood to the Test Strip: Touch the tip of the test strip to the blood drop. The blood will be drawn into the strip automatically. Hold the strip in the blood drop until the meter beeps or indicates that enough blood has been collected.
Read the Result: The meter will count down (typically 5 seconds) and then display your blood glucose result on the screen.

This image highlights the rapid measurement capability of the Nuvance BGM-T1 meter, showing a result displayed on the screen within 5 seconds. The meter is held by a hand, emphasizing its ease of use.
Record and Dispose: Record your result if necessary. Carefully remove the used test strip and lancet. Dispose of them safely in a sharps container or according to local regulations.
5. Maintenance and Care
5.1. Cleaning the Meter
Wipe the meter's exterior with a soft, damp cloth. Do not use harsh chemicals or immerse the meter in water.
5.2. Storage
Store the meter, test strips, and lancets in a cool, dry place, away from direct sunlight and extreme temperatures. Keep out of reach of children.
Ensure test strip vials are tightly closed after each use to prevent moisture exposure.
5.3. Battery Replacement
Replace batteries when the low battery indicator appears on the display. Dispose of used batteries according to local regulations.
6. Troubleshooting
This section addresses common issues you might encounter.
| Problem | Possible Cause | Solution |
|---|---|---|
| Meter does not turn on. | Dead or incorrectly inserted batteries. | Check battery orientation; replace batteries if necessary. |
| Error message on display. | Insufficient blood sample, damaged test strip, or meter malfunction. | Repeat test with a new strip and sufficient blood. If error persists, contact customer support. |
| Inconsistent readings. | Expired test strips, improper storage, or incorrect testing technique. | Check test strip expiry date. Ensure strips are stored correctly. Review testing steps. |
| Cannot get enough blood. | Lancing device depth setting too shallow, or hands not warm enough. | Increase lancing device depth setting. Wash hands with warm water to improve blood flow. |
7. Specifications
- Model: BGM-T1
- Brand: NV Nuvance
- Measurement Time: Approximately 5 seconds
- Memory Capacity: Stores up to 250 readings with date and time
- Battery Type: Alkaline
- ASIN: B0D3M61SZ3
- Manufacturer Reference: 8720986570879

This image focuses on the Nuvance BGM-T1 meter's large and clear display, which shows a blood glucose reading, date, and time. Text accompanying the image indicates the device's ability to store up to 250 measurements for tracking.
8. Warranty Information
Warranty information for the Nuvance BGM-T1 Blood Glucose Meter is not explicitly provided in the product details. Please refer to the packaging or contact NV Nuvance customer support for details regarding warranty coverage.
9. Customer Support
For further assistance, technical support, or inquiries regarding your Nuvance BGM-T1 Blood Glucose Meter, please contact NV Nuvance customer service.
Contact details are typically found on the product packaging or the official NV Nuvance website.


