1. Introduction
This manual provides detailed instructions for the safe and efficient use of your IMIPAW Automatic Cat Feeder, Model IMI3L-KY-02. This 3-liter capacity feeder is designed to provide timed and portion-controlled dry food meals for cats and small dogs, ensuring a consistent feeding schedule. Please read this manual thoroughly before operating the device and retain it for future reference.
2. Safety Information
- Always place the feeder on a stable, level surface to prevent tipping.
- This device is intended for indoor use only.
- Use only dry pet food with kibble sizes between 2-10mm. Do not use wet, canned, or moist food.
- Keep the power adapter and cable away from pets to prevent chewing or damage.
- Ensure the lid is securely locked to prevent pets from accessing the food reservoir.
- Do not immerse the main unit in water. The food tray is removable for cleaning.
- Supervise pets during initial use to ensure they adapt to the feeder.
- Keep out of reach of children.
3. Product Overview and Components
The IMIPAW Automatic Cat Feeder consists of several key components designed for ease of use and pet safety.

Image: The IMIPAW Automatic Cat Feeder, showcasing its main unit, transparent food reservoir, control panel, and food bowl.
Components:
- Food Reservoir: Transparent container for storing dry pet food (3L capacity).
- Lid: Secure, twist-lock lid to keep food fresh and prevent pet access.
- Control Panel: LCD screen and buttons for programming and manual dispensing.
- Food Outlet: Dispenses food into the bowl.
- Food Bowl: Removable tray for pets to eat from.
- Power Port: For connecting the 5V DC adapter.
- Battery Compartment: For 3 x D-cell alkaline batteries (backup power).
- Desiccant Bag Holder: Located under the lid to keep food fresh.
4. Setup Instructions
Follow these steps to set up your automatic pet feeder.

Image: Visual guide for the installation steps of the pet feeder.
- Unpack and Assemble: Carefully remove all components from the packaging.
- Install Food Bowl: Attach the food bowl to the main unit. Ensure it clicks securely into place.
- Insert Desiccant Bag: Open the lid by twisting counter-clockwise. Locate the desiccant bag holder on the underside of the lid. Insert a fresh desiccant bag to help keep food dry and fresh. Close the lid by twisting clockwise until secure.
- Add Pet Food: Open the lid and pour dry pet food into the reservoir. Ensure the kibble size is between 2-10mm to prevent clogging. Do not overfill.
- Power Supply:
- Primary Power: Connect the 5V DC power adapter to the feeder's power port and plug it into a wall outlet.
- Backup Power (Optional but Recommended): Open the battery compartment on the bottom of the feeder and insert 3 new D-cell alkaline batteries (not included). This ensures continuous operation during power outages.

Image: The sealed food bucket with a desiccant packet to maintain food freshness.
Image: Illustration of the dual power supply system, including the DC adapter and battery compartment.
5. Operating Instructions
The IMIPAW Automatic Cat Feeder allows for precise control over your pet's feeding schedule.

Image: Detailed view of the control panel and button functions.
5.1. Control Panel Overview
- LCD Screen: Displays current time, meal settings, and battery status.
- Lock Button: Press and hold for 3 seconds to lock or unlock the control panel. The screen automatically locks after 30 seconds of inactivity.
- Up/Down Buttons: Used to adjust values (time, meal times, portions).
- Set Button: Press and hold for 3 seconds to enter time setting mode. Press briefly to confirm settings and move to the next step.
5.2. Setting the Current Time
- Ensure the control panel is unlocked. If locked, press and hold the Lock button for 3 seconds.
- Press and hold the Set button for 3 seconds until the hour display flashes.
- Use the Up or Down buttons to adjust the hour (12-hour format with AM/PM).
- Press the Set button briefly to confirm the hour and move to the minute setting.
- Use the Up or Down buttons to adjust the minutes.
- Press the Set button briefly to confirm the minutes and exit time setting mode.
5.3. Programming Feeding Schedule
You can set up to 6 meals per day, with 1 to 20 portions per meal.
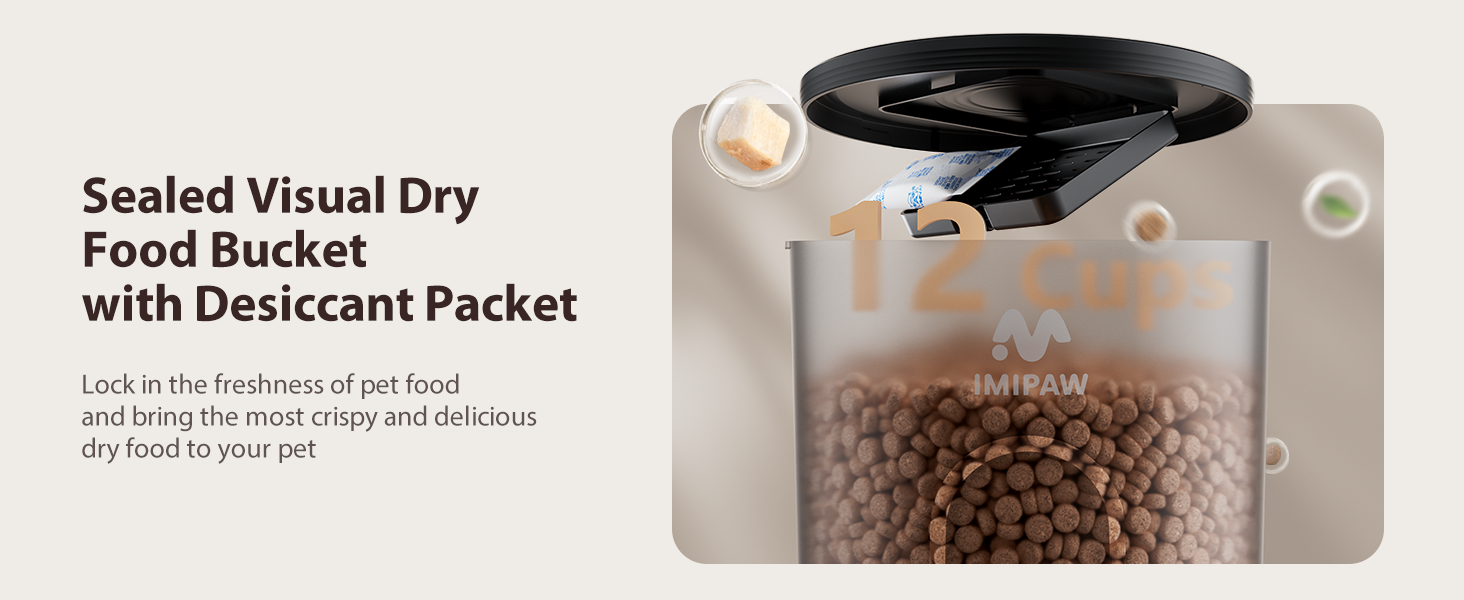
Image: Example of a flexible, multi-choice feeding schedule.
- From the main display, press the Set button briefly to cycle through the meal settings (M1, M2, M3, M4, M5, M6).
- When the desired meal number (e.g., M1) is flashing, press and hold the Set button for 3 seconds to enter its time setting.
- Use the Up or Down buttons to set the hour for this meal. Press Set to confirm.
- Use the Up or Down buttons to set the minutes for this meal. Press Set to confirm.
- The portion display will now flash. Use the Up or Down buttons to select the number of portions (1-20) for this meal. (1 portion is approximately 7-9 grams).
- Press Set to confirm the portions and save the meal setting. The display will return to the next meal setting or the main clock if all meals are set.
- Repeat for additional meals (M2-M6) as needed. To disable a meal, set its portion size to 0.
Recommended Daily Feeding Portions:

Image: Table of recommended daily feeding portions.
Consult your veterinarian for specific dietary needs for your pet. The table above provides general guidelines.
5.4. Manual Feeding
To dispense one portion of food immediately, press the Up and Down buttons simultaneously.
6. Maintenance
Regular cleaning and maintenance will ensure the longevity and proper function of your feeder.
6.1. Cleaning
- Food Bowl: The food bowl is removable for easy cleaning. Wash it with mild soap and water, then rinse thoroughly and dry completely before reattaching.
- Food Reservoir: The food reservoir is not designed to be fully removed for washing. To clean, empty any remaining food, then wipe the interior with a damp cloth. Ensure it is completely dry before refilling with food.
- Main Unit: Wipe the exterior of the main unit with a clean, dry cloth. Do not use abrasive cleaners or immerse the unit in water.
6.2. Desiccant Bag Replacement
Replace the desiccant bag every 1-2 months, or as needed, to maintain food freshness. New desiccant bags can be purchased separately.
6.3. Anti-Clog Design
The feeder features an anti-clog design suitable for dry food sizes between 2-10mm. To prevent clogging, ensure you use kibble within this size range. Regularly check the food outlet for any obstructions.
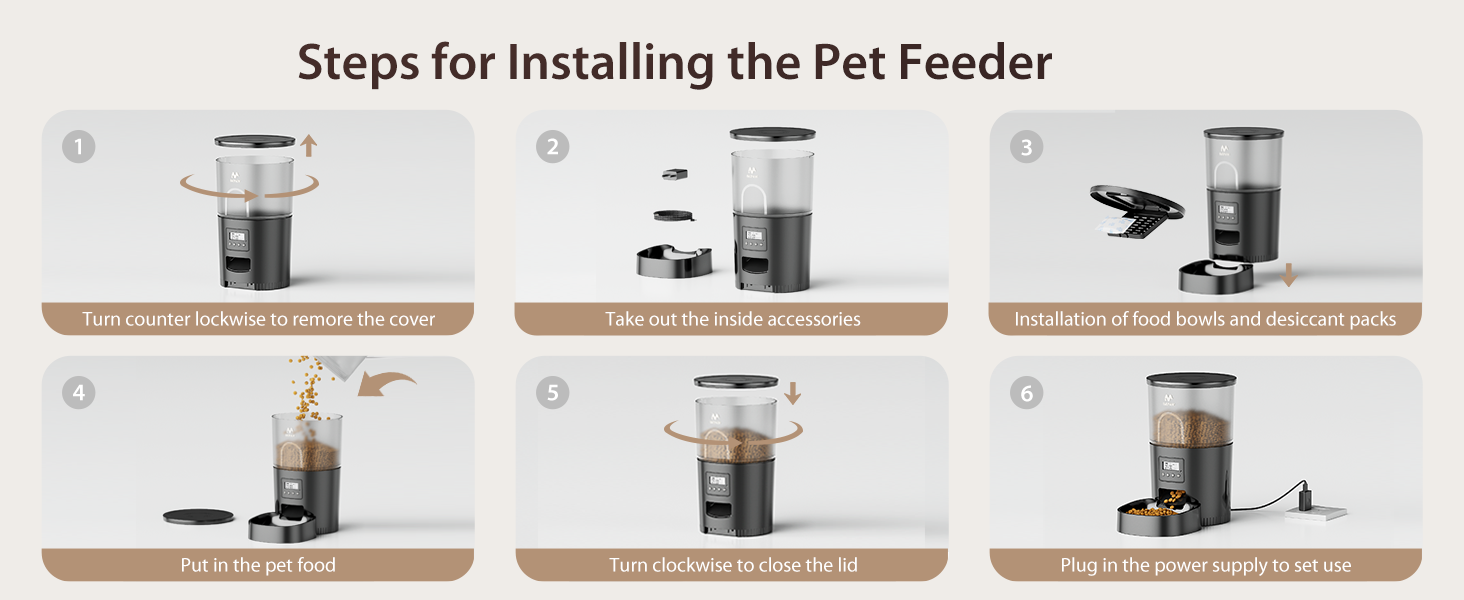
Image: Kibble size recommendations and compatible food types.
7. Troubleshooting
If you encounter issues with your IMIPAW Automatic Cat Feeder, refer to the following common problems and solutions:
| Problem | Possible Cause | Solution |
|---|---|---|
| Feeder not dispensing food. |
|
|
| Time display is incorrect or drifts. |
|
|
| Pet accessing food from reservoir. | Lid not securely closed. | Ensure the lid is twisted clockwise until it is firmly locked. |
| Control panel buttons unresponsive. | Control panel is locked. | Press and hold the Lock button for 3 seconds to unlock. |
8. Specifications
- Model: IMI3L-KY-02
- Capacity: 3 Liters (approximately 12 cups)
- Meals Per Day: 1-6
- Portions Per Meal: 1-20 (1 portion = 7-9 grams)
- Kibble Size: 2-10mm (dry food only)
- Power Supply: 5V DC Adapter (included) and 3 x D-cell Alkaline Batteries (not included)
- Material: Acrylonitrile Butadiene Styrene (ABS)
- Dimensions (LxWxH): 7 x 12 x 7 inches
- Item Weight: 3.19 pounds
9. Warranty and Support
9.1. Manufacturer's Warranty
This IMIPAW Automatic Cat Feeder comes with a 1-Year Manufacturer's Warranty from the date of purchase. This warranty covers defects in materials and workmanship under normal use. It does not cover damage caused by misuse, accidents, unauthorized modifications, or normal wear and tear.
9.2. Customer Support
For any questions, concerns, or warranty claims, please contact IMIPAW customer support. Refer to the contact information provided with your product packaging or visit the official IMIPAW website for assistance.
You can also visit the IMIPAW Store on Amazon for more information: IMIPAW Amazon Store