1. Introduction
Welcome to the user manual for the GekoGear Orbit C110 7" Infotainment Display. This device integrates a high-definition display with advanced dash cam and backup camera functionalities, designed to enhance your driving experience and safety. Please read this manual thoroughly before operating the device to ensure proper installation and usage.
2. Key Features
- 7-Inch IPS Touchscreen: A vibrant 7-inch IPS display provides clear visuals and intuitive touch control for all functions.
- Wireless Apple CarPlay & Android Auto: Seamlessly integrate your smartphone for navigation, music, calls, and more, wirelessly.
- Front and Rear 1080p Dashcams: Capture high-definition video recordings from both the front and rear of your vehicle, providing comprehensive coverage for security and evidence.
- Backup Camera with Reverse Assist: The included backup camera displays a clear view of the rear, complete with guidelines for safe and easy parking.
- Multiple Mounting Options: Flexible installation with options for dashboard or windshield mounting using an adhesive pad or suction cup.
3. Package Contents
Please verify that all items are present in your package:
- GekoGear Orbit C110 Infotainment Display
- Front Dash Camera (integrated)
- Rear Backup Camera
- Power Cable
- Adhesive Pad for mounting
- Suction Cup Mount
- User Manual (this document)
4. Setup and Installation
4.1 Choosing a Mounting Location
Select a location on your dashboard or windshield that does not obstruct your view of the road or interfere with airbag deployment. Ensure the chosen spot allows for easy access to the touchscreen.

Figure 4.1: Multiple mounting options for the Orbit C110, including an adhesive pad for dashboard placement and a suction cup for windshield mounting.
4.2 Installing the Main Unit
- Clean the chosen mounting surface thoroughly to ensure proper adhesion.
- Attach the adhesive pad to the base of the main unit's stand, or secure the suction cup mount to the windshield.
- Press the unit firmly onto the prepared surface.
4.3 Connecting the Rear Camera
The rear camera provides a view of the area behind your vehicle, especially useful for parking. It typically connects to the main unit via a cable and can be mounted near the license plate or on the rear window.

Figure 4.2: The backup camera view displayed on the Orbit C110, showing parking guidelines for assistance.
4.4 Power Connection
Connect the provided power cable to the Orbit C110 and then to your vehicle's 12V power outlet (cigarette lighter socket). Ensure the cable is routed safely and does not interfere with driving controls.
5. Operating Instructions
5.1 Powering On/Off
The device will typically power on automatically when your vehicle starts. To manually power off, press and hold the power button located on the side of the unit.
5.2 Navigating the Touchscreen Interface
The 7-inch IPS touchscreen allows for intuitive control. Tap icons to select applications, swipe to navigate menus, and pinch-to-zoom on maps (where applicable).

Figure 5.1: Interacting with the 7-inch IPS touchscreen for navigation and other functions.
5.3 Wireless Apple CarPlay & Android Auto
To connect your smartphone wirelessly:
- Ensure Bluetooth and Wi-Fi are enabled on your smartphone.
- On the Orbit C110, select the "CarPlay" or "Android Auto" icon.
- Follow the on-screen prompts to pair your device.

Figure 5.2: The main interface of the Orbit C110, highlighting connectivity options like Apple CarPlay and Android Auto.
5.4 Dash Cam Operation
The integrated front and rear dashcams automatically begin recording when the device powers on. Recordings are saved to a microSD card (not included). Ensure a compatible microSD card is inserted for continuous recording.

Figure 5.3: The dual-channel display of the Orbit C110, showing simultaneous views from the front and rear dash cameras.
5.5 Backup Camera Activation
When the vehicle is shifted into reverse, the display will automatically switch to the backup camera view, showing real-time footage and dynamic parking guidelines.
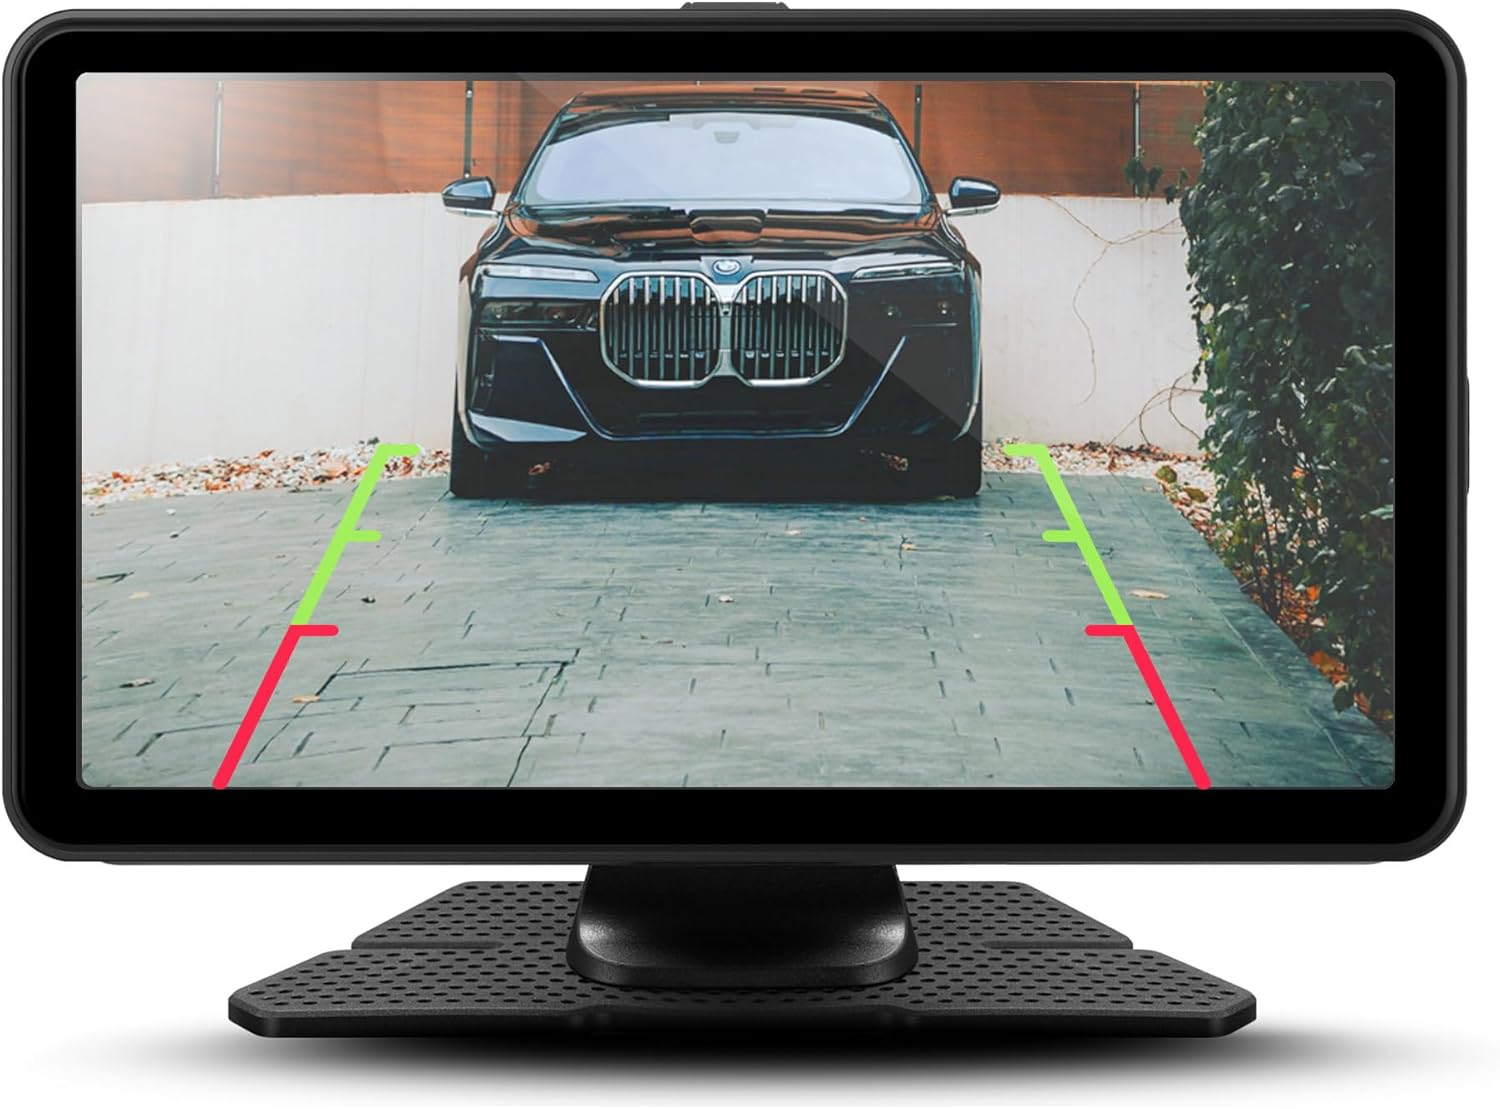
Figure 5.4: Detailed view of the backup camera feed on the Orbit C110, assisting with precise parking.
6. Maintenance
- Cleaning the Screen: Use a soft, lint-free cloth to clean the touchscreen. Do not use abrasive cleaners or solvents.
- MicroSD Card: Periodically format the microSD card (at least once a month) to ensure optimal recording performance and prevent data corruption. Back up any important footage before formatting.
- Camera Lenses: Keep the front and rear camera lenses clean from dust and smudges for clear video quality.
7. Troubleshooting
| Problem | Possible Cause | Solution |
|---|---|---|
| Device does not power on. | No power connection or faulty power cable. | Check power cable connection to the device and vehicle's 12V outlet. Ensure the vehicle's ignition is on. |
| Dash cam not recording. | No microSD card, full microSD card, or corrupted card. | Insert a compatible microSD card. Format the card. Replace the card if corrupted. |
| Wireless CarPlay/Android Auto not connecting. | Bluetooth/Wi-Fi off on phone, incorrect pairing, or software glitch. | Ensure Bluetooth and Wi-Fi are on. Re-pair the device. Restart both the Orbit C110 and your smartphone. |
| Backup camera not displaying. | Rear camera cable disconnected or faulty camera. | Check the connection of the rear camera cable to the main unit. Ensure the vehicle is in reverse. |
8. Specifications
| Feature | Detail |
|---|---|
| Model | Orbit C110 |
| Display Size | 7 Inches |
| Display Type | IPS LCD Touchscreen |
| Dash Cam Resolution | 1080p (Front & Rear) |
| Connectivity | Wireless Apple CarPlay, Wireless Android Auto |
| Dimensions (Product) | 7 x 1.5 x 4.5 inches |
| Item Weight | 3.45 pounds |
| Manufacturer | Adesso, Inc |
9. Warranty and Support
For warranty information and technical support, please refer to the official myGEKOgear website or contact their customer service directly. Keep your purchase receipt as proof of purchase for warranty claims.
Official Product Video:
Video 9.1: An official product video showcasing the features and functionality of the myGEKOgear ORBIT C110 7-inch Infotainment Display with Dash Cam and Backup Cam.


