1. Introduction
This manual provides essential information for the safe and efficient operation of your SOLPERK 8A 12V Solar Charge Controller. This intelligent PWM controller is designed to regulate power from your solar panel to various 12V rechargeable batteries, including LiFePO4, AGM, GEL, and Lead-Acid types. Its robust IP67 waterproof design makes it suitable for outdoor use in environments such as RVs, boats, and cars.
Key features include:
- 100% Waterproof: Built with a waterproof seal for protection against rain, snow, and dust.
- Strong Safety Protection: Incorporates six safety features to prevent reverse current, overheating, short circuit, overcharging, over-voltage, and reverse polarity.
- Intelligent LED Display: Two LED lights provide clear indication of charging status.
- Zero Consumption from Battery: Utilizes solar power for charging without draining the battery at night.
- Wide Compatibility: Supports 12V solar panels (max 8A) and 12V LiFePO4, AGM, GEL, and Lead-Acid batteries.
- Easy to Use: Features a convenient SAE connector for straightforward installation.
2. Safety Information
Please read and understand all safety instructions before installation and operation to prevent injury or damage.
General Safety Precautions
- This product is not intended for use by persons with reduced physical, sensory or mental capabilities, or lack of experience or knowledge. Children should be supervised to ensure that they do not play with the product.
- NEVER operate the product in a wet environment, or at sites where gas or dust explosions could occur.
- NEVER touch uninsulated cable ends, and use ONLY insulated tools.
- The installer must provide a means for cable strain relief to prevent the transmission of stress to the connections.
- The MPPT controller is ONLY designed to regulate solar panels.
- DO NOT reverse the polarity of the battery connection to the MPPT controller. It is highly likely that the controller will be burned if it is connected to the solar panel with reverse battery connection.
- Please set the correct battery type the first time you use.
- All lead-acid batteries produce harmful, explosive gases. The battery should be mounted in a well-ventilated area, as far as possible from any ignition sources. DO NOT smoke or have a naked flame in the vicinity of the battery under charge.
- Keep the battery away from any metal objects which may cause a short circuit of the terminals.
- Ventilation is highly recommended when mounting the controller in an enclosure, especially in a sealed enclosure with flooded batteries. Battery gases from flooded batteries can cause corrosion and destroy the controller circuits.
- Loose power connections and corroded wires may result in high heat that can melt wire insulation, burn surrounding materials, or even cause fire. Ensure tight connections and use cable clamps to secure cables and prevent them from unnecessary movement.
Battery Safety
- Please note that this controller is ONLY compatible with lead-acid, AGM, GEL, calcium or LiFePO4 batteries.
- Be cautious when working with lead acid batteries. Immediately rinse the affected area with water and seek medical assistance if lead acid comes into contact with your eyes or skin.
- DO NOT connect any inverters or battery charger into the load terminal of the controller.
- Connect battery terminals to the controller BEFORE connecting the solar panel to the controller. NEVER connect solar panels to the controller until the battery is connected.
- DO NOT use the controller to charge non-rechargeable batteries. Doing so may result in harm to the user and/or damage the solar panel, battery and controller.
- Refer to the specifications provided by the manufacturer of the battery to ensure that the battery is suitable for use with this product. The battery manufacturer's safety instructions should always be observed.
- The controller will achieve optimal performance when proper battery maintenance is regularly performed.
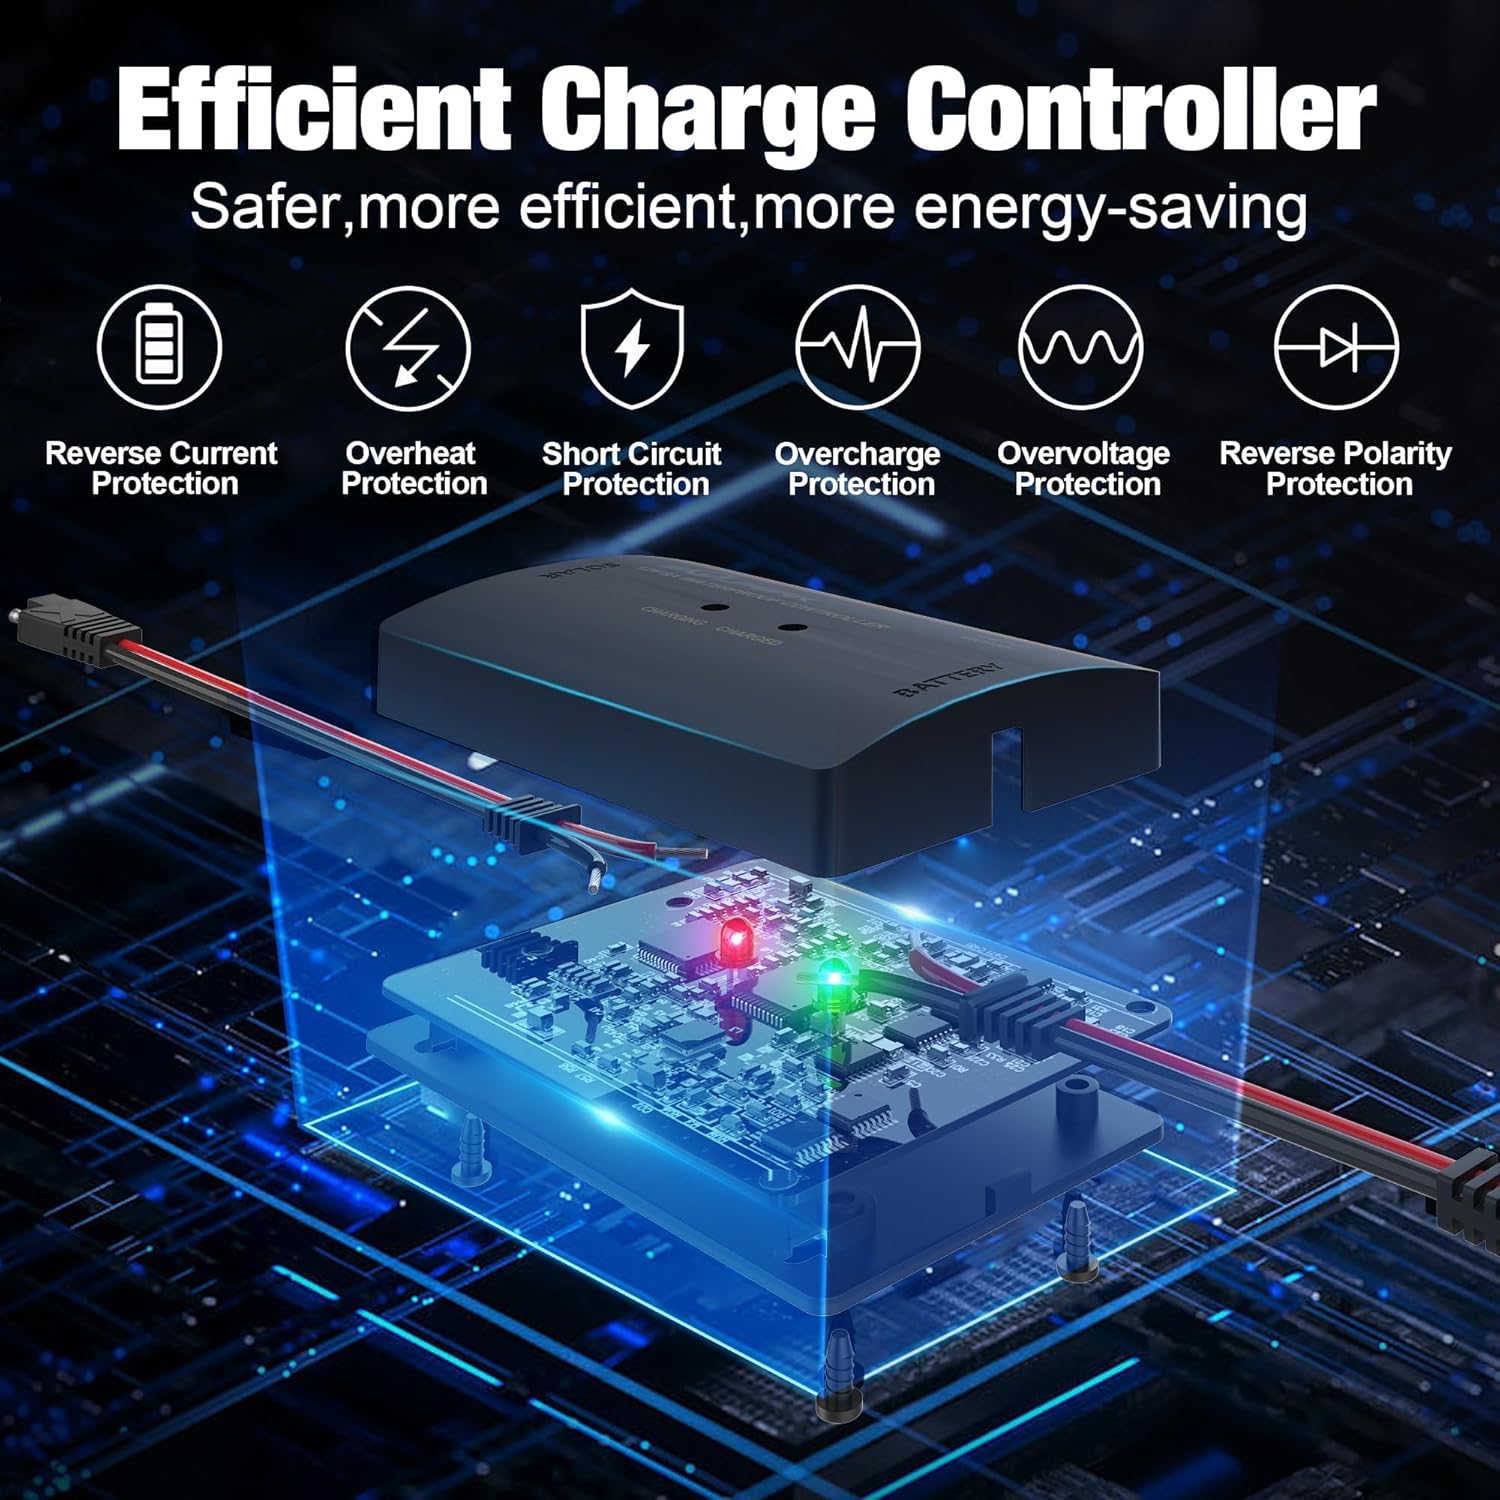
Image: The SOLPERK Solar Charge Controller highlighting its six safety protection features: Reverse Current Protection, Overheat Protection, Short Circuit Protection, Overcharge Protection, Overvoltage Protection, and Reverse Polarity Protection.
3. Setup
Follow these steps for proper installation and initial setup of your SOLPERK Solar Charge Controller.
Connection Steps
- Connect the Controller to the Battery: Ensure the battery is connected to the controller first. Connect the red wire to the positive terminal and the black wire to the negative terminal of your 12V rechargeable battery. The controller is powered by the battery, so this step is crucial for proper initialization.
- Select Battery Type: After connecting to the battery, the controller's LED display will show the current battery voltage. Press and hold the 'BATTERY TYPE' button for 3 seconds to enter battery type selection mode. The LED indicator will then flash, indicating the current battery type. Simply press the 'BATTERY TYPE' button once to cycle through different battery types (Lead Acid, AGM/GEL, Calcium, LiFePO4). Once you have selected the desired battery type, exit the mode by holding the button for 3 seconds. This operation comes with power-off memory, eliminating the need to reselect the battery type after the charger restarts.
- Connect the Solar Panel to the Controller: Finally, connect your 12V solar panel to the controller. Ensure the red wire connects to the positive terminal and the black wire to the negative terminal of the solar panel. The controller will automatically begin charging your battery when sufficient sunlight is available.
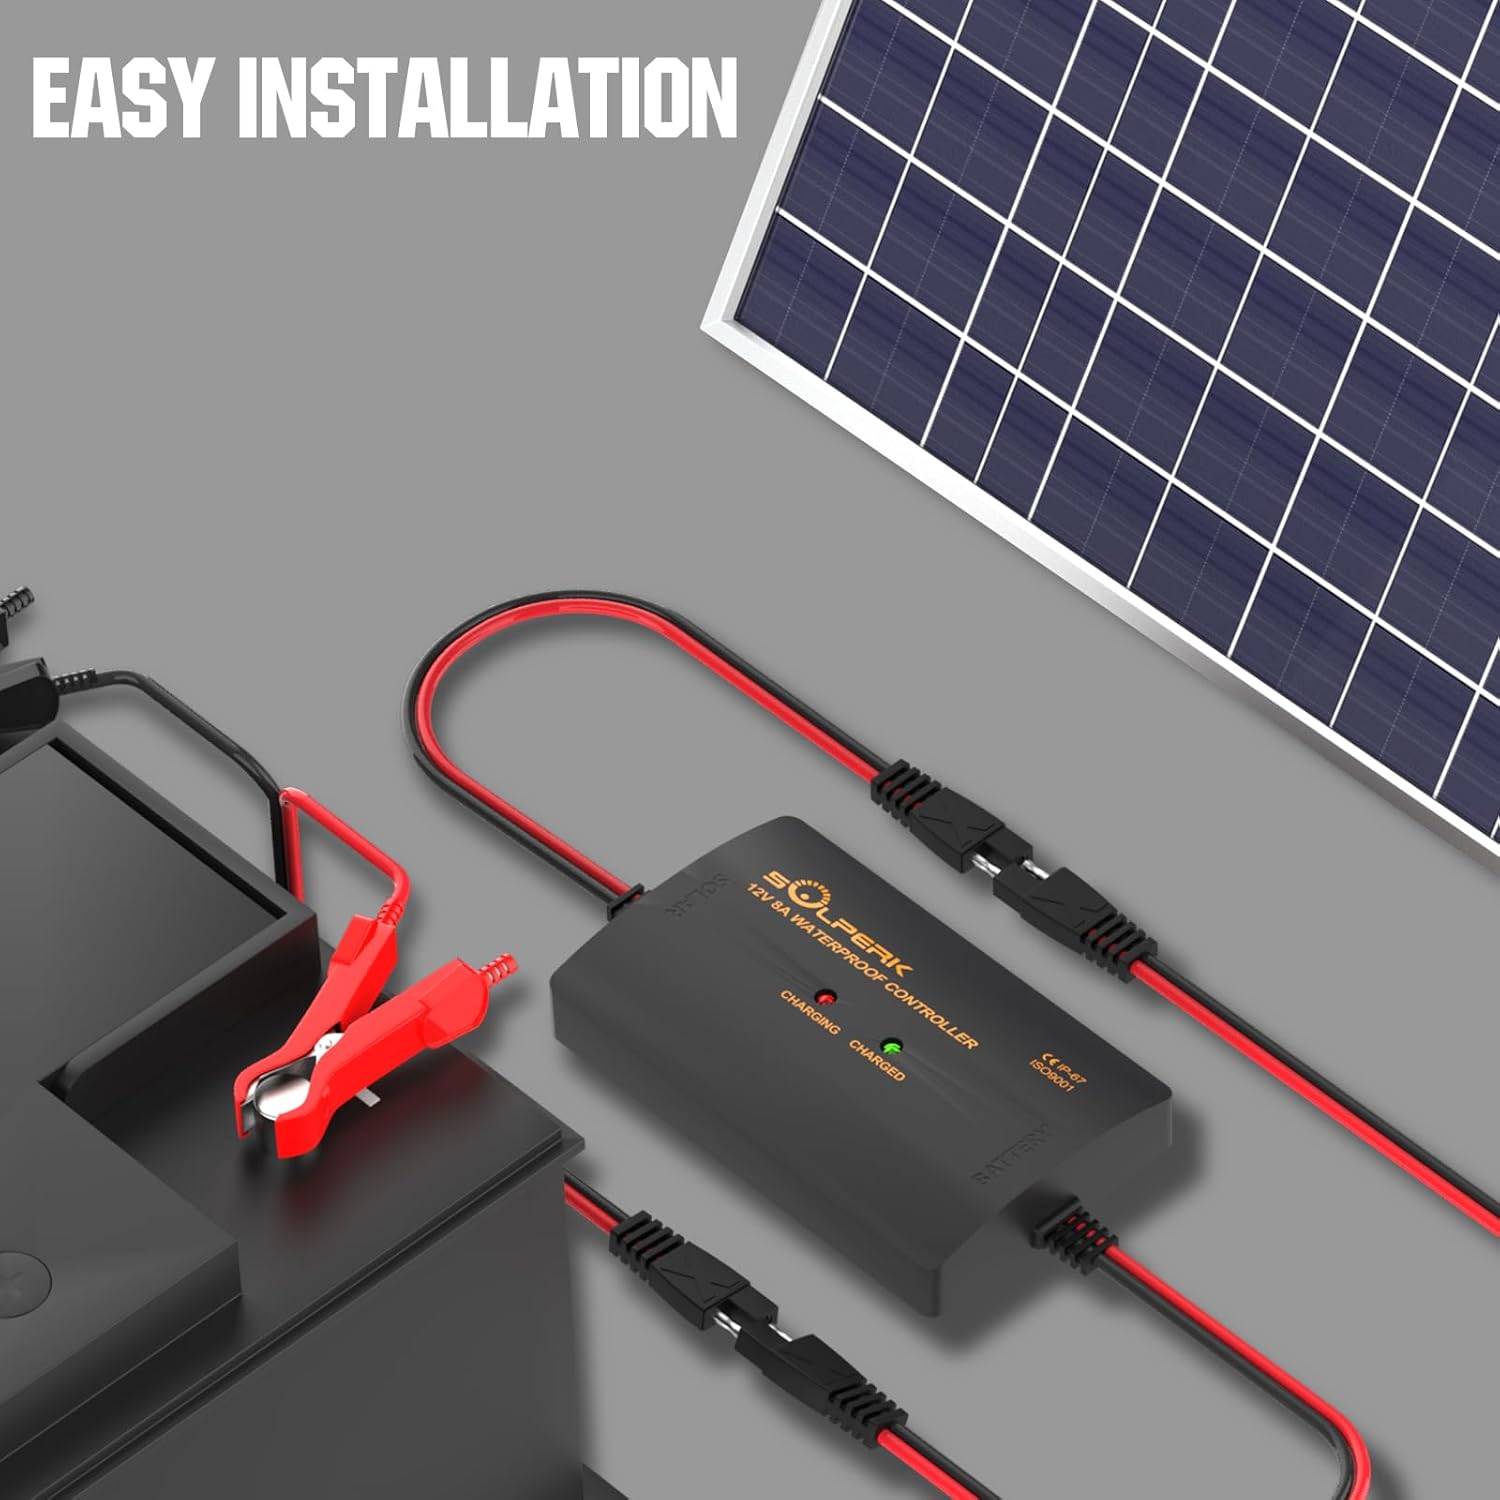
Image: A SOLPERK Solar Charge Controller connected to a battery via alligator clips and to a solar panel, demonstrating easy installation with SAE connectors.
Video: This video demonstrates the connection method for the SOLPERK MPPT 10A Controller, showing how to connect the battery and solar panel, and how to select the battery type.
Video: A guide on how to connect a solar controller, illustrating the sequence of connecting the battery first, then the solar panel.
4. Operating Instructions
The SOLPERK Solar Charge Controller features an intelligent LED display to provide real-time status updates.
LED Indicator Lights
- When the solar panel is connected to the controller, both the 'CHARGING' (red) and 'CHARGED' (green) lights will illuminate.
- When the controller is connected to the battery, only the 'CHARGING' (red) light will be on, indicating that the battery is receiving charge.
- When the battery is fully charged, both the 'CHARGING' (red) and 'CHARGED' (green) lights will illuminate again.
- If there is an abnormal battery voltage, all three indicators (including the battery type indicator) will flash simultaneously, signaling a potential issue.
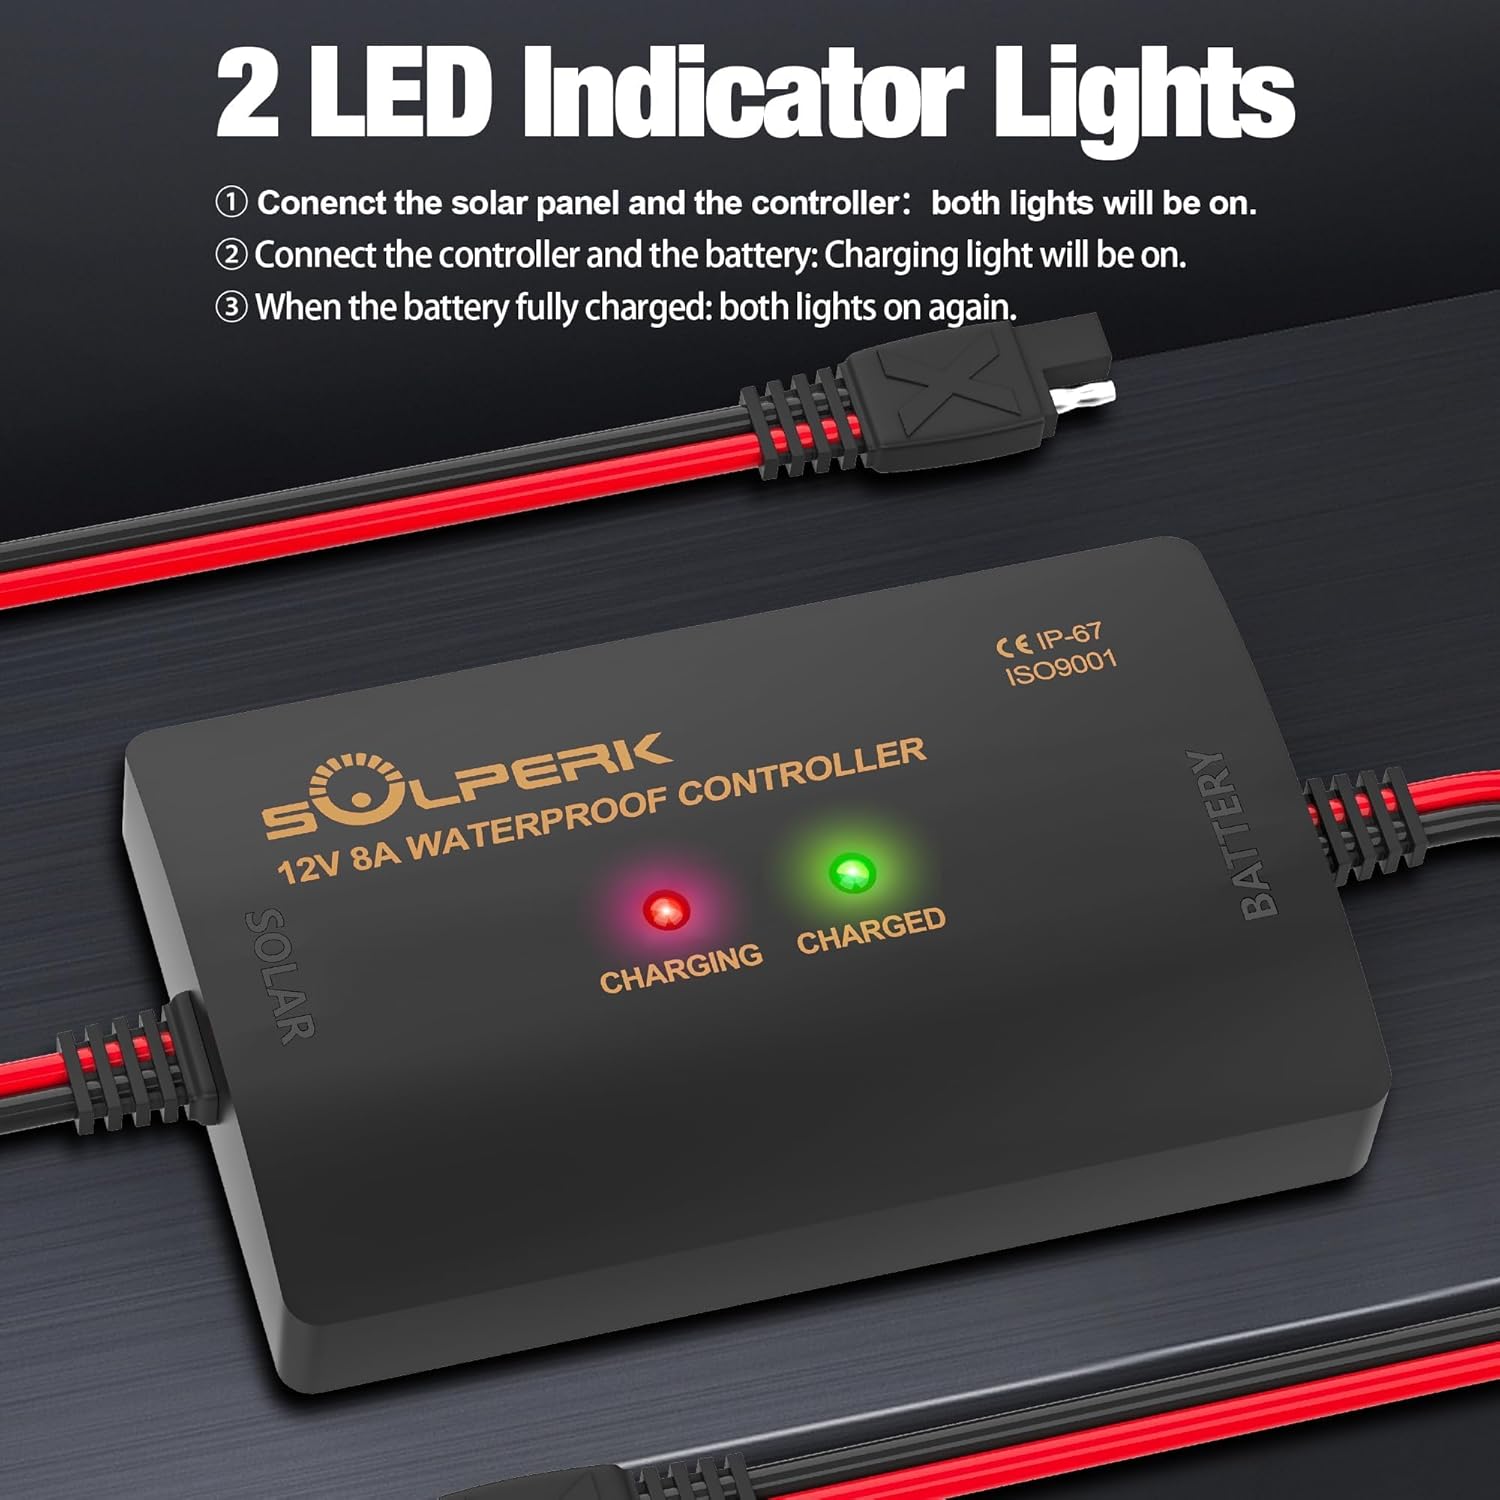
Image: The SOLPERK Solar Charge Controller showing its two LED indicator lights, 'CHARGING' (red) and 'CHARGED' (green), which indicate the charging status of the battery.
Video: This video demonstrates the SOLPERK controller's function self-check, showing the LED indicators and how they respond during operation.
5. Maintenance
To ensure optimal performance and longevity of your SOLPERK Solar Charge Controller, regular maintenance is recommended:
- Ensure the controller is securely installed in a clean and dry ambient environment.
- Ensure there is no block on air-flow around the controller to prevent overheating.
- Keep the controller clean and periodically check the terminals to ensure they are clean before plugging in.
- Regularly inspect for exposed wiring between the solar panel and battery. Repair or replace any damaged wires immediately.
- Ensure that all system components are grounded and connected tightly and correctly.
6. Troubleshooting
If you encounter issues with your SOLPERK Solar Charge Controller, refer to the following common problems and solutions:
My batteries are not charging:
- Loose or missing battery cables: Check all battery connections for tightness and ensure no cables are missing.
- Badly crimped cable terminals: Inspect cable terminals for proper crimping. Re-crimp or replace if necessary.
- Missing or incorrectly wired battery cables: Verify all battery cables are present and connected with correct polarity (red to positive, black to negative).
- Incorrect settings: Ensure the correct battery type is selected on the controller.
- Incorrect polarities: Double-check all positive and negative connections.
- The battery is full: If the battery is already at full capacity, the controller will stop charging.
My batteries are undercharged:
- Too much DC load: Reduce the load on the battery.
- Battery charge voltages are too low: Check battery health and voltage.
- The battery is almost full: The controller may be in float charge mode.
- Insufficient solar: Ensure the solar panel is receiving adequate sunlight and is not shaded.
My controller cannot reach its full rated output:
- PV array too small: The solar panel array may not be powerful enough for the connected load or battery size.
- Temperature above 45°C or below -10°C: Extreme temperatures can affect controller performance.
If you are still experiencing any issues, please contact SOLPERK customer service for professional assistance.
7. Specifications
Detailed technical specifications for the SOLPERK 8A 12V Solar Charge Controller (Model 001):
| Specification | Value |
|---|---|
| Model Number | 001 |
| Battery Voltage Range | 12V/24V |
| Max. Solar Input Voltage | 46V |
| Rated Charge/Discharge Current | 10A |
| Max. Power | 250W |
| Operation Temperature | -10°C ~ 45°C |
| Display Type | LED |
| Item Weight | 4.2 ounces (0.12 Kilograms) |
| Package Dimensions | 7.87 x 4.45 x 0.75 inches |
| Material | Plastic |
| Color | Black |
| Included Components | 1*8A 12V Solar Charge Controller |

Image: The SOLPERK Solar Charge Controller with its compact dimensions (3.94 inches length, 2.36 inches width, 8.27 inches cable length) and weight (0.26 lbs), highlighting its portability.

Image: The SOLPERK Solar Charge Controller demonstrating compatibility with various 12V battery types including Lithium, AGM, and GEL batteries.
8. Warranty and Support
SOLPERK offers a one-year warranty and lifetime technical support for this controller. Our 24/7 customer service team is available to answer your questions within a day.
Warranty Details
SOLPERK warrants to the original purchaser that its solar charge controller will be free of defects in material and/or workmanship under normal application, installation, use, and service conditions for a period of 1 YEAR from the date of purchase. If the product is determined to be defective in material or workmanship within the warranty period, SOLPERK will replace or repair the solar charge controller. If the product is not repairable, a new, similar controller will be offered, or a refund will be issued. This Limited Warranty is non-transferable.
Exclusions
This warranty does not cover defects caused by:
- Normal wear and tear, inadequate maintenance, transportation, storage, or faulty repair.
- Misuse, neglect, accident, or failure to observe proper installation procedures.
- Improper installation not in accordance with the user manual.
- Disassembly, alteration, or repair by unauthorized agents.
- Physical damage, overvoltage, storm, fire, or other force majeure events.
- Use for applications other than those for which it was designed.
- Selection of incorrect size or design for the intended application.
Claims
To make a warranty claim, please request a return authorization. No returns will be credited without authorization. If a SOLPERK product is suspected of being defective, you will need to provide proof of purchase (e.g., a screenshot of the order) and a picture of the damaged goods for evaluation. In no event shall SOLPERK be liable for any loss or damages of any other kind, whether direct, incidental, consequential, including lost profits, exemplary, special, or otherwise, including any lost profits or removal, shipping, or installation expenses.
Contact Support
For technical assistance or warranty claims, please contact our 24/7 customer service team. Refer to your product packaging or the official SOLPERK website for contact details.