1. Introduction
Thank you for choosing the KCO Lighting 5 Light Globe Chandelier (Model L1141-5 Head). This manual provides essential information for the safe installation, operation, and maintenance of your new lighting fixture. Please read these instructions thoroughly before beginning installation and retain them for future reference.

Image 1.1: KCO Lighting 5 Light Globe Chandelier, Gold-5-Light. This image displays the complete chandelier with five frosted glass globes suspended from a gold-finished canopy.
2. Safety Information
- WARNING: To avoid electric shock, always turn off the power at the main circuit breaker or fuse box before installation, servicing, or cleaning.
- All electrical connections must be in accordance with local codes, ordinances, or the National Electric Code (NEC). Consult a qualified electrician if you are unfamiliar with electrical wiring.
- Do not install this fixture in wet locations. It is designed for indoor use only.
- Ensure the mounting surface can support the weight of the fixture.
- Handle glass components with care to prevent breakage.
- Use only the specified bulb type and wattage to avoid overheating and potential fire hazards.
- This product is UL and CE compliant, indicating it meets safety standards.
3. Package Contents
Verify that all components are present and undamaged before proceeding with installation. If any parts are missing or damaged, contact KCO Lighting customer support.
- Mounting Canopy (Gold finish)
- Mounting Hardware (Screws, wire nuts, mounting bracket)
- Adjustable Hanging Cords (5 units)
- Lamp Cups/Sockets (5 units, integrated with cords)
- Frosted White Glass Shades (5 units)
- E26 Base Bulbs (5 units)

Image 3.1: Detailed view of the large gold canopy and a frosted milk glass shade, illustrating key components of the chandelier.
4. Product Specifications
| Feature | Specification |
|---|---|
| Brand | KCO |
| Model Name | L1141-5 Head |
| Color | Gold-5-Light |
| Material | Glass, Metal |
| Style | Contemporary |
| Light Fixture Form | Chandelier |
| Room Type | Living room, bedroom, reading room, kitchen island, stairway |
| Product Dimensions (Canopy) | 11.8"L x 11.8"W (30cm x 30cm) |
| Glass Shade Diameter | 5.9" (15cm) |
| Hanging Cord Length | Adjustable up to 59.1" (150cm) |
| Power Source | Corded Electric |
| Installation Type | Semi Flush Mount |
| Special Feature | Adjustable Cord |
| Light Source Type | LED (Bulbs included) |
| Bulb Base | E26 |
| Voltage | 110-240V |
| Wattage (per bulb) | Max 60W |
| Brightness | 600 lumens (per included bulb) |
| Color Temperature | 3000 Kelvin (Warm White) |
| Assembly Required | Yes |
| Certifications | CE, UL |

Image 4.1: Diagram illustrating the chandelier's dimensions, including canopy diameter, glass shade diameter, and adjustable cord length. It also specifies E26 base, 110-240V, and max 60W bulb requirements.
5. Installation Guide
Professional installation is recommended. If you are not experienced with electrical wiring, consult a qualified electrician.
- Turn Off Power: Before starting, ensure the power supply to the junction box is turned off at the circuit breaker.
- Prepare Mounting Bracket: Attach the mounting bracket to the ceiling junction box using the provided screws.
- Adjust Cord Lengths: The five hanging cords are adjustable. Determine your desired hanging height for each globe. To adjust, loosen the small screw at the base of each cord entry point on the canopy, slide the cord to the desired length, and then securely tighten the screw. Ensure cords are adjusted and secured before mounting the canopy.
- Electrical Connections: Connect the fixture's wires to the household wires according to standard electrical codes (typically black to black, white to white, and ground to ground). Secure connections with wire nuts.
- Mount Canopy: Carefully push the wires into the junction box and secure the canopy to the mounting bracket with the provided screws.
- Install Glass Shades: Gently screw each frosted glass shade onto its respective lamp cup. Do not overtighten.
- Install Bulbs: Screw the E26 base bulbs into the sockets.
- Restore Power: Once installation is complete, turn the power back on at the circuit breaker.

Image 5.1: Illustration demonstrating the adjustable hanging cord feature, allowing customization of the chandelier's drop height.
This chandelier is designed for installation on various ceiling types, including sloped, vaulted, slanted, and flat ceilings.
6. Operating Instructions
Once installed and powered, the chandelier operates via a standard wall switch (not included). This fixture itself is not dimmable, but it can be used with dimmable E26 bulbs and a compatible dimmable wall switch (both sold separately) to achieve dimming functionality.
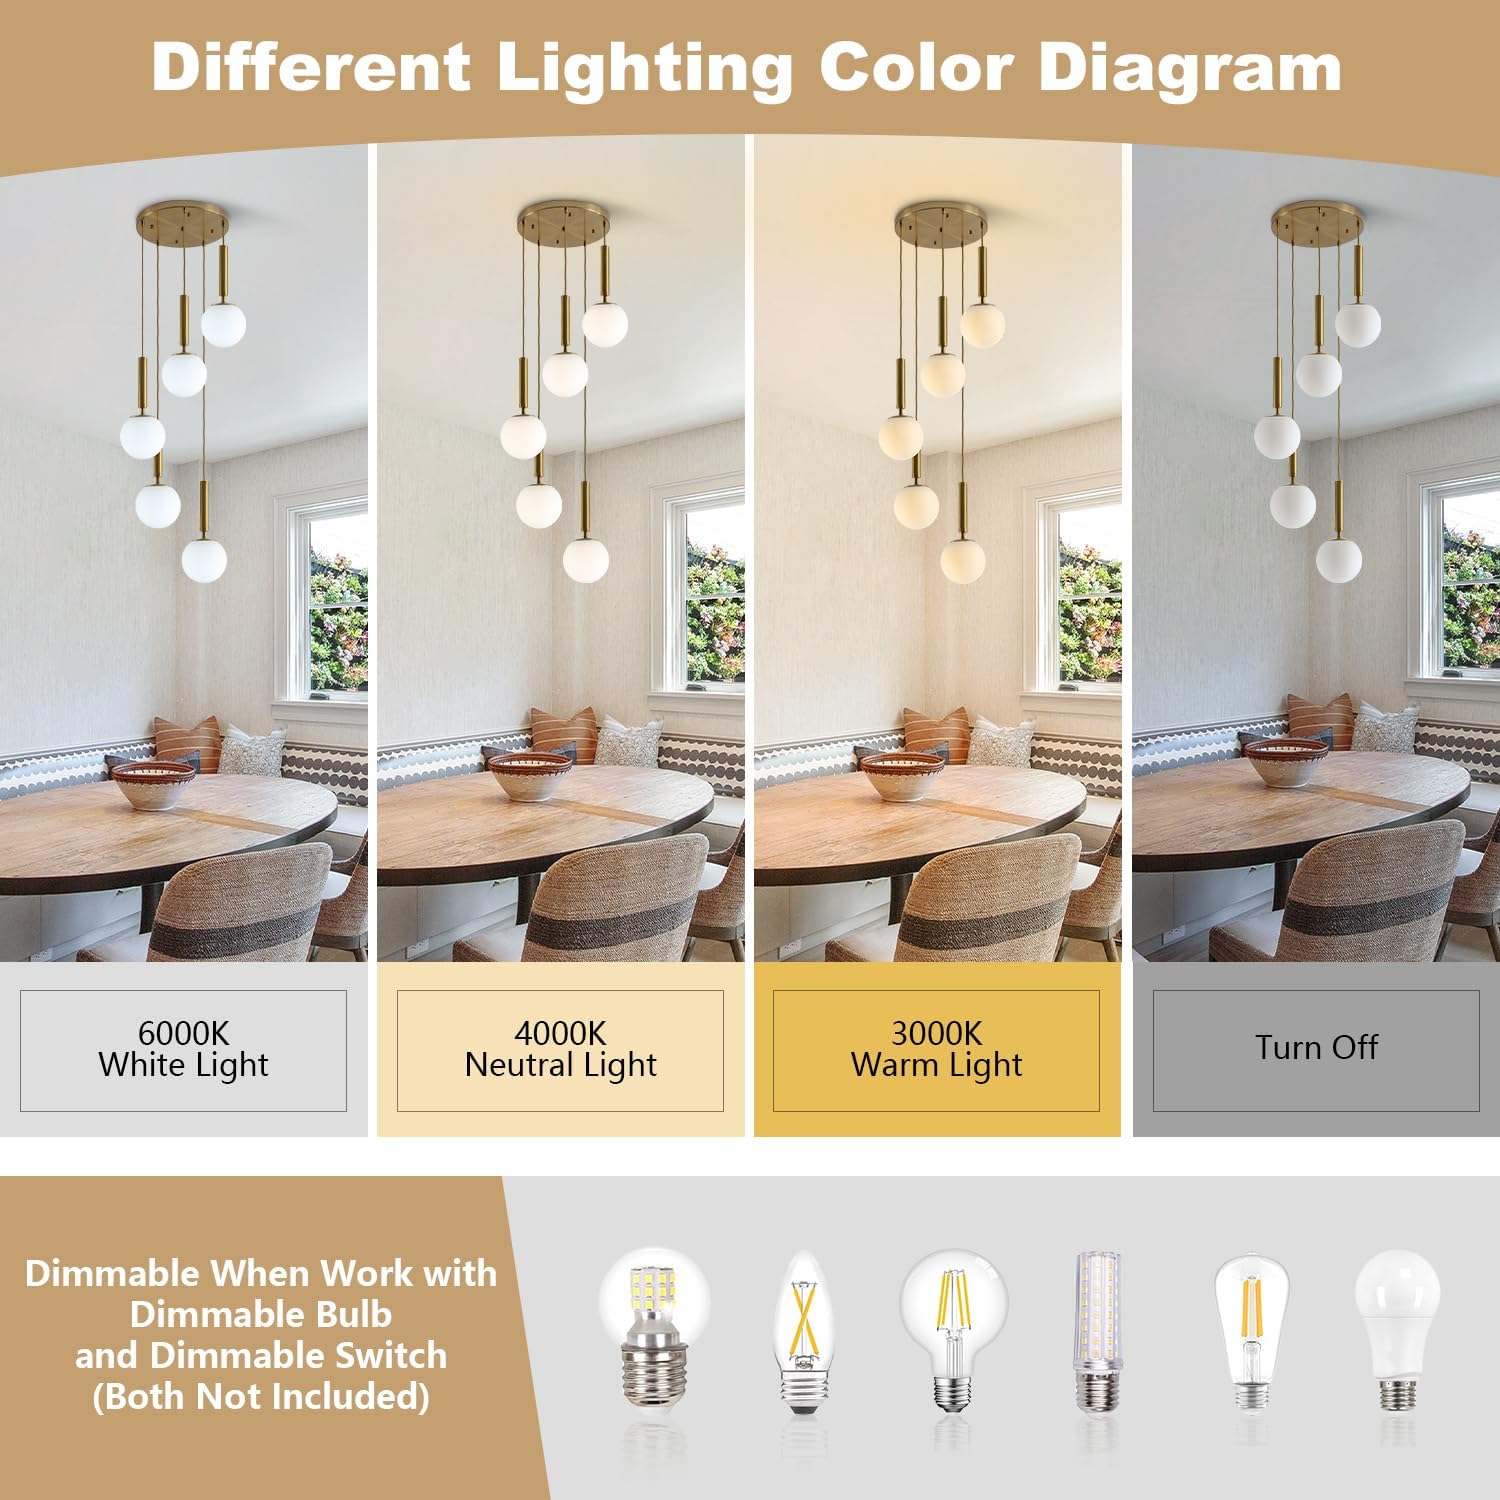
Image 6.1: Diagram showing the effect of different light color temperatures (6000K White, 4000K Neutral, 3000K Warm) and the 'Turn Off' state. It also indicates that dimming requires a dimmable bulb and switch.
7. Care and Maintenance
- Cleaning: Always turn off the power before cleaning. Use a soft, dry cloth to wipe the metal parts. For glass shades, use a mild glass cleaner on a soft cloth, then wipe dry. Avoid abrasive cleaners or solvents that could damage the finish.
- Bulb Replacement: Ensure the power is off and bulbs have cooled before attempting to replace them. Unscrew the old bulb and screw in a new E26 base bulb (max 60W).
8. Troubleshooting
| Problem | Possible Cause | Solution |
|---|---|---|
| Light does not turn on | No power to fixture Loose wiring connection Faulty bulb | Check circuit breaker and wall switch. Verify all wire connections are secure (ensure power is off first). Replace bulb with a new one. |
| Light flickers | Loose bulb Incorrect bulb type Loose wiring | Tighten bulb securely. Ensure bulb is E26 base, max 60W. Check wiring connections (ensure power is off first). |
| Glass shade is broken/cracked | Shipping damage Accidental impact | Contact KCO Lighting customer service for a replacement. |
If you encounter issues not listed here or if the problem persists after attempting the solutions, please contact KCO Lighting customer support.
9. Warranty and Customer Support
KCO Lighting offers a 3-year warranty on this product. This warranty covers manufacturing defects and quality issues. If you receive broken, damaged, or cracked glass shades, or if you require an extra hanging cord or are missing any parts, please contact KCO Lighting customer service.
For any inquiries or support needs, please contact KCO Lighting directly via your order number. Our professional after-sales service team aims to provide a solution within 24 hours.
Some products may offer customization services. Please feel free to contact us for consultation regarding such services.
Contact Information: Refer to your purchase platform or product packaging for the most current contact details for KCO Lighting customer support.