
eXtremeRate QESDP016
eXtremeRate New Hope Gray Custom Replacement Shell for Steam Deck LCD - Installation Manual
Model: QESDP016
1. Product Overview
This document provides detailed instructions for installing the eXtremeRate New Hope Gray Custom Faceplate and Back Plate Shell for your Steam Deck LCD handheld console. This replacement kit allows for customization of your device's appearance.

Image 1.1: Front and back view of the eXtremeRate New Hope Gray Custom Shell installed on a Steam Deck LCD.

Image 1.2: Detailed view of the New Hope Gray custom shell, showcasing the front and back plates.

Image 1.3: Close-up of the front of the custom shell, highlighting the buttons and joystick area.
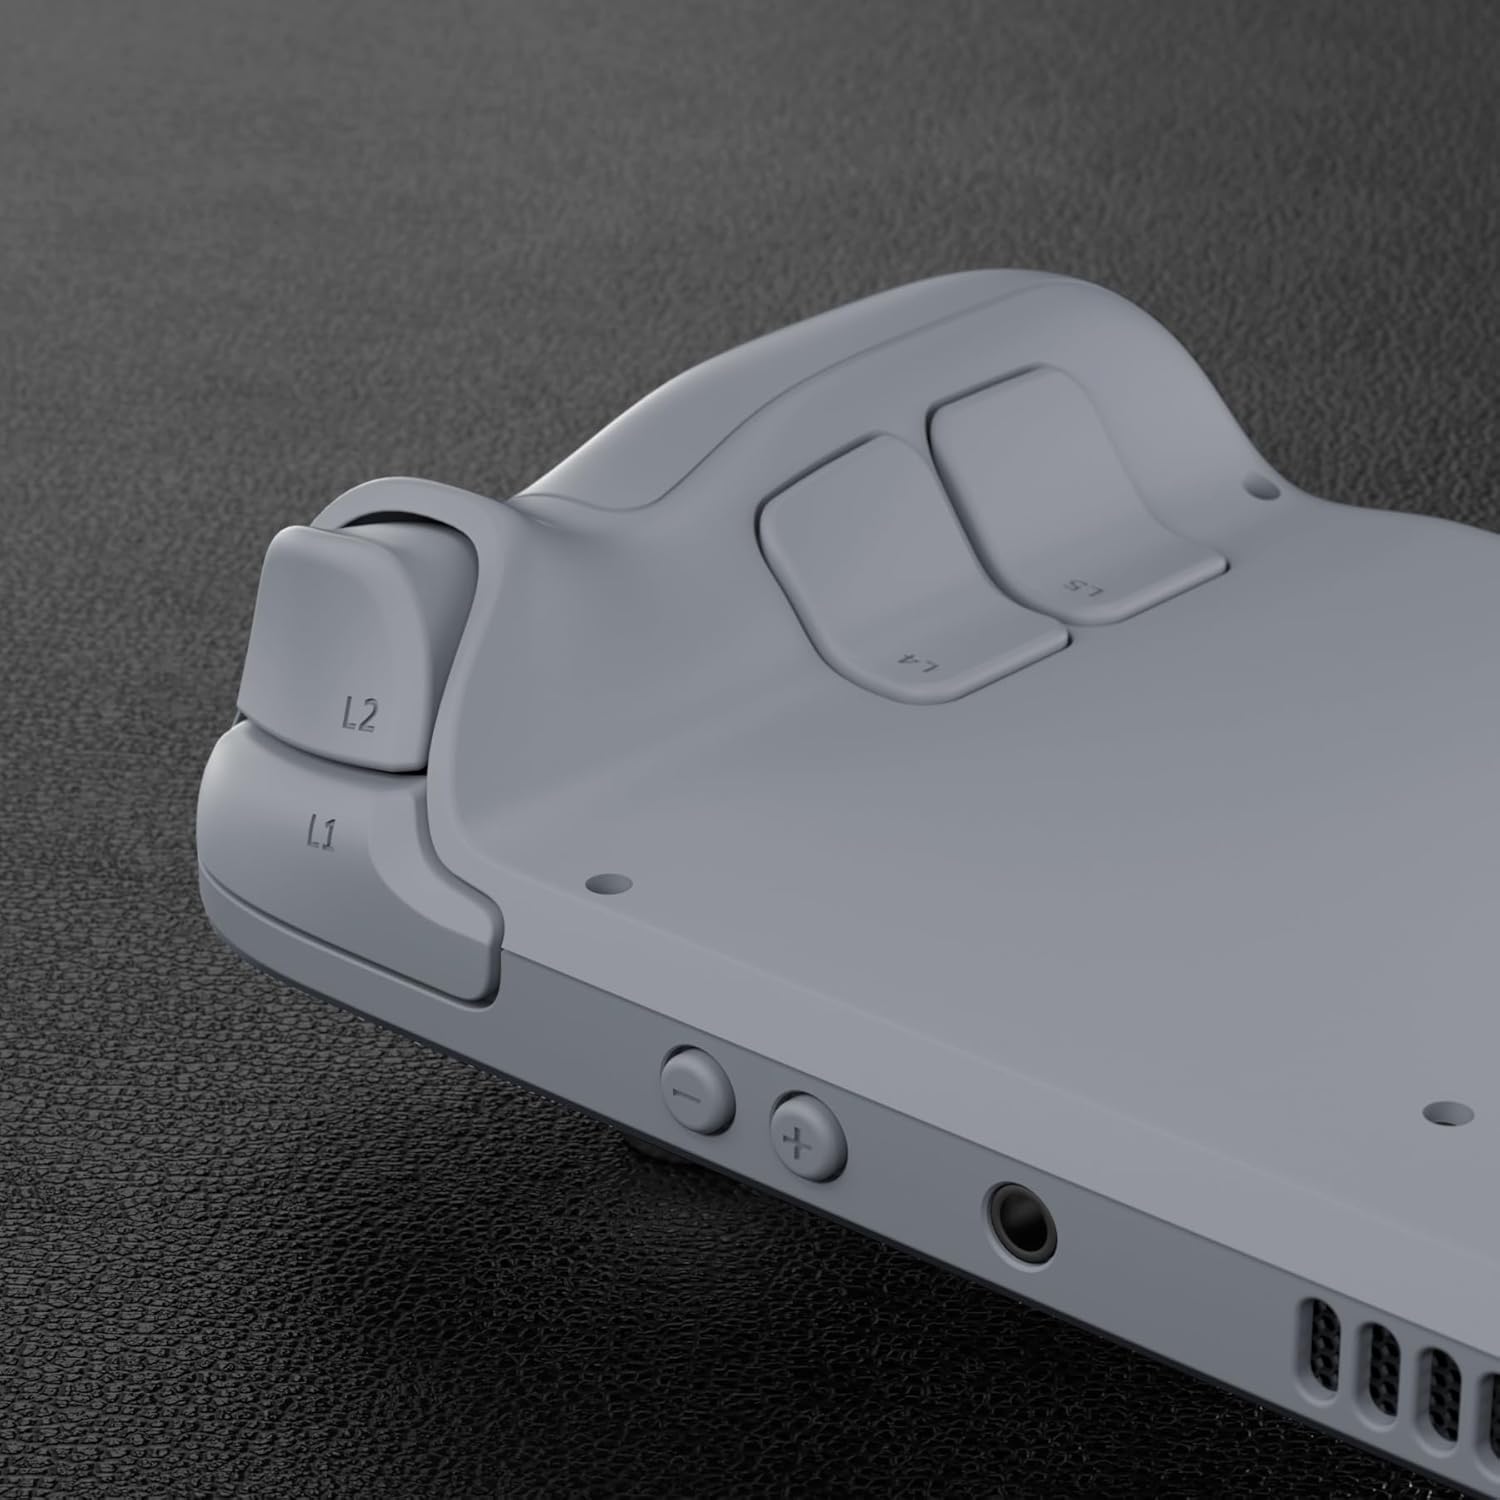
Image 1.4: Close-up of the back of the custom shell, showing the back buttons and ventilation.
2. Setup & Compatibility
2.1 Package Contents
The eXtremeRate New Hope Gray Custom Shell kit includes the following components:
- Custom designed replacement faceplate
- Custom designed replacement back plate
- Full set of replacement buttons
- Screwdrivers (Phillips)
- Open shell tools (pry tools)
- Spare screws

Image 2.1: All components included in the eXtremeRate New Hope Gray Custom Shell kit.
2.2 Compatibility
This custom replacement shell is specifically designed for the Steam Deck LCD (2022) handheld console. It is not compatible with the Steam Deck OLED handheld console.

Image 2.2: Visual guide distinguishing Steam Deck LCD from OLED for compatibility.
3. Installation Instructions
The installation process requires a high level of electronic installation experience. Please proceed with caution. Installing this shell will void your console's warranty.
For a detailed visual guide, please refer to the official eXtremeRate installation video:
Video 3.1: eXtremeRate Full Set Shell Replacement Guide for Steam Deck LCD. This video demonstrates the complete disassembly and reassembly process for replacing the console's housing.
3.1 Preparation
- Power Off: Fully power off your Steam Deck LCD console.
- Battery Discharge: Discharge the battery to below 25%. A fully charged lithium-ion battery can pose a safety hazard if damaged during disassembly.
- Remove MicroSD Card: Ensure the microSD card is removed from its slot before opening the backplate to prevent damage.
3.2 Back Plate Removal
- Using a Phillips screwdriver, remove the 8 screws securing the back cover of the Steam Deck.
- Gently pry along the edge of the back plate with an opening tool to release the internal clips. Start from one side and work your way around.
- Once all clips are disengaged, carefully lift and remove the back plate.
3.3 Internal Disassembly
- Disconnect Battery: Locate the battery connector on the motherboard. Pinch the small tab on the connector and pull it straight outward to fully disconnect the battery.
- Remove Motherboard Shield: Remove the screws securing the motherboard shield. Lift the shield and flip it over to the side to expose the internal components.
- Remove Thumbsticks: Remove the screws securing each thumbstick. Carefully disconnect the thumbstick board cables by lifting the locking flap and pulling the cable out. Lift each thumbstick out of its slot.
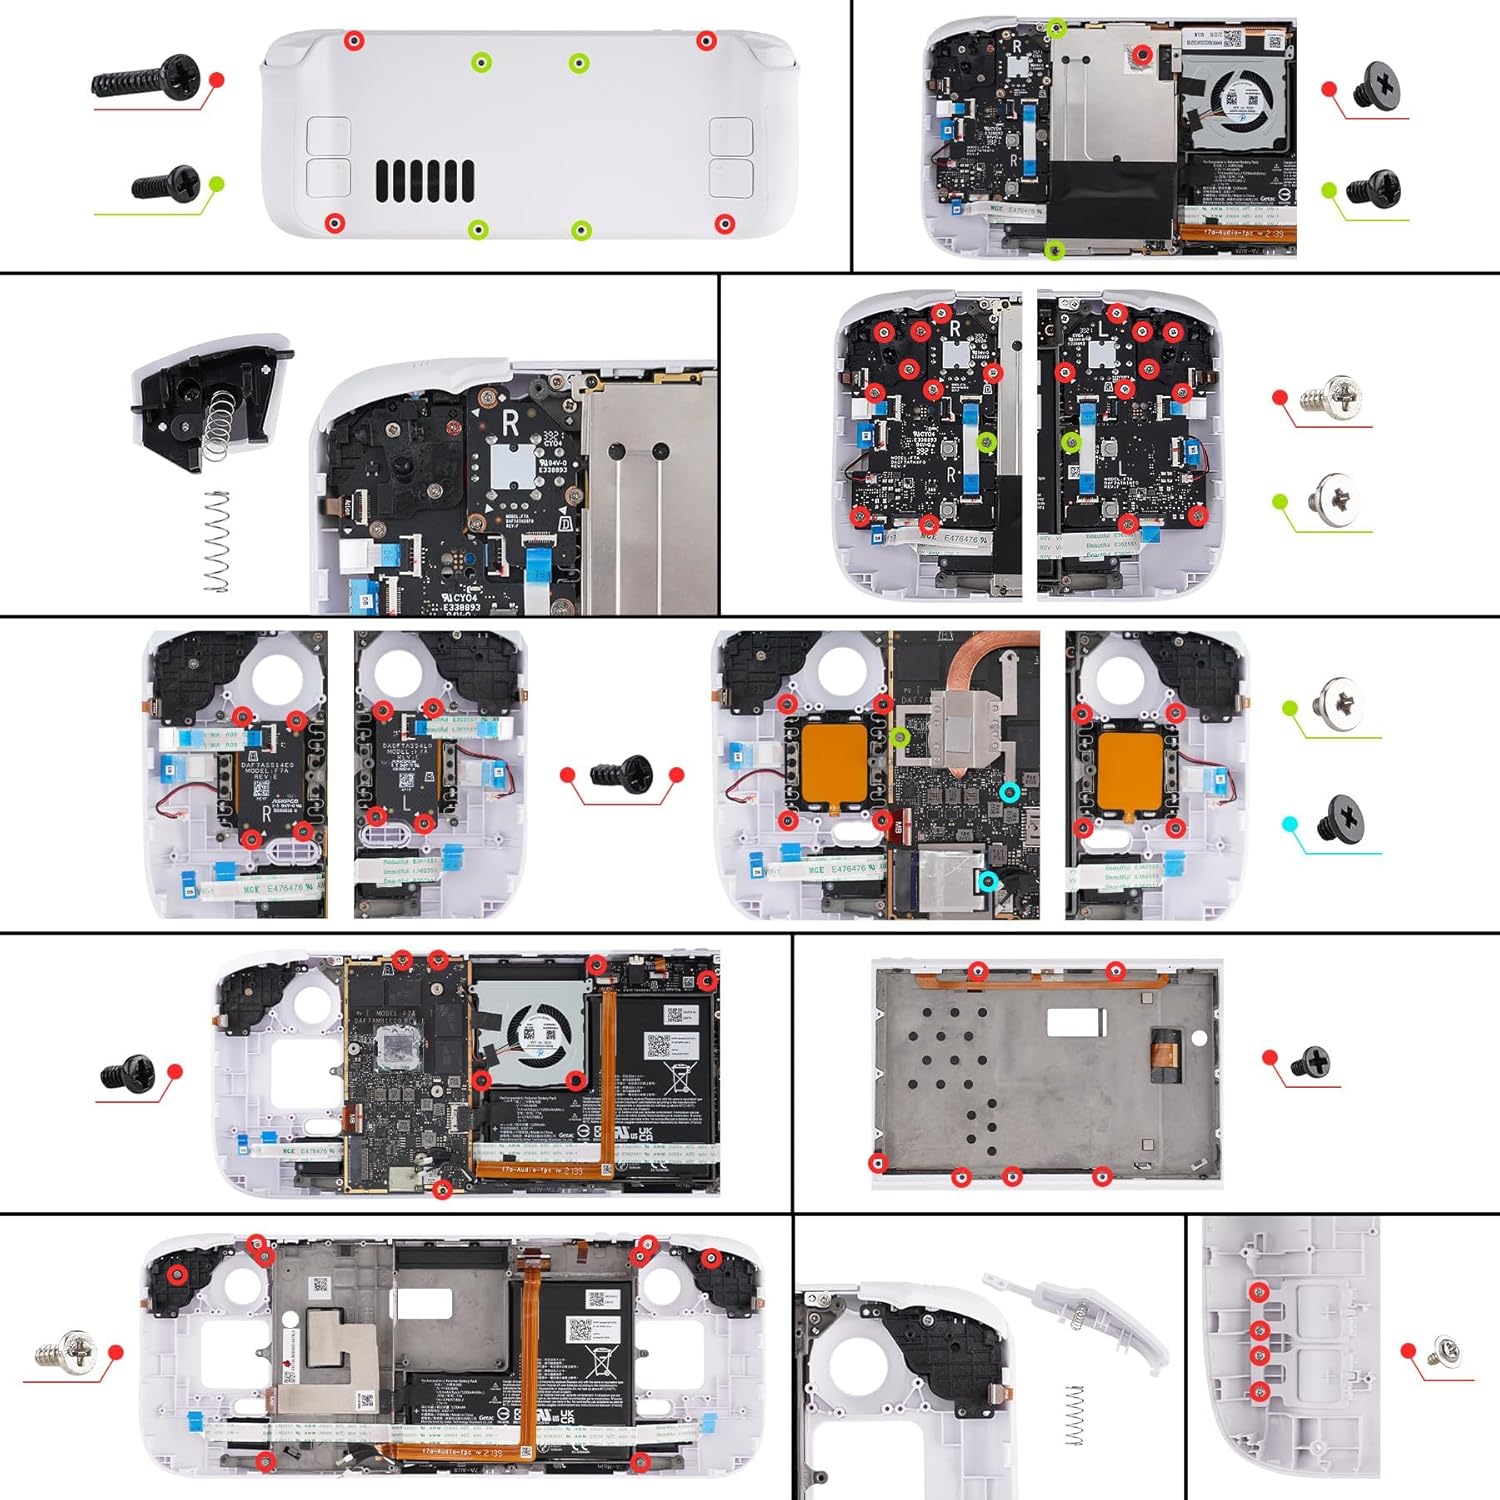
Image 3.1: Diagram showing the location of various screws and internal components for disassembly.
3.4 Thumbstick Cap Replacement (Soldering Required)
This step involves soldering and requires appropriate tools and skills. If you are not comfortable with soldering, seek professional assistance.
- Heat Adhesive: Before removing the original thumbstick cap, gently heat the adhesive layer on the joystick soldering area using a heat gun (70-100°C) for approximately one minute. Caution: Do not overheat or heat nearby components, as this may cause damage.
- Remove Adhesive: Carefully remove the softened adhesive from the soldering area using tweezers. This step can be risky; proceed with care to avoid damaging surrounding components.
- Desolder Old Cap: Use a soldering iron to desolder the wires connecting the old thumbstick cap to the thumbstick board.
- Solder New Cap: Solder the wires of the new custom thumbstick cap onto the corresponding pads on the thumbstick board. Ensure secure connections.
- Install New Cap: Snap the new thumbstick cap firmly onto the thumbstick mechanism.
3.5 Reassembly
- Reinstall Thumbsticks: Place each thumbstick back into its slot on the motherboard. Reconnect the thumbstick board cables and close their locking flaps. Secure the thumbsticks with their respective screws.
- Reconnect Battery: Reconnect the battery cable to the motherboard connector.
- Reinstall Motherboard Shield: Place the motherboard shield back over the components and secure it with its screws.
- Reinstall Back Plate: Align the new custom back plate with the console. Press firmly around the edges to engage all clips and snap it into place.
- Secure Back Plate: Reinsert and tighten the 8 Phillips screws to secure the back plate.
4. Maintenance
4.1 Cleaning Plastic Products
To clean the plastic components of your eXtremeRate custom shell:
- It is recommended to clean with a wipe dampened with water.
- If alcohol is used, clean with a wipe dampened with less than 70% alcohol and place it in a ventilated place to dry in time.
- Do not spray water or alcohol directly on the product surface.
- Do not use any other organic solvents for cleaning.

Image 4.1: Visual guide for cleaning plastic components.
5. Troubleshooting
5.1 Installation Challenges
If you encounter difficulties during installation:
- Review Video: Watch the installation video (Video 3.1) at half speed. It is recommended to watch, pause, perform the step, and repeat.
- Patience is Key: The process is intricate and requires patience. Do not force components.
- Tool Usage: Use appropriate tools. For prying, a plastic guitar pick is often safer than a metal one to prevent scratches.
- Cable Connections: Ensure all ribbon cables are properly seated and their locking flaps are securely closed.
- Screw Management: Keep track of all screws, as they may vary in size and type.
5.2 Post-Installation Issues
- Buttons Not Responding: Recheck the connections of the button ribbon cables. Ensure no debris is obstructing button presses.
- Console Not Powering On: Verify the battery is securely reconnected. Ensure no other internal cables are loose.
- Screen Damage: Extreme care is needed when handling the screen. If the screen is not functioning, it may have been damaged during removal or reinstallation.
6. Specifications
- Brand: eXtremeRate
- Model: QESDP016
- Color: New Hope Gray
- Material: Acrylonitrile Butadiene Styrene (ABS)
- Finish Type: Matte
- Hardware Platform: Steam Deck LCD
- Product Dimensions: 3 x 2 x 1 cm; 10 g (approximate, for individual components)
7. Warranty and Support
Please note that the installation of this shell will void the warranty of your console. For product-related inquiries or support, please visit the official eXtremeRate store or contact their customer service.
eXtremeRate is a gaming accessory development company focused on quality and innovation, providing customized and unique gaming modding solutions.
Visit the eXtremeRate Store for more information and products.
Ask a question about this manual
Ask about setup, troubleshooting, compatibility, parts, safety, or missing instructions. Manuals+ will review the question and use this page’s manual context to help answer it.