GAOMON Table Saw
GAOMON 10-inch Portable Benchtop Table Saw User Manual
Model: Table Saw
1. Important Safety Instructions
Always read and understand all safety warnings and instructions before operating this table saw. Failure to follow the warnings and instructions may result in electric shock, fire, and/or serious injury.
- Work Area Safety: Keep the work area clean and well-lit. Cluttered or dark areas invite accidents.
- Electrical Safety: Do not expose power tools to rain or wet conditions. Avoid body contact with earthed or grounded surfaces.
- Personal Safety: Always wear eye protection (safety glasses or goggles) and hearing protection (earmuffs or earplugs). Use a dust mask if operations create dust. Do not wear loose clothing or jewelry. Keep hair, clothing, and gloves away from moving parts.
- Tool Use and Care: Do not force the power tool. Use the correct power tool for your application. Ensure the switch is in the off-position before connecting to power.
- Table Saw Specific Safety:
- Always use the blade guard and push stick provided to enhance security during operation.
- Ensure the On-off switch and overload protection are functioning correctly.
- Never reach behind or over the saw blade while it is running.
- Always disconnect power before changing blades or performing maintenance.
2. Package Contents
Verify all items are present upon unpacking:
- 10-inch Table Saw Unit
- 10-Inch 24-Tooth Carbide Tipped Blade
- Blade Guard
- Metal Stand
- Push Stick
- Wrenches (for assembly and adjustments)
- Rip Fence
- Miter Gauge
- Assembly Manual
3. Components Overview
Familiarize yourself with the main parts of your table saw:
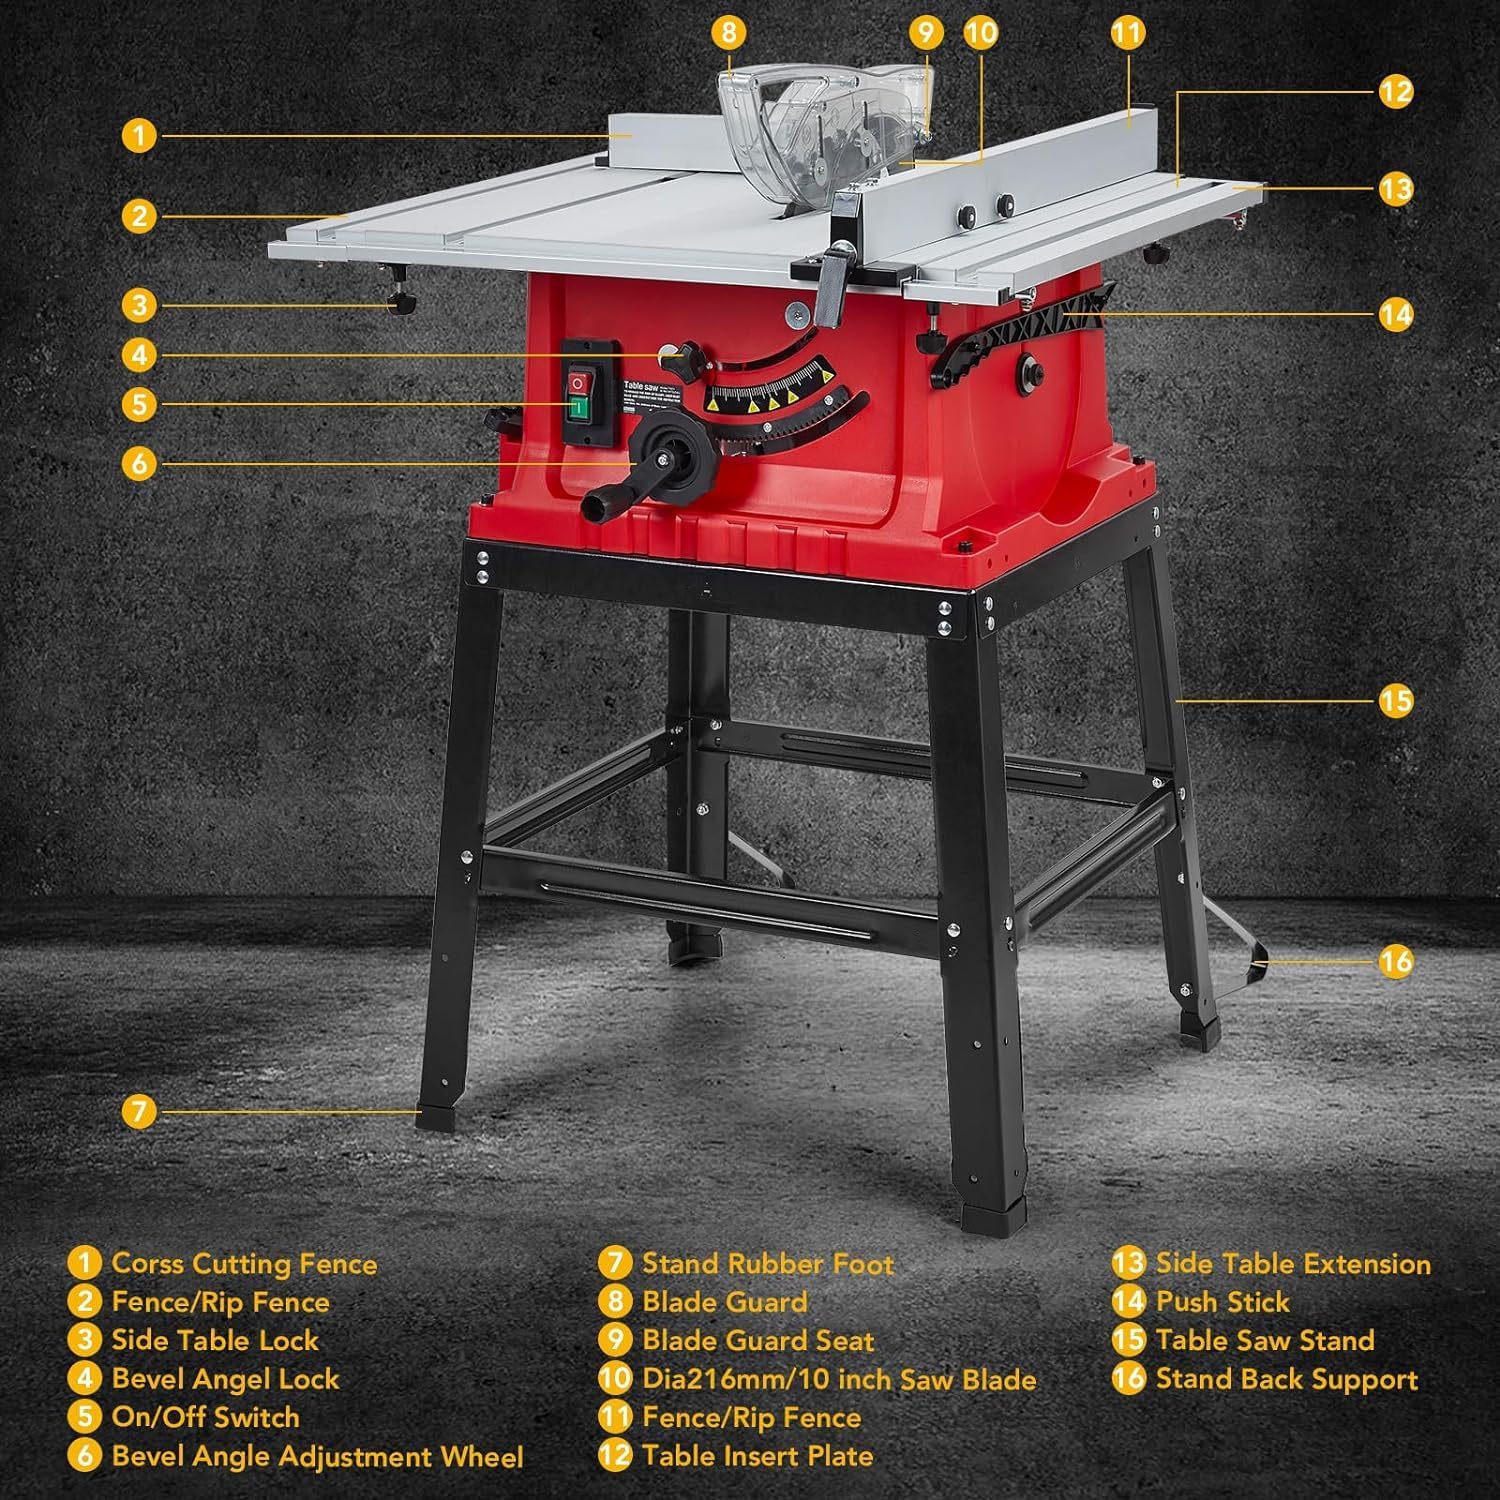
Image: Overview of the GAOMON 10-inch Table Saw with numbered labels indicating various components such as the cross cutting fence, blade guard, on/off switch, and stand.
- Cross Cutting Fence
- Fence/Rip Fence
- Side Table Lock
- Bevel Angle Lock
- On/Off Switch
- Bevel Angle Adjustment Wheel
- Stand Rubber Foot
- Blade Guard
- Blade Guard Seat
- Dia216mm/10 inch Saw Blade
- Fence/Rip Fence
- Table Insert Plate
- Side Table Extension
- Push Stick
- Table Saw Stand
- Stand Back Support
4. Setup
Follow these steps for initial setup and assembly:
- Assemble the Metal Stand: Refer to the included assembly manual for detailed instructions on attaching the legs and supports to form a stable base for the table saw. Ensure all bolts are securely tightened.
- Mount the Table Saw Unit: Carefully place the table saw unit onto the assembled metal stand and secure it using the provided hardware.
- Install the Saw Blade: Disconnect the saw from power. Use the provided wrenches to loosen the arbor nut, install the 10-inch 24-tooth carbide tipped blade, and then securely tighten the arbor nut. Ensure the blade teeth are oriented correctly for cutting.
- Attach the Blade Guard: Install the transparent blade guard over the saw blade. This guard is crucial for safety during operation.
- Attach Rip Fence and Miter Gauge: Slide the rip fence onto the table and ensure it locks securely. The miter gauge can be inserted into the miter slot for cross-cutting operations.
- Position the Saw: Place the assembled table saw on a firm, level surface in a well-lit work area, ensuring adequate space around the saw for safe operation and material handling.
5. Operating Instructions
5.1 Powering On/Off
- To turn the saw ON, press the green button on the On/Off switch.
- To turn the saw OFF, press the red button on the On/Off switch. The saw is equipped with overload protection for added safety.
5.2 Adjusting Blade Height
The blade height can be adjusted to meet specific cutting needs using the hand wheel.

Image: A hand adjusting the blade height of the table saw. The image indicates a maximum cutting depth of 74mm at a 90-degree angle.
- Rotate the hand wheel located on the front of the saw to raise or lower the blade.
- For through cuts, adjust the blade so that it extends approximately 1/8 inch above the workpiece.
- For non-through cuts (e.g., dados or grooves), adjust the blade to the desired depth.
5.3 Bevel Cutting (0-45°)
The table saw allows for bevel cuts from 0 to 45 degrees.

Image: A table saw blade tilted for a bevel cut, demonstrating the 0-45 degree bevel capacity. The cutting thickness for a bevel cut is shown as 52mm.
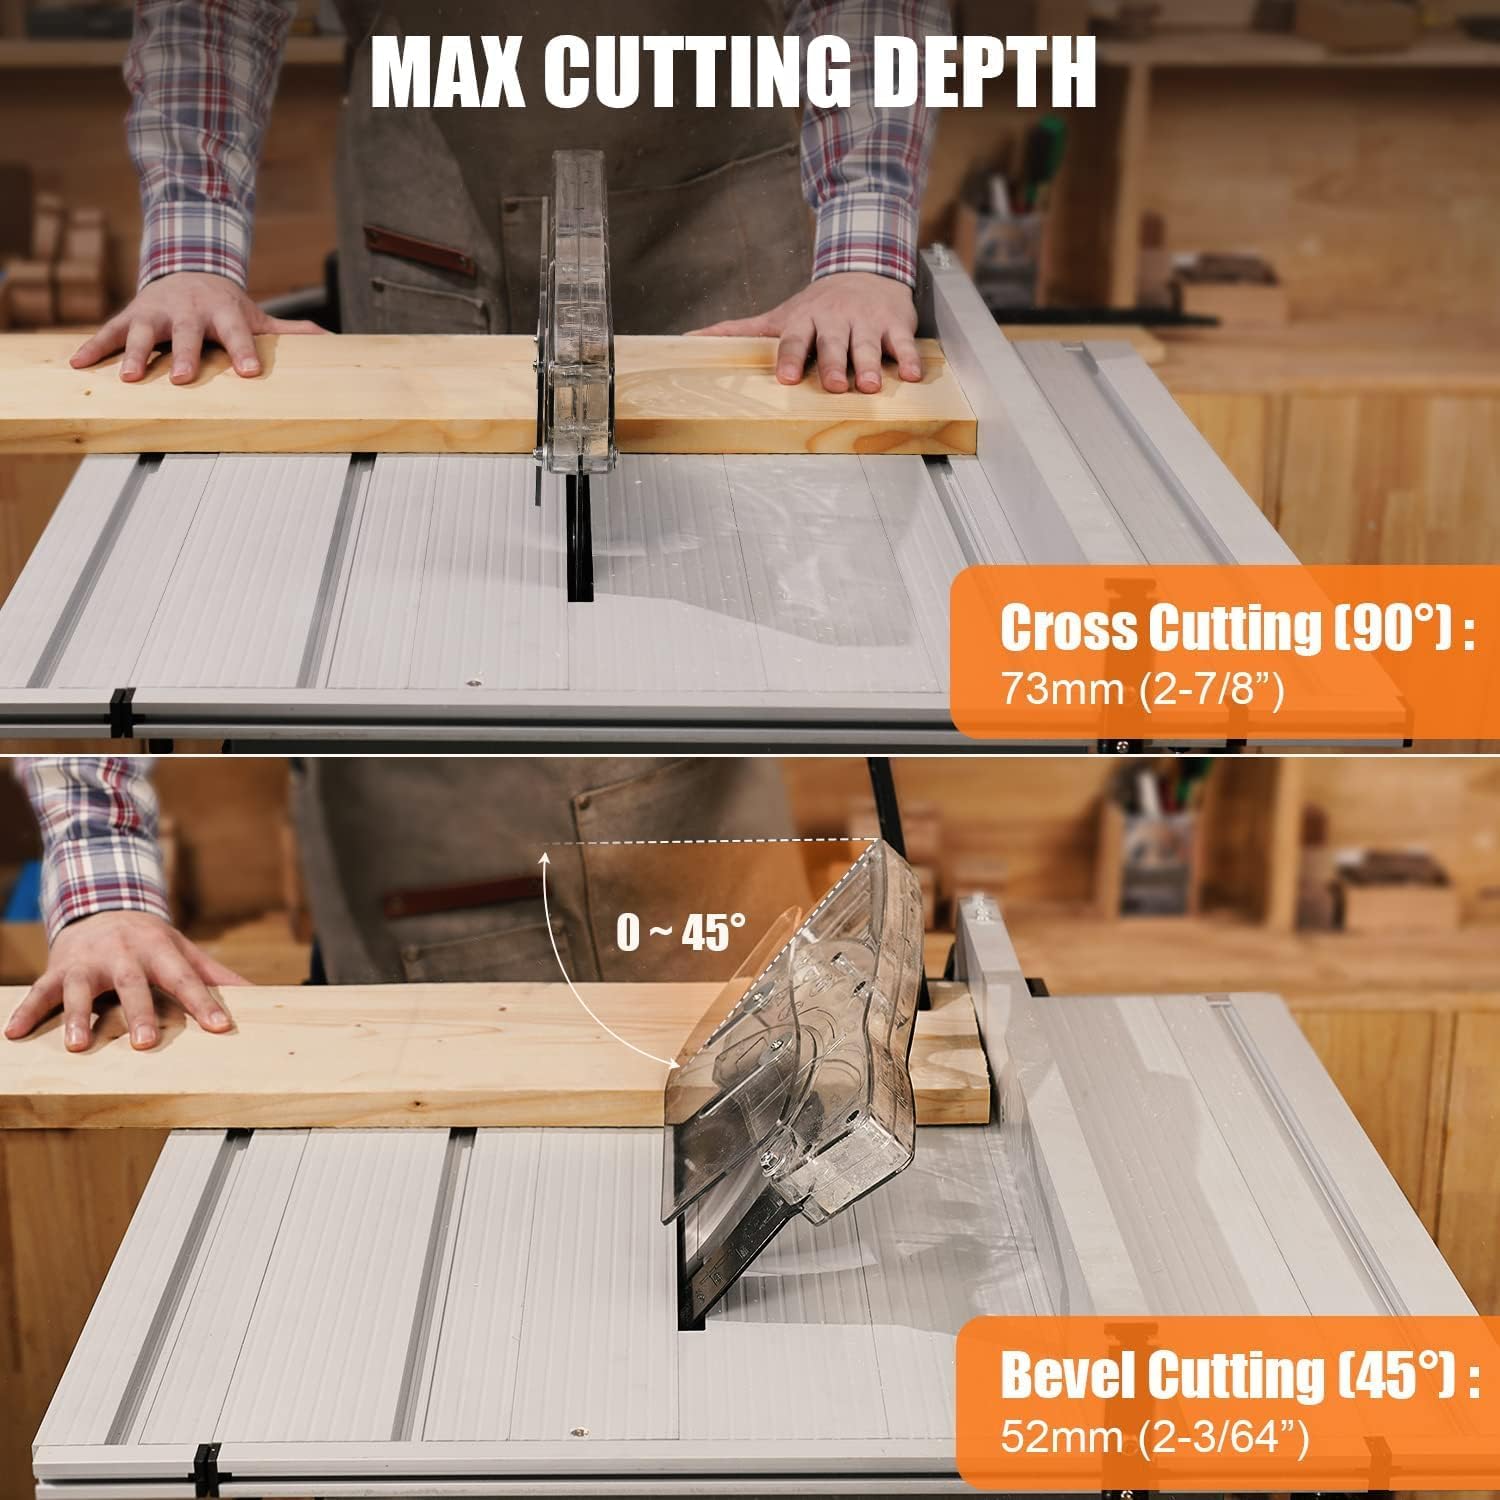
Image: A split image showing the maximum cutting depths for both 90-degree cross cuts (73mm) and 45-degree bevel cuts (52mm).
- Loosen the bevel angle lock.
- Use the bevel angle adjustment wheel to tilt the blade to the desired angle between 0 and 45 degrees.
- Securely tighten the bevel angle lock before making the cut.
- The maximum cutting thickness for a 45-degree bevel cut is approximately 52mm (2-3/64 inches).
5.4 Cross Cutting (90°)
For straight cuts across the grain of the wood.
- Ensure the blade is set to a 90-degree angle (0-degree bevel).
- Use the miter gauge to guide the workpiece for accurate cross cuts.
- The maximum cutting depth for a 90-degree cross cut is approximately 73mm (2-7/8 inches).
5.5 Dust Collection
The table saw is designed with a port for connecting a dust collector at the back, helping to maintain a cleaner working environment.

Image: A person operating the GAOMON table saw in a workshop setting, with a dust collection hose connected to the saw's port, illustrating its use for a cleaner workspace.
- Connect a compatible dust collector hose to the dust port located at the rear of the saw.
- Turn on the dust collector before operating the saw to effectively capture sawdust and debris.
6. Maintenance
Regular maintenance ensures optimal performance and extends the life of your table saw.
- Cleaning: After each use, disconnect the saw from power and clean off sawdust and debris from the table, blade guard, and motor housing. Use compressed air for hard-to-reach areas.
- Blade Inspection: Regularly inspect the saw blade for sharpness, damage, or missing teeth. Replace dull or damaged blades promptly.
- Dust Port: Ensure the dust collection port remains clear of blockages for efficient dust extraction.
- Storage: When not in use, store the saw in a dry, secure location. The saw is designed with storage parts on the left and right sides for wrenches and the push stick.
7. Troubleshooting
Common issues and their potential solutions:
| Problem | Possible Cause | Solution |
|---|---|---|
| Saw does not turn on | No power, faulty switch, tripped overload protector | Check power connection. Ensure the On/Off switch is fully engaged. Reset the overload protector if tripped. If issues persist, contact customer support. |
| Motor smokes or seizes during operation | Overload, internal motor issue, dull blade | Immediately turn off the saw and disconnect power. Do not continue operation. This indicates a serious issue. Contact customer support. |
| Blade not cutting effectively or burning wood | Dull blade, incorrect blade for material, improper feed rate | Replace or sharpen the blade. Ensure the blade type is suitable for the material being cut. Adjust feed rate to prevent burning. |
| Missing parts upon delivery | Packaging error | Refer to the package contents list and contact GAOMON customer support immediately with your purchase details. |
8. Specifications
Detailed technical specifications for the GAOMON 10-inch Portable Benchtop Table Saw:
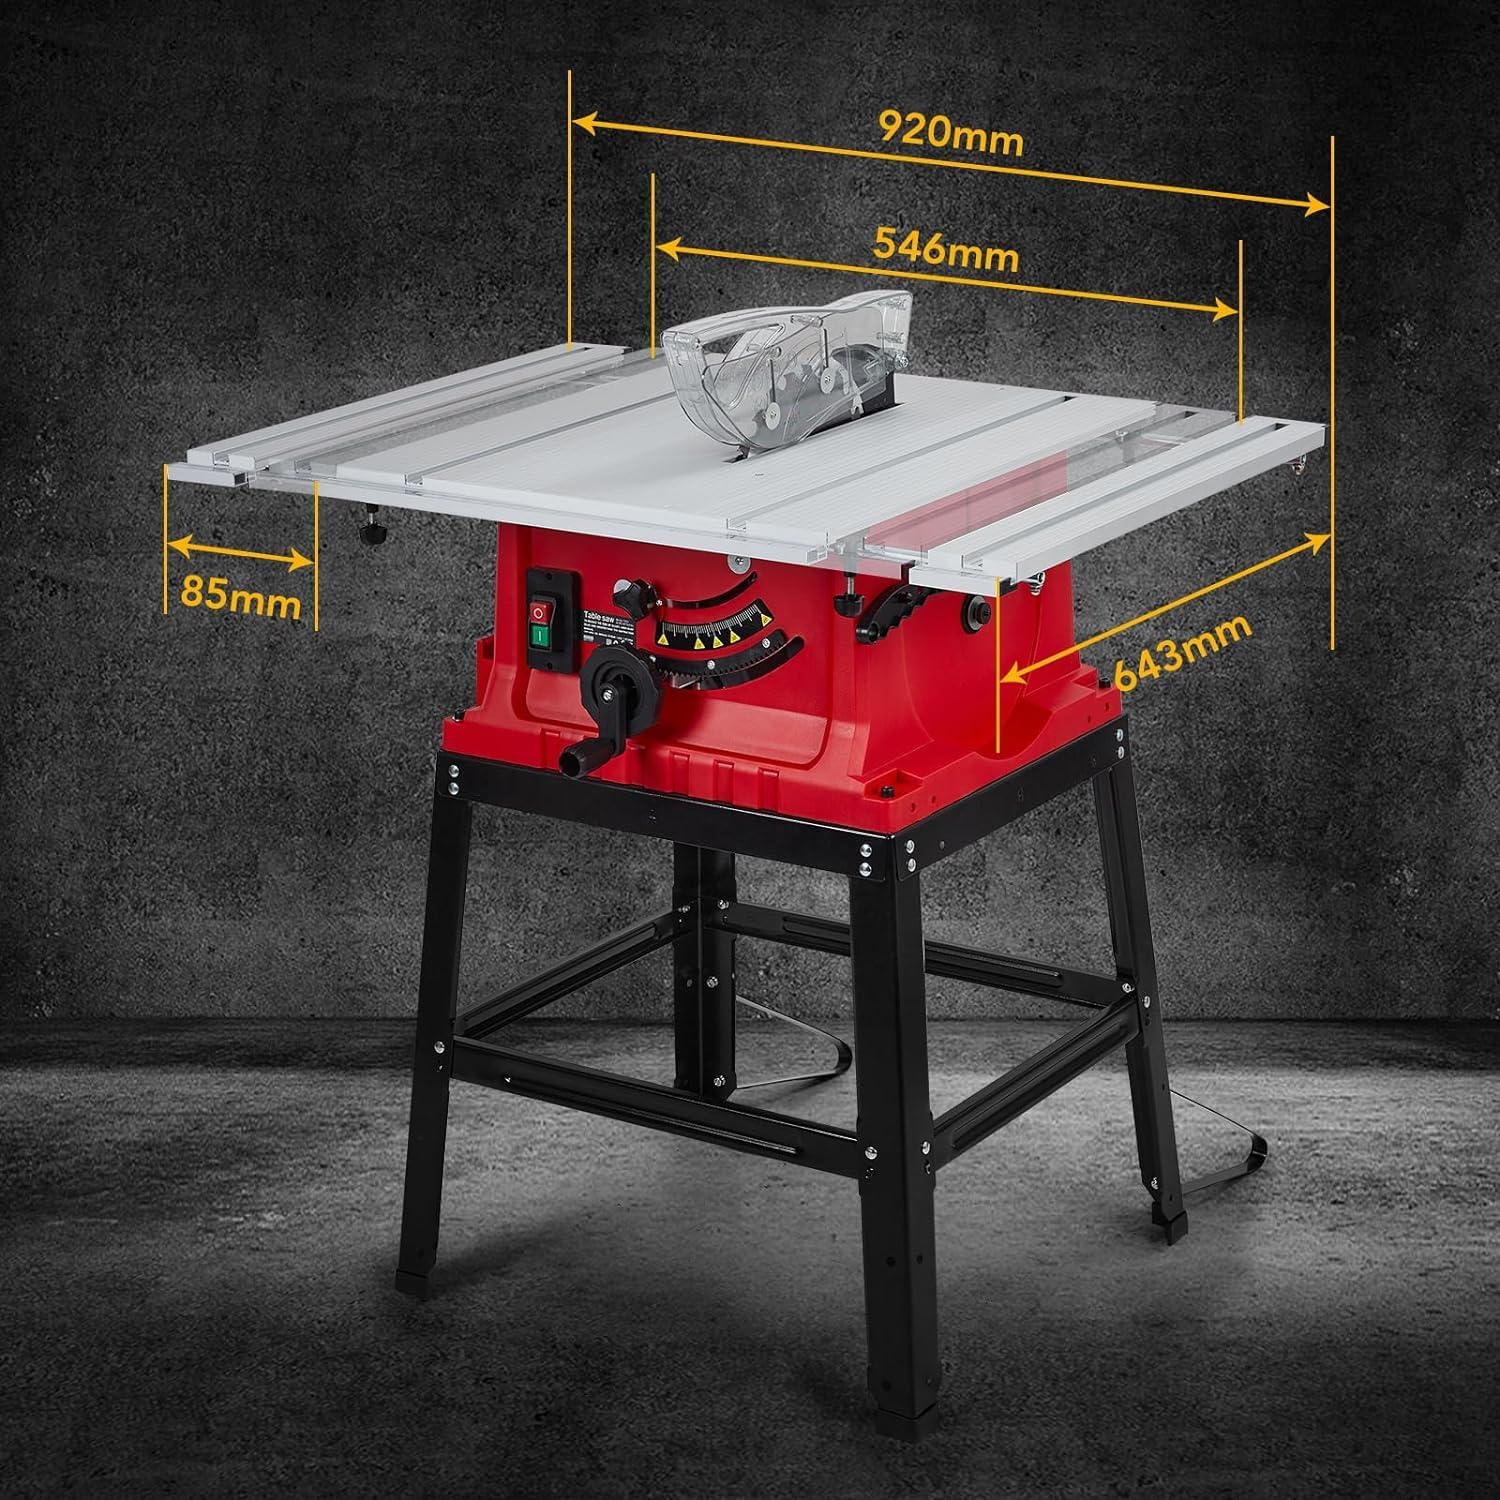
Image: The GAOMON 10-inch Table Saw with key dimensions labeled: 920mm (length), 546mm (width), 643mm (height), and 85mm (table height).
| Feature | Specification |
|---|---|
| Brand | GAOMON |
| Model Number | Table Saw |
| Power Source | Corded Electric |
| Motor Amperage | 15 Amp (implied from 5000 RPM performance for hardwood) |
| Speed | 5000 RPM |
| Blade Length | 10 Inches (Dia216mm) |
| Number of Teeth | 24 (Carbide Tipped Blade) |
| Max Cross Cutting Depth (90°) | 73mm (2-7/8 inches) |
| Max Bevel Cutting Depth (45°) | 52mm (2-3/64 inches) |
| Bevel Capacity | 0-45 Degrees |
| Product Dimensions (L x W x H) | 28.7"L x 24"W x 14"H (approx. 920mm x 546mm x 643mm with stand) |
| Item Weight | 52 pounds |
| Blade Material | Stainless Steel (Blade) |
| Special Features | Adjustable Blade Height & Bevel Control, Dust Collection Port, On/Off Switch, Overload Protection |
9. Warranty and Support
For warranty information, technical support, or to inquire about replacement parts, please contact GAOMON customer service. Keep your purchase receipt and product model number readily available when contacting support.
For the most up-to-date contact information, please refer to the GAOMON official website or the contact details provided with your product packaging.
Ask a question about this manual
Ask about setup, troubleshooting, compatibility, parts, safety, or missing instructions. Manuals+ will review the question and use this page’s manual context to help answer it.