Introduction
The UMIDIGI G9 5G is an Android 14 smartphone designed for reliable communication and multimedia experiences. It features a 6.75-inch HD+ 90Hz display, a 50MP main camera, and a 5000mAh battery.

Image: Front and back view of the UMIDIGI G9 5G cell phone, highlighting its design and camera module.
What's in the Box
Verify that all items are present in your product package:
- UMIDIGI G9 5G Phone
- Power Adapter
- USB Type-C Cable
- Pre-applied Protective Screen Film
- Phone Case
- SIM Tray Ejector
- Quick Start Guide

Image: Illustration showing the UMIDIGI G9 5G phone and its included accessories: power adapter, USB-C cable, phone case, and SIM ejector tool.
Setup
1. Inserting SIM Cards and MicroSD Card
The UMIDIGI G9 5G supports dual Nano-SIM cards or one Nano-SIM card and one MicroSD card for expandable storage up to 1TB.
- Locate the SIM tray on the side of the phone.
- Insert the SIM tray ejector tool into the small hole next to the tray and press gently until the tray pops out.
- Place your Nano-SIM card(s) and/or MicroSD card into the designated slots on the tray. Ensure the gold contacts face downwards.
- Carefully reinsert the tray into the phone.
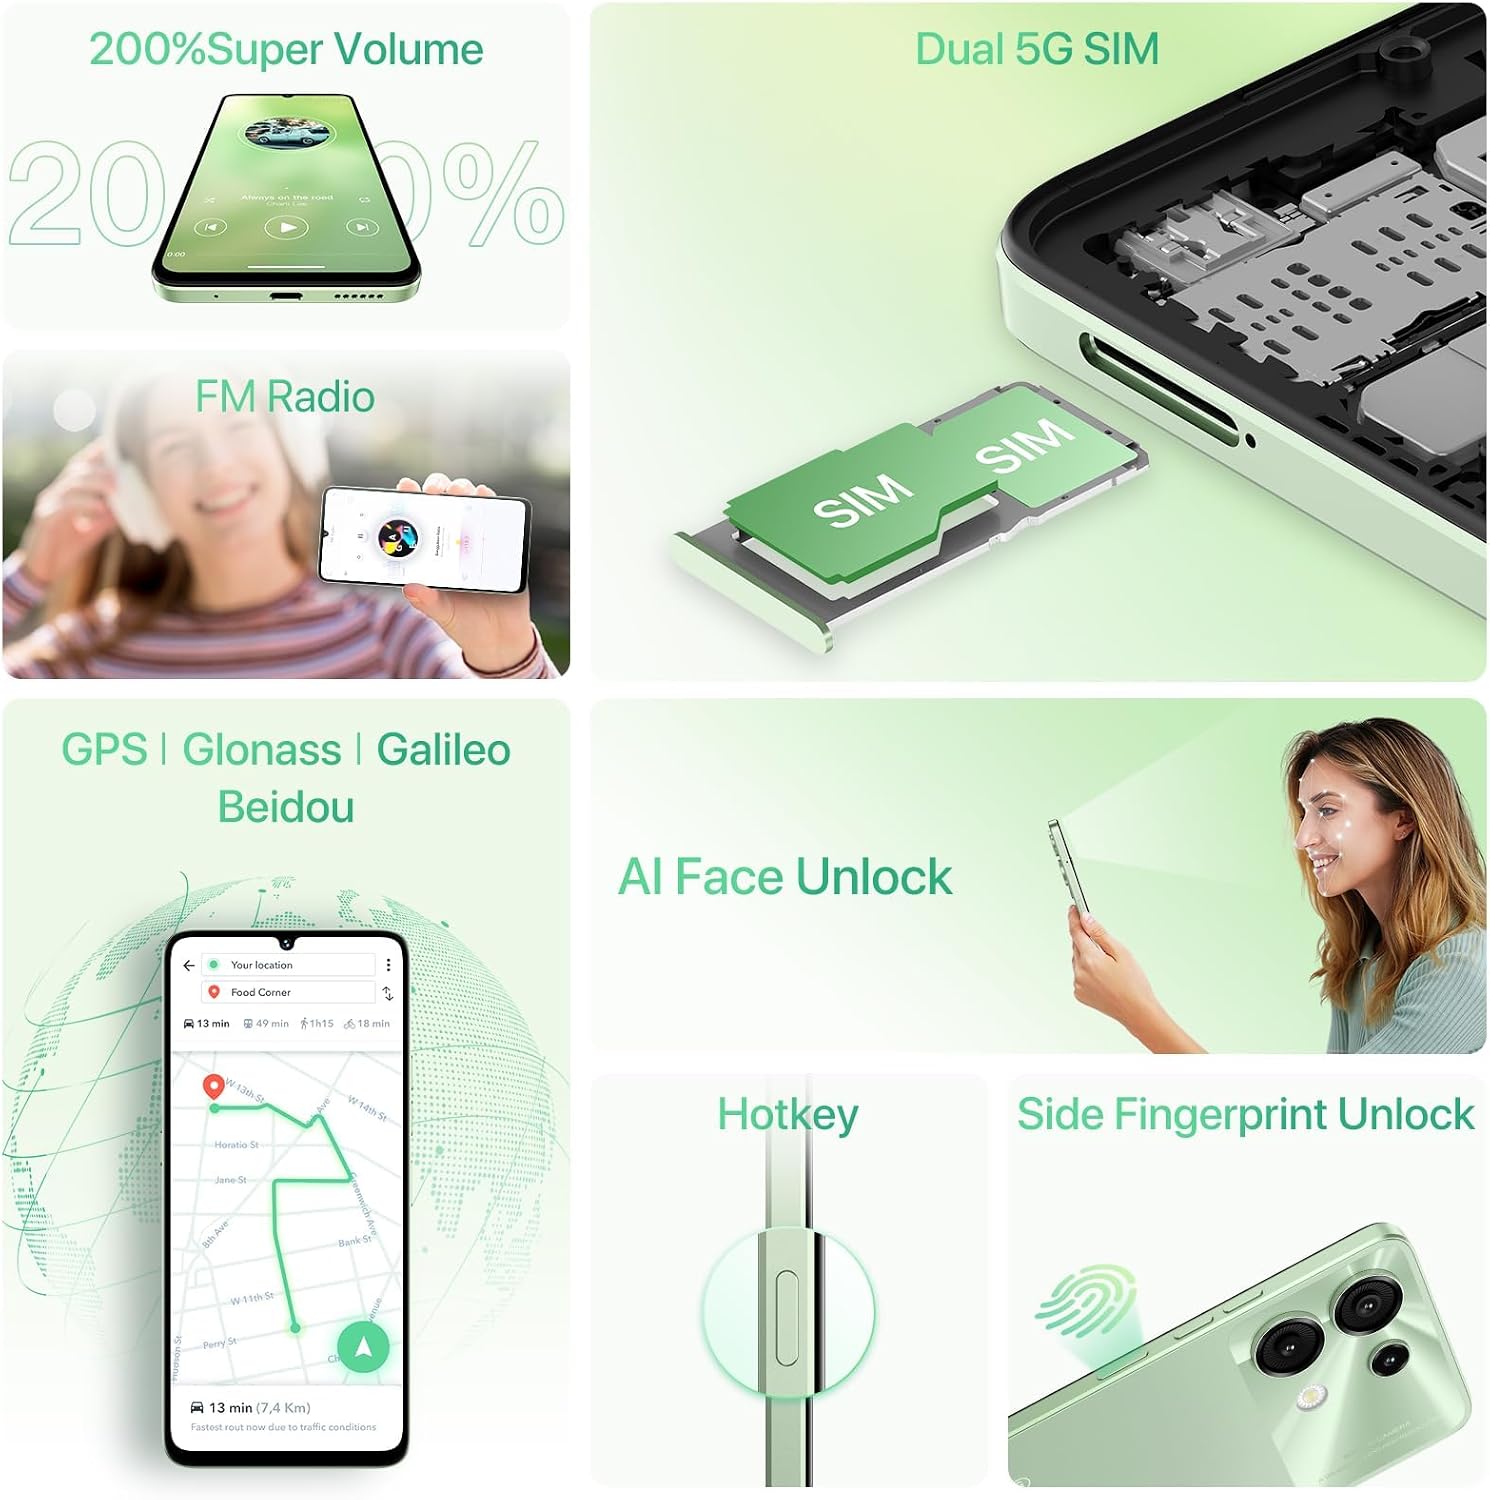
Image: Close-up of the UMIDIGI G9 5G's SIM tray, illustrating the placement of two SIM cards.
2. Initial Power On and Configuration
- Press and hold the Power button until the UMIDIGI logo appears.
- Follow the on-screen prompts to select your language, connect to a Wi-Fi network, and set up your Google account.
- Configure security features such as PIN, pattern, fingerprint, or face unlock.
3. Charging the Device
Connect the provided USB Type-C cable to the phone's charging port and the power adapter. Plug the adapter into a wall outlet. The phone supports 18W fast charging.

Image: Visual representation of the UMIDIGI G9 5G connected to its 18W fast charger, alongside the Type-C cable, OTG adapter, and 3.5mm headphone jack.
Operating Your Device
1. Android 14 Operating System
The UMIDIGI G9 5G runs on Android 14, offering enhanced personalization, privacy controls, and accessibility features.

Image: Various screenshots showcasing the Android 14 interface, including themes, widgets, and notification panel.
2. Display and Navigation
The device features a 6.75-inch HD+ display with a 90Hz refresh rate for smooth visuals. Navigation is primarily via touchscreen gestures and on-screen buttons.
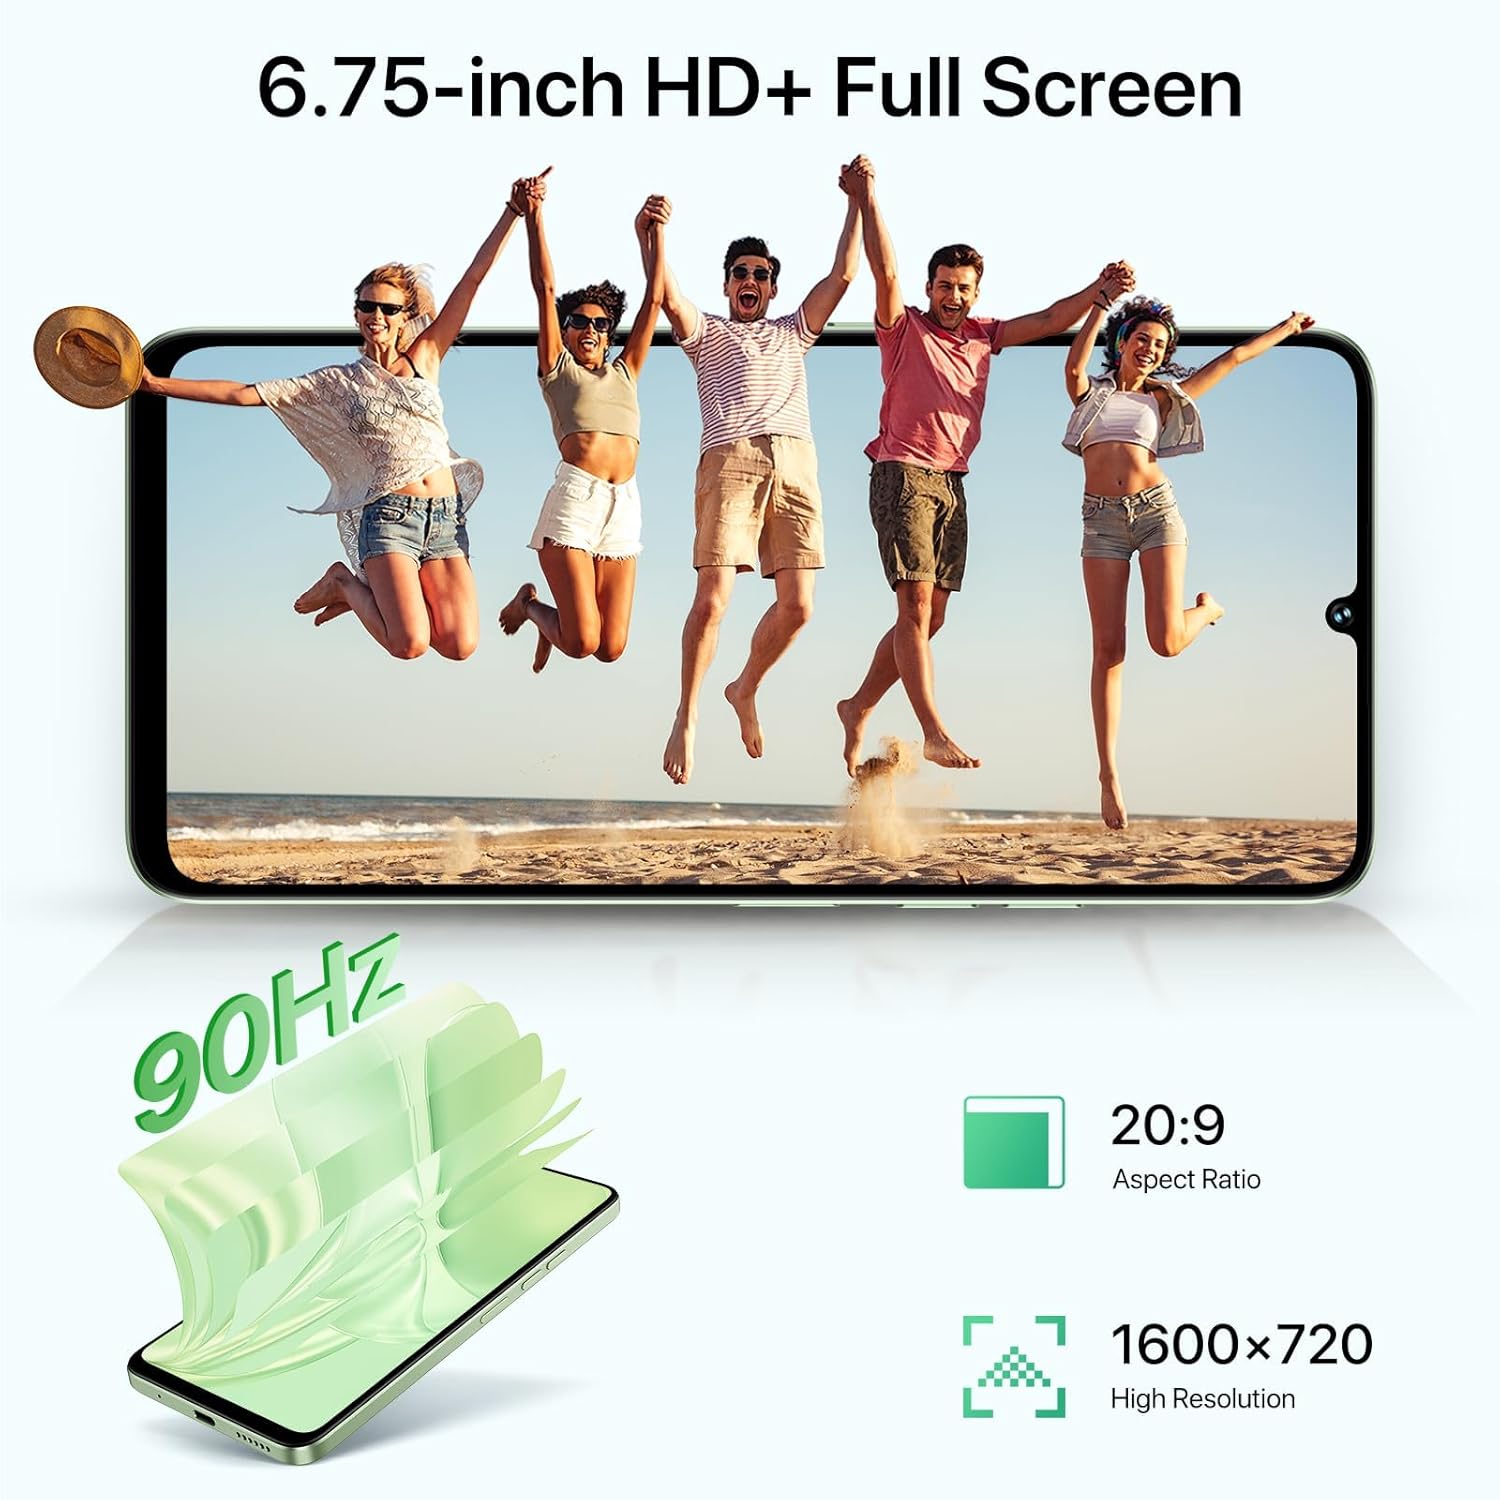
Image: The UMIDIGI G9 5G display showing vibrant content, emphasizing its 6.75-inch size and 90Hz refresh rate.
3. Camera Functions
The UMIDIGI G9 5G is equipped with a versatile camera system:
- 50MP Ultra-Clear Main Camera
- 8MP Front Camera
- 2MP Macro Camera
- 2MP Depth Camera
To access the camera, tap the camera icon on your home screen or app drawer. Select different modes like Photo, Video, Portrait, Pro, or Night Mode from the camera interface.

Image: Diagram illustrating the UMIDIGI G9 5G's camera setup, including the 50MP main, 8MP front, 2MP macro, and 2MP depth cameras.
4. Security Features
Your device offers multiple security options:
- Fingerprint Unlock: The side-mounted fingerprint sensor allows for quick and secure access.
- AI Face Unlock: Use your face to unlock the device.
- PIN/Pattern/Password: Standard Android security methods.

Image: Visuals demonstrating the Face ID unlock and side fingerprint sensor functionality on the UMIDIGI G9 5G.
5. Other Features
- FM Radio: The phone includes a built-in FM antenna, allowing you to listen to radio stations without external headphones.
- GPS Navigation: Supports GPS, Glonass, Galileo, and Beidou for accurate location services.
- Hotkey: A customizable hotkey allows quick access to frequently used functions.

Image: Screenshots showing the FM Radio interface and a GPS navigation map on the UMIDIGI G9 5G.
Maintenance
1. Battery Care
The UMIDIGI G9 5G is equipped with a 5000mAh battery. To prolong battery life:
- Avoid extreme temperatures.
- Do not fully discharge the battery regularly.
- Use the provided charger for optimal charging.

Image: The UMIDIGI G9 5G displaying a 100% charge, highlighting its 5000mAh battery and 18W fast charging capability.
2. Software Updates
Regularly check for and install software updates to ensure optimal performance, security, and access to the latest features.
To check for updates: Go to Settings > About Phone > System Update.
3. Cleaning Your Device
Use a soft, lint-free cloth to clean the screen and body of the phone. Avoid using harsh chemicals or abrasive materials.
4. Durability
The UMIDIGI G9 5G has undergone various quality tests to ensure durability:
- 20,000 times USB plug and unplug test
- 1,000 times 25kg soft pressure test
- 75 rounds roller test
- 300,000 times button press test
- 14,000 times micro-drop test

Image: Infographic detailing the various durability tests performed on the UMIDIGI G9 5G, including USB plug, pressure, roller, button press, and micro-drop tests.
Troubleshooting
1. Carrier Incompatibility Issues
If you experience carrier incompatibility, ensure your phone's software is up to date.
- Check for the latest software version (e.g., UMIDIGI G9 5G V1.0 20240923 or newer).
- Upgrade path: Settings > About Phone > System Update.
If issues persist, contact customer support.
2. Memory Expansion
To expand RAM using virtual memory:
- Go to Settings.
- Find and select Memory Expansion.
- Click Set RAM extend Size.
- Select the desired RAM option (e.g., 2GB, 4GB, 6GB).
- The phone will prompt you to reboot for changes to take effect.
Note: Any change to memory expansion settings requires a device restart to take effect.

Image: Step-by-step guide on how to access and configure the memory expansion settings on the UMIDIGI G9 5G, including the required reboot.
3. General Performance Issues
- Restart the device: A simple restart can resolve many temporary software glitches.
- Clear cache: Regularly clear app caches to free up storage and improve performance.
- Factory Reset: As a last resort, you can perform a factory reset. Warning: This will erase all data on your phone. Back up important information before proceeding.
Specifications
| Feature | Detail |
|---|---|
| Model Name | G9 5G |
| Operating System | Android 14 |
| Processor | UNISOC T765 5G Octa-Core (6nm process, 2.3 GHz) |
| RAM | 6GB (expandable to 12GB with virtual RAM) |
| Internal Storage | 128GB |
| Expandable Storage | Up to 1TB via MicroSD card |
| Display Size | 6.75 inches |
| Display Resolution | 1600 x 720 (HD+) |
| Refresh Rate | 90Hz |
| Main Camera | 50MP |
| Front Camera | 8MP |
| Macro Camera | 2MP |
| Depth Camera | 2MP |
| Battery Capacity | 5000mAh |
| Charging | 18W Fast Charging |
| Connectivity | 5G Dual SIM, Wi-Fi, Bluetooth |
| Navigation | GPS, Glonass, Galileo, Beidou |
| Audio Jack | 3.5mm |
| Dimensions | 6.57 x 3.03 x 0.31 inches |
| Weight | 14.4 ounces (408 grams) |

Image: Diagram illustrating the UNISOC T765 5G processor, 6GB RAM, and 128GB ROM with 1TB TF card expansion support.
Device Information
For specific device identifiers such as IMEI numbers, please refer to the label on the back of your phone or the device settings.

Image: The back of the UMIDIGI G9 5G phone, displaying a product label with model information, IMEI numbers, and other certifications.
Warranty and Support
Warranty Information
For detailed warranty information, please refer to the warranty card included in your product package or visit the official UMIDIGI website.
Customer Support
If you have questions or require assistance with your UMIDIGI G9 5G, you can contact customer support through the following methods:
- Via Amazon: Navigate to your order history, select the applicable order, and click on "Contact Seller" or "Ask question" on the product page.
- Via Service Center App:
- Open the "Service Center" app on your phone.
- Enter "Customer Service".
- Click on "Questions".
- Fill in the required information and submit your query.

Image: Step-by-step visual guide on how to use the "Service Center" app on the UMIDIGI G9 5G to submit a customer support question.