1. Introduction
Thank you for choosing the X W EI UNION Dash Camera, Model RM. This device is designed to provide reliable video recording of your journeys, enhancing vehicle security and offering crucial evidence in case of incidents. This manual provides detailed instructions for installation, operation, and maintenance to ensure optimal performance.
2. Product Overview
2.1 Package Contents
- X W EI UNION Dash Camera Unit
- Suction Cup Mount
- Car Charger (Power Cable)
- User Manual
2.2 Key Features
- Dual 1080P Recording: Simultaneously records front and interior views in Full HD (1920*1080P).
- 2-Inch Screen: For live view and playback.
- 170° Wide-Angle Lens: Captures a broad field of view for comprehensive coverage.
- Built-in G-Sensor: Automatically detects collisions and locks video files to prevent overwriting.
- Loop Recording: Continuously records, overwriting the oldest unlocked files when the memory card is full.
- Night Vision: Enhanced recording in low-light conditions using infrared (IR) lights.
- WDR (Wide Dynamic Range): Improves video quality in varying light conditions.
- Parking Monitor: (Implied by features, though not explicitly listed as a bullet point, it's on an image) Provides surveillance when the vehicle is parked.
2.3 Product Diagram

Figure 2.3.1: Front and rear views of the X W EI UNION Dash Camera with suction cup mounts.
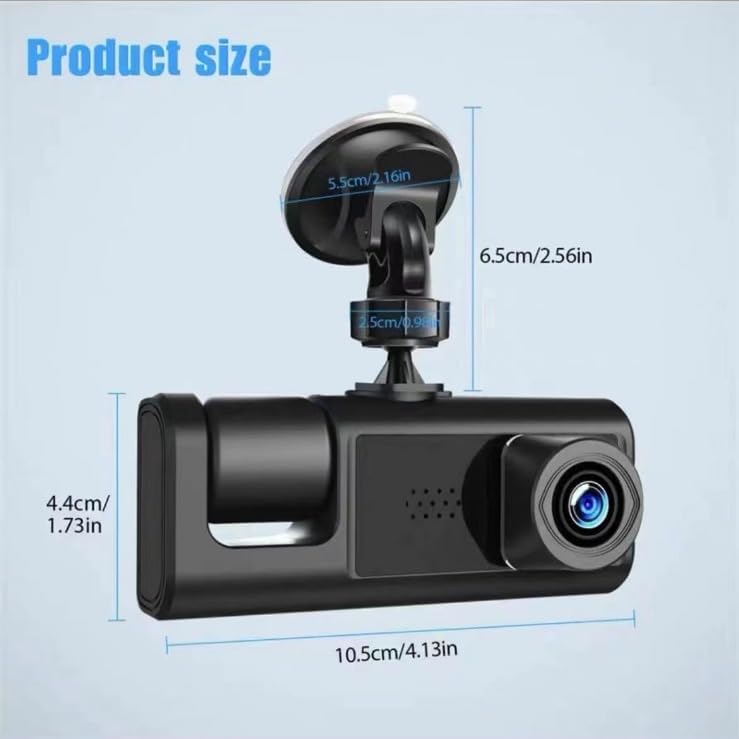
Figure 2.3.2: Product dimensions of the dash camera.
3. Setup
3.1 Inserting a Micro SD Card
A micro SD card (not included) is required for recording. The camera supports up to 32GB micro SD cards. Ensure the card is formatted before first use. Insert the micro SD card into the designated slot on the dash camera until it clicks into place.
3.2 Mounting the Dash Camera
- Clean the windshield thoroughly where you intend to mount the camera. A clean surface ensures the suction cup adheres tightly.
- Attach the suction cup mount to the dash camera.
- Press the suction cup firmly against the cleaned windshield and engage the locking mechanism to secure it. Position the camera to ensure a clear view of the road ahead and the vehicle interior.

Figure 3.2.1: Recommended installation position and cable routing.
3.3 Power Connection
- Connect the provided car charger cable to the dash camera's power input port.
- Plug the other end of the car charger into your vehicle's cigarette lighter socket.
- Route the power cable neatly along the windshield and dashboard to avoid obstructing your view or interfering with driving.
4. Operating Instructions
4.1 Powering On/Off
- Automatic: The dash camera will automatically power on and begin recording when your vehicle's ignition is turned on (and power is supplied to the cigarette lighter).
- Manual: Press and hold the Power button to manually turn the camera on or off.
4.2 Recording Modes
The camera typically starts recording automatically upon power-on. The 2-inch screen will display live footage from both the front and interior cameras.

Figure 4.2.1: Dual 1080P Full HD Recording in action.
4.3 Menu Navigation
Use the physical buttons on the camera (usually labeled Mode, Up, Down, OK) to navigate through the menu options. Refer to the on-screen prompts for specific settings such as resolution, loop recording duration, G-sensor sensitivity, and date/time.
4.4 Playback
To review recorded footage, stop recording (if active), then enter playback mode via the Mode button. Use the Up/Down buttons to select files and the OK button to play them on the 2-inch screen.
5. Features Explained
5.1 G-Sensor (Gravity Sensor)
The built-in G-sensor detects sudden impacts or rapid acceleration/deceleration. When triggered, it automatically locks the current video segment, preventing it from being overwritten by loop recording. This ensures critical event footage is preserved.

Figure 5.1.1: G-Sensor automatically locks video during an event.
5.2 Loop Recording
This feature allows continuous recording. When the micro SD card reaches its storage limit, the camera automatically overwrites the oldest unlocked video files. This ensures you always have the most recent footage without manually clearing the card.

Figure 5.2.1: Visual representation of loop recording.
5.3 Night Vision
Equipped with infrared (IR) lights, the dash camera enhances recording clarity in low-light or nighttime conditions, capturing details that might otherwise be missed.

Figure 5.3.1: Dash camera with IR lights for night vision.
5.4 Wide Dynamic Range (WDR)
WDR technology balances exposure in scenes with high contrast, such as bright sunlight and deep shadows. This results in clearer video footage where both bright and dark areas are visible, preventing overexposure or underexposure.

Figure 5.4.1: WDR technology for balanced exposure.
5.5 170° Wide-Angle View
The camera's wide-angle lens captures a broad perspective of the road and interior, minimizing blind spots and providing more comprehensive coverage of events.

Figure 5.5.1: 170-degree wide-angle coverage.
6. Maintenance
- Clean the Lens: Regularly wipe the camera lenses with a soft, lint-free cloth to ensure clear recordings.
- Format SD Card: Periodically format the micro SD card (e.g., once a month) to maintain optimal performance and prevent data corruption. Back up any important files before formatting.
- Check Mount: Ensure the suction cup mount remains securely attached to the windshield. Re-clean the surface and re-attach if necessary.
- Temperature: Avoid exposing the dash camera to extreme temperatures for extended periods, as this can affect battery life and component integrity.
7. Troubleshooting
| Problem | Possible Cause | Solution |
|---|---|---|
| Camera does not power on. | No power from car charger; faulty cable; dead battery. | Check car charger connection and vehicle's cigarette lighter. Try a different power source or cable. Ensure the car's ignition is on. |
| Recording stops or fails. | SD card full; SD card error; slow SD card. | Format the micro SD card. Replace with a new, high-speed (Class 10 or U1/U3) micro SD card. Ensure loop recording is enabled. |
| Video footage is blurry. | Dirty lens; protective film still on lens. | Clean the camera lenses with a soft cloth. Remove any protective film from the lens. |
| G-sensor is too sensitive/not sensitive enough. | G-sensor sensitivity setting. | Adjust the G-sensor sensitivity in the camera's settings menu. |
| Suction cup mount detaches. | Dirty windshield; improper attachment. | Clean the windshield and the suction cup thoroughly. Re-attach firmly, ensuring the locking mechanism is engaged. |
8. Specifications
| Feature | Detail |
|---|---|
| Model Name | RM |
| Video Capture Resolution | 1080p (Front & Interior) |
| Field Of View | 170 Degrees |
| Screen Size | 2 Inch |
| Storage | Supports up to 32GB Micro SD Card (Class 10 or higher recommended) |
| Special Features | G-Sensor, Loop Recording, Night Vision, WDR |
| Power Source | Car Cigarette Lighter (DC 12V/24V) |
| Battery | 1 Lithium Ion battery (included) |
| Product Dimensions | 3.94 x 1.18 x 2.36 inches (approx. 10 x 3 x 6 cm) |
| Item Weight | 4.8 ounces (approx. 136 grams) |
| Color | Black |
| Mounting Type | Suction Cup Mount (Windshield) |
9. Warranty and Support
For warranty information, technical support, or any questions regarding your X W EI UNION Dash Camera, please refer to the contact details provided at your point of purchase or visit the official X W EI UNION website. Keep your purchase receipt as proof of purchase for warranty claims.