1. Introduction
This manual provides detailed instructions for the installation, operation, and maintenance of your Backnets Solid Brass Shower Mixer Valve. Please read this manual thoroughly before installation and use to ensure proper function and longevity of the product. Retain this manual for future reference.
2. Product Overview
2.1 Key Features
- Solid Brass Construction: Manufactured from high-quality brass for durability and corrosion resistance.
- Concealed Design: Provides a clean, minimalist aesthetic in your shower space.
- LED Digital Temperature Display: Hydro-powered display shows real-time water temperature without the need for batteries.
- Three Function Diverter: Allows selection of up to three shower outputs (e.g., rain shower, handheld shower, body jets) individually or simultaneously.
- cUPC Certified: Ensures compliance with safety standards for water temperature control.
- Standard Connections: Features US standard NPT 1/2" threads for inlets and outlets.
2.2 Components
The Backnets Shower Mixer Valve includes the main valve body, faceplate, control knobs, and buttons. Additional shower components (shower heads, handhelds, body jets) are sold separately.

Figure 1: Front view of the Backnets Solid Brass Shower Mixer Valve with its matte black finish and digital temperature display.

Figure 2: Illustration highlighting the robust, integrated forging and solid brass construction of the Backnets valve, contrasting it with lower quality sand-cast alternatives.
3. Setup and Installation
Installation should be performed by a qualified plumber or experienced individual. Ensure all local plumbing codes are followed.
3.1 Pre-Installation Checklist
- Verify all components are present and undamaged.
- Ensure water supply lines (hot and cold) are accessible and can be shut off.
- Confirm wall cavity dimensions are sufficient for concealed valve installation.
- Gather necessary tools: pipe wrench, sealant tape (Teflon tape), pipe dope, measuring tape, level.
3.2 Installation Steps
- Shut off Water Supply: Turn off the main water supply to the installation area.
- Prepare Wall Opening: Create an appropriate opening in the wall for the concealed valve body.
- Connect Inlets: Connect the hot water supply to the designated 'Hot Inlet' (G 1/2") and the cold water supply to the 'Cold Inlet' (G 1/2") on the valve body. Use sealant tape or pipe dope on all threaded connections to prevent leaks.
- Connect Outlets: Connect the three shower outputs (e.g., to rain shower head, handheld shower, body jets) to 'Outlet 1', 'Outlet 2', and 'Outlet 3' as desired. These are also 1/2" NPT connections.
- Secure Valve: Mount the valve body securely within the wall cavity, ensuring it is level and properly aligned for the faceplate.
- Pressure Test: After all connections are made, block all outlets and adjust water pressure to 10kg (1MPa) for testing. Carefully check all pipe connections and the interior of the shower valve for any leaks.
- Install Faceplate and Controls: Once leak-free, install the decorative faceplate, control knobs, and buttons.
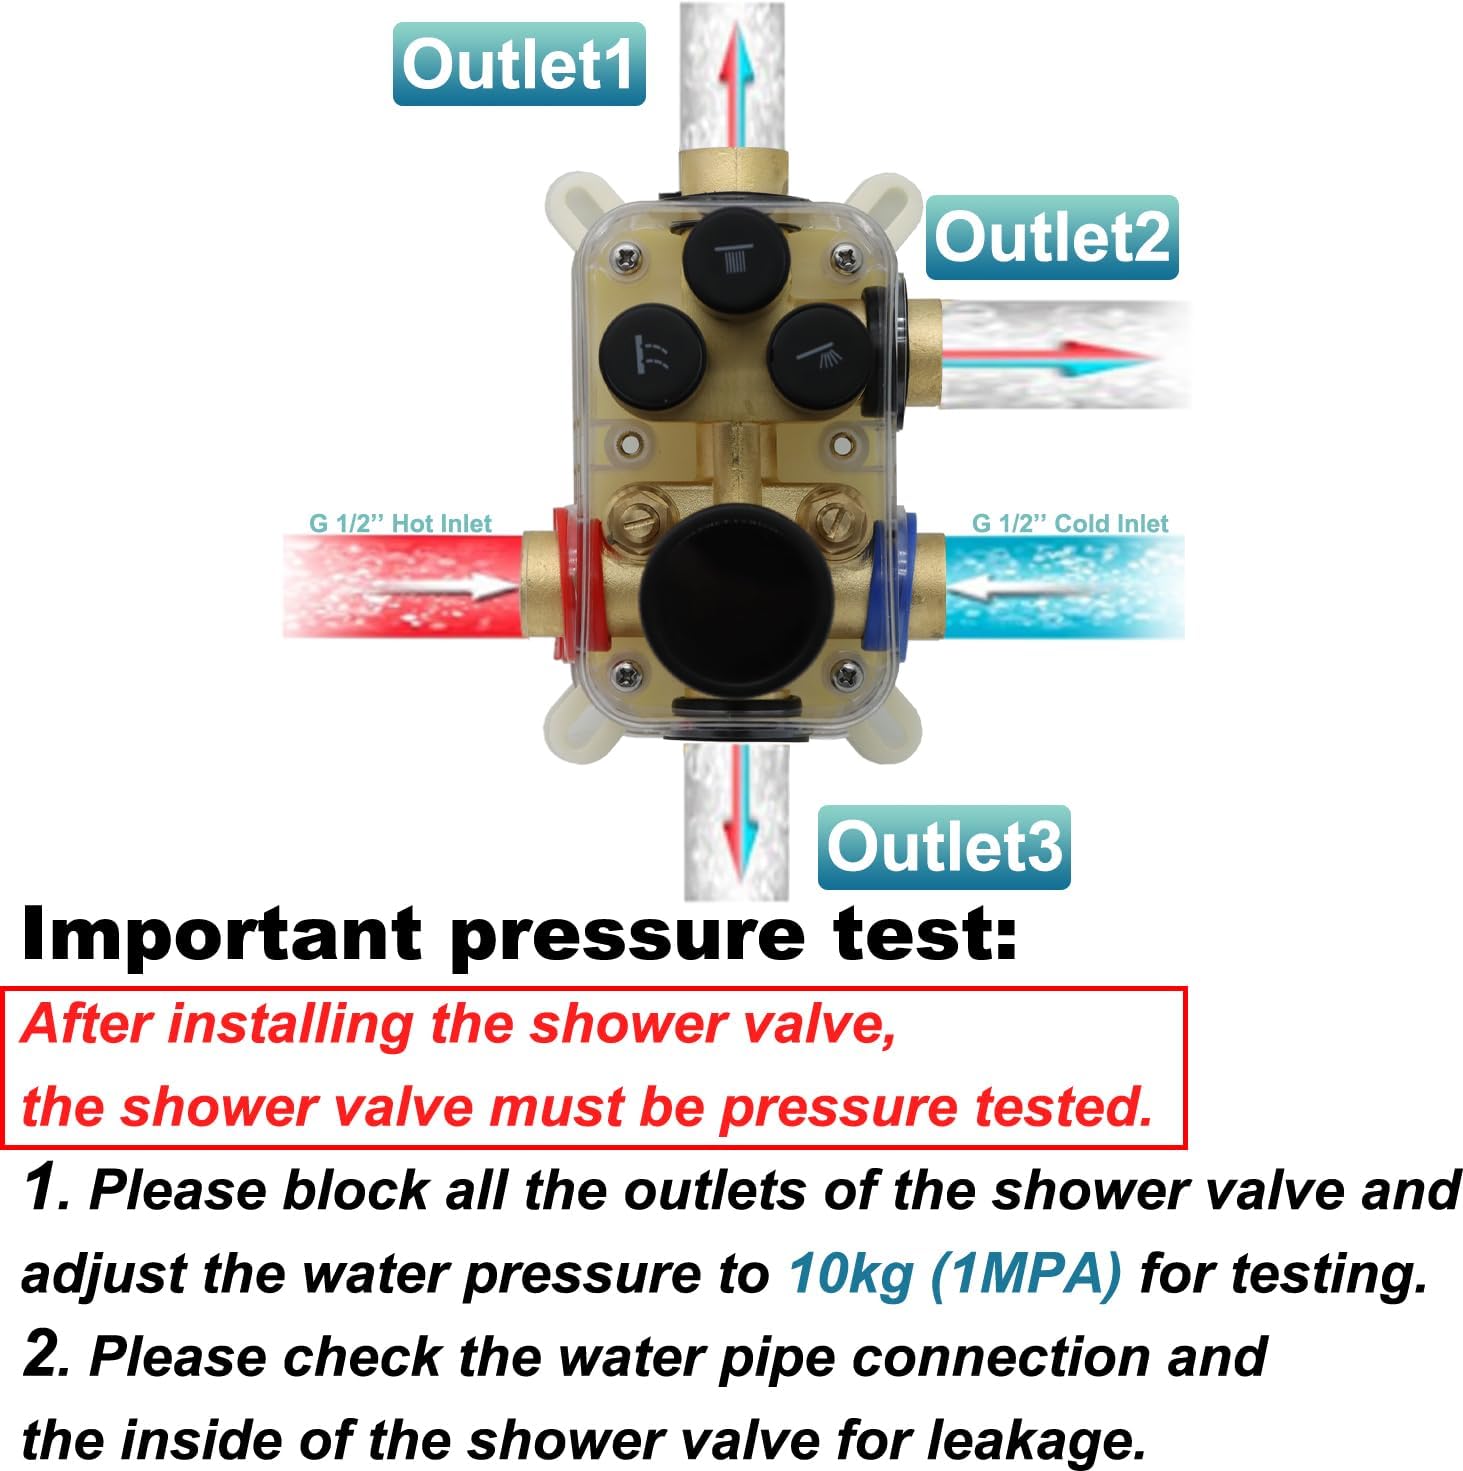
Figure 3: Detailed view of the valve's G 1/2" hot and cold inlets and three outlets, along with critical pressure testing instructions.

Figure 4: Product dimensions (9.45 x 3.54 x 2.76 inches) and weight (approximately 31 pounds) for installation planning.
4. Operating Instructions
The Backnets Shower Mixer Valve is designed for intuitive control of water flow and temperature.
4.1 Temperature Control
- The large rotary knob controls both water flow and temperature.
- Rotate the knob counter-clockwise towards the red indicator for hotter water.
- Rotate the knob clockwise towards the blue indicator for cooler water.
- The integrated LED digital display will show the current water temperature in Fahrenheit. The display is powered by water flow and requires no batteries.
- For temperatures below 100°F, the indicator light around the knob will typically be blue. For temperatures above 100°F, it will be orange.
4.2 Function Selection
- The three smaller buttons on the faceplate correspond to the three shower outputs (e.g., rain shower head, handheld shower, shower body jet).
- Press a button to activate its corresponding shower function.
- Multiple buttons can be pressed simultaneously to use two or all three functions at once.
- To turn off a function, press its button again.
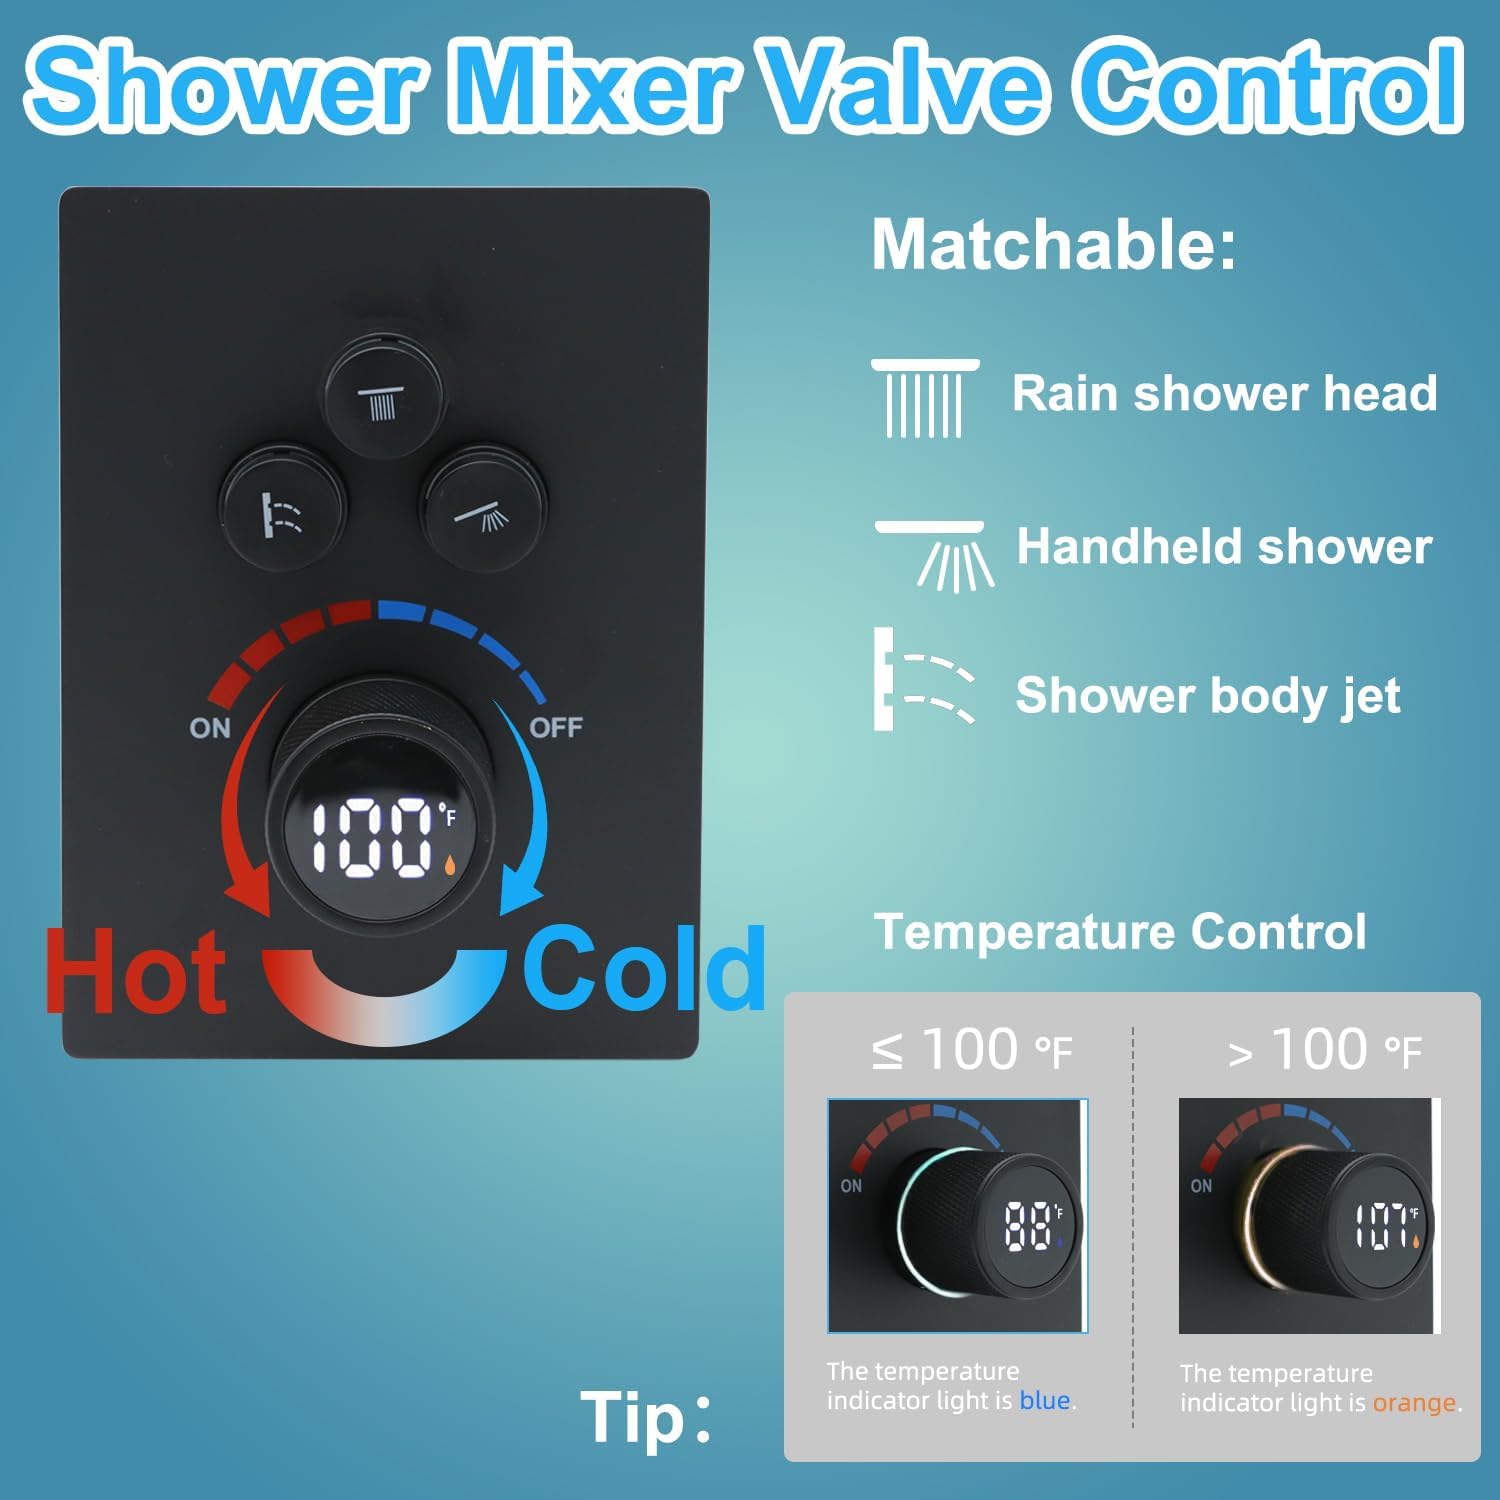
Figure 5: Overview of the control panel, illustrating the temperature control knob and the three buttons for selecting shower functions (rain shower, handheld, body jet).

Figure 6: The hydro-powered digital display indicating water temperature, demonstrating its functionality for both hot and cold water settings.

Figure 7: An example of the shower system in operation, showing how all three functions (rain shower, handheld, body jets) can be used concurrently.
Video 1: A short demonstration of the 3-function digital display valve, showcasing its operation and features.
5. Maintenance
Regular maintenance ensures optimal performance and extends the lifespan of your shower mixer valve.
- Cleaning: Clean the faceplate and control knobs regularly with a soft cloth and mild soap. Avoid abrasive cleaners, harsh chemicals, or scouring pads, as these can damage the finish.
- Inspection: Periodically inspect for any signs of leaks around the connections. Address any leaks promptly to prevent water damage.
- Mineral Buildup: In areas with hard water, mineral deposits may accumulate. If flow or temperature control is affected, consult a professional plumber for descaling or internal component inspection.
6. Troubleshooting
Refer to the following table for common issues and their solutions.
| Problem | Possible Cause | Solution |
|---|---|---|
| No water flow or low pressure | Main water supply off; clogged inlet filters; kinked supply lines. | Check main water supply; clean inlet filters; inspect and straighten supply lines. |
| Inconsistent water temperature | Imbalance in hot/cold water pressure; faulty thermostatic cartridge. | Check water pressure balance; contact a plumber for cartridge inspection/replacement. |
| Digital display not working | Insufficient water flow to power the display; internal sensor issue. | Ensure adequate water flow; if problem persists, contact support. |
| Leaks from valve or connections | Loose connections; damaged seals/O-rings; improper installation. | Tighten connections (do not overtighten); replace damaged seals; re-evaluate installation. |
If you encounter issues not listed here or if the suggested solutions do not resolve the problem, please contact customer support.
7. Specifications
- Model Number: SXFT-1
- Material: Solid Brass
- Color: Matte Black
- Dimensions (L x W x H): 9.45 x 3.54 x 2.76 inches
- Item Weight: Approximately 31 pounds
- Inlet Connection Size: 0.5 Inches NPT
- Outlet Connection Size: 0.5 Inches NPT
- Number of Ports: 5 (2 Inlets, 3 Outlets)
- Certifications: cUPC
- Power Source for Display: Hydroelectric (no batteries required)
8. Warranty and Support
For warranty information or technical assistance, please contact Backnets customer service through the retailer where the product was purchased or visit the official Backnets website. Please have your model number (SXFT-1) and purchase date available when contacting support.