1. Introduction
Thank you for purchasing the Nikai 2000W Single Induction Cooker, Model NIC222A. This appliance is designed for efficient and convenient cooking with its 7 preset cooking options, 4-digit digital LED display, and touch controls. Please read this manual thoroughly before operating the appliance to ensure safe and optimal performance. Keep this manual for future reference.
2. Important Safety Instructions
When using electrical appliances, basic safety precautions should always be followed to reduce the risk of fire, electric shock, and injury.
- Read all instructions carefully before use.
- Do not touch hot surfaces. Use handles or knobs.
- To protect against electrical shock, do not immerse cord, plugs, or the appliance in water or other liquid.
- Close supervision is necessary when any appliance is used by or near children.
- Unplug from outlet when not in use and before cleaning. Allow to cool before putting on or taking off parts.
- Do not operate any appliance with a damaged cord or plug, or after the appliance malfunctions or has been damaged in any manner.
- The use of accessory attachments not recommended by the appliance manufacturer may cause injuries.
- Do not use outdoors.
- Do not let cord hang over edge of table or counter, or touch hot surfaces.
- Do not place on or near a hot gas or electric burner, or in a heated oven.
- Extreme caution must be used when moving an appliance containing hot oil or other hot liquids.
- Always attach plug to appliance first, then plug cord into the wall outlet. To disconnect, turn any control to 'off', then remove plug from wall outlet.
- Do not use appliance for other than intended use.
- Warning: The surface remains hot after use. Please do not touch until it has cooled down completely.
- Ensure proper ventilation around the appliance during operation.
- Do not place metallic objects such as knives, forks, spoons, and lids on the induction cooktop surface as they can get hot.
3. Product Overview
The Nikai Single Induction Cooker features a sleek black crystal glass panel and an intuitive touch control interface.
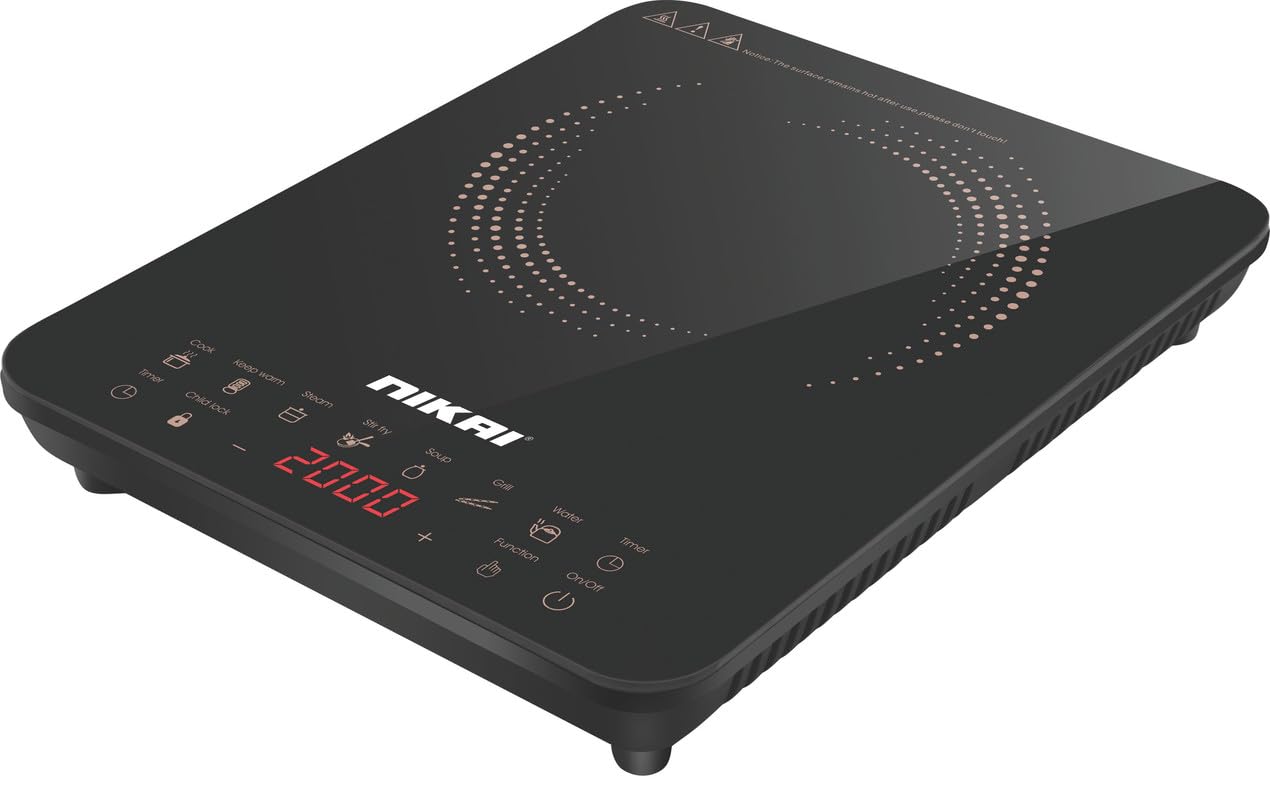
Image 1: Front view of the Nikai Single Induction Cooker, showing the cooking surface and control panel.
Control Panel Features:
- Cook: General cooking function.
- Keep Warm: Maintains food at a warm temperature.
- Steam: Preset function for steaming.
- Stir Fry: Preset function for stir-frying.
- Soup: Preset function for cooking soup.
- Grill: Preset function for grilling.
- Water: Preset function for boiling water.
- Timer: Sets the cooking duration.
- Child Lock: Locks the control panel to prevent accidental operation.
- Function: Selects different cooking modes or adjusts settings.
- On/Off: Powers the unit on or off.
- '-' and '+': Adjusts power levels, temperature, or timer settings.
- LED Display: Shows power level, temperature, timer, and other indicators.
4. Setup
- Unpacking: Carefully remove the induction cooker from its packaging. Retain the packaging for future storage or transport.
- Placement: Place the cooker on a stable, flat, heat-resistant surface. Ensure there is adequate space (at least 10-15 cm) around the appliance for proper ventilation. Do not place it near water sources or heat-sensitive materials.
- Power Connection: Ensure the voltage of your power outlet matches the appliance's requirements (220V). Plug the power cord into a grounded electrical outlet.
- Initial Cleaning: Before first use, wipe the glass surface with a soft, damp cloth. Ensure the surface is dry before plugging in.
5. Operating Instructions
5.1 Basic Operation
- Place suitable induction-compatible cookware (see Section 6) containing food or liquid on the center of the glass cooktop.
- Press the 'On/Off' button to power on the cooker. The LED display will light up.
- Select a cooking function (e.g., 'Cook', 'Stir Fry', 'Soup') or press 'Function' to manually adjust the power level using the '-' and '+' buttons. The power level typically ranges from 1 to 10 or displays wattage.
- The cooker will begin heating. Monitor your cooking process.
- To stop cooking, press the 'On/Off' button. The cooker will turn off, and the fan may continue to run for a short period to cool down the internal components.
5.2 Preset Cooking Options
The cooker offers 7 preset cooking options: Cook, Keep Warm, Steam, Stir Fry, Soup, Grill, and Water. To use a preset:
- Place cookware on the cooktop and power on the unit.
- Press the desired preset button (e.g., 'Steam'). The cooker will automatically set the appropriate power and time for that function.
- You may be able to adjust the time or power within some preset modes using the '-' and '+' buttons.
5.3 Timer Function
The cooker features a 3-hour timer and a 24-hour preset function.
- Cooking Timer: While cooking, press the 'Timer' button. Use '-' and '+' to set the desired cooking duration (up to 3 hours). The cooker will automatically turn off when the timer expires.
- 24-Hour Preset Function: This allows you to set a delayed start time for cooking. Consult the full manual for detailed instructions on setting the 24-hour preset.
5.4 Child Lock
To activate the child lock, press and hold the 'Child Lock' button for a few seconds. The control panel will be locked, preventing accidental changes to settings. To deactivate, press and hold the 'Child Lock' button again.
6. Compatible Cookware
Induction cookers only work with specific types of cookware. Ensure your pots and pans are induction-compatible.
Compatible Cookware Materials:
- Cast iron
- Enamelled iron
- Steel
- Stainless steel (magnetic grade)
- Flat-bottomed pans with a diameter between 12 cm and 26 cm.
Incompatible Cookware Materials:
- Ceramic
- Glass
- Aluminum
- Copper
- Non-magnetic stainless steel
- Pans with a rounded bottom or feet.
How to Test Cookware Compatibility:
Place a magnet on the bottom of your pot or pan. If the magnet sticks firmly, the cookware is compatible with induction cooking.
For optimal performance, use cookware with a flat bottom that makes full contact with the induction surface.
7. Maintenance and Cleaning
Regular cleaning and maintenance will ensure the longevity and optimal performance of your induction cooker.
- Before Cleaning: Always unplug the appliance from the power outlet and allow it to cool down completely before cleaning.
- Glass Surface: Wipe the glass cooktop with a soft, damp cloth and a mild detergent. For stubborn stains, use a non-abrasive ceramic hob cleaner. Dry thoroughly with a clean cloth.
- Body: Wipe the exterior body with a soft, damp cloth. Do not use abrasive cleaners, scouring pads, or harsh chemicals.
- Ventilation Openings: Ensure the ventilation openings are free from dust and debris to prevent overheating. Use a soft brush or vacuum cleaner to gently clear them.
- Do Not Immerse: Never immerse the induction cooker in water or any other liquid.
8. Troubleshooting
If you encounter issues with your induction cooker, refer to the following common problems and solutions:
| Problem | Possible Cause | Solution |
|---|---|---|
| Cooker does not turn on. | No power supply; Power cord not properly plugged in; Child lock activated. | Check power outlet and plug connection. Deactivate child lock by pressing and holding the 'Child Lock' button. |
| Cooker turns on but does not heat. | Cookware is not induction-compatible; Cookware is not centered; Cookware is too small or too large. | Use induction-compatible cookware. Center the cookware on the cooking zone. Ensure cookware diameter is between 12-26 cm. |
| Uneven heating or food not cooking properly. | Cookware not suitable for induction; Cookware base is warped or too thin; Incorrect power setting. | Ensure cookware is induction-compatible with a flat, thick base. Adjust power settings as needed. |
| Display shows an error code. | Internal malfunction; Overheating; Sensor error. | Turn off the cooker, unplug it, and wait for 10-15 minutes before plugging it back in. If the error persists, contact customer support. |
| Fan continues to run after turning off. | Normal operation to cool down internal components. | This is normal. The fan will stop automatically once the unit has cooled sufficiently. |
If the problem persists after attempting these solutions, please contact Nikai customer support.
9. Specifications
| Feature | Specification |
|---|---|
| Brand | Nikai |
| Model Number | NIC222A |
| Power | 2000W |
| Voltage | 220V |
| Cooktop Type | Induction |
| Number of Heating Elements | 1 |
| Control Type | Touch |
| Material | Glass |
| Color | Black |
| Product Dimensions (D x W x H) | 38 cm x 30 cm x 7.5 cm |
| Item Weight | 2.8 kg |
| Special Features | LCD Display, Automatic Shut-off, Temperature Control, Programmable, Child Lock |
| Included Components | Induction Cooker |
| Manufacturing Year | 2024 |
| Country of Origin | China |
10. Warranty and Support
Warranty Information:
This Nikai Induction Cooker (Model NIC222A) comes with a 2-year manufacturer warranty from the date of purchase. Please retain your proof of purchase for warranty claims. The warranty covers defects in materials and workmanship under normal use.
The warranty does not cover damage resulting from misuse, accident, unauthorized modification, or failure to follow the instructions in this manual.
Customer Support:
For technical assistance, warranty claims, or any questions regarding your Nikai Induction Cooker, please contact Nikai customer service. Refer to the contact information provided with your product packaging or visit the official Nikai website for support details.