Nairtech VM PLUS-3.5KW-WIFI
Nairtech 3500W Pure Sine Wave Hybrid Solar Inverter VM PLUS-3.5KW-WIFI User Manual
1. Introduction
This manual provides essential information for the safe and efficient operation of your Nairtech 3500W Pure Sine Wave Hybrid Solar Inverter VM PLUS-3.5KW-WIFI. This device combines the functions of an inverter, solar charger, and battery charger to provide uninterruptible power support. Please read this manual thoroughly before installation and use to ensure proper functionality and longevity of the product.
2. Safety Instructions
Observe the following safety precautions during installation, operation, and maintenance:
- High Voltage Warning: The inverter contains high voltage components. Do not open the inverter casing without proper training and safety precautions. Only qualified personnel should perform internal servicing.
- Proper Grounding: Ensure the inverter is properly grounded to prevent electrical shock.
- Disconnect Power: Always disconnect all power sources (AC input, solar input, battery) before performing any wiring or servicing.
- Ventilation: Install the inverter in a well-ventilated area to prevent overheating. Maintain adequate clearance around the unit.
- Environmental Conditions: Avoid installing the inverter in direct sunlight, near flammable materials, or in areas with excessive dust, moisture, or corrosive gases.
- Battery Safety: Work with batteries carefully. Wear eye protection and appropriate clothing. Batteries can produce explosive gases.
3. Product Overview
3.1 Key Features
- Multi-function inverter/charger combining inverter, solar charger, and battery charger.
- Provides uninterruptible power support in a portable size.
- Comprehensive LCD display for user-configurable settings.
- Easy-accessible button operation for settings such as battery charging current, AC/solar charger priority, and acceptable input voltage.
- All-in-one design for simplified operation and wide application range.
- Integrated WiFi module for remote monitoring and communication.
3.2 Components and Interface
The Nairtech 3500W Hybrid Solar Inverter features a user-friendly interface and robust connection points.

Figure 1: Front view of the Nairtech 3500W Hybrid Solar Inverter, showing the LCD display and control buttons for system monitoring and configuration.

Figure 2: Angled view of the Nairtech 3500W Hybrid Solar Inverter, illustrating its overall design and various connection points on the side and rear.
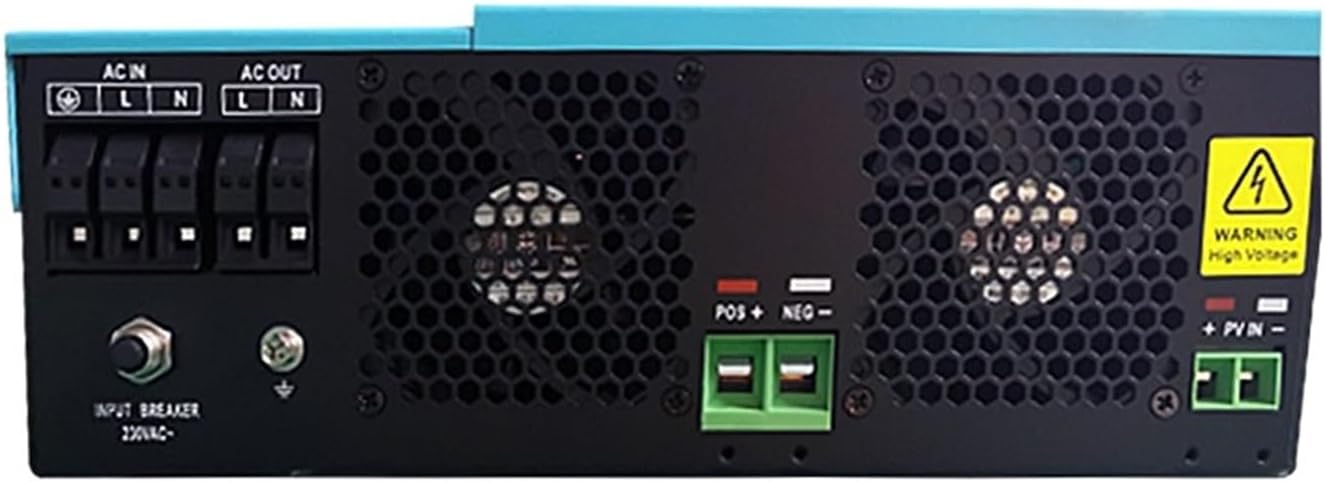
Figure 3: Rear panel of the inverter, detailing the AC input/output terminals, battery connections (POS+, NEG-), PV input (+PVIN-), input breaker, and cooling vents. A warning label for high voltage is also visible.

Figure 4: The external WiFi module and its connecting cable, which enables remote monitoring and communication capabilities for the inverter system.
4. Setup and Installation
4.1 System Overview Diagram
The following diagram illustrates a typical setup for the Nairtech Hybrid Solar Inverter, integrating solar power, a generator, utility grid, battery packs, and home appliances.

Figure 5: A comprehensive system diagram showing the integration of solar panels, a generator, the utility grid, the Nairtech inverter, battery packs, and various home appliances, demonstrating the inverter's role in managing power flow.
4.2 Mounting the Inverter
- Choose a vertical, non-flammable surface for mounting.
- Ensure the mounting location is dry, well-ventilated, and protected from direct sunlight and moisture.
- Leave at least 20 cm (8 inches) clearance on all sides for proper airflow and heat dissipation.
4.3 Wiring Connections
All wiring must be performed by a qualified electrician in accordance with local electrical codes.
- Battery Connection: Connect the battery bank to the inverter's battery terminals (POS+ and NEG-). Ensure correct polarity. The inverter supports a 24VDC battery system.
- AC Input Connection: Connect the utility grid or generator AC input to the designated AC IN terminals.
- AC Output Connection: Connect your loads (home appliances) to the AC OUT terminals.
- PV Input Connection: Connect the solar panel array to the PV input terminals (+PVIN-). Ensure the maximum PV array open circuit voltage does not exceed 500VDC.
- Communication Port: Connect the WiFi module to the 'COMM PORT' for remote monitoring.

Figure 6: A close-up view of the inverter's communication port, labeled 'COMM PORT', with an RS232 cable connected to an external WiFi module, facilitating data exchange and remote control.
5. Operating Instructions
5.1 Initial Startup
- After all connections are securely made, switch on the battery breaker first.
- Then, switch on the AC input breaker (if connected to utility/generator).
- Finally, switch on the PV input breaker (if connected to solar panels).
- The inverter will perform a self-test and the LCD display will illuminate.
5.2 LCD Display and Button Operation
The comprehensive LCD display provides real-time system status and allows for user configuration. Use the buttons adjacent to the display to navigate menus and adjust settings.
- Monitoring: View battery voltage, AC input/output voltage, charging current, load percentage, and operational status.
- Configuration: Adjust parameters such as battery charging current (Max AC Charge Current: 80A, Max Charging Current: MPPT 100A), AC/solar charger priority, and acceptable input voltage range based on your application requirements.
5.3 WiFi Module Usage
The integrated WiFi module allows for remote monitoring and management of your inverter. Refer to the separate WiFi module instruction manual for detailed setup and application usage.
6. Maintenance
- Regular Inspection: Periodically check all wiring connections for tightness and signs of corrosion.
- Cleaning: Keep the inverter's ventilation openings clear of dust and debris to ensure proper cooling. Use a dry cloth to clean the exterior. Do not use liquid cleaners.
- Battery Maintenance: Follow the battery manufacturer's guidelines for maintenance to ensure optimal performance and lifespan.
7. Troubleshooting
This section provides solutions to common issues. For problems not listed here, contact technical support.
| Problem | Possible Cause | Solution |
|---|---|---|
| Inverter not turning on | No battery connection or low battery voltage. | Check battery connections and ensure battery voltage is above the minimum operating level. |
| No AC output | Overload, short circuit, or inverter fault. | Reduce load, check for short circuits in wiring, or restart the inverter. If the problem persists, contact support. |
| Solar charging not active | PV input voltage too low or high, or PV connections incorrect. | Verify PV array voltage is within specifications (Max PV Array Open Circuit Voltage: 500VDC) and check all PV wiring. |
| Overheating warning | Insufficient ventilation or blocked cooling vents. | Ensure adequate clearance around the inverter and clean any blocked vents. Reduce ambient temperature if possible. |
8. Specifications
| Parameter | Value |
|---|---|
| Model Number | VM PLUS-3.5KW-WIFI |
| Rated Power | 3500VA / 3500W |
| Output Voltage | 230VAC |
| Output Frequency | 50Hz/60Hz |
| Output Type | Single Phase |
| Battery Voltage | 24VDC |
| Floating Charge Voltage | 27VDC |
| Overcharge Protection | 33VDC |
| Maximum AC Charge Current | 80A |
| Maximum PV Array Power | 5000W |
| Maximum Charging Current (MPPT) | 100A |
| Maximum PV Array Open Circuit Voltage | 500VDC |
| Grid Type | Off-Grid Inverter |
| Communication Interface | RS232/GPRS/WIFI |
| Dimensions (approx.) | 100*300*440mm |
| Manufacturer | Nairtech |
| ASIN | B0D39LTF4Q |
9. Warranty and Support
For warranty information, technical support, or service inquiries, please refer to the warranty card included with your product or contact your authorized Nairtech dealer or customer service directly. Ensure you have your product model number (VM PLUS-3.5KW-WIFI) and purchase details available when seeking support.
Ask a question about this manual
Ask about setup, troubleshooting, compatibility, parts, safety, or missing instructions. Manuals+ will review the question and use this page’s manual context to help answer it.