Introduction
This manual provides comprehensive instructions for the installation, operation, and maintenance of your SOLRIG Bi-Folding Barn Door. Please read these instructions carefully before beginning installation to ensure proper setup and safe use. Retain this manual for future reference.
The SOLRIG Bi-Folding Barn Door is designed to offer unique functionality and space-saving benefits. Its panels slide and fold simultaneously, allowing for unobtrusive storage and maximizing doorway clearance. This design is ideal for various interior spaces, providing both aesthetic appeal and practical utility.
Package Contents
Before starting the installation, verify that all components listed below are present and undamaged. If any parts are missing or damaged, please contact SOLRIG customer support immediately.
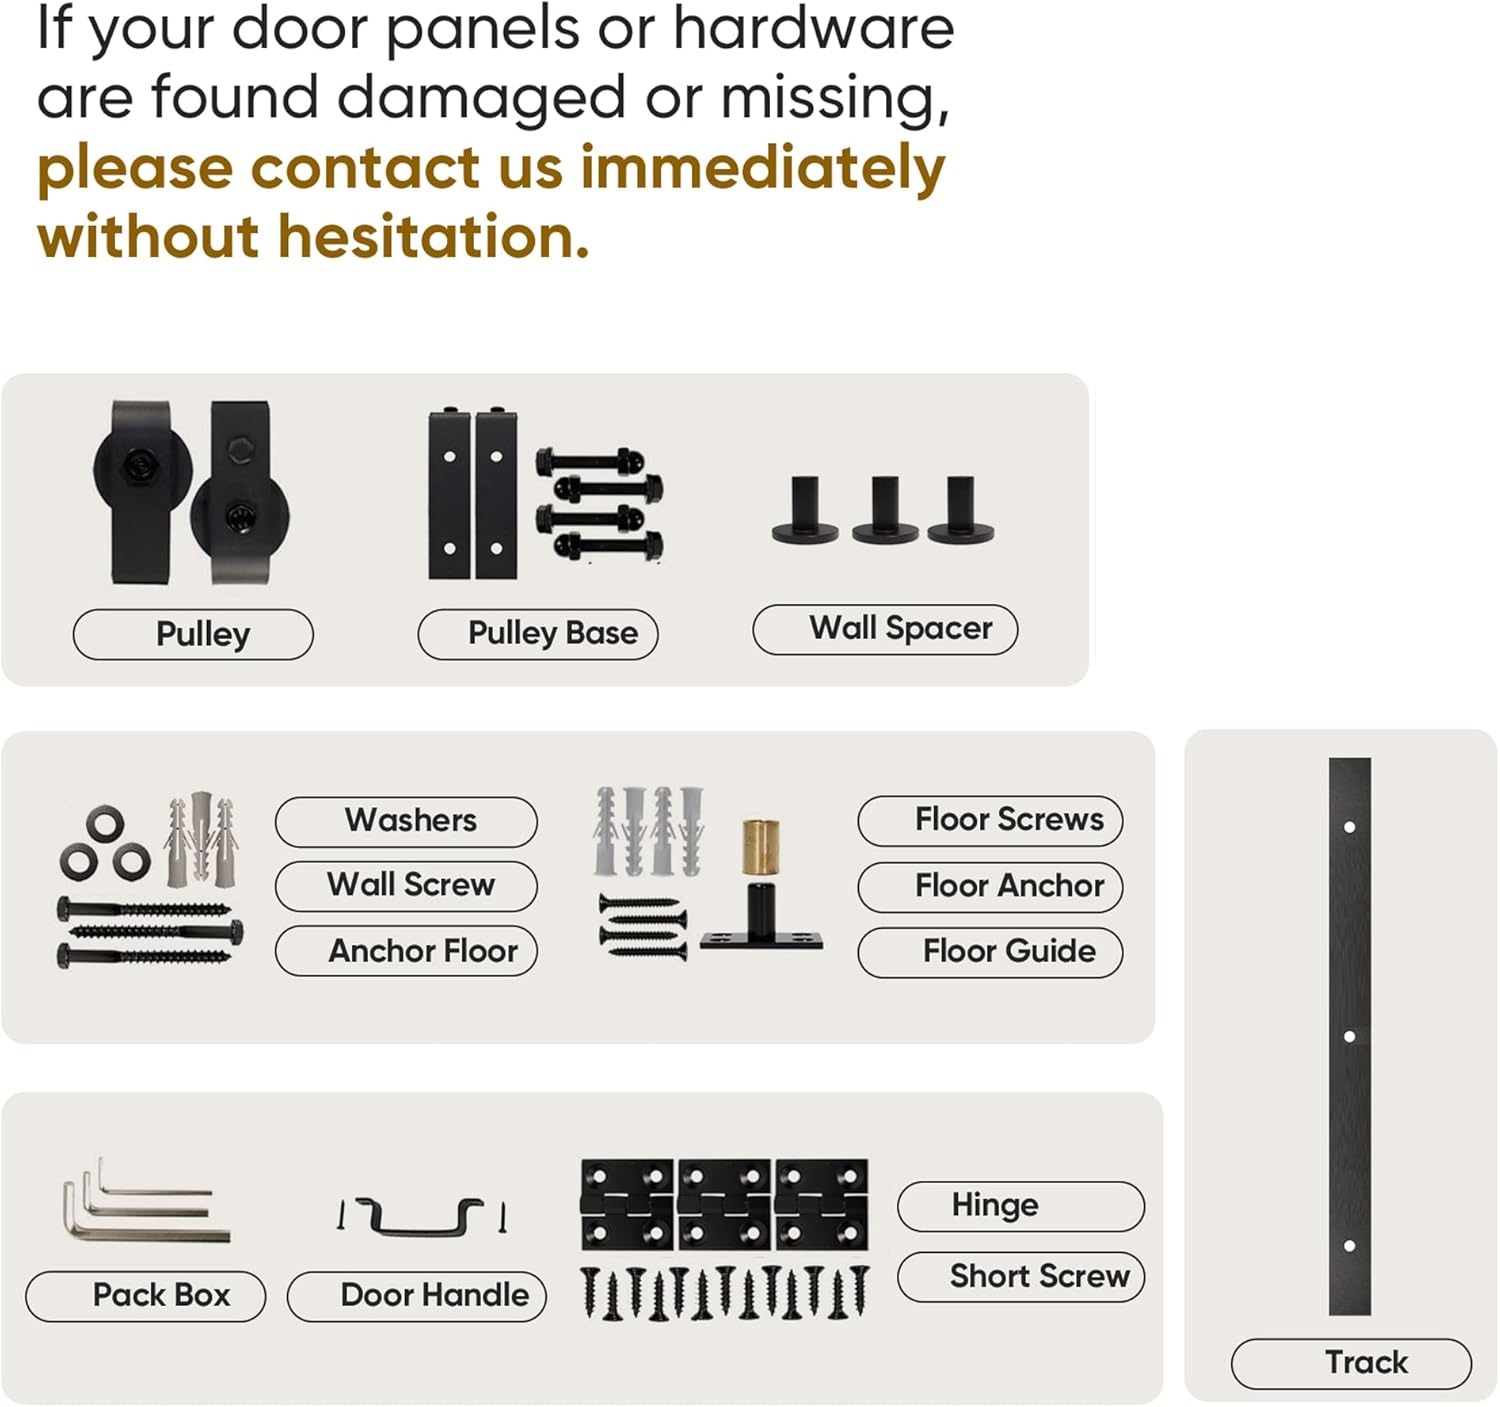
Figure 1: Package Contents Overview. This image displays the various components included in the bi-folding barn door kit, such as pulleys, pulley bases, wall spacers, washers, screws, anchors, floor guide, hinges, door handle, and the track.
- Door Panels: Four finished door panels (24 inches each, totaling 48 inches width, 84 inches height).
- Track: 4.33 FT (1320mm) track.
- Sliding Wheels: Two sets of sliding wheels for smooth operation.
- Hinges: Hinges specifically designed for bi-folding door panels.
- Mounting Hardware: Includes pulleys, pulley bases, wall spacers, washers, various screws (floor screws, wall screws, short screws), floor anchors, and a floor guide.
- Door Handle: One door handle.
- Instruction Manual: This document.
Specifications
| Feature | Detail |
|---|---|
| Model Number | B0D31Q7SS2 |
| Dimensions (Overall) | 48" (24"x 2) x 84" (Width x Height) |
| Door Thickness | 1.42 inches |
| Material | MDF (Medium-Density Fiberboard) |
| Color | White 6 Panel |
| Track Length | 4.33 FT (1320mm) |
| Item Weight | 80 pounds |
| Sound Insulation | Effective in reducing external noise transmission. |
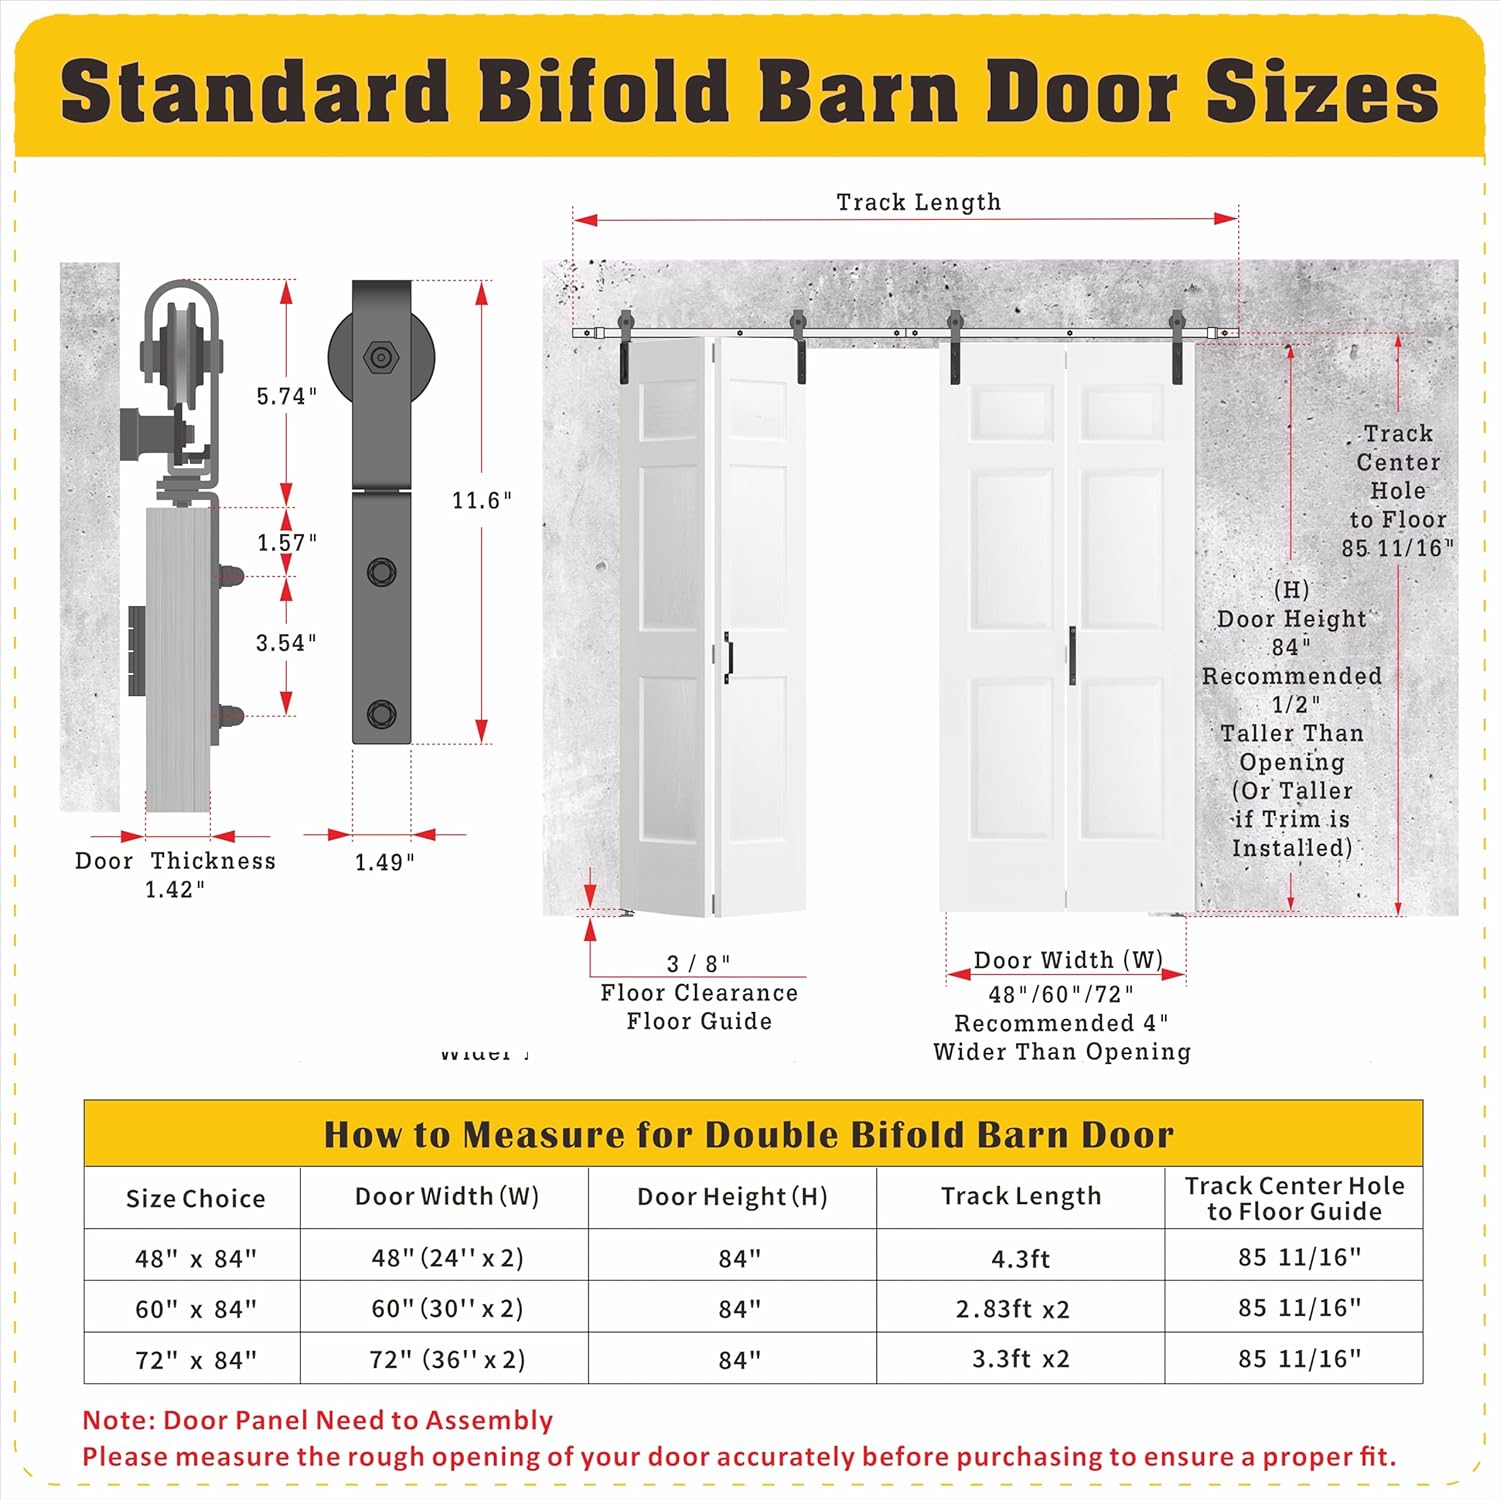
Figure 2: Standard Bifold Barn Door Sizes and Measurement Guide. This image provides a detailed diagram for measuring door openings, showing recommended door height and width relative to the opening, and track length specifications for different door sizes.
Setup and Installation
Proper installation is crucial for the functionality and longevity of your bi-folding barn door. Follow these steps carefully. It is recommended to have at least two people for installation due to the weight and size of the door panels.
Tools Required (Not Included):
- Measuring Tape
- Pencil
- Level
- Drill with appropriate drill bits
- Screwdriver (Phillips head)
- Wrench (for track bolts)
- Stud Finder (recommended)
Installation Steps:
- Measure and Prepare Opening:
Ensure your rough opening is accurately measured. The recommended door height is 84 inches, and the door width is 48 inches (24 inches x 2 panels). The track center hole to floor should be 85 11/16 inches. The door height should be approximately 1/2 inch taller than the opening (or taller if trim is installed).
- Install Track:
Locate wall studs for secure mounting. Mark the positions for the track mounting holes. Drill pilot holes and attach the 4.33 FT track to the wall using the provided wall spacers and screws. Ensure the track is perfectly level.
- Assemble Door Panels:
Attach the hinges to connect the individual door panels. Ensure the hinges are securely fastened and allow for smooth folding action. The door panels require assembly before hanging.
- Attach Sliding Wheels and Hardware to Doors:
Mount the sliding wheels (pulleys) and pulley bases to the top edge of the door panels as per the detailed instructions provided in the physical manual. Ensure they are aligned correctly for smooth 360-degree rotation and silent operation.

Figure 3: Hardware Features. This image highlights the smooth 360-degree rotation of the pulley, the silent operation of the sliding wheel, and the robust construction of the high-strength industrial-grade tracks and pulleys.
- Hang Doors on Track:
Carefully lift and hang the assembled door panels onto the track. Ensure the sliding wheels engage properly with the track. Adjust as necessary to ensure the doors hang evenly.
- Install Floor Guide:
Position the floor guide at the bottom of the door opening to prevent the doors from swinging outwards. Mark and drill holes, then secure the floor guide using the provided floor screws and anchors. Ensure a 3/8 inch floor clearance.
- Attach Door Handle:
Securely attach the door handle to the designated panel using the short screws.
- Final Adjustments:
Test the door's operation. Open and close the door fully to check for any resistance or misalignment. Make minor adjustments to the track or door hardware as needed to ensure smooth and quiet operation.
Operating Instructions
The SOLRIG Bi-Folding Barn Door is designed for ease of use. Follow these guidelines for optimal performance.
Opening the Door:
- Grasp the door handle firmly.
- Gently pull the door panels along the track. The panels will fold simultaneously as they slide, creating a wider opening.
- Continue pulling until the door is fully open and folded against the wall or frame, maximizing the clear passage.
Closing the Door:
- Grasp the door handle.
- Gently push the door panels along the track. The panels will unfold as they slide, closing the opening.
- Ensure the door is fully closed and aligned with the frame to provide optimal sound insulation and privacy.

Figure 4: Bi-Folding Door in Open Position. This image demonstrates the door fully opened, with panels folded to the side, showcasing the space-saving design.
Figure 5: Bi-Folding Door in Closed Position. This image shows the door fully closed, providing privacy and sound insulation for the room.
Maintenance
Regular maintenance will help ensure the longevity and smooth operation of your SOLRIG Bi-Folding Barn Door.
- Cleaning:
Wipe door panels with a soft, damp cloth. Avoid abrasive cleaners or harsh chemicals that could damage the MDF finish. For the track and hardware, use a dry cloth to remove dust and debris.
- Lubrication:
Periodically apply a silicone-based lubricant to the track and sliding wheels to maintain smooth and silent operation. Do not use oil-based lubricants as they can attract dust and dirt.
- Hardware Inspection:
Regularly check all screws, bolts, and hinges for tightness. Tighten any loose fasteners to prevent misalignment or damage. Inspect the track for any obstructions or damage that could impede door movement.
- Floor Guide:
Ensure the floor guide remains free of debris and is securely fastened to the floor.
Troubleshooting
This section addresses common issues you might encounter with your bi-folding barn door.
| Problem | Possible Cause | Solution |
|---|---|---|
| Door sticks or is difficult to slide. |
|
|
| Door panels do not fold smoothly. |
|
|
| Door makes noise during operation. |
|
|
| Door does not close completely or leaves a gap. |
|
|
Warranty and Support
SOLRIG stands by the quality of its products. All our work is guaranteed by quality, efficiency, and durability.
Warranty Information:
This product comes with a 30-day easy returns policy. For specific warranty details regarding defects in materials or workmanship, please refer to the documentation included with your purchase or contact customer support.
Customer Support:
If you encounter any issues, have questions about installation, or if your product arrives damaged or with missing parts, please contact our team of experts immediately. We are committed to providing a good shopping experience and will assist with replacements or solutions.
You can reach SOLRIG customer support through the seller contact options on the platform where you purchased the product. Look for the "Ask a question" or "Contact Seller" option.

Figure 6: How to Contact Customer Support. This image illustrates the process of contacting customer support through the Amazon platform, guiding users to the "Ask a question" feature.