1. Introduction
This manual provides detailed instructions for the assembly, safe operation, and maintenance of your Merax Metal Loft Bed with an integrated desk and shelves. Please read all instructions carefully before assembly and use to ensure proper setup and to prevent injury.

Image 1.1: Overview of the Merax Metal Loft Bed with Desk and Shelves.
2. Safety Information
Adhere to the following safety guidelines to reduce the risk of injury:
- Maximum Weight Capacity: The loft bed is designed to support a maximum weight of 250 pounds. Do not exceed this limit.
- Mattress Requirements: Use a mattress that is appropriate for a full-size bed. Ensure the mattress thickness does not exceed the height of the guardrails to maintain safety.
- Guardrails: Always ensure all guardrails are securely in place before using the bed. Guardrails are essential for preventing falls.
- Ladder Use: Use the ladder for entry and exit from the loft bed. Do not jump on or off the bed.
- Assembly: Assemble the bed strictly according to the instructions. Ensure all bolts and fasteners are tightened securely. Periodically check and re-tighten all connections.
- Children: This loft bed is not recommended for children under 6 years of age.
- Ventilation: Ensure adequate ventilation around the bed.
- No Horseplay: Prohibit horseplay on or under the bed.

Image 2.1: Detail of the full-length safety guardrail.
3. Package Contents
Before beginning assembly, verify that all components are present and undamaged. If any parts are missing or damaged, do not proceed with assembly. Contact customer support for assistance.
- Metal frame components (posts, side rails, crossbars)
- Bed slats or mattress support grid
- Desk panel
- Shelf panels
- Ladder components
- Guardrails
- Hardware pack (bolts, screws, washers, Allen wrench)
- Instruction Manual
4. Setup and Assembly Instructions
Assembly typically requires two adults. Clear a spacious area for assembly. Do not fully tighten bolts until instructed.
Step 4.1: Prepare Components
- Unpack all components and lay them out on a soft, clean surface to prevent scratches.
- Identify each part using the provided parts list (if applicable).
Step 4.2: Assemble Side Frames
- Connect the vertical posts with the horizontal side rails using the provided bolts and Allen wrench. Hand-tighten only.
- Repeat for the second side frame.
Step 4.3: Connect Main Frame
- Attach the assembled side frames using the front and back horizontal crossbars.
- Ensure the frame is square and stable before proceeding.
Step 4.4: Install Desk and Shelves
- Position the desk panel and shelf panels into their designated slots or attachment points on the frame.
- Secure them with the appropriate hardware.
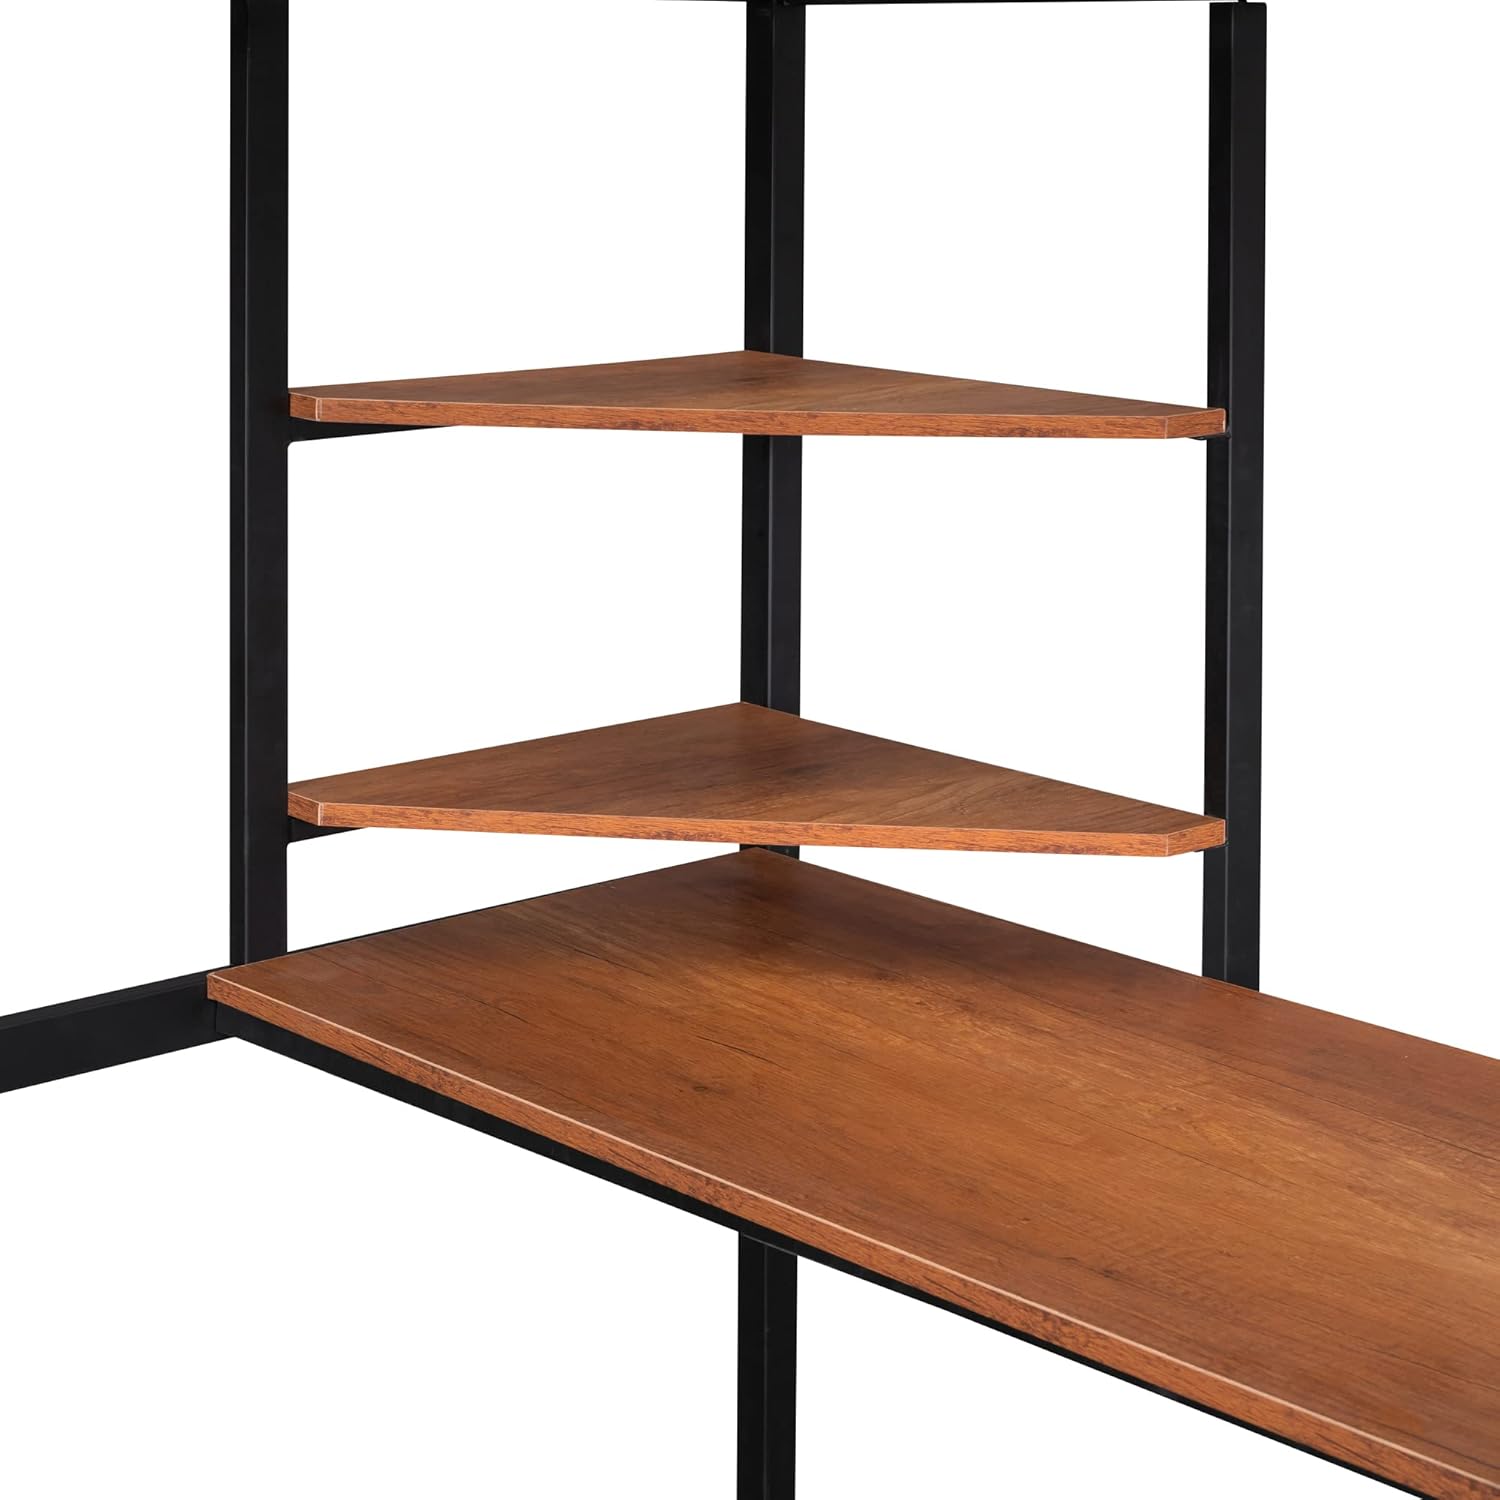
Image 4.4.1: Detail of the integrated corner shelves.
Step 4.5: Attach Ladder and Guardrails
- Attach the ladder to the designated side of the bed frame.
- Install the full-length guardrails around the top sleeping area.
- Ensure all ladder and guardrail connections are secure.

Image 4.5.1: View of the integrated ladder and desk area.
Step 4.6: Install Bed Slats
- Place the bed slats or mattress support grid onto the designated support ledges of the bed frame.
- Secure the slats according to the instructions, typically by screwing them into place or using plastic caps.

Image 4.6.1: Detail of the metal bed slats and desk surface.
Step 4.7: Final Tightening
- Once all components are in place, go back and fully tighten all bolts and fasteners. Do not overtighten.
- Ensure the bed is stable and does not wobble.
5. Operating Instructions (Usage)
The Merax Metal Loft Bed is designed for sleeping, studying, and storage.
- Sleeping Area: The top bunk is for sleeping. Ensure a suitable full-size mattress is used.
- Desk Area: The integrated desk provides a workspace for studying, hobbies, or computer use.
- Shelves: The corner shelves offer convenient storage for books, decor, or personal items.
- Access: Always use the ladder to access the top bunk.
6. Maintenance
Regular maintenance will prolong the life and safety of your loft bed.
- Cleaning: Wipe metal surfaces with a soft, damp cloth. Avoid abrasive cleaners. For wooden desk and shelf surfaces, use a furniture cleaner as appropriate.
- Hardware Check: Periodically (every 3-6 months) inspect all bolts, screws, and fasteners. Re-tighten any loose connections to maintain stability and safety.
- Structural Integrity: Check the bed frame for any signs of damage, bending, or cracks. Discontinue use if significant damage is found and contact customer support.
7. Troubleshooting
Address common issues with your loft bed using the following guide:
- Wobbling/Instability: Ensure all bolts and fasteners are fully tightened. Check that the bed is placed on a level surface.
- Squeaking Noises: Squeaking often indicates loose connections. Re-tighten all hardware. Applying a small amount of lubricant (e.g., silicone spray) to metal-on-metal contact points can also help.
- Difficulty Assembling: Review the assembly instructions carefully. Ensure all parts are correctly oriented and that you are using the correct hardware for each step. Do not force parts together.
- Damaged/Missing Parts: Do not attempt to use the bed with damaged or missing parts. Contact customer support for replacements.
8. Specifications
| Feature | Specification |
|---|---|
| Model Number | 235AAB |
| Material | Metal |
| Color | Black |
| Compatible Mattress Size | Full |
| Overall Dimensions (L x W x H) | 77.2'' x 56.1'' x 66'' |
| Maximum Weight Recommendation | 250 Pounds |
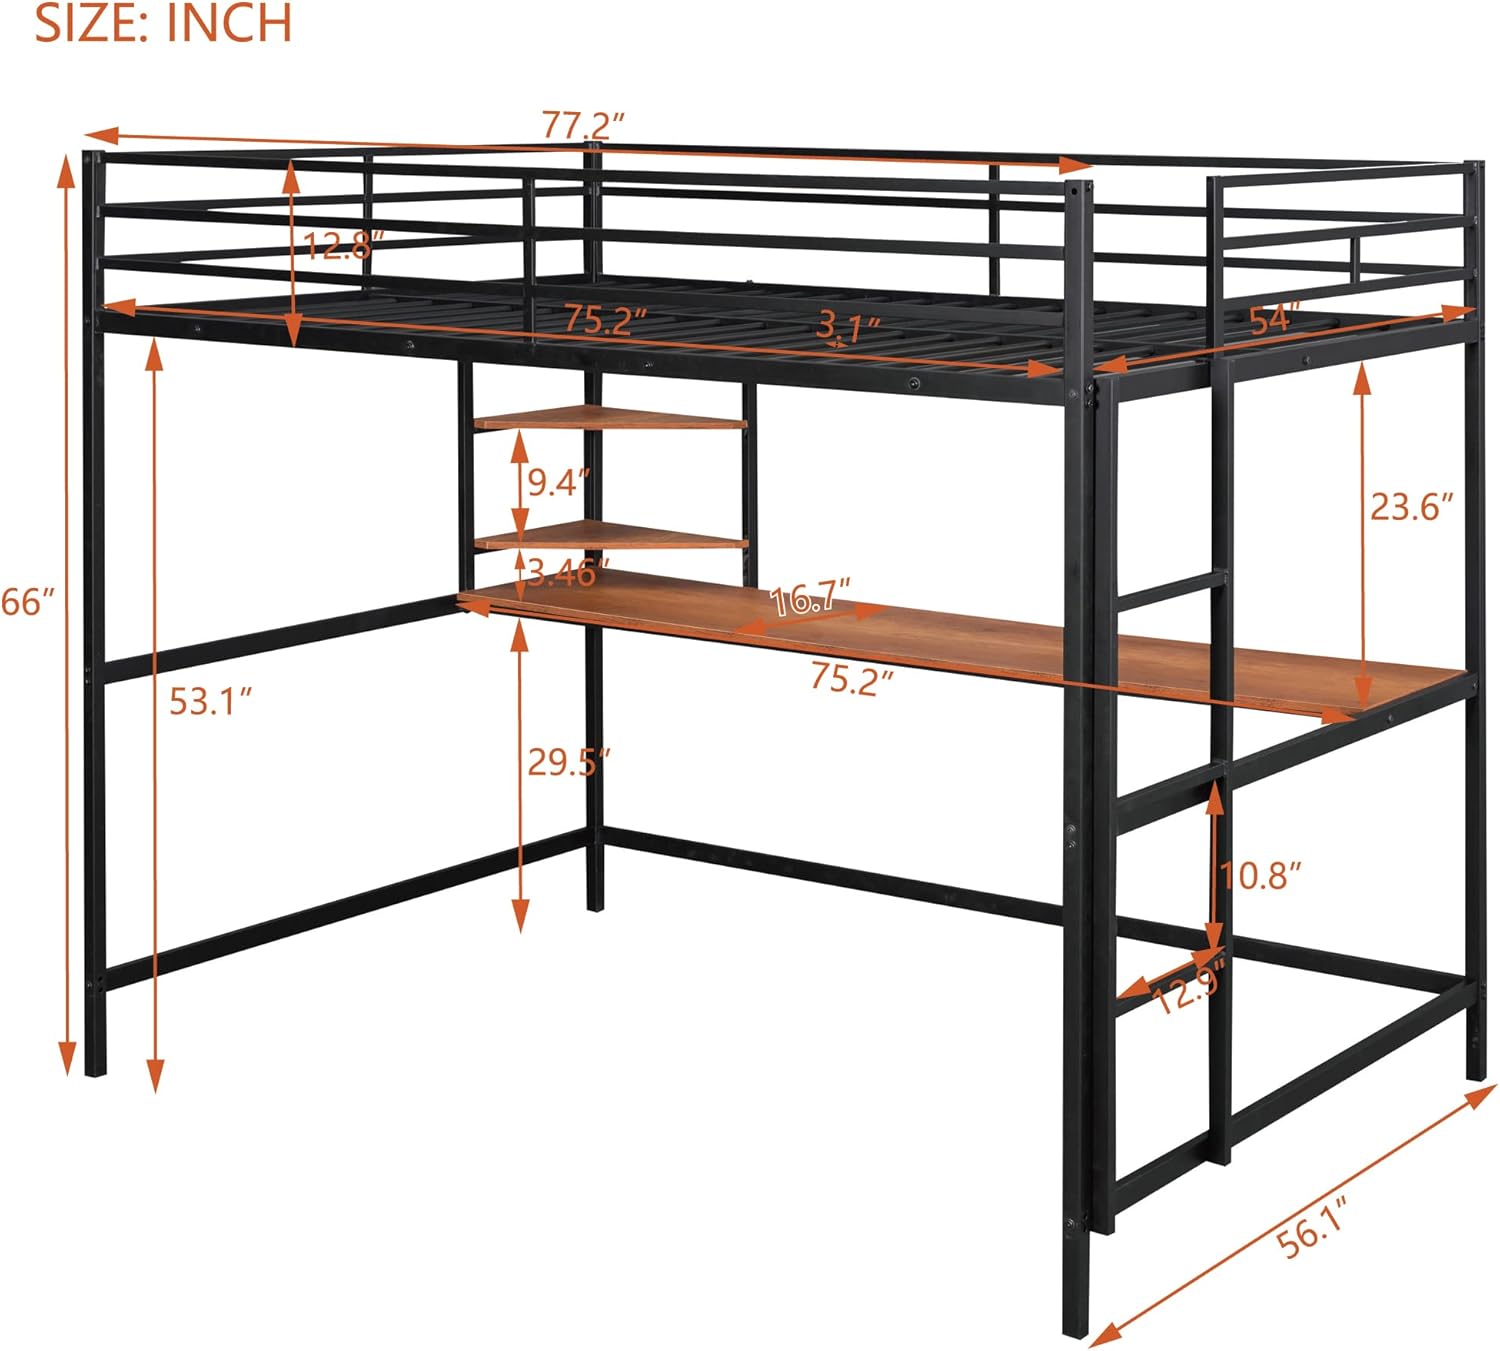
Image 8.1: Dimensional diagram of the loft bed.
9. Warranty Information
Merax products are covered by a limited warranty against manufacturing defects. For specific warranty terms and conditions, please refer to the warranty card included with your product or visit the official Merax website. Keep your proof of purchase for warranty claims.
10. Customer Support
If you have any questions, require assistance with assembly, or need to report missing/damaged parts, please contact Merax customer support. Provide your model number (235AAB) and purchase details for efficient service.
Contact Information: Please refer to the contact details provided on your purchase receipt or the official Merax website for the most current support options.


