1. Product Overview
This manual provides essential instructions for the installation, operation, and maintenance of your ToiCottage HY2005RX-RM-24V Remote Control and Receiver system, designed for children's electric ride-on vehicles. Please read this manual thoroughly before use to ensure proper function and safety.

Image 1.1: The ToiCottage HY2005RX-RM-24V receiver unit and its accompanying remote control. The receiver is a black rectangular box with various ports and a cooling fan design, while the remote is a black, ergonomic controller with grey buttons.
2. Setup and Installation
Proper installation is crucial for the safe and correct operation of the remote control and receiver system. Ensure the vehicle's power is off before beginning installation.
2.1 Compatibility Check
It is imperative that the model number of your existing controller matches the HY2005RX-RM-24V model. Incompatible models will not function together. Verify the model number printed on your current control box before replacement.

Image 2.1: Visual comparison highlighting the importance of matching model numbers. The image shows two different receiver models, HY2005RX-RM-24V and HY2005RX-24V/40A, with a clear warning that they are not compatible and must be the same model to function.
2.2 Receiver Installation
- Locate the existing control box in your child's electric vehicle.
- Carefully disconnect all wiring from the old control box. Note the position of each connector.
- Install the new HY2005RX-RM-24V receiver in the same location.
- Connect the wiring to the new receiver. Ensure correct connections for steering motor, drive motors, and power supply as indicated on the receiver unit.
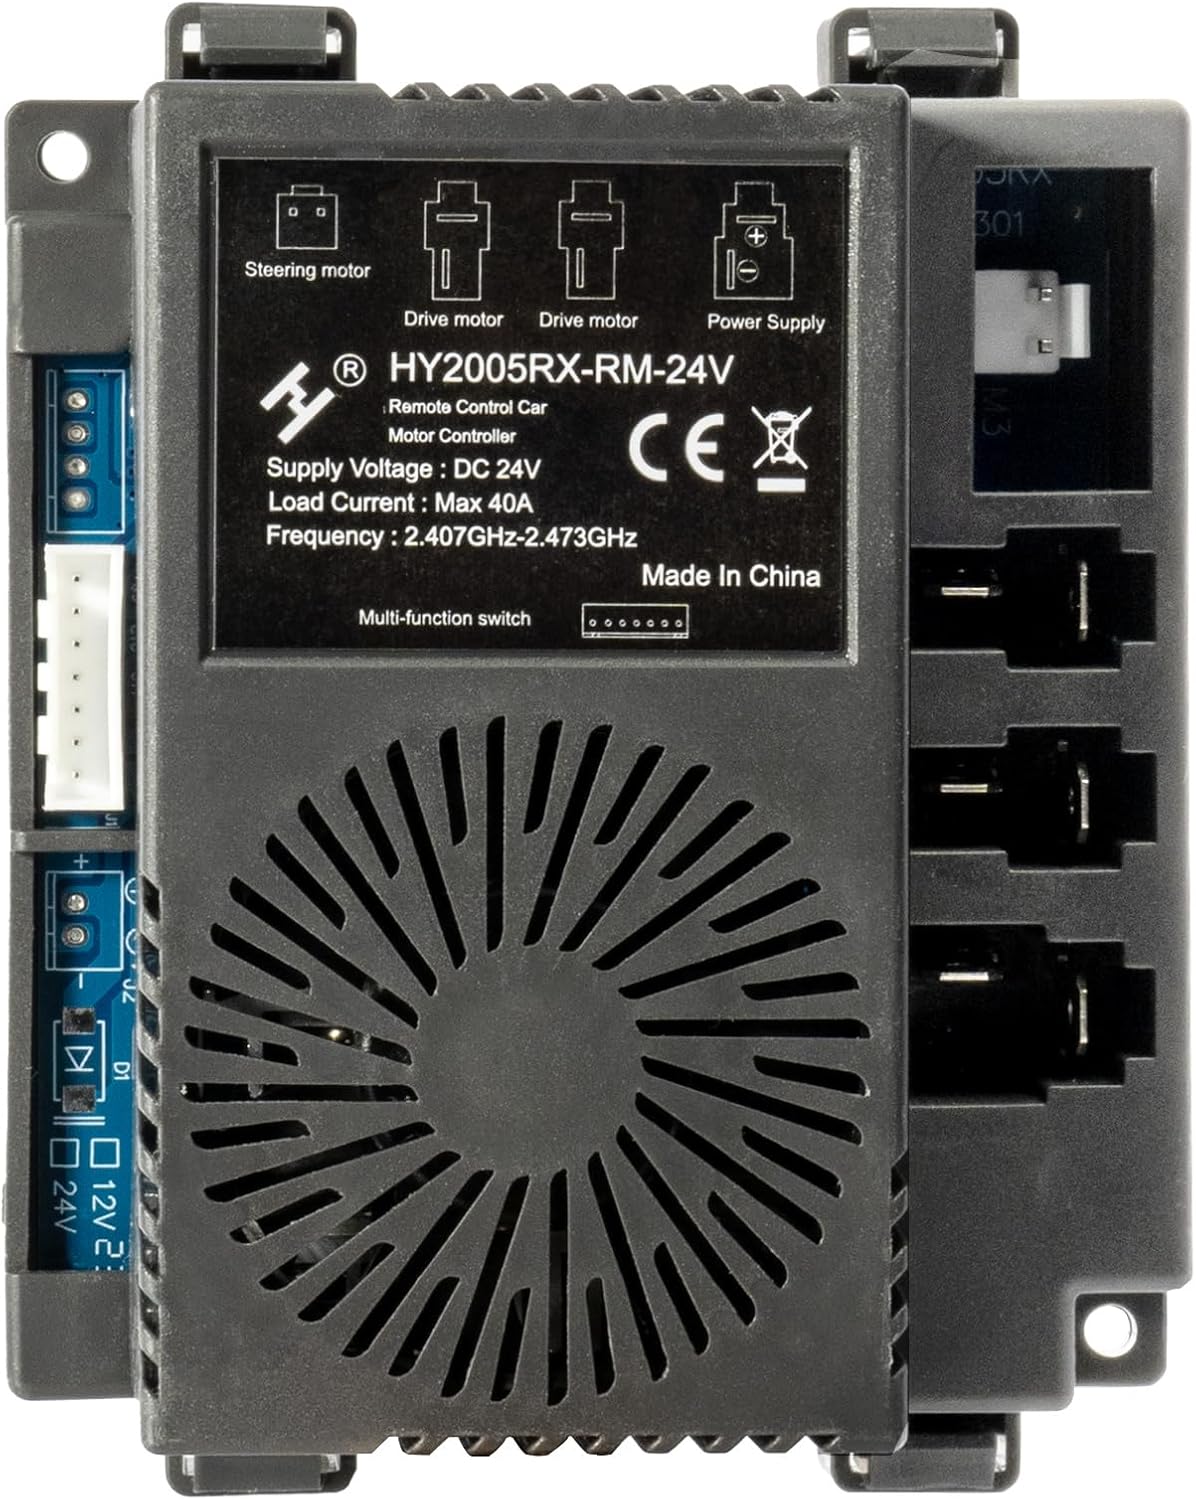
Image 2.2: A detailed view of the HY2005RX-RM-24V receiver unit, showing the labels for Steering motor, Drive motor, and Power Supply connections. This image helps identify the correct ports for wiring.

Image 2.3: The rear view of the HY2005RX-RM-24V receiver, displaying the various wiring connectors. This perspective is useful for understanding how the unit integrates into the vehicle's electrical system.
3. Operating Instructions
After installing the receiver, the remote control must be paired with the new unit. Refer to the instructions below for pairing and remote control functions.
3.1 Remote Control Pairing (Frequency Matching)
The remote control requires frequency matching with the receiver after installation or battery replacement. Follow these steps:

Image 3.1: A copy of the remote control's instruction manual, detailing the pairing process and button functions. This image is critical for understanding how to synchronize the remote with the vehicle.
- First-time use / New Match: When using for the first time or after replacing parts, the remote control needs to match the frequency.
- Battery Replacement: If the remote control batteries are replaced, re-match the frequency.
- Pairing Process:
- Hold down the "Code" key (often labeled 'S' or a similar symbol) for 3 seconds to start the match code process. The first LED will flicker.
- Turn on the car's power. The first LED on the remote will light up, indicating successful matching.
- If the remote remains idle for 10 seconds, it will enter standby mode. Press any key to wake it up.
3.2 Remote Control Functions
The remote control features several buttons for operating the ride-on vehicle. Refer to the diagram and descriptions below:

Image 3.2: The front of the remote control, showing its ergonomic design and button layout. The main buttons are for direction, speed, and parking.
- Directional Arrows (Up/Down/Left/Right): Control the vehicle's movement.
- "Up Arrow": Forward
- "Down Arrow": Back (Reverse)
- "Left Arrow": Turn Left
- "Right Arrow": Turn Right
- 'S' Button (Speed): Controls the vehicle's speed.
- Press 'S' once: 1 LED lit up (low speed).
- Press 'S' twice: 2 LEDs lit up (medium speed).
- Press 'S' three times: 3 LEDs lit up (high speed).
- 'P' Button (Brake/Parking): Press 'P' to hold the brake. The LED will be low speed.
- 'Code' Button (often 'S' or a small button): Used for frequency matching (as described in Section 3.1).
Note: The remote controller can only be used under adult's guidance.
4. Maintenance
To ensure the longevity and optimal performance of your HY2005RX-RM-24V system, follow these maintenance guidelines:
- Cleaning: Wipe the receiver and remote control with a dry, soft cloth. Avoid using harsh chemicals or abrasive cleaners.
- Battery Care (Remote Control): Replace batteries when the remote's performance degrades. Use the specified battery type (2*1.5V AA, not included). Remove batteries if the remote will not be used for an extended period to prevent leakage.
- Storage: Store the system in a cool, dry place away from direct sunlight and extreme temperatures.
- Connections: Periodically check all wiring connections to the receiver to ensure they are secure and free from corrosion.
5. Troubleshooting
If you encounter issues with your HY2005RX-RM-24V system, refer to the following troubleshooting tips:
- Remote Control Not Responding:
- Check if the remote control batteries are correctly installed and have sufficient charge. Replace if necessary.
- Re-perform the frequency matching (pairing) process as described in Section 3.1.
- Ensure the vehicle's power is on.
- Vehicle Not Moving or Responding Erratically:
- Verify all wiring connections to the receiver are secure.
- Confirm the receiver model (HY2005RX-RM-24V) matches the original or required model for your vehicle. Incompatible models will not work.
- Check the vehicle's main battery charge.
- Interference Issues (FCC Compliance):
This device complies with Part 15 of the FCC Rules. Operation is subject to the following two conditions: (1) This device may not cause harmful interference, and (2) this device must accept any interference received, including interference that may cause undesired operation.
If interference occurs:
- Reorient or relocate the receiving antenna.
- Increase the separation between the equipment and receiver.
- Connect the equipment into an outlet on a circuit different from that to which the receiver is connected.
- Consult the dealer or an experienced radio/TV technician for help.
Warning: Changes or modifications to this unit not expressly approved by the party responsible for compliance could void the user's authority to operate the equipment.

Image 5.1: The back of the remote control, displaying the model number (JR1839FCC) and FCC compliance statements. This information is relevant for understanding regulatory guidelines and troubleshooting interference.
6. Specifications
| Feature | Specification |
|---|---|
| Model | HY2005RX-RM-24V |
| Brand | ToiCottage |
| Supply Voltage (Receiver) | DC 24V |
| Load Current (Receiver) | Max 40A |
| Frequency | 2.407GHz-2.473GHz |
| Controller Type | Push Button (Remote) |
| Connectivity Technology | Wireless (2.4GHz), USB (for internal programming/diagnostics) |
| Power Source (Remote) | Battery Powered (2*1.5V AA, not included) |
7. Warranty and Support
No specific warranty information is provided in the product details. For technical support, replacement parts, or any inquiries regarding your ToiCottage HY2005RX-RM-24V Remote Control and Receiver, please contact the manufacturer or your retailer.
You can search for "ToiCottage" for more children's electric car accessories and support information.