Introduction
This manual provides detailed instructions for the setup, operation, and maintenance of your GEEVON Indoor Outdoor Thermometer. Please read this manual thoroughly before use to ensure optimal performance and longevity of your device.
The GEEVON Indoor Outdoor Thermometer is a wireless digital hygrometer that accurately measures temperature and humidity both indoors and outdoors. It also features a built-in clock, alarm, and records maximum and minimum readings over 24 hours. With a 200ft/60m remote range, it can connect to up to 3 wireless sensors for monitoring multiple locations.
What's in the Box
- Indoor Display Unit
- Outdoor Sensor
- User Manual

Image: The main display unit and the wireless outdoor sensor.
Setup Guide
1. Battery Installation
The main display unit requires 2 x AAA Alkaline Batteries (not included). The outdoor sensor requires 2 x AAA Alkaline Batteries (not included). Do not mix new and old batteries.
- Open the battery compartment on the back of the main display unit.
- Insert 2 x AAA batteries, ensuring correct polarity (+/-). Close the compartment.
- For the outdoor sensor, open its battery compartment.
- Before inserting batteries, set the selector switch (1, 2, or 3) to your desired transmission channel.
- Insert 2 x AAA batteries, ensuring correct polarity (+/-). Close the compartment.

Image: Illustration of battery installation in the main unit.
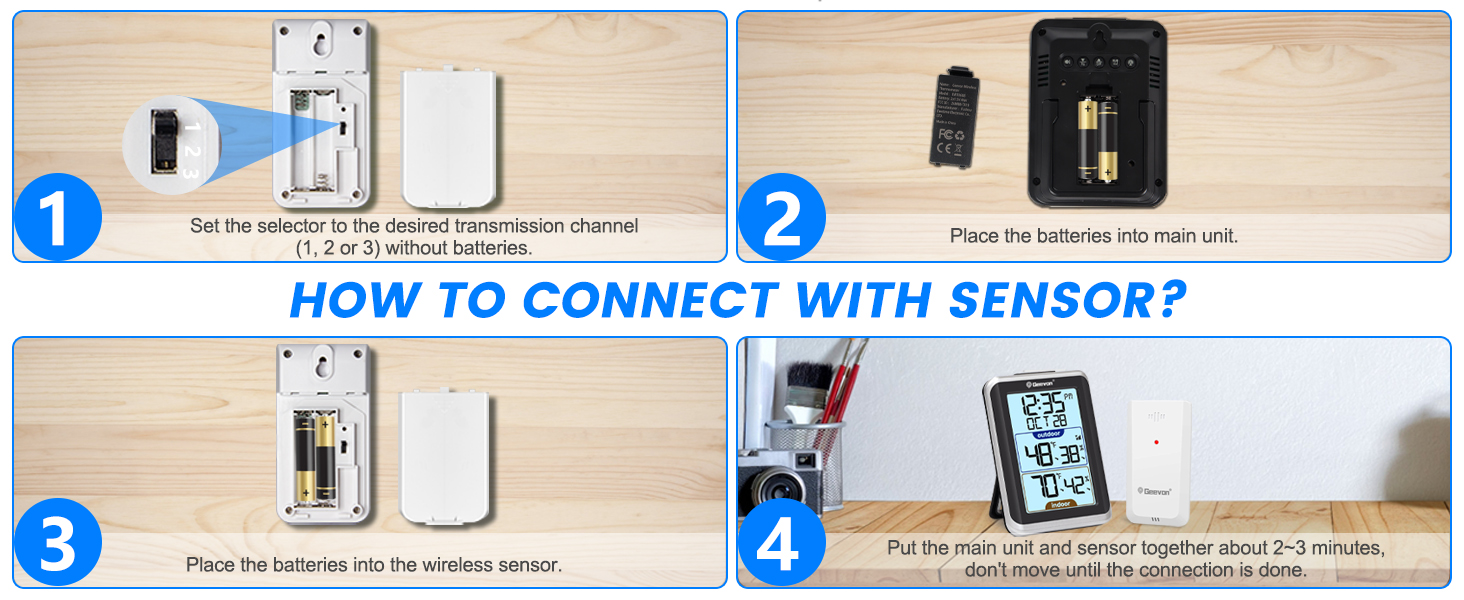
Image: Detailed steps for battery insertion and channel selection for the outdoor sensor.
2. Pairing the Units
After installing batteries, place the main display unit and the outdoor sensor together, about 2-3 minutes apart. Do not move them until the connection is established. The red light on the sensor will flash when transmitting data.
3. Sensor Placement
For accurate outdoor temperature and humidity readings, proper sensor placement is crucial:
- Place the sensor vertically on a north-facing wall.
- Ensure it is shielded from direct sunlight and rain.
- Mount it 1.2 to 2.4 meters (4 to 8 feet) above the ground.
- Keep it at least 1.5-2 meters (5-6.5 feet) away from electronic devices (TV, computer, microwave, radio, etc.) to avoid interference.
- Avoid placing it near heat sources or vents.

Image: Guidelines for optimal sensor placement to ensure accurate readings.
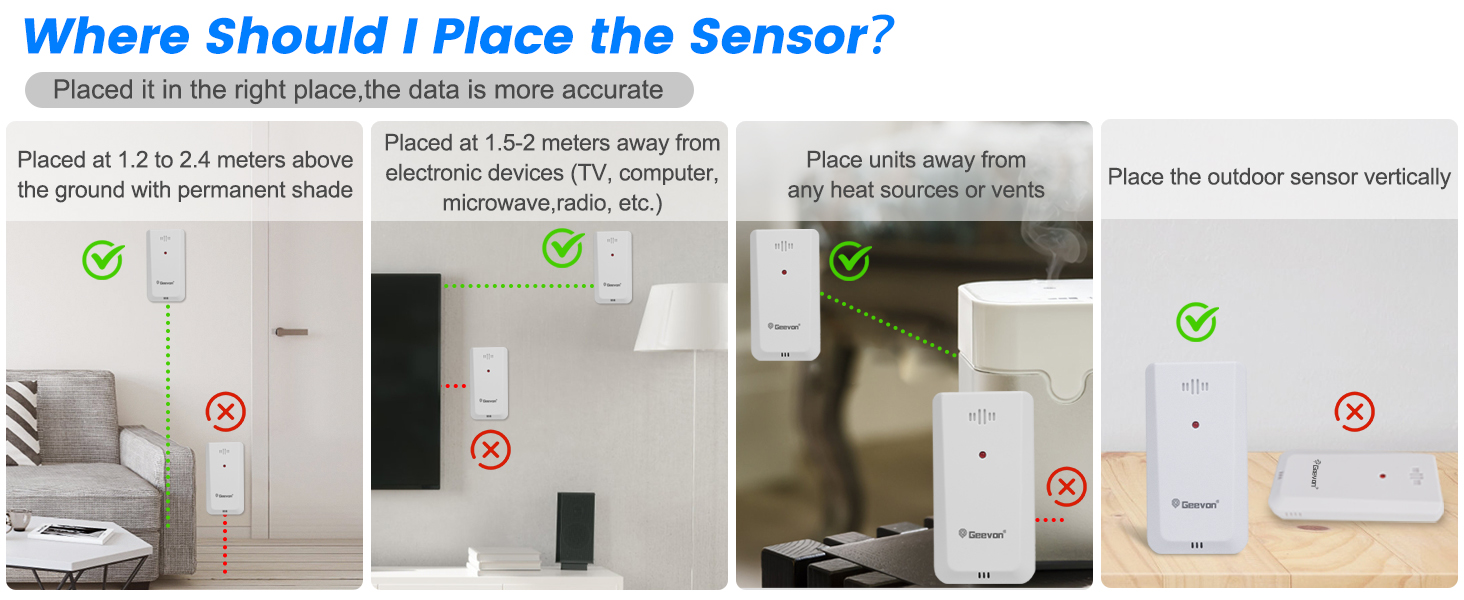
Image: Visual guide for correct sensor placement, avoiding direct sunlight and ground contact.
Operating Instructions
Display Overview
The 3.8-inch large LCD display provides comprehensive information at a glance:
- Time and Date: Displays current time (12/24H format) and calendar.
- Outdoor Temperature & Humidity: Shows current outdoor readings with trend arrows (indicating warmer/colder).
- Indoor Temperature & Humidity: Shows current indoor readings.
- Max & Min Records: Records 24-hour maximum and minimum indoor/outdoor temperature and humidity readings.
- Alarm Clock & Snooze: Built-in alarm with snooze function.
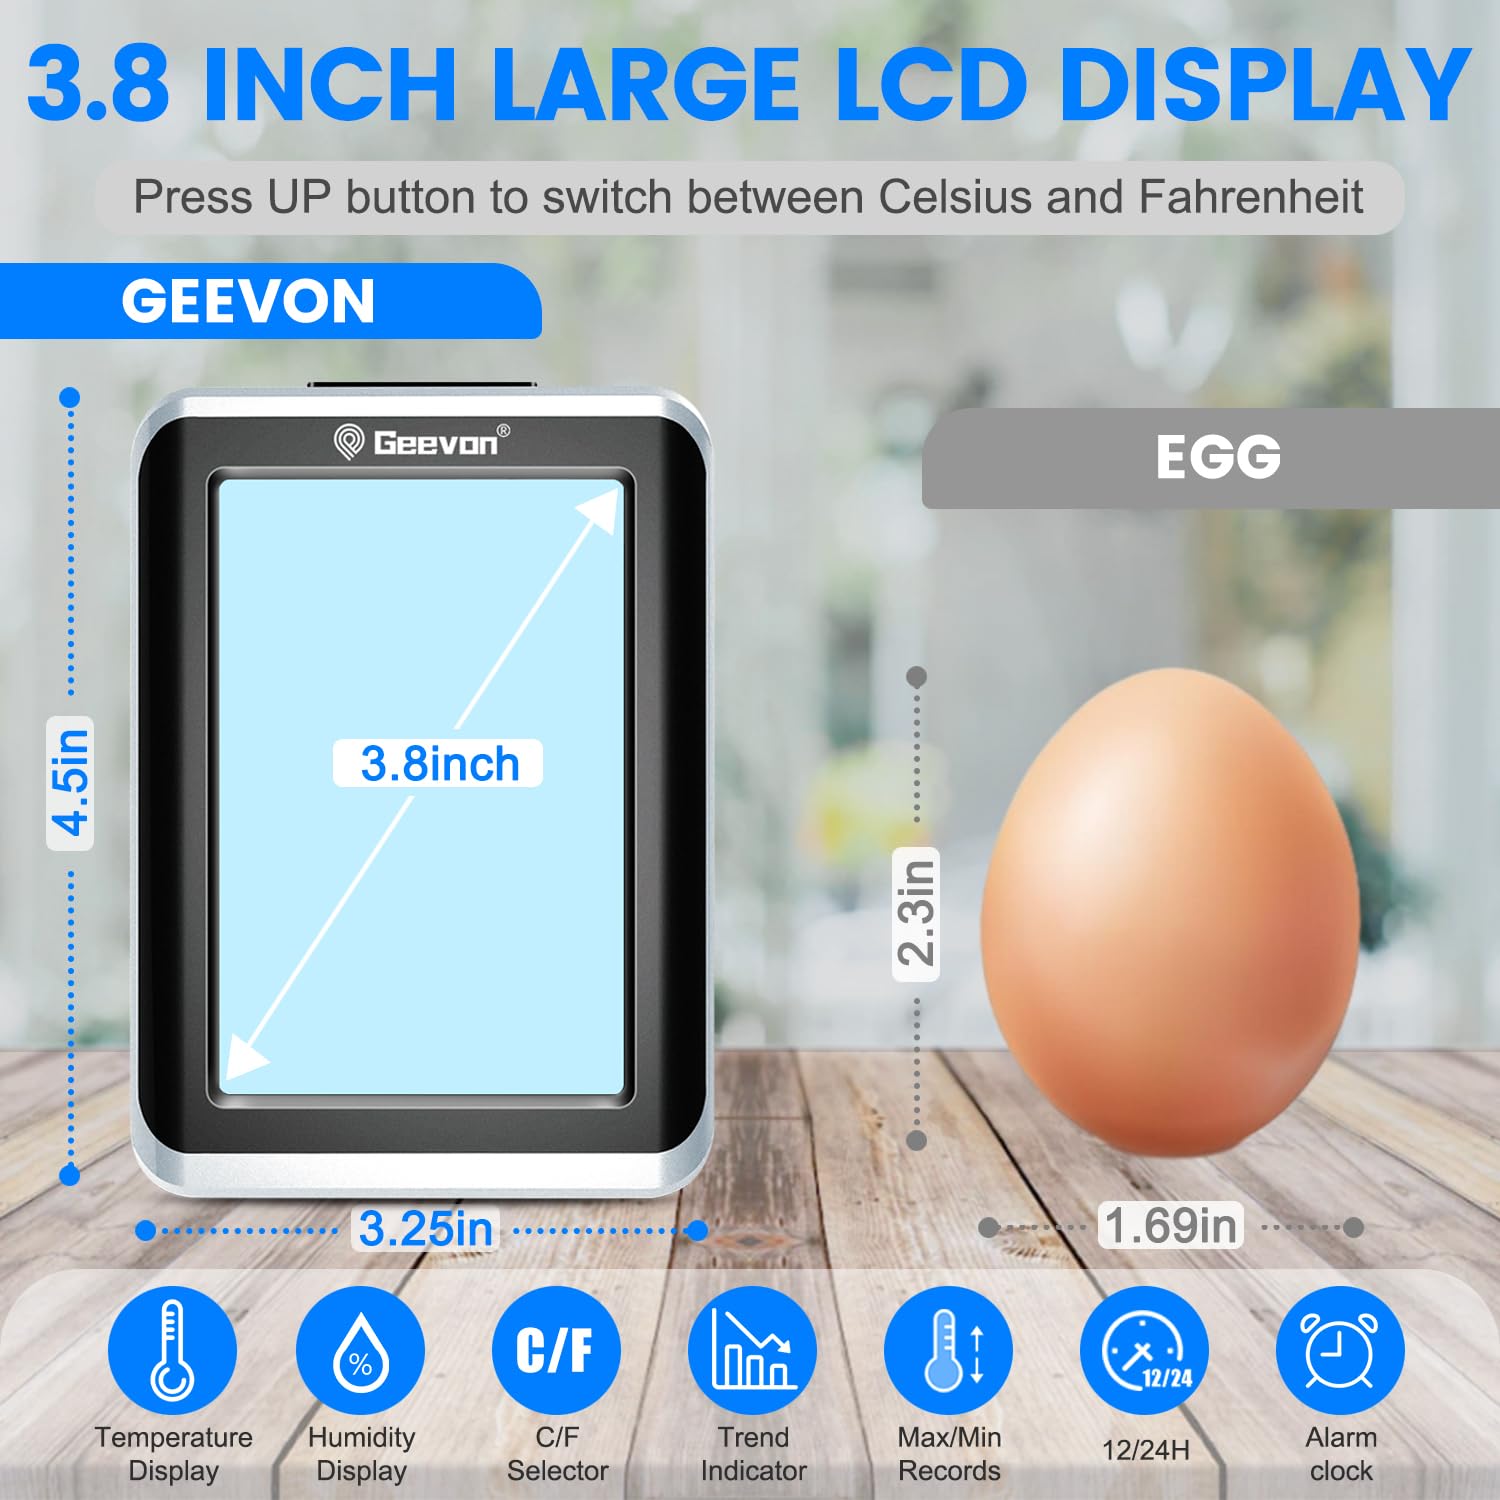
Image: The 3.8-inch LCD display showing time, date, outdoor/indoor temperature and humidity, and trend indicators.
Backlight Function
Press the "SNZ/LIGHT" button on top of the main unit to activate the white backlight. The backlight will stay on for 10 seconds, making it easier to read in dim light conditions.

Image: The display unit with its backlight activated for visibility in low light.
Celsius/Fahrenheit Switch
To switch between Celsius (°C) and Fahrenheit (°F) temperature units, press the "UP" button on the back of the main unit.
Multi-Sensor Display (Optional)
If you have additional outdoor sensors (up to 3 total), you can cycle through their readings on the main display unit. Ensure each sensor is set to a different channel (CH1, CH2, CH3) using the selector switch in its battery compartment. Press the "CH" button on the back of the main unit to switch between channels or enable sequential display of all connected sensors.

Image: The main unit displaying readings from multiple remote sensors in different locations.
Alarm Clock Function
The main unit includes an alarm clock with a snooze feature. Refer to the user manual for detailed instructions on setting the alarm time and activating/deactivating the alarm.
Video: A user demonstrates setting the alarm and using the backlight function on the GEEVON thermometer.
Maintenance
Battery Replacement
Replace batteries in both the main unit and outdoor sensor when the low battery indicator appears on the display. Always use new AAA Alkaline Batteries and ensure correct polarity.
Cleaning
Wipe the device with a soft, damp cloth. Do not use abrasive cleaners or immerse the unit in water.
Environmental Considerations
While the outdoor sensor is designed for outdoor use, it is not fully waterproof. Protect it from direct rain and prolonged exposure to harsh weather conditions to ensure its longevity and accurate readings.
Troubleshooting
No Outdoor Reading / Signal Loss
- Ensure both the main unit and outdoor sensor have fresh batteries installed with correct polarity.
- Verify the outdoor sensor's channel switch matches the selected channel on the main unit.
- Move the outdoor sensor closer to the main unit to check if it's out of range (max 200ft/60m in open area).
- Avoid placing the sensor near large metal objects, thick walls, or other electronic devices that may cause interference.
- Reset both units by removing batteries, waiting a few minutes, and then reinserting them.
Inaccurate Readings
- Ensure the outdoor sensor is not in direct sunlight or exposed to heat sources, as this can cause artificially high readings.
- Verify the sensor is placed in a well-ventilated area.
- Compare readings with another known accurate thermometer to confirm discrepancy.
Video: A brief overview of the GEEVON 8688 Indoor Outdoor Thermometer's features and setup.
Specifications
| Feature | Detail |
|---|---|
| Model Number | GN-238688-BT-US |
| Product Dimensions | 3.2"W x 4.5"H |
| Item Weight | 0.45 Pounds |
| Indoor Temperature Range | 0°C ~ 50°C (32°F ~ 122°F) |
| Outdoor Temperature Range | -40°C ~ 70°C (-40°F ~ 158°F) |
| Humidity Range | 20% ~ 95% RH |
| Wireless Transmission Range | 200ft/60m (open area) |
| Power Supply (Main Unit) | 2 x AAA Alkaline Batteries |
| Power Supply (Outdoor Sensor) | 2 x AAA Alkaline Batteries |
Warranty & Support
GEEVON products come with a manufacturer's warranty. For specific warranty details, please refer to the product packaging or contact GEEVON customer service.
If you encounter any issues or have questions regarding your GEEVON Indoor Outdoor Thermometer, please feel free to contact GEEVON customer service. We are available 24/7 to provide assistance and ensure your satisfaction.
You can visit the official Geevon Store on Amazon for more information and support.


