1. Introduction
This manual provides essential instructions for the safe and effective use, maintenance, and troubleshooting of your Sonashi Portable Garment Steamer, model SGS-101-1. Please read this manual thoroughly before operating the appliance and retain it for future reference.
2. Important Safety Instructions
When using electrical appliances, basic safety precautions should always be followed to reduce the risk of fire, electric shock, and injury to persons, including the following:
- Read all instructions before using the appliance.
- To protect against electric shock, do not immerse the appliance, power cord, or plug in water or other liquids.
- Always turn the appliance off and unplug it from the electrical outlet before filling with water, emptying, cleaning, or when not in use.
- Do not operate any appliance with a damaged cord or plug, or after the appliance malfunctions or has been dropped or damaged in any manner.
- Close supervision is necessary for any appliance being used by or near children. Do not leave the appliance unattended while connected.
- Burns can occur from touching hot metal parts, hot water, or steam. Use caution when turning the appliance upside down – there may be hot water in the reservoir.
- Use the appliance only for its intended use.
- Do not use attachments not recommended by the manufacturer.
- Do not direct steam at people, animals, or directly at electrical appliances.
- Ensure the water tank cap is securely closed before operation.
3. Product Overview
Familiarize yourself with the components of your Sonashi Portable Garment Steamer:
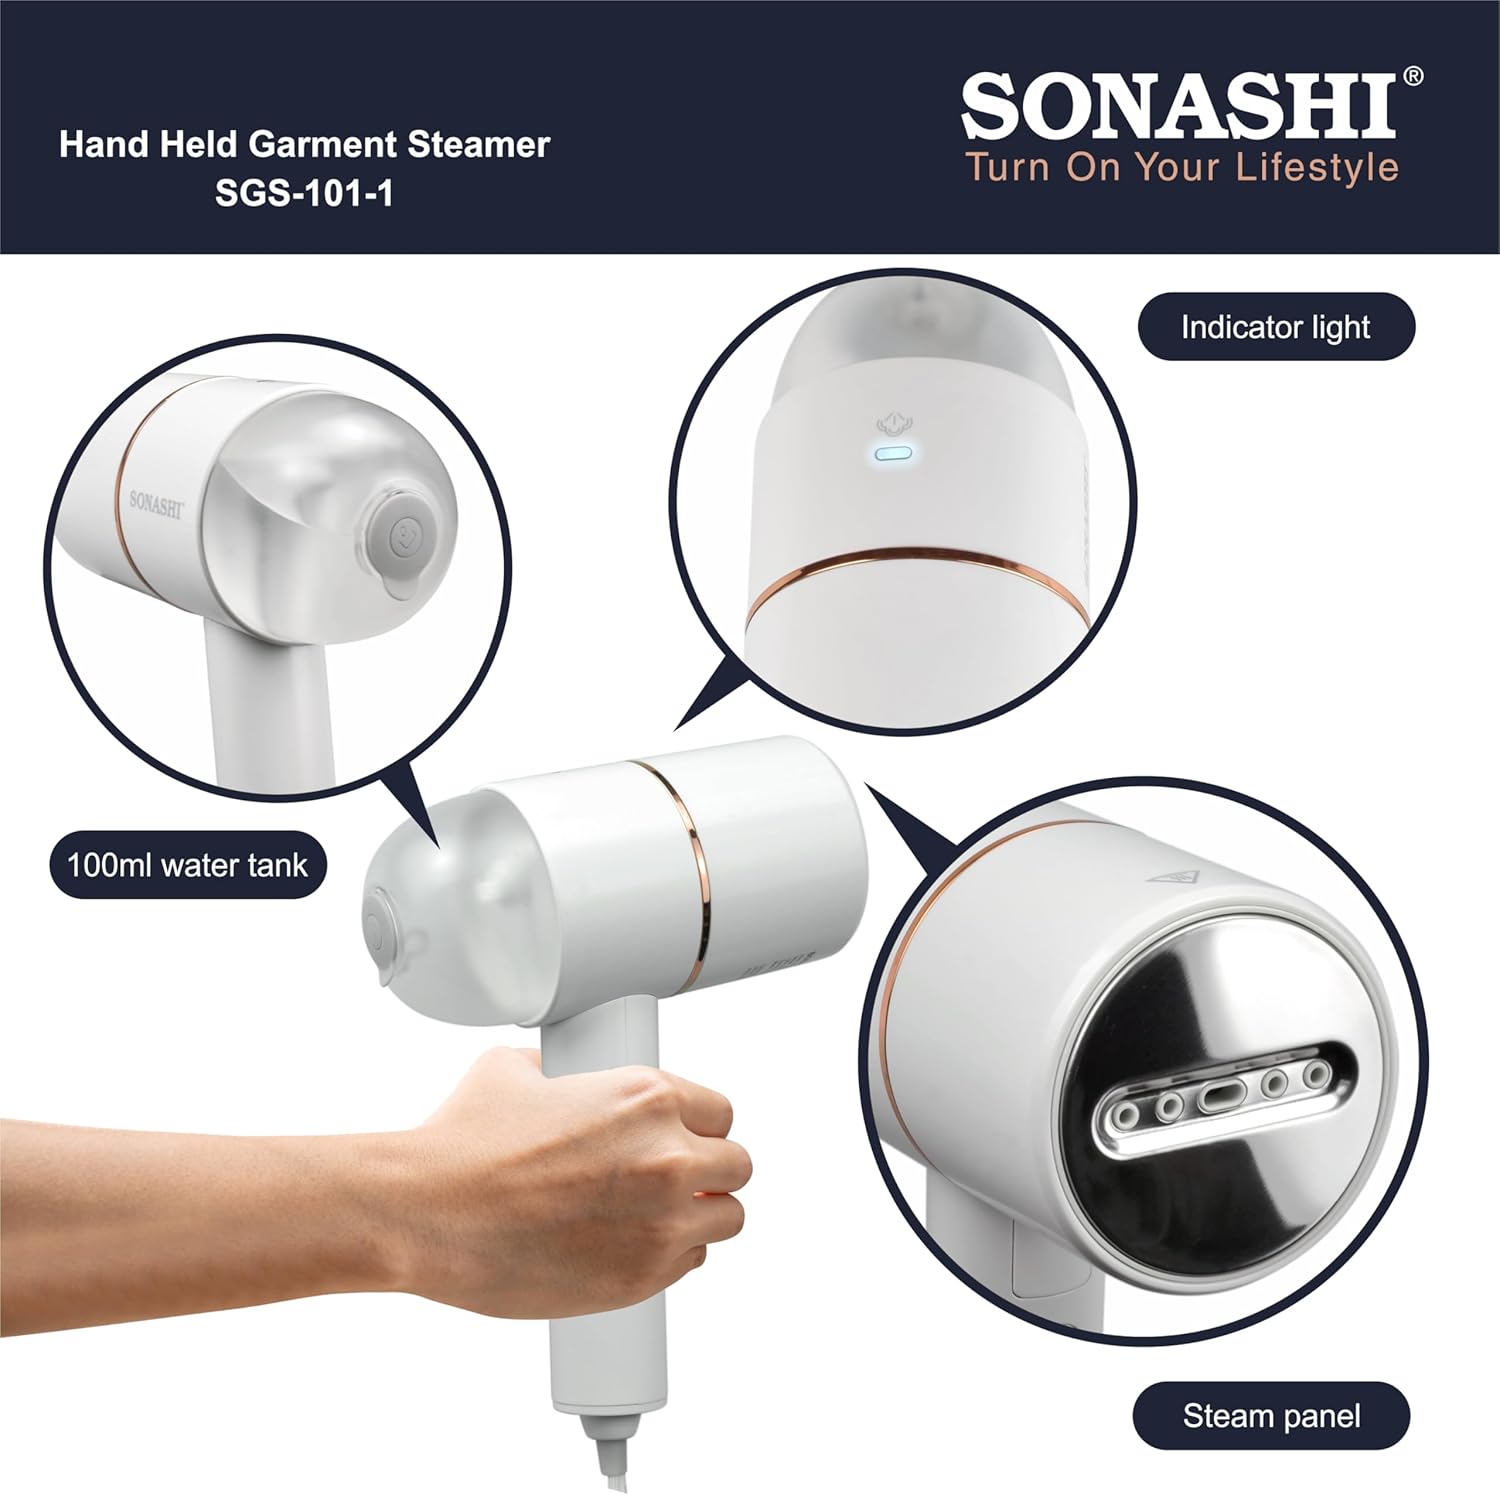
Image: Sonashi Portable Garment Steamer SGS-101-1. This image displays the steamer with key components labeled: the 100ml water tank, the indicator light, and the steam panel.
- Steam Panel: The surface from which steam is emitted.
- Water Tank: Removable reservoir for water.
- Indicator Light: Illuminates to show power status and readiness.
- Power Button: Activates the steamer.
- Foldable Handle: Allows for compact storage and portability.
- Power Cord: Connects the steamer to an electrical outlet.
4. Setup
Follow these steps to prepare your garment steamer for use:
- Fill the Water Tank:

Image: Fast Steps To Use. This image illustrates the first two steps of preparing the steamer: opening the water filler sealing and adding 100ml of water using a measuring cup.
- Ensure the steamer is unplugged.
- Open the water filler sealing on the top of the water tank.
- Using a measuring cup, carefully add up to 140 milliliters of clean tap water into the tank. Do not overfill.
- Securely close the water filler sealing.
- Connect to Power: Plug the power cord into a standard 120V AC electrical outlet.
5. Operating Instructions
Once set up, operate your steamer as follows:
- Preheating:
Image: Fast Steps To Use. This image shows the third and fourth steps: pressing the button to start preheating and the steamer's 20-second quick preheating with 1200W high power.
- Press the power button to turn on the steamer. The indicator light will illuminate.
- Allow approximately 10-20 seconds for the steamer to heat up and produce steam. The indicator light may change or stop blinking when ready.
- Steaming Garments:

Image: Steam Any Angle No Leaks. This image demonstrates both vertical steaming (steaming a garment hanging on a hanger) and horizontal steaming (steaming a garment laid flat on a surface).
- Hang the garment on a hanger or lay it flat on a clean, heat-resistant surface.
- Hold the steamer upright (for vertical steaming) or horizontally (for horizontal steaming) a few inches away from the fabric.
- Move the steam panel slowly over the wrinkled areas. For stubborn wrinkles, hold the steamer closer and pass over the area multiple times.
- The steamer is designed to operate without leaking, allowing for steaming at various angles.
- Fabric Compatibility:

Image: Suitable For A Wide Range Of Fabrics. This image displays icons representing various fabric types including Nylon, Polyester, Wool, Fiber, Silk, Linen, and Cotton, indicating the steamer's versatility.
The Sonashi Garment Steamer is suitable for a wide range of fabrics, including:
- Nylon
- Polyester
- Wool
- Fiber blends
- Silk
- Linen
- Cotton
Always test on an inconspicuous area first, especially for delicate fabrics.
- Finishing: After steaming, turn off the steamer and unplug it. Allow garments to cool and dry completely before wearing or storing.
6. Maintenance and Cleaning
Regular maintenance ensures optimal performance and longevity of your steamer:
- Empty Water Tank: After each use, ensure the steamer is cool, then empty any remaining water from the tank.
- Wipe Exterior: Wipe the exterior of the steamer with a soft, damp cloth. Do not use abrasive cleaners or solvents.
- Descaling (Optional): If you notice mineral buildup or reduced steam output, descaling may be necessary. Consult the manufacturer's website or support for specific descaling instructions.
- Storage: Store the steamer in a cool, dry place. The foldable handle allows for compact storage.
7. Troubleshooting
If you encounter issues with your steamer, refer to the following common problems and solutions:
| Problem | Possible Cause | Solution |
|---|---|---|
| No steam or low steam output |
|
|
| Water leaking from steam panel |
|
|
| Steamer does not turn on |
|
|
8. Specifications
Key technical specifications for the Sonashi Portable Garment Steamer SGS-101-1:

Image: Handheld Steamer for Wrinkle-Free Style Specifications. This image lists the technical specifications of the steamer, including voltage, wattage, water tank capacity, steam output time, cord length, and dimensions.
- Model: SGS-101-1
- Brand: Sonashi
- Voltage: AC 120V ~ 60Hz
- Wattage: 1200W
- Water Tank Capacity: 140 Milliliters (100ml indicated on some diagrams)
- Heat Time: Approximately 10-20 Seconds
- Product Dimensions: 164mm (L) x 80mm (W) x 230mm (H)
- Item Weight: 1.87 pounds
- Cord Length: 1.9 Meters
9. Warranty and Support
For warranty information, product support, or service inquiries, please refer to the documentation included with your purchase or contact the retailer or manufacturer directly. Keep your purchase receipt as proof of purchase.