Veement V300
Veement V300 Dash Cam User Manual
Model: V300 | Brand: Veement
Introduction
This manual provides comprehensive instructions for the installation, operation, and maintenance of your Veement V300 Dash Cam. Please read this manual thoroughly before using the device to ensure optimal performance and safety.
What's Included

The package contains all necessary components for immediate setup and use. Please verify all items are present upon unboxing.
- 1 x Veement V300 Dash Cam
- 1 x Car Charger (11.5ft cable)
- 1 x Electrostatic Sticker
- 1 x User Manual
- 1 x Easy Pry Tool
Setup and Installation
1. Prepare for Installation
Ensure your vehicle's windshield is clean and dry before applying the electrostatic sticker. This provides a stable base for the dash cam's adhesive mount.
2. Mount the Dash Cam
- Apply the electrostatic sticker to a clean, dry area on your windshield, ideally behind the rearview mirror to avoid obstructing your view.
- Attach the dash cam to the electrostatic sticker using the pre-applied 3M adhesive pad. Press firmly for at least 30 seconds to ensure a secure bond.
- Adjust the camera lens angle as needed to capture the desired field of view. The mount allows for vertical adjustment.

The compact design allows for discreet placement on the windshield, minimizing obstruction of the driver's view.
3. Power Connection
- Connect the provided car charger to the dash cam's Type-C port.
- Route the power cable along the edge of the windshield and dashboard using the included pry tool to tuck it neatly.
- Plug the car charger into your vehicle's cigarette lighter socket. The dash cam will power on automatically when the vehicle starts.

The long power cable and pry tool facilitate a clean and hidden installation of the power supply.
4. Insert Memory Card
IMPORTANT: A memory card is NOT included. You must purchase a U1 grade or higher Micro SD card (up to 256GB) separately for recording functionality.
- With the dash cam powered off, insert the Micro SD card into the designated slot until it clicks into place.
- If prompted by a voice alert to "Please insert a memory card," ensure the card is correctly inserted and formatted.
Operating Instructions
Automatic Recording
Once powered on, the Veement V300 Dash Cam automatically begins recording. A red "REC" indicator light will illuminate on the device.
VeeCar App Control
The built-in Wi-Fi allows for seamless control and management via the exclusive VeeCar APP. Download the app from your device's app store.
- Turn on Wi-Fi on your smartphone and connect to the dash cam's Wi-Fi network (SSID and password typically found on the device or manual).
- Open the VeeCar APP to access real-time video previews, download recorded footage, edit videos, and share them directly from your phone.
The VeeCar app provides convenient access to live view and recorded files directly from your smartphone.
NOTE: Using the VeeCar app may not be possible while connected to wireless CarPlay or Android Auto due to Wi-Fi conflicts.
Voice Alerts
The dash cam provides voice alerts for important status updates, such as "Please insert a memory card" or "Start recording."
Key Features
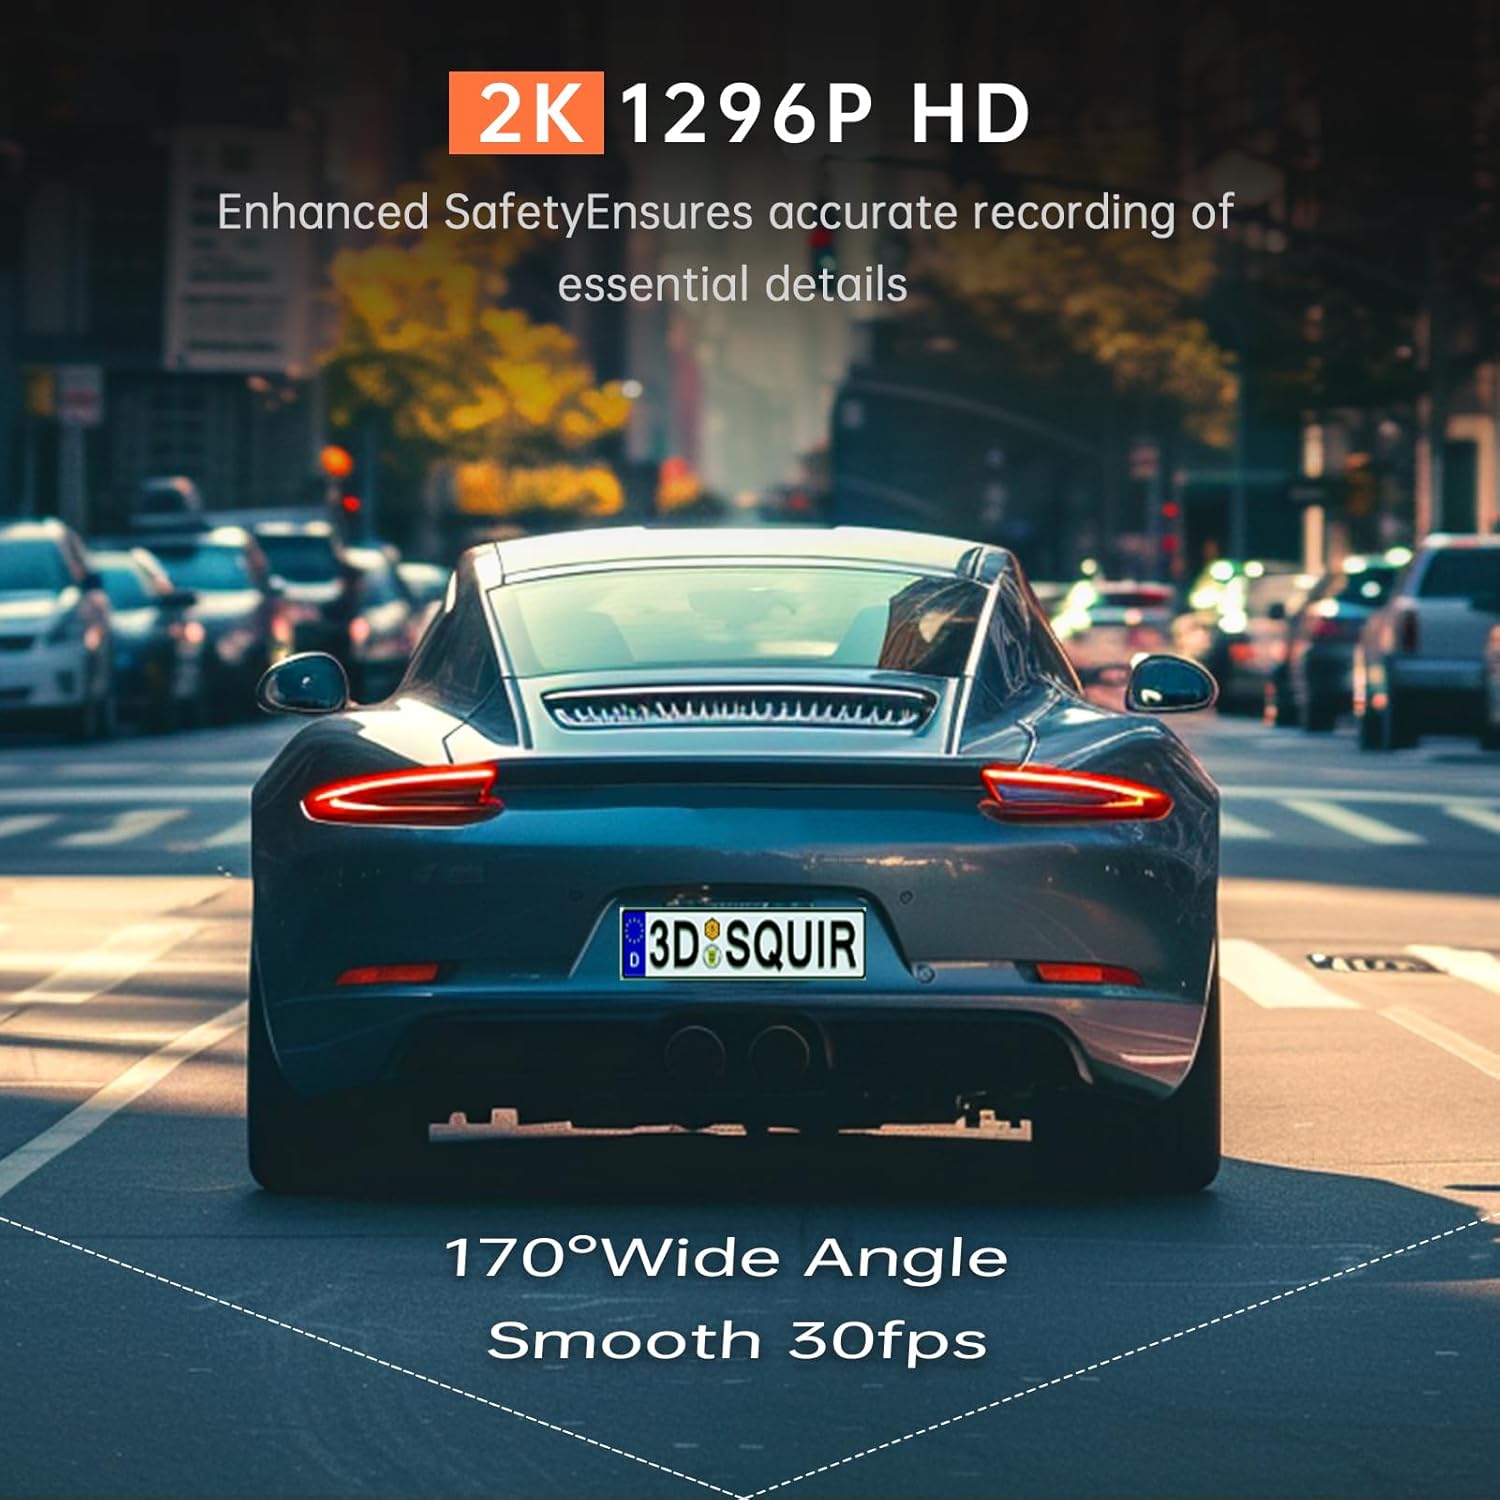
1296P HD Resolution
The Veement V300 captures ultra-clear footage at 2304*1296@30FPS, ensuring every detail on the road is preserved with exceptional clarity, day or night.

High-definition recording ensures critical details like license plates are clearly visible.
Superior Night Vision
Equipped with a starlight-level sensor, F=1.7 large aperture, and a 170° ultra-wide lens, the dash cam captures clear, detailed video even in low-light environments. Six-layer glass lens technology further enhances night driving security.

Advanced sensor and lens technology provide enhanced visibility during nighttime driving.
Seamless Loop Recording
The dash cam supports seamless loop recording, continuously recording over the oldest files when the memory card is full. This ensures continuous operation without manual intervention.
24H Parking Mode
For continuous surveillance, the 24H Parking Mode monitors your vehicle even when parked. This function requires an additional hardwire kit (sold separately) to activate.
Super Capacitor
The integrated super capacitor provides enhanced durability and reliability, allowing the dash cam to operate effectively in extreme temperatures ranging from -4°F to 165°F.
Maintenance
Memory Card Management
Regularly format your Micro SD card (at least once a month) to ensure optimal performance and prevent data corruption. Back up any important footage before formatting.
Cleaning
Use a soft, dry cloth to clean the dash cam lens and body. Avoid using abrasive cleaners or solvents that could damage the device.
Troubleshooting
"Please insert a memory card" voice alert
- Ensure the Micro SD card is inserted correctly and fully into the slot.
- Format the memory card using the VeeCar app or a computer.
- If the issue persists, try a different U1 grade or higher Micro SD card (up to 256GB).
App connectivity issues with CarPlay/Android Auto
- This is a known limitation. Disconnect from wireless CarPlay or Android Auto to use the VeeCar app.
Dash cam not powering on
- Check the car charger connection to both the dash cam and the vehicle's cigarette lighter socket.
- Ensure the vehicle's power outlet is functioning.
- Verify the power cable is not damaged.
Poor video quality
- Clean the camera lens.
- Ensure the protective film has been removed from the lens.
- Check that the recording resolution setting in the app is set to 1296P.
Specifications
| Feature | Detail |
|---|---|
| Model Name | V300 |
| Video Resolution | 1296P (2304*1296@30FPS) |
| Lens Aperture | F=1.7 |
| Viewing Angle | 170° Ultra-Wide |
| Storage Support | Micro SD Card up to 256GB (U1 or higher recommended, not included) |
| Connectivity | Built-in Wi-Fi, VeeCar APP |
| Special Features | Loop Recording, 24H Parking Mode (requires hardwire kit), Voice Alert, Super Capacitor |
| Power Source | Car Charger (Type-C) |
| Operating Temperature | -4°F to 165°F |
| Dimensions | 1 x 3.3 x 1.5 inches |
| Weight | 7 ounces |
Warranty and Support
For warranty information and technical support, please refer to the contact details provided in the packaging or visit the official Veement website.
For common questions and troubleshooting tips, please visit the Veement Store on Amazon.
Ask a question about this manual
Ask about setup, troubleshooting, compatibility, parts, safety, or missing instructions. Manuals+ will review the question and use this page’s manual context to help answer it.