1. Introduction
The Yohonk Candle Warmer Lamp provides a flameless solution for enjoying scented jar candles. Utilizing top-down heat melting technology, it safely releases fragrance without an open flame, smoke, or pollution. This lamp features adjustable height, dimmable light settings, and a convenient timer function, making it a versatile addition to any indoor space.

Figure 1: Yohonk Candle Warmer Lamp in operation.
2. Safety Information
- Flameless Operation: This device melts candles using a halogen bulb, eliminating the need for an open flame. This significantly reduces the risk of fire hazards associated with traditional candles.
- Indoor Use Only: The candle warmer is designed for indoor use in environments such as bedrooms, living rooms, and offices.
- Stable Placement: Always place the lamp on a stable, flat, and heat-resistant surface to prevent tipping.
- Unplug When Not in Use: Disconnect the power cord from the outlet when the lamp is not in use or during maintenance.
- Keep Away from Water: Do not expose the lamp to water or operate it with wet hands.
- Bulb Safety: The halogen bulb can become hot during operation. Avoid touching the bulb directly when the lamp is on or immediately after turning it off. Allow it to cool before handling.
3. Package Contents
Verify that all items are present in your package:
- 1 x Yohonk Candle Warmer Lamp (Base, Pole, Lamp Head)
- 2 x GU10 Halogen Warming Bulbs (one for immediate use, one spare)
- 1 x Inline Control Switch (integrated with power cord)
- 1 x Instruction Manual (this document)
4. Setup
- Unpack: Carefully remove all components from the packaging.
- Bulb Installation: Gently insert one of the provided GU10 halogen bulbs into the socket located inside the lamp head. Ensure it is securely twisted into place.
- Positioning: Place the candle warmer lamp on a stable, flat surface.
- Candle Placement: Place your desired scented jar candle onto the center of the lamp's base.
- Connect Power: Plug the power cord into a standard electrical outlet.
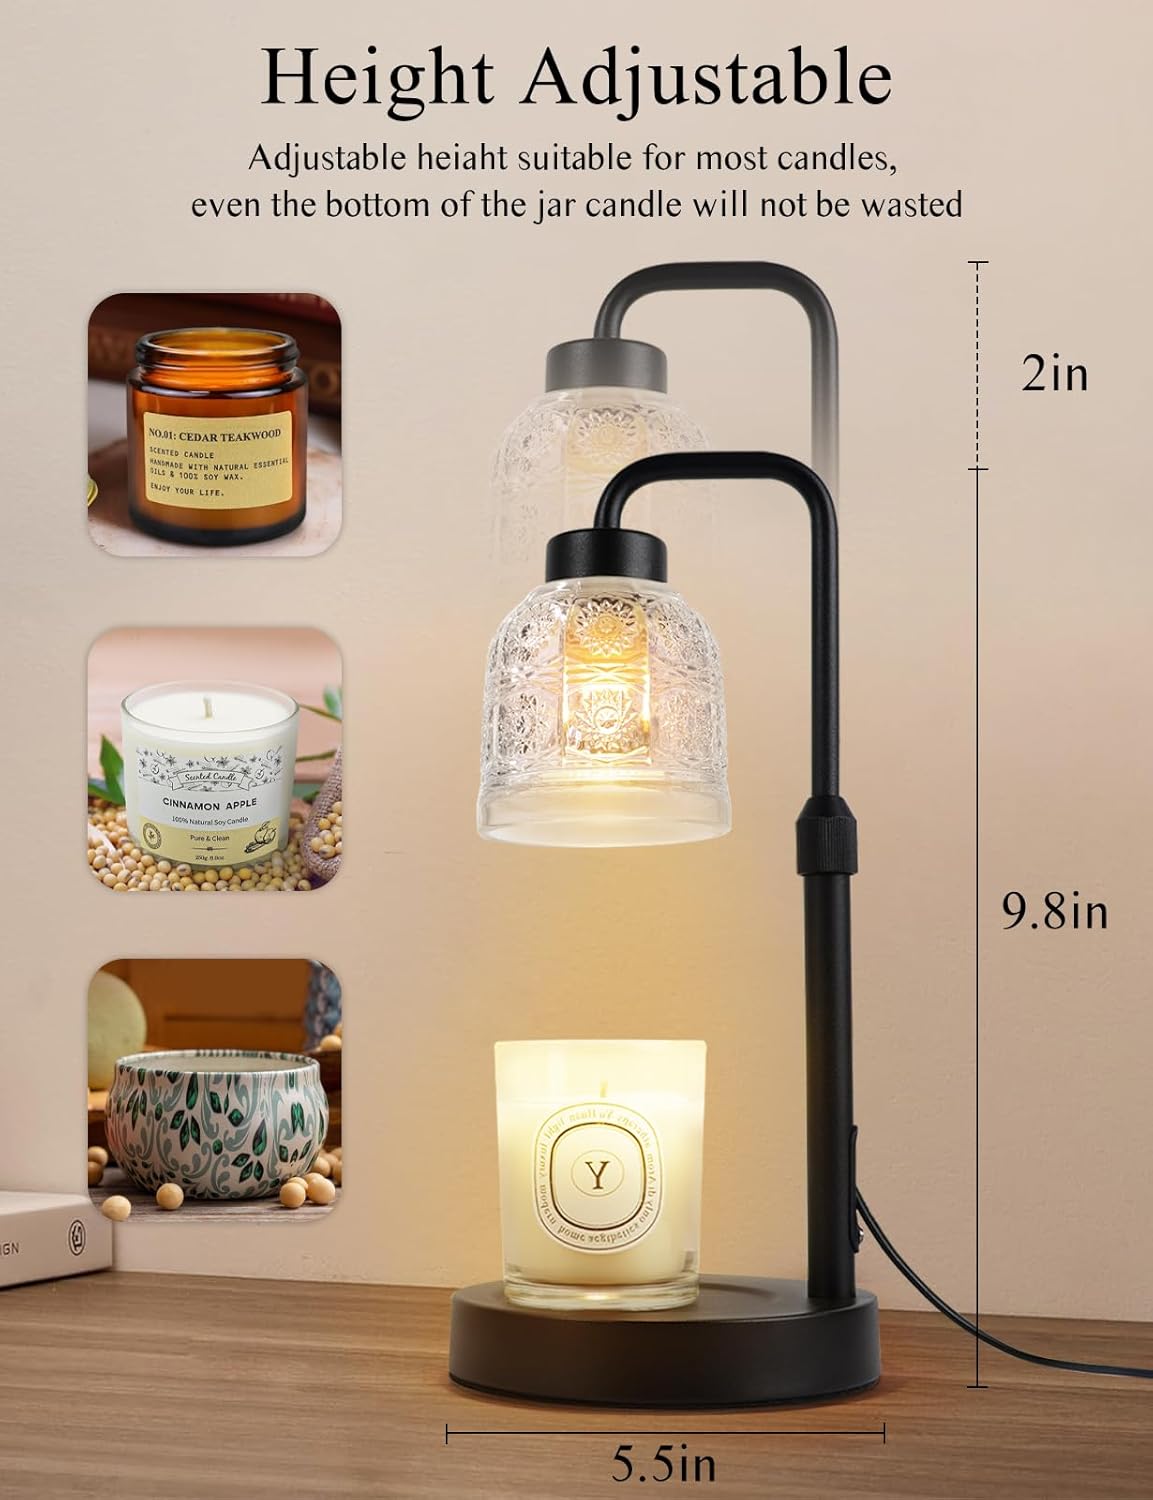
Figure 2: Key components of the candle warmer lamp.
Video: Bulb Installation and Setup Overview
Video 1: Demonstrates the installation of the halogen bulb and an overview of the lamp's features.
5. Operating Instructions
5.1 Power On/Off
Press the power button (G) on the inline control switch to turn the lamp on or off.
5.2 Adjusting Light Intensity (Dimmer Function)
The lamp features four dimming options to control the melting speed of the wax and the intensity of the fragrance release. A brighter setting will melt the candle faster and release more fragrance.
- Press the '+' button to increase brightness.
- Press the '-' button to decrease brightness.

Figure 3: Dimmable light settings from 25% to 100% intensity.
5.3 Setting the Timer
The integrated timer allows you to set the lamp to automatically turn off after a specified duration, providing peace of mind, especially when falling asleep.
- Press the timer button (clock icon) on the inline control switch to cycle through the available settings: 2 hours, 4 hours, or 8 hours.
- The indicator lights on the switch will show the active timer setting.

Figure 4: Timer function for 2, 4, or 8 hours.
5.4 Adjusting Lamp Height
The lamp's height is adjustable to accommodate various sizes of jar candles. This ensures optimal heat distribution for efficient melting and fragrance release.
- Loosen the adjustment knob on the vertical pole.
- Carefully slide the lamp head up or down to the desired height.
- Tighten the adjustment knob to secure the lamp head in place.

Figure 5: Adjustable height mechanism for various candle sizes.
Video: Adjustable Height and Dimmable Features
Video 2: Shows how to adjust the lamp's height and demonstrates the dimming capabilities.
6. Maintenance
6.1 Cleaning
- Always unplug the lamp before cleaning.
- Wipe the lamp's exterior surfaces with a soft, dry cloth.
- For the glass shade, use a mild glass cleaner if necessary, ensuring no liquid enters the electrical components.
- Do not use abrasive cleaners or solvents.
6.2 Bulb Replacement
If the bulb burns out or its performance diminishes:
- Ensure the lamp is unplugged and the bulb has completely cooled down.
- Gently pull the old GU10 halogen bulb straight out from the socket.
- Insert a new GU10 halogen bulb (50 watts, as specified) by aligning the pins with the socket holes and pushing it firmly into place.
- Dispose of the old bulb responsibly.
7. Troubleshooting
| Problem | Possible Cause | Solution |
|---|---|---|
| Lamp does not turn on. | No power, faulty bulb, or loose connection. | Check if the power cord is securely plugged in. Ensure the outlet is functional. Replace the halogen bulb if it appears burnt out. |
| Candle wax not melting or fragrance is weak. | Low brightness setting, incorrect bulb wattage, or lamp height too high. | Increase the brightness setting using the '+' button. Ensure a 50-watt GU10 halogen bulb is installed. Adjust the lamp height closer to the candle. |
| Lamp feels unstable. | Uneven surface or loose components. | Place the lamp on a completely flat and stable surface. Ensure the adjustable pole is securely tightened. |
8. Specifications
- Model Name: Sunflower-01
- Brand: Yohonk
- Product Dimensions: 12.6"D x 9.06"W x 9.06"H
- Item Weight: 15.2 ounces
- Material: Glass, Metal
- Finish Type: Painted
- Shade Material: Glass
- Shade Color: Clear
- Light Source Type: Halogen
- Bulb Base: GU10
- Wattage: 50 watts
- Power Source: Corded Electric
- Switch Type: Dimmer
- Control Method: Remote (inline switch)
- Special Features: Adjustable Height, Dimmable, Timer (2H/4H/8H)
- Indoor/Outdoor Usage: Indoor
- Assembly Required: No
9. Warranty and Support
For any questions, concerns, or support needs regarding your Yohonk Candle Warmer Lamp, please contact Yohonk Customer Support. Refer to your purchase documentation for specific warranty details and contact information.
We are committed to providing high-quality products and excellent customer service.