1. Introduction
Thank you for choosing the Andoer 1080P Body Camera. This portable mini camera is designed for versatile audio and video recording, featuring a 180° rotatable lens, integrated LED fill lights, and a magnetic back clip for convenient attachment. It is suitable for various applications, including law enforcement, delivery services, travel, and personal security. Please read this manual carefully to ensure proper operation and maintenance of your device.

Figure 1: Andoer Body Camera in various usage scenarios, demonstrating its versatility for different recording environments.
2. Product Overview
The Andoer Body Camera is equipped with several key features to enhance your recording experience:
- 1080P HD Video Recording: Captures clear and detailed video footage.
- Audio Recording: Functions as a standalone audio recorder.
- 180° Rotatable Lens: Allows for flexible recording angles to suit different situations.
- Integrated LED Fill Lights: Provides illumination for clear recording in low-light conditions.
- Magnetic Back Clip: Enables secure attachment to clothing or metallic surfaces.
- Memory Expansion: Supports TF cards up to 256GB for extended recording time.
- Built-in 800mAh Battery: Offers long-term audio and video recording.
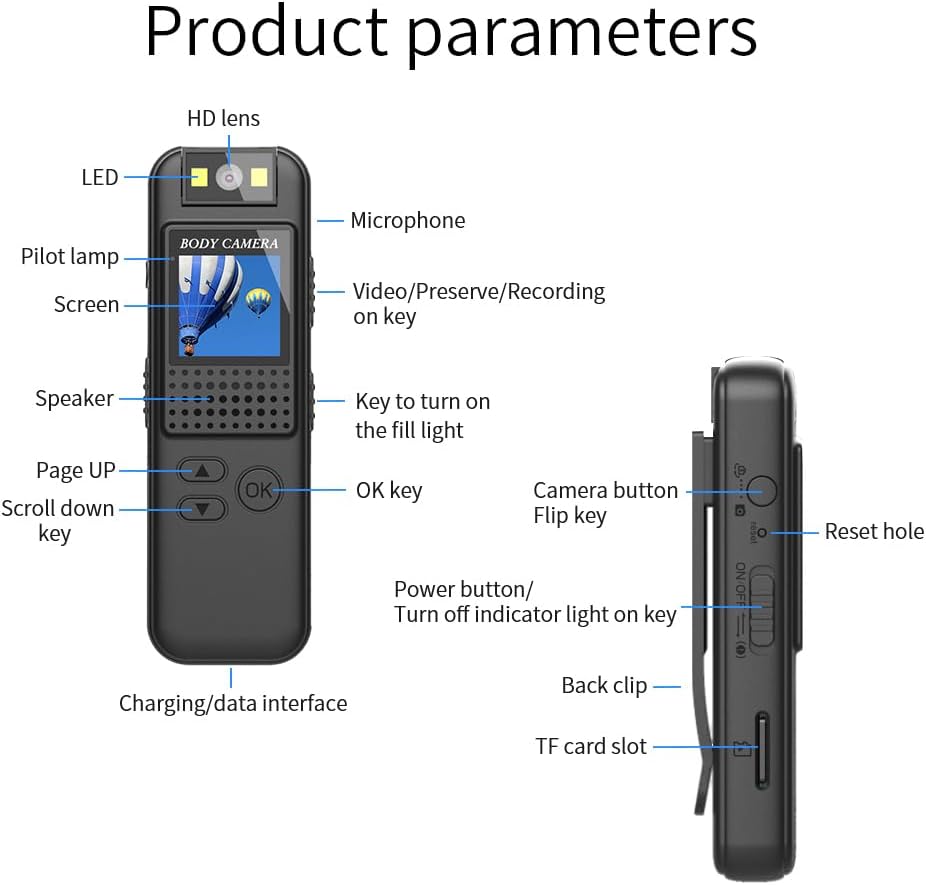
Figure 2: Detailed diagram of the Andoer Body Camera, highlighting its various components and control buttons.
Component Identification:
- HD Lens: Main camera lens.
- LED: Indicator light.
- Microphone: For audio recording.
- Pilot lamp: Status indicator.
- Screen: Display for viewing and settings.
- Video/Preserve/Recording on key: Multi-function button for video operations.
- Speaker: For audio playback.
- Key to turn on the fill light: Button to activate LED fill lights.
- Page UP / Scroll down key: Navigation buttons.
- OK key: Confirmation button.
- Charging/data interface: Type-C port for charging and data transfer.
- Camera button: For taking still photos.
- Flip key: Likely for screen orientation or specific mode.
- Reset hole: For factory reset.
- Power button/Turn off indicator light on key: Power control and indicator light toggle.
- Back clip: For attaching the camera.
- TF card slot: For inserting a microSD card.
3. Setup
3.1. Charging the Device
Before first use, fully charge the body camera. Connect the included Type-C charging cable to the camera's charging/data interface and plug the other end into a USB power adapter (not included) or a computer's USB port. The pilot lamp will indicate charging status.
3.2. Inserting a TF Card
The camera requires a TF (microSD) card for storing recordings. It supports cards up to 256GB (not included). Ensure the camera is powered off before inserting or removing the TF card.
- Locate the TF card slot on the side of the camera.
- Gently insert the TF card into the slot with the gold contacts facing down until it clicks into place.
- To remove, push the card in slightly until it springs out.

Figure 3: Illustration demonstrating the insertion of a TF (microSD) card into the camera's dedicated slot for memory expansion.
3.3. Powering On/Off
- To Power On: Press and hold the "Power button" until the screen lights up.
- To Power Off: Press and hold the "Power button" until the screen turns off.
4. Operating Instructions
4.1. Video Recording
The camera records video in 1080P resolution with audio.
- Ensure a TF card is inserted and the camera is powered on.
- Press the "Video/Preserve/Recording on key" to start video recording. The pilot lamp will change to indicate recording is in progress.
- Press the "Video/Preserve/Recording on key" again to stop recording. The video file will be saved to the TF card.

Figure 4: Visual representation of the camera's 1080P video recording and sound recording capabilities, along with the TF card slot.
4.2. Using the LED Fill Light
The integrated LED fill lights assist in recording clear video in low-light environments.
- Press the "Key to turn on the fill light" to activate the LED lights.
- Press it again to turn them off.

Figure 5: Comparison of video clarity with and without the LED fill light, illustrating its effectiveness in both day and night conditions.
4.3. Rotating the Lens
The camera features a 180° rotatable lens, allowing you to adjust the recording angle without repositioning the entire device.
- Gently rotate the lens module on top of the camera to your desired angle.
- Ensure the lens is securely positioned before recording.

Figure 6: Depiction of the camera's 180° rotatable lens, showing how it can be adjusted for different recording perspectives.
4.4. Using the Magnetic Back Clip
The magnetic back clip provides flexible mounting options.
- Attach the camera to clothing pockets, belts, or other suitable surfaces using the clip.
- For magnetic surfaces, the integrated magnets in the back clip allow for direct attachment to metallic objects.
- The 1/4" screw hole can be used with compatible bicycle mounts (not included) for cycling recording.
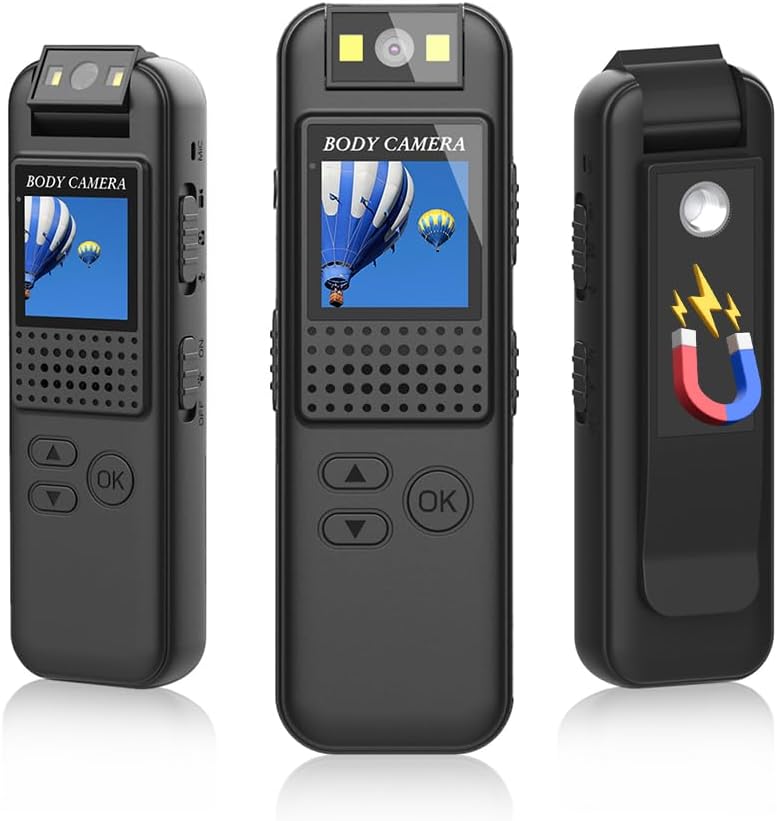
Figure 7: The Andoer Body Camera showcasing its magnetic back clip, illustrating how it can be attached to various surfaces.
4.5. Loop Recording
The camera supports circular recording, which means when the memory card is full, the oldest files will be overwritten by new recordings. This ensures continuous recording without manual deletion of old files.
5. Maintenance
- Cleaning: Use a soft, dry cloth to clean the camera body. For the lens, use a specialized lens cleaning cloth and solution. Avoid harsh chemicals.
- Storage: Store the camera in a cool, dry place away from direct sunlight and extreme temperatures.
- Battery Care: To prolong battery life, avoid fully discharging the battery frequently. Charge the camera regularly, even if not in use, to maintain battery health.
- Water Resistance: This device is not waterproof. Avoid exposure to water or high humidity.
6. Troubleshooting
| Problem | Possible Cause | Solution |
|---|---|---|
| Camera does not power on. | Low battery; device frozen. | Charge the camera fully. If unresponsive, use a thin object to press the "Reset hole" to restart the device. |
| Cannot record video. | No TF card inserted; TF card full or corrupted; incorrect mode. | Insert a TF card. Format or replace the TF card. Ensure the camera is in video recording mode. |
| Poor video quality. | Dirty lens; insufficient lighting. | Clean the lens. Activate the LED fill lights in low-light conditions. |
| Computer does not recognize the camera. | Faulty USB cable; driver issue; camera not in data transfer mode. | Try a different Type-C cable. Connect to another USB port or computer. Ensure the camera is powered on and connected correctly. |
7. Specifications
| Feature | Detail |
|---|---|
| Video Resolution | 1920 x 1080 (1080P) |
| Video Format | AVI |
| Video Encoding | M-JPEG |
| Video Scale | 16:9 |
| Image Format | JPG |
| Battery Capacity | 800 mAh |
| Memory Card Support | Max 256GB TF card (not included) |
| Charging Interface | Type-C |
| Supported Systems | Windows, Mac OS, Linux |
| Lens Rotation | 180 Degrees |
| Special Features | 180° Rotatable lens, Integrated LED fill lights, Magnetic back clip, Memory expansion |
| Dimensions (Package) | 12.6 x 8.6 x 3.5 cm |
| Weight (Package) | 110 grams |
| Model Number | SUL1854288931811WC |
8. Warranty and Support
Andoer products are designed for reliability and performance. For any questions, technical support, or warranty inquiries, please refer to the contact information provided with your purchase or visit the official Andoer website. Please retain your proof of purchase for warranty claims.
This manual is provided for informational purposes only. Specifications are subject to change without notice. Andoer is not responsible for any damage or injury caused by improper use or modification of the product.


