1. Introduction
The RAINLEOTI NF-817L Underground Wire Locator is a professional tool designed for efficiently tracing and tracking buried and hidden wires. It enables precise location of breakpoints and directions of underground and through-wall cables without damaging the cable insulation. This device is suitable for various applications, including locating sprinkler valves, pet fences, buried wires, pipelines, invisible fences, and cable testers.
This manual provides detailed instructions on the proper use, setup, operation, and maintenance of your NF-817L wire locator. Please read it thoroughly before operating the device.
2. Safety Information
- WARNING: Do not use this device on live circuits. Using the tester on energized cables can cause damage to the unit and pose a risk of electric shock.
- The underground cable locator is intended for non-energized cables only.
- Ensure all power to the circuit being tested is completely disconnected before connecting the transmitter.
- This device is suitable for single or dual-core wires. It is not designed for multi-core, bundled, or twisted wires due to potential signal interference.
- Always wear appropriate personal protective equipment (PPE) when working with electrical systems or digging.
- Keep the device away from water and extreme temperatures.
 Figure 2.1: Always ensure power is OFF before testing.
3. Package Contents
Verify that all items are present in the package:
- Transmitter (1 unit)
- Receiver (1 unit)
- Tool Bag (1 unit)
- Packing Box (1 unit)
- User Manual (1 unit)
- Earphone (1 pair)
- 9V Batteries (2 units, included)
4. Product Overview and Features
The RAINLEOTI NF-817L consists of a Transmitter and a Receiver, designed for ease of use and accurate detection.
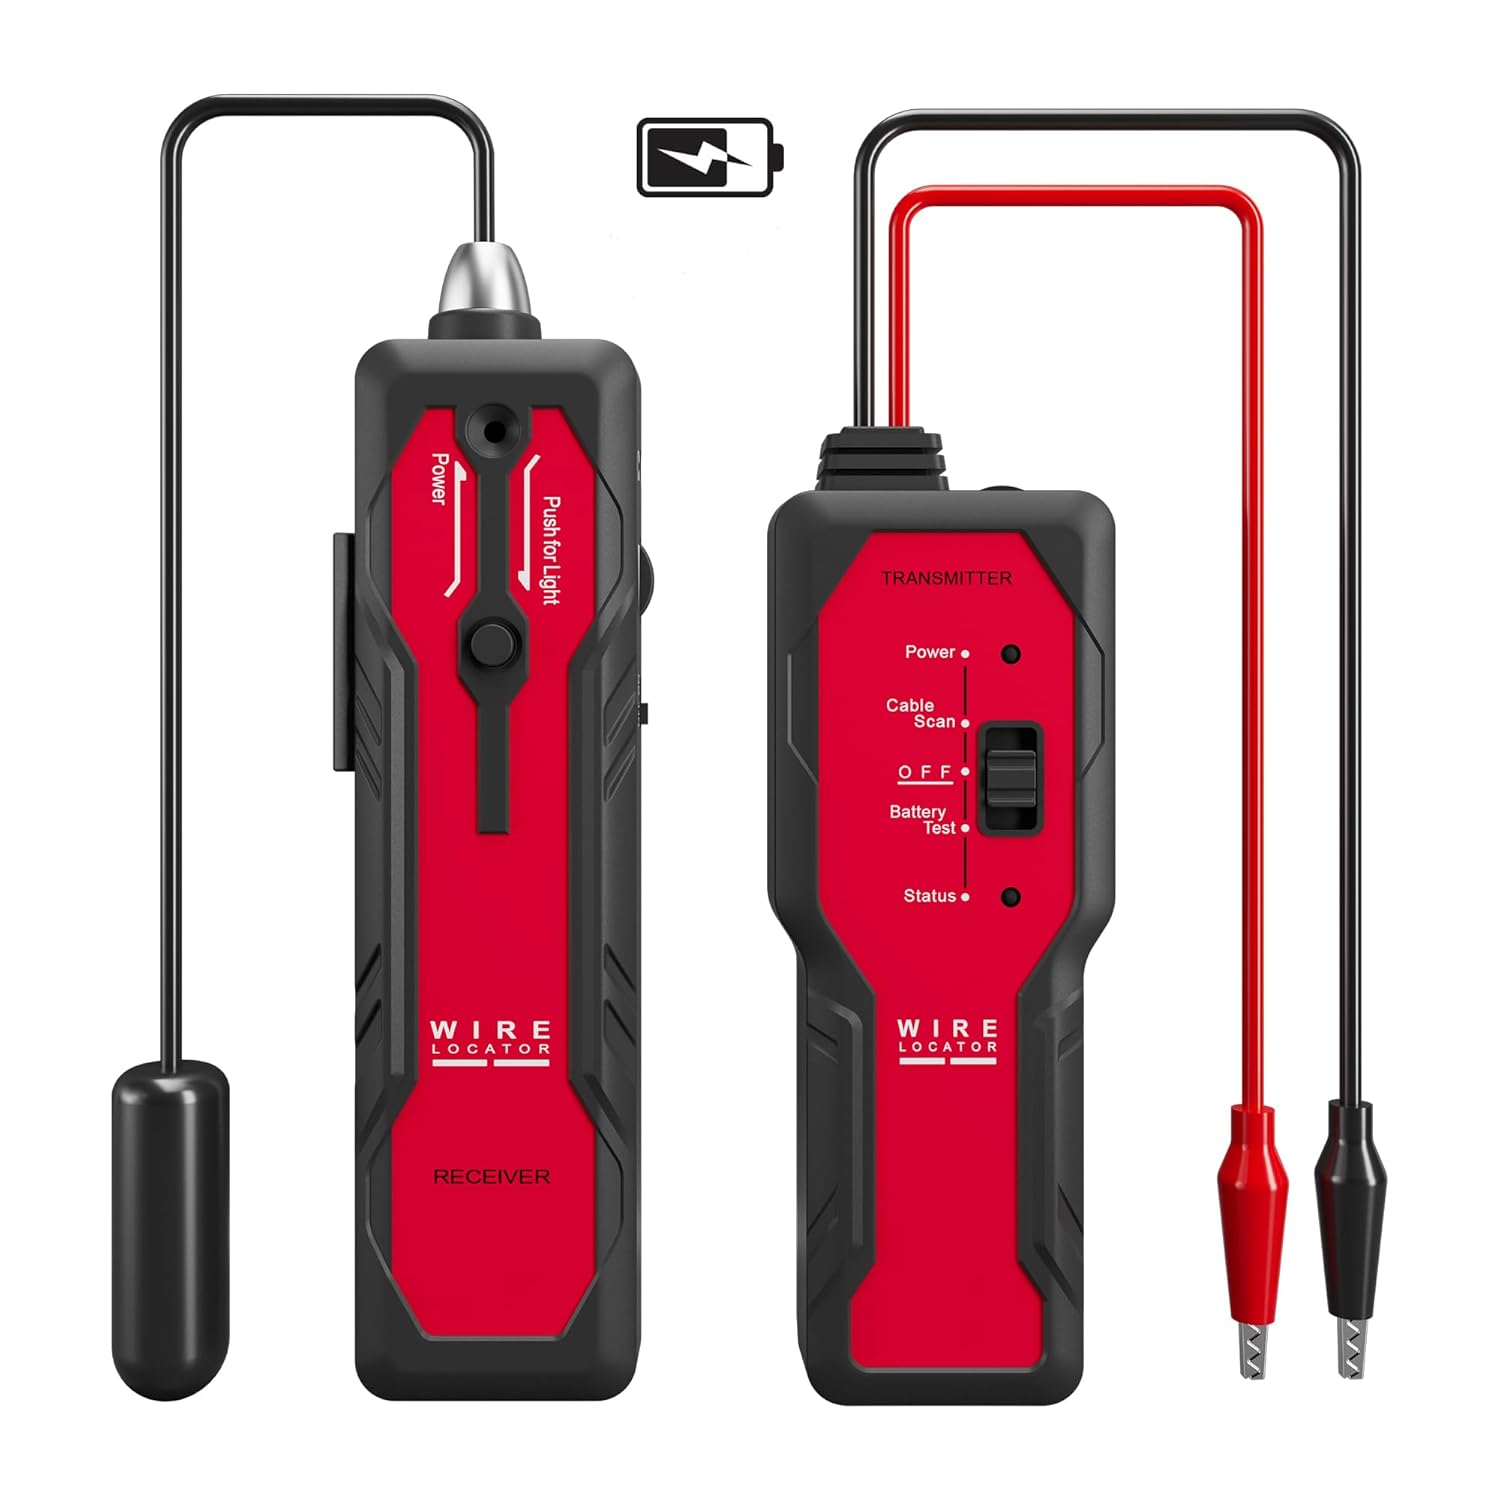 Figure 4.1: RAINLEOTI NF-817L Transmitter and Receiver.
 Figure 4.2: Component Diagram of the NF-817L.
Key Features:
- Accurate Location: Designed to precisely trace and track buried wires and locate breakpoints.
- Anti-Interference Design: Transmitter features adjustable power and interference resistance for reliable detection.
- Rechargeable Batteries: Both transmitter and receiver are powered by 3.7V, 1100mAh rechargeable lithium-ion batteries for convenience and cost savings.
- Depth and Length Capability: Detects wires up to 2.6 feet (0.8 meters) deep and 1640 feet (500 meters) in length.
- Flashlight: Integrated flashlight on the receiver for improved visibility in low-light conditions.
- Headphone Support: Includes earphones for connecting to the receiver, allowing focused detection in noisy environments.
 Figure 4.3: Receiver with headphone jack and built-in flashlight.
 Figure 4.4: Rechargeable lithium-ion batteries for convenient power.
5. Setup
- Charge Batteries: Ensure both the Transmitter and Receiver are fully charged before use. Connect them to a standard USB power adapter using the provided charging cables. The charging indicator will show the charging status.
- Prepare the Circuit: IMPORTANT: Before connecting the transmitter, ensure the circuit you intend to test is completely de-energized. Turn off all power to the wire or cable.
- Connect the Transmitter:
- Connect the red alligator clip of the transmitter to one end of the wire you wish to trace. This is the signal line.
- Connect the black alligator clip to a suitable ground point. For underground wires, this can be a metal stake driven into the ground or a known ground wire. If tracing a single wire, the black clip can be left unloaded.
 Figure 5.1: Connecting the transmitter to the wire and ground.
 - Power On Transmitter: Turn on the transmitter using its power switch. The Power LED will illuminate.
- Adjust Transmit Power: Use the adjustable power setting on the transmitter to set the signal strength. Start with a lower setting and increase if needed for better detection range.
 Figure 5.2: Overview of connection and initial setup steps.
6. Operating Instructions
- Power On Receiver: Turn on the receiver using its ON/OFF switch.
- Connect Earphones (Optional): For noisy environments, plug the provided earphones into the receiver's earphone jack. This helps to focus on the signal.
- Trace the Wire: Hold the receiver with the antenna pointing towards the ground or wall where the wire is suspected. Move the receiver slowly along the suspected path of the wire. The receiver will emit an audible signal (e.g., "BI BI BI") when it detects the transmitter's signal.
- Locate Breakpoints: As you trace the wire, pay close attention to the signal strength. The alert tone from the receiver will be strong when directly over the active wire. When you approach a breakpoint, the signal will weaken significantly and then fade out completely past the break. The point where the signal disappears or becomes very weak indicates the breakpoint.
 Figure 6.1: Receiver detecting the signal from the buried wire.
 Figure 6.2: Identifying a breakpoint by signal loss.
Tips for Accurate Location:
- Move the receiver slowly and steadily.
- Adjust the transmitter's power if the signal is too strong or too weak.
- In areas with multiple wires or high interference, the signal might be less clear. Focus on the distinct change in signal strength to pinpoint the break.
- For shielded wires and multi-stranded wires, it may be difficult to determine the exact breakpoint due to signal interference. However, the general direction of the line can still be tested. If tracing a shielded wire, the red clip should grip the shielding layer.
 Figure 6.3: Tracing a buried wire and locating a breakpoint.
Wall-Through Cable Detection:
The NF-817L can also assist in locating cables within walls. Follow the same principles: connect the transmitter to the de-energized cable, and use the receiver to trace the signal through the wall. The signal will weaken or disappear at a break.
 Figure 6.4: Locating a breakpoint in a wall-through cable.
7. Applications
The RAINLEOTI NF-817L is a versatile tool suitable for a wide range of applications:
- Locating buried sprinkler valve wires.
- Tracing pet fence wires (invisible fences).
- Finding breaks in underground electrical cables (non-energized).
- Identifying the path of pipelines (non-metallic pipes may require a tracer wire).
- Locating in-wall wires and cables.
- General cable testing and continuity checks.
 Figure 7.1: Wide range of applications for the NF-817L.
8. Maintenance
- Battery Charging: Recharge the internal lithium-ion batteries regularly to ensure optimal performance. Use the provided USB cables and a compatible power adapter.
- Cleaning: Wipe the device with a soft, dry cloth. Do not use abrasive cleaners or solvents.
- Storage: Store the device in its tool bag in a cool, dry place away from direct sunlight and extreme temperatures when not in use.
- Battery Replacement: The device uses internal rechargeable batteries. If battery performance significantly degrades over time, contact customer support for assistance.
9. Troubleshooting
- No Signal from Receiver:
- Ensure both Transmitter and Receiver are powered on and fully charged.
- Verify the transmitter is correctly connected to the wire and a good ground.
- Increase the transmit power on the transmitter.
- Confirm the wire being tested is de-energized.
- Check if the wire is a multi-core, bundled, or twisted wire, which may not be detectable.
- Inaccurate Breakpoint Location:
- Move the receiver more slowly and deliberately over the suspected area.
- Adjust the transmit power to find the optimal signal strength for your environment.
- Ensure there are no other strong electromagnetic fields nearby causing interference.
- Use the earphones to better discern subtle changes in the signal.
- Short Battery Life:
- Ensure batteries are fully charged before each use.
- Avoid operating in extremely cold temperatures, which can reduce battery performance.
- If battery life remains significantly short after full charging, the batteries may need replacement. Contact customer support.
10. Specifications
| Feature | Specification |
|---|---|
| Model Number | NF-817L |
| Brand | RAINLEOTI |
| Max Detection Depth | 2.6 feet (0.8 meters) |
| Max Detection Length | 1640 feet (500 meters) |
| Transmitter Battery | 3.7V, 1100mAh Rechargeable Lithium-ion |
| Receiver Battery | 3.7V, 1100mAh Rechargeable Lithium-ion |
| Power Source | Battery Powered |
| Color | BLACK |
| UPC | 772093267393 |
| Package Dimensions | 11.18 x 5.98 x 1.85 inches |
| Item Weight | 15.84 ounces |
11. Warranty and Support
RAINLEOTI is committed to providing quality products and customer satisfaction. While specific warranty details are not provided in this manual, please retain your proof of purchase for any warranty claims.
For technical support, troubleshooting assistance, or any questions regarding your RAINLEOTI NF-817L Underground Wire Locator, please contact RAINLEOTI customer service. We aim to respond to inquiries within 24 hours.
Thank you for choosing RAINLEOTI.


