Introduction
This manual provides detailed instructions for the proper setup, operation, and maintenance of your NEEWER GM006 Heavy Duty Video Tripod Fluid Head. Please read this manual thoroughly before using the product to ensure optimal performance and longevity.
The NEEWER GM006 is a robust fluid head designed for professional video applications. Constructed from aluminum alloy, it offers a maximum load capacity of 22lb (10kg) and features a Ø75mm flat base with a 3/8" threaded hole for versatile mounting. Key features include stepless adjustable panoramic damping, definable vertical tilt damping, and a quick-lock dual-compatibility quick release plate.

Image: The NEEWER GM006 Heavy Duty Video Tripod Fluid Head, showcasing its robust design and adjustable handle.
Package Contents
Verify that all items listed below are included in your package:
- 1 x Tripod Fluid Head
- 1 x User Manual
- 1 x Quick Release Plate
- 1 x L Shaped Hex Key
- 1 x 3/8" to 1/4" Screw Adapter
- 1 x Handle

Image: Visual representation of the NEEWER GM006 package contents, including the fluid head, quick release plate, handle, hex key, screw adapter, and user manual.
Setup
1. Attaching the Fluid Head to a Tripod
- Ensure your tripod has a Ø75mm flat base or a compatible mounting plate with a 3/8" screw. The GM006 features a 3/8" threaded hole at its base.
- Align the fluid head's base with the tripod's mounting screw.
- Rotate the fluid head clockwise onto the tripod's screw until securely tightened. If your tripod has a 1/4" screw, use the provided 3/8" to 1/4" screw adapter.

Image: Illustration of the fluid head's 75mm flat base with 3/8" and 1/4" screw compatibility, demonstrating attachment to various tripods, monopods, and camera sliders.
2. Attaching the Quick Release Plate to your Camera
- Locate the quick release plate. It has 1/4" and 3/8" top screws.
- Attach the quick release plate to the bottom of your camera or compatible equipment using the appropriate screw. Use the L-shaped hex key for secure tightening.

Image: Step-by-step guide on how to quickly install and release the quick release plate from the fluid head by pushing the button to unlock and pressing to install.
3. Mounting the Camera onto the Fluid Head
- Ensure the quick release plate is securely attached to your camera.
- Press the quick release button on the fluid head to unlock the plate receiver.
- Align the quick release plate (with camera attached) with the receiver on the fluid head and press it down until it locks into place.
- The GM006 supports two quick release modes: DJI RS2/RS3/RS3 PRO gimbal compatible and 501PL compatible. Ensure the lock is set to the correct mode for your plate.

Image: Detailed view of the quick release plate compatibility, showing both DJI RS2/RS3/RS3 PRO gimbal mode and Manfrotto 501PL quick release plate mode.
4. Attaching the Handle
- Insert the handle into the designated socket on either the left or right side of the fluid head.
- Tighten the handle's locking knob to secure it in place.
- The handle is telescopic, allowing adjustment from 9.1" to 14.2" (23-36cm) for comfortable operation.

Image: Demonstration of the adjustable and telescopic handle, showing how it can be rotated and pulled to extend its length for ergonomic use.
Operating Instructions
1. Stepless Adjustable Panoramic Damping (Horizontal)
The fluid head features an advanced horizontal damping system for smooth 360° panoramic movements.
- To adjust horizontal damping, first release the pan locking knob located at the base of the fluid head.
- Rotate the damping adjustment ring to increase or decrease the desired level of fluid damping.
- Once the desired damping is set, you can re-engage the pan locking knob for static shots or leave it loose for smooth panning.

Image: Close-up view of the horizontal damping controls, illustrating how to release the pan locking knob and rotate the damping adjustment ring for customized panoramic movement.
2. Definable Vertical Tilt Damping
Adjust the vertical tilt damping to achieve precise +90°/-75° up and down shooting motions, maintaining dynamic balance even when the handle is released.
- Release the tilt locking knob on the side of the fluid head.
- Turn the damping adjustment knob to customize the vertical damping levels according to the weight of your camera setup.
- This allows for controlled tilting without sudden drops, ensuring smooth vertical camera movements.
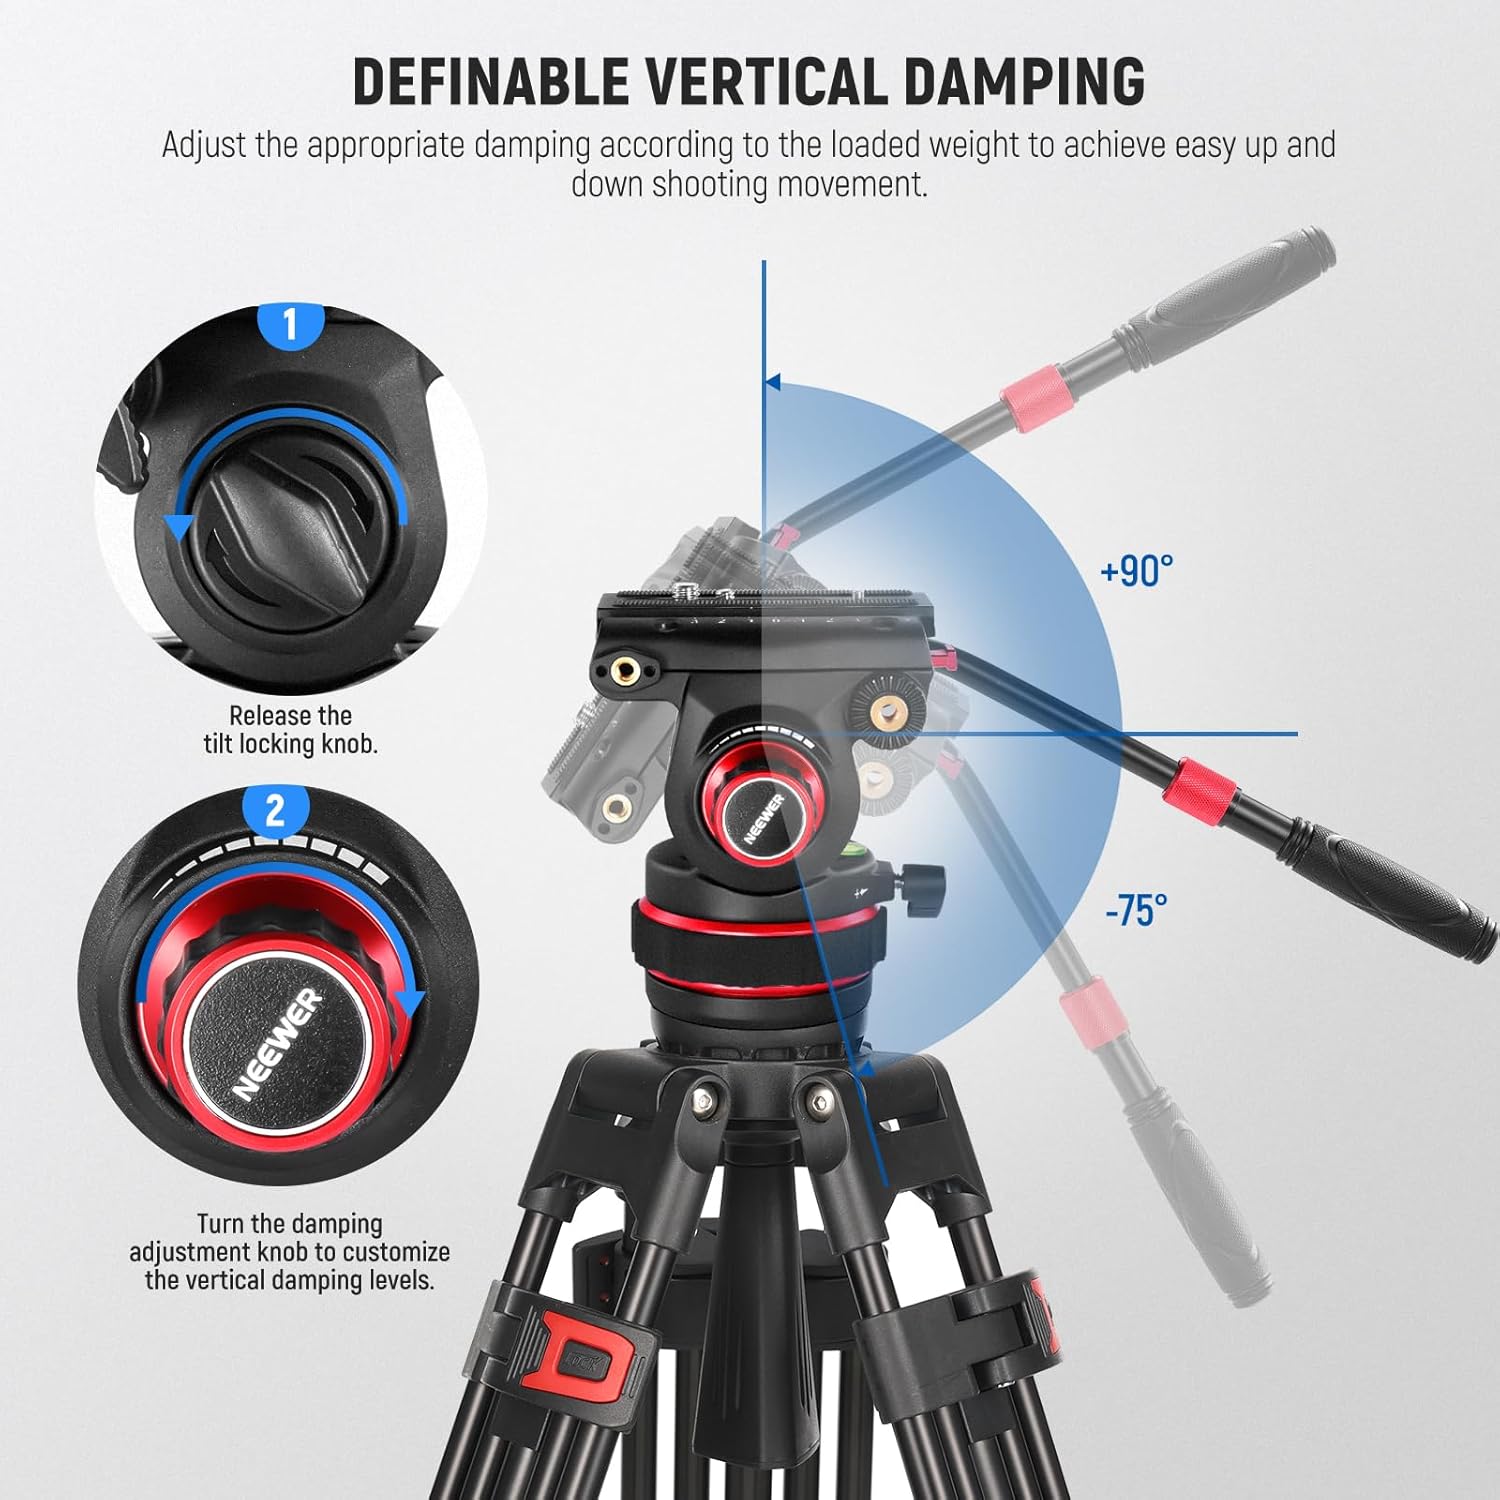
Image: Close-up view of the vertical damping controls, showing how to release the tilt locking knob and turn the damping adjustment knob to customize vertical movement from +90° to -75°.
3. Switching Between Tripod and Gimbal Shooting
The quick release system allows for efficient transitions between tripod and gimbal setups.
- To remove the camera from the fluid head, press the quick release button and lift the camera with its attached plate.
- Mount the camera directly onto your DJI RS2, RS3, or RS3 PRO gimbal.
- To remount on the fluid head, ensure the quick release plate is attached to the camera and re-insert it into the fluid head's receiver until it clicks.

Image: Visual demonstration of seamlessly switching a camera between the fluid head on a tripod and a gimbal stabilizer.
Maintenance
Regular maintenance ensures the longevity and smooth operation of your fluid head.
- Cleaning: Wipe the fluid head with a soft, dry cloth after each use to remove dust and debris. For stubborn dirt, use a slightly damp cloth and then dry thoroughly. Avoid harsh chemicals or abrasive materials.
- Lubrication: The fluid damping system is factory-sealed and does not require user lubrication. Do not attempt to disassemble the fluid head.
- Storage: Store the fluid head in a clean, dry environment, away from extreme temperatures and humidity.
- Inspection: Periodically check all knobs, screws, and connections to ensure they are tight and secure.
Troubleshooting
If you encounter issues with your NEEWER GM006 Fluid Head, refer to the following common problems and solutions:
| Problem | Possible Cause | Solution |
|---|---|---|
| Camera not securely mounted | Quick release plate not fully engaged or locking mechanism not activated. | Ensure the quick release plate is pressed firmly into the receiver until an audible click is heard. Verify the locking mechanism is engaged. Check if the correct QR plate mode (DJI RS or 501PL) is selected. |
| Pan or tilt movement is stiff/loose | Damping adjustment knobs are too tight/loose, or locking knobs are engaged. | Adjust the respective damping adjustment rings/knobs to the desired level. Ensure pan/tilt locking knobs are released for movement. |
| Handle is loose | Handle locking knob is not tightened. | Tighten the handle's locking knob securely. |
| Fluid head wobbles on tripod | Fluid head not securely attached to the tripod. | Ensure the fluid head is tightly screwed onto the tripod's mounting screw. Check if the tripod legs are fully extended and locked. |
If the problem persists after attempting these solutions, please contact NEEWER customer support for further assistance.
Specifications
| Feature | Detail |
|---|---|
| Model Number | GM006 |
| Brand | NEEWER |
| Material | Aluminum Alloy |
| Max Load Capacity | 22lb (10kg) |
| Item Weight | 3.1lb (1.4kg) / 45.86 Ounces |
| Base Diameter | Ø75mm |
| Pan Range | 360° |
| Tilt Range | +90° / -75° |
| Handle Length | 9.1"-14.2" (23-36cm) adjustable |
| Quick Release Plate Compatibility | DJI RS2/RS3/RS3 PRO gimbal, Manfrotto 501PL |
| Mounting Threads | 3/8" threaded hole (base), 1/4" and 3/8" top screws (QR plate), 1/4" screw hole (side) |
| Package Dimensions | 12.24 x 6.89 x 5.59 inches |
| UPC | 191073098169 |
Warranty & Support
NEEWER products are designed and manufactured to high-quality standards. For information regarding warranty coverage, please refer to the warranty card included with your product or visit the official NEEWER website.
For technical support, troubleshooting assistance, or inquiries about replacement parts, please contact NEEWER customer service through their official website or the contact information provided in your product packaging. Please have your model number (GM006) and purchase details ready when contacting support.