1. Introduction
This document provides comprehensive instructions for the installation, operation, and maintenance of the WLLKIY 3000W Hybrid Solar Inverter, Model SM-3200H. This multi-functional inverter/charger combines the functions of an inverter, MPPT solar charger, and battery charger to provide uninterruptible power support. It features a comprehensive LCD display for user-configurable operations such as battery charging current, AC/solar charger priority, and acceptable input voltage.
Key Features:
- Pure sine wave output inverter.
- Selectable input voltage range for home appliances or personal computers.
- Adjustable battery charging current via LCD display.
- Configurable battery charging priority mode.
- LCD display for monitoring and settings.
- Optional dust filter.
- Compatible with utility grid and generator inputs.
- Maximizes PV power utilization with automatic restart function upon PV restoration.
- Overload, high temperature, and inverter output short circuit protection.
- Cold start function.
- Supports lithium batteries.
- Optional WIFI monitoring and setting capabilities.
2. Safety Instructions
Please read all instructions and warnings in this manual carefully before installation and operation. Failure to follow these instructions may result in electric shock, fire, or severe injury. Keep this manual for future reference.
- Installation must be performed by qualified personnel.
- Ensure proper grounding of the inverter.
- Do not expose the inverter to rain, snow, or liquids of any type.
- Do not disassemble the unit. There are no user-serviceable parts inside.
- Disconnect all power sources (PV, battery, AC) before performing any maintenance or wiring.
- Ensure adequate ventilation around the inverter to prevent overheating.
3. Product Overview
The WLLKIY SM-3200H is a compact and efficient hybrid solar inverter designed for various power applications. It integrates an inverter, solar charger, and battery charger into a single unit.

Figure 3.1: Front view of the SM-3200H Hybrid Solar Inverter, highlighting its display and main features.
The inverter features a clear LCD display for monitoring system status and configuring operational parameters. The rear panel provides all necessary connection terminals for PV input, battery, AC input, and AC output.

Figure 3.2: Rear view of the SM-3200H, illustrating connection points for AC, battery, and PV.

Figure 3.3: Detailed rear view of the SM-3200H, showing the input breaker and cooling vents.
4. Setup
Proper installation is crucial for the safe and efficient operation of your hybrid solar inverter. Ensure all local electrical codes are followed.
4.1 Unpacking and Inspection
Upon receiving the inverter, carefully unpack it and inspect for any shipping damage. Report any damage to your dealer immediately. Ensure all accessories are present.
4.2 Mounting the Unit
Mount the inverter on a vertical surface in a clean, dry, and well-ventilated area. Ensure there is sufficient clearance around the unit for proper airflow. Avoid direct sunlight and heat sources.
4.3 Wiring Connections
All wiring must be performed with power disconnected from all sources. Use appropriate gauge wiring for all connections.
- Battery Connection: Connect the battery bank to the BATTERY terminals. Ensure correct polarity (+ to + and - to -).
- PV Array Connection: Connect the solar panel array to the PV IN terminals. Observe correct polarity and ensure the PV input voltage does not exceed 450VDC.
- AC Input Connection: Connect the utility grid or generator AC source to the AC IN terminals.
- AC Output Connection: Connect your loads (home appliances, computers) to the AC OUT terminals.
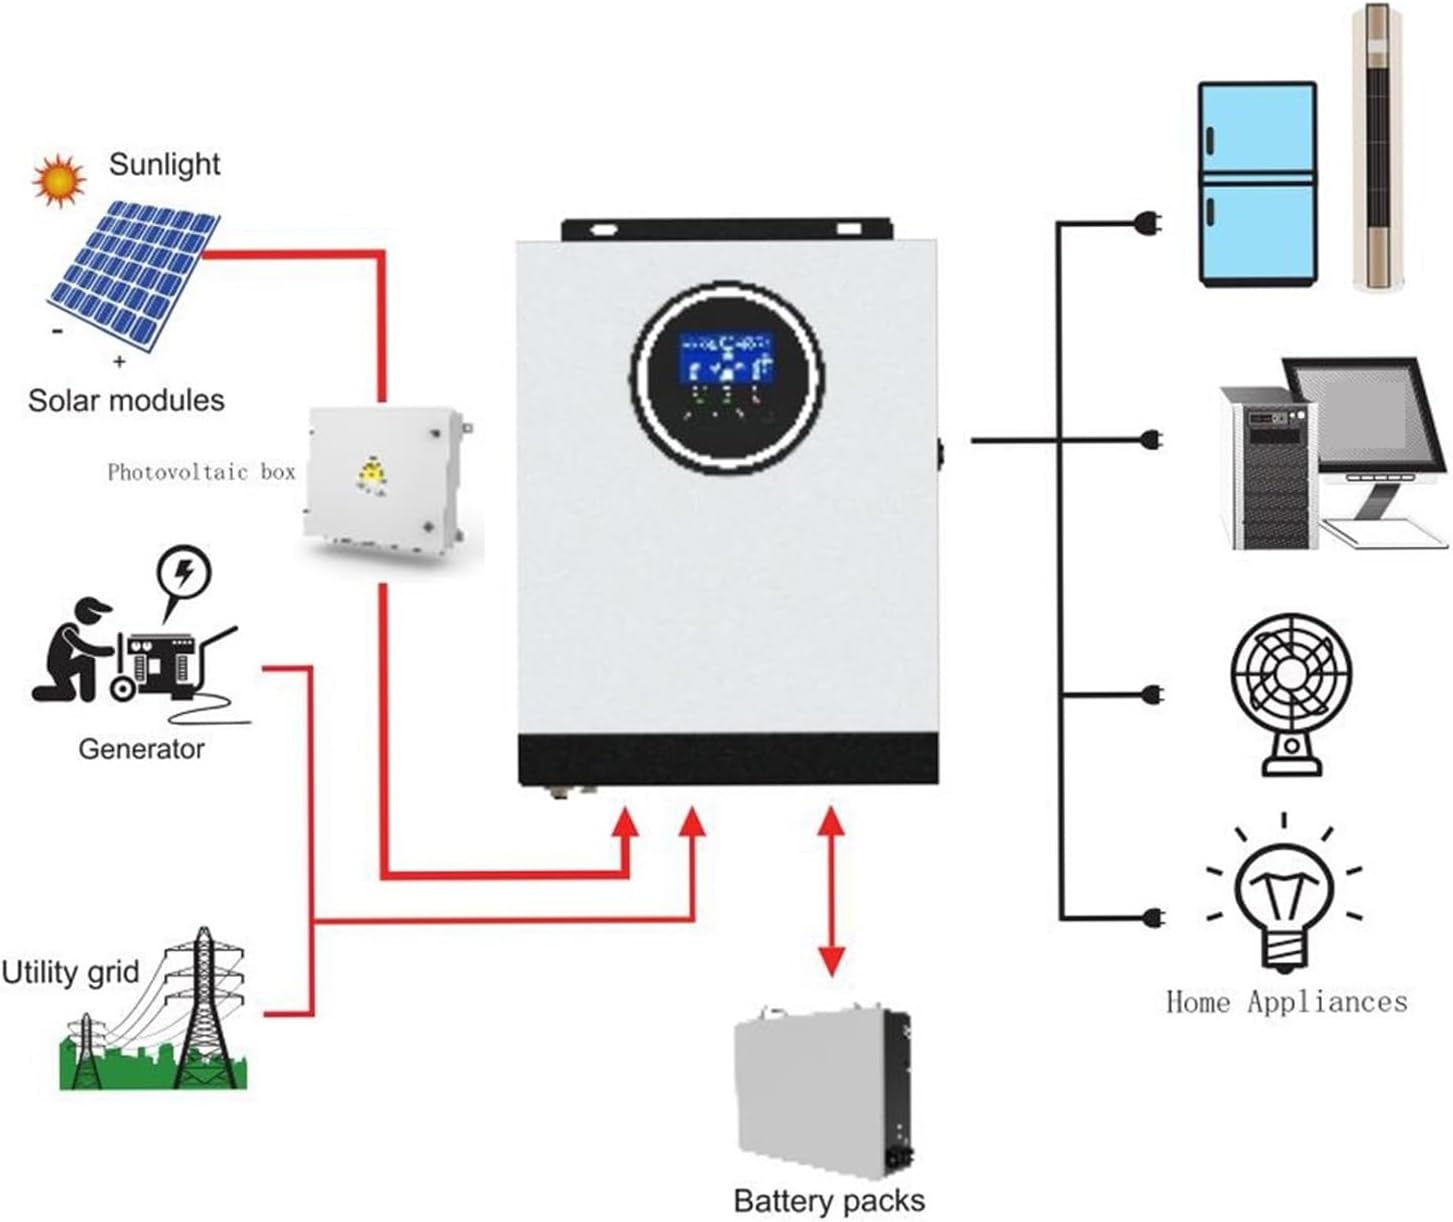
Figure 4.1: Typical system connection diagram for the SM-3200H Hybrid Solar Inverter.
5. Operating Instructions
Once all connections are securely made, you can begin operating the inverter.
5.1 Powering On/Off
- To Power On: Ensure the input breaker is in the 'ON' position. The inverter will perform a self-test and the LCD display will illuminate.
- To Power Off: Disconnect all AC loads. Turn off the input breaker. Disconnect the PV input and then the battery input.
5.2 LCD Display and Settings
The LCD display provides real-time system information and allows for configuration of various parameters. Use the buttons adjacent to the display to navigate menus and adjust settings.
- Monitoring: View input/output voltage, frequency, battery status, charging current, and load percentage.
- Parameter Settings: Adjust settings such as battery charging current, AC input voltage range (170-280VAC for PC or 90-280VAC for appliances), and charger source priority (Solar first, Utility first, SBU priority).
6. Maintenance
Regular maintenance ensures the longevity and optimal performance of your inverter.
- Cleaning: Periodically clean the exterior of the inverter with a dry cloth. Ensure ventilation openings are free from dust and debris. If an optional dust filter is installed, clean or replace it as recommended.
- Connections: Annually check all electrical connections for tightness and corrosion.
- Battery Inspection: Regularly inspect battery terminals for corrosion and ensure battery voltage is within acceptable limits.
- Environment: Ensure the installation environment remains within specified temperature and humidity ranges.
7. Troubleshooting
This section provides solutions for common issues you might encounter.
| Problem | Possible Cause | Solution |
|---|---|---|
| Inverter does not power on | No battery connection; Battery voltage too low; Input breaker off | Check battery connections and voltage; Ensure input breaker is ON. |
| No AC output | Overload; Short circuit; Inverter fault | Reduce load; Check for short circuits in wiring; Restart inverter. |
| Battery not charging | PV input too low/disconnected; AC input not present; Charger settings incorrect | Check PV connections and sunlight; Verify AC input; Adjust charger settings via LCD. |
| Overload warning | Connected load exceeds inverter capacity | Reduce the total load connected to the inverter. |
If the problem persists after attempting these solutions, please contact customer support.
8. Specifications
| Parameter | Value |
|---|---|
| Model | SM-3200H |
| Rated Power | 3000 W |
| AC Input Voltage | 230 V AC |
| Selectable Voltage Range (PC) | 170-280 VAC |
| Selectable Voltage Range (Appliances) | 90-280 VAC |
| Frequency Range | 50 Hz / 60 Hz (Auto Sensing) |
| AC Voltage Regulation (Battery Mode) | 230 VAC ± 5% |
| Surge Power | 6400 VA |
| Transfer Time (PC) | 10 ms |
| Transfer Time (Appliances) | 20 ms |
| Waveform | Pure Sine Wave |
| Battery Voltage | 24 VDC |
| Floating Charge Voltage | 27 V |
| MPPT Solar Charger Current | 80 A |
| Max. PV Array Open Circuit Voltage | 450 VDC |
| Product Weight | 10 Grams |
9. Warranty and Support
This product comes with a standard manufacturer's warranty. Please refer to the warranty card included with your purchase for specific terms and conditions. For technical support, troubleshooting assistance, or warranty claims, please contact your dealer or the manufacturer directly.
Keep your purchase receipt as proof of purchase for warranty purposes.