1. Introduction
Thank you for choosing the MELLCOM 20x30 Carport. This manual provides essential information for the safe assembly, operation, and maintenance of your carport. Please read these instructions thoroughly before beginning assembly and retain them for future reference. This carport is designed to provide protection for vehicles, outdoor equipment, or serve as a covered space for outdoor events.

Image 1.1: Fully assembled MELLCOM 20x30 Carport. This image shows the complete structure of the carport, highlighting its size and design.
2. Safety Information
WARNING: Failure to follow these safety instructions may result in serious injury or property damage.
- Anchoring: Ensure proper anchoring of the carport according to local weather conditions and building codes. The structure must be securely fastened to the ground to prevent uplift or collapse due to wind.
- Weather Conditions: This carport is designed to withstand a snow load of 35 PSF (pounds per square foot) and wind speeds up to 100 MPH. In areas with severe weather, including heavy snowfall, strong winds, or hurricanes, additional precautions or temporary disassembly may be necessary. Regularly clear snow accumulation from the roof.
- Assembly: Assembly requires multiple people. Do not attempt to assemble alone. Wear appropriate safety gear, including gloves and eye protection.
- Site Selection: Choose a level, stable surface for installation. Avoid areas prone to flooding or with overhead power lines.
- Inspection: Periodically inspect all connections, bolts, and the roof cover for wear, damage, or loosening. Tighten fasteners as needed.
- Children and Pets: Keep children and pets away from the assembly area.
3. Parts List
Before beginning assembly, verify that all components listed below are present and undamaged. Refer to the packaging for a detailed inventory. If any parts are missing or damaged, contact MELLCOM customer service immediately.
- Galvanized Steel Frame Components (Poles, Beams, Connectors)
- Galvanized Metal Roof Panels
- Fasteners (Bolts, Nuts, Washers, Screws)
- Anchoring Hardware (Ground stakes or similar, depending on package)
- Assembly Tools (Wrenches, Hex Keys - may or may not be included)
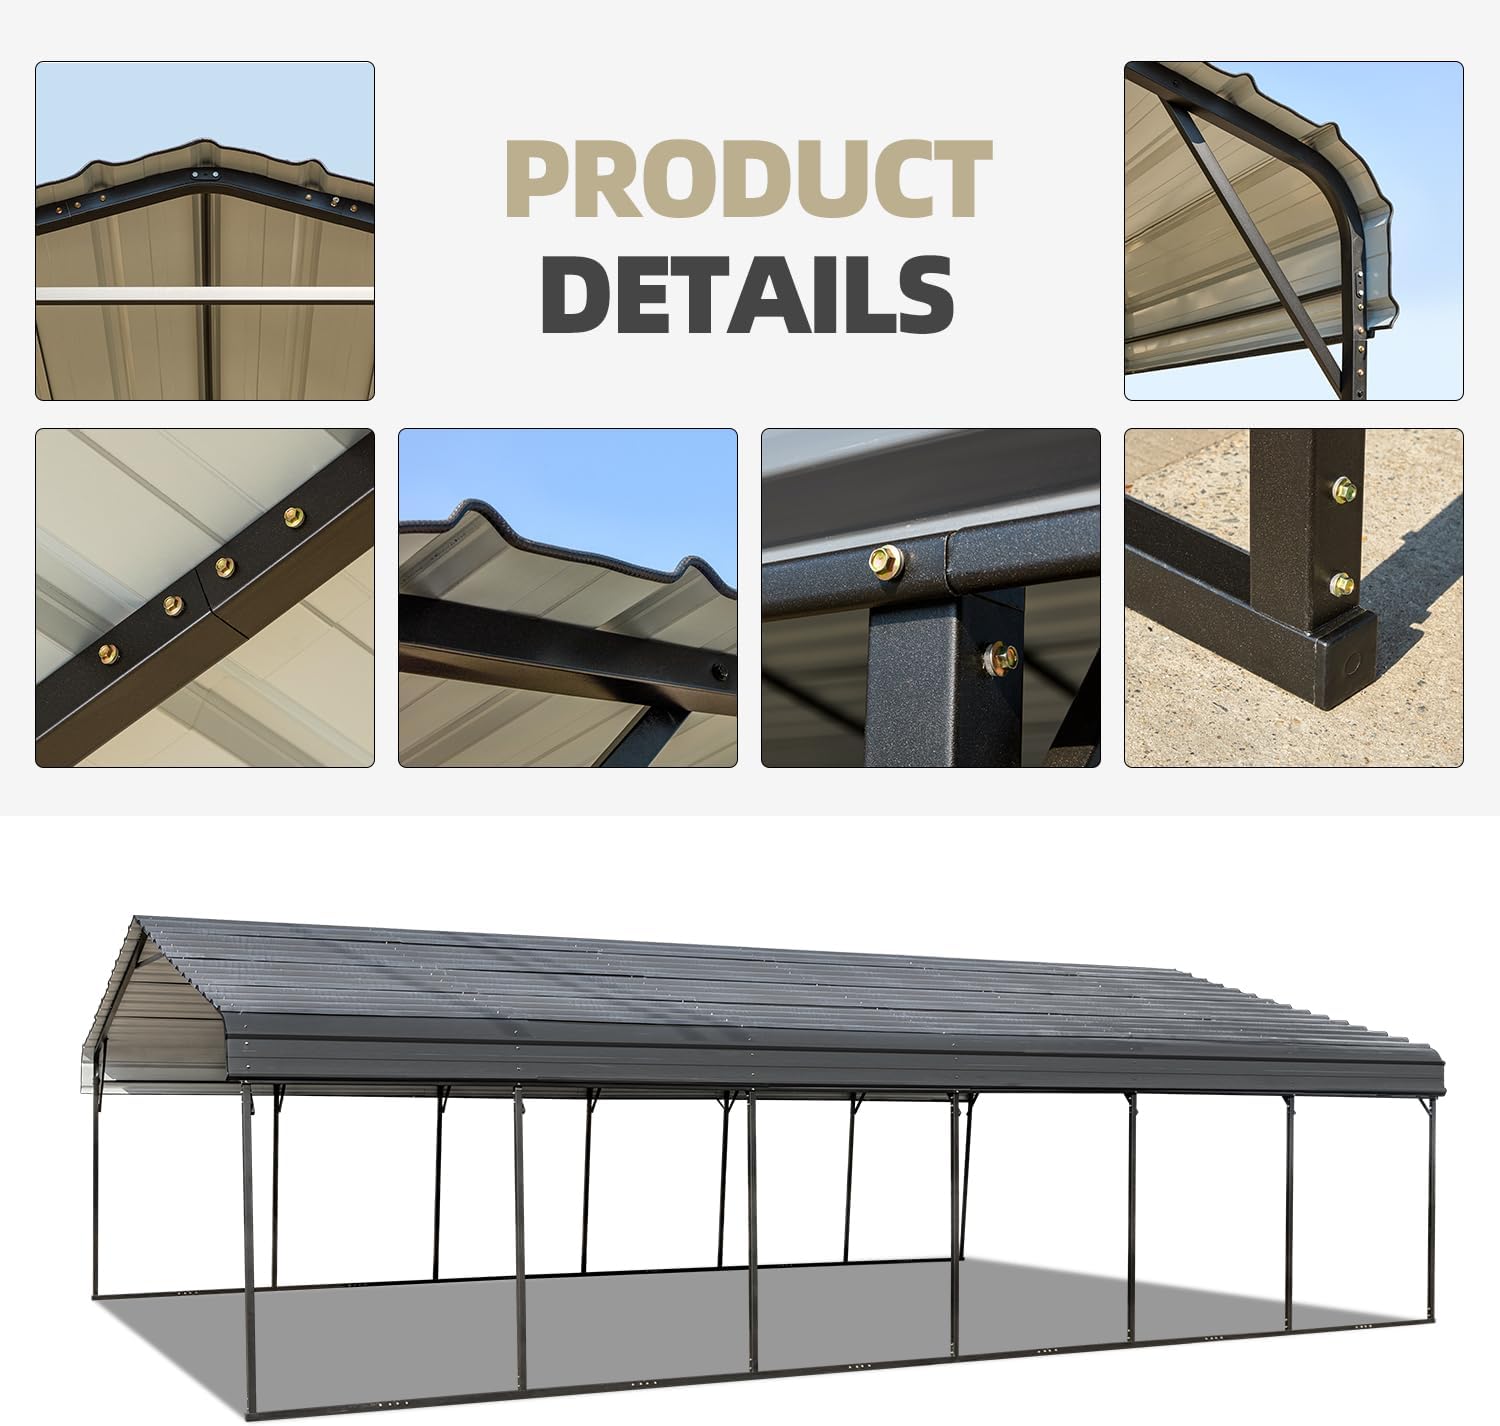
Image 3.1: Close-up views of various carport components, including roof panels, frame connections, and base plates. This image illustrates the construction details of the carport.
4. Setup and Assembly
Assembly of the MELLCOM Carport requires careful attention to detail and adherence to the provided step-by-step instructions in the separate assembly guide. This section provides a general overview.
- Site Preparation: Clear and level the chosen installation area. Ensure adequate space for the 20x30 ft footprint plus working room.
- Frame Assembly: Begin by assembling the base frame components, followed by the vertical support poles and roof trusses. Ensure all connections are secure but do not fully tighten bolts until the entire frame is upright and aligned.
- Roof Panel Installation: Carefully attach the galvanized metal roof panels to the frame. Ensure proper overlap and secure fastening to prevent leaks. The roof features an anti-leak design with seam taping for superior protection.
- Final Tightening and Anchoring: Once the entire structure is assembled and aligned, fully tighten all bolts and fasteners. Proceed with anchoring the carport to the ground using the provided hardware or suitable alternatives for your specific ground type.
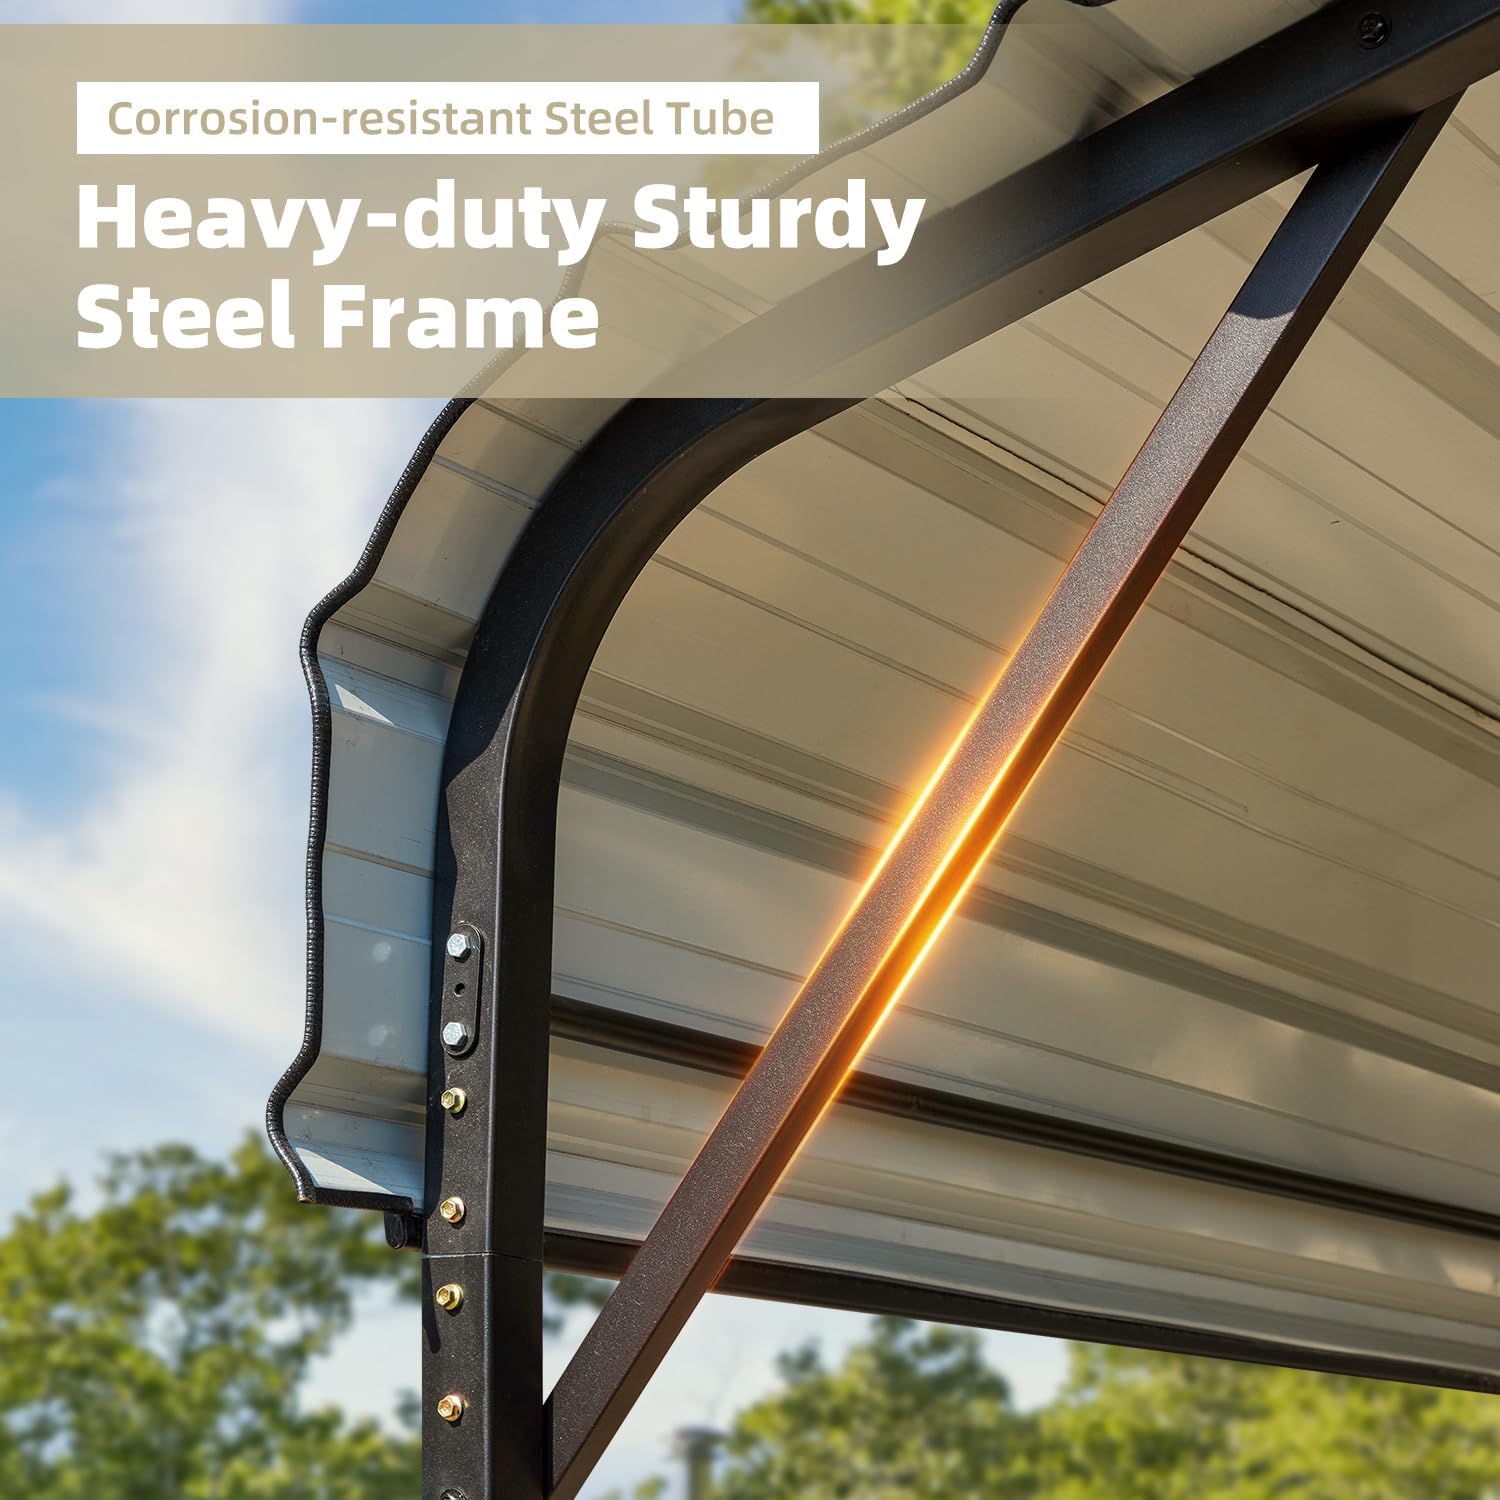
Image 4.1: Detail of the corrosion-resistant steel tube and heavy-duty frame construction. This image highlights the robust nature of the carport's structural components.

Image 4.2: Close-up of a frame connection point, showing how the steel tubes are joined with bolts.

Image 4.3: Detail of the carport's base plate and anchoring point, illustrating how the structure is secured to the ground.

Image 4.4: Close-up of the galvanized metal roof panels with seam taping, illustrating the anti-leak design. This image shows how the roof panels are designed to prevent water intrusion.
5. Operation and Intended Use
The MELLCOM 20x30 Carport is designed for various outdoor applications:
- Vehicle Protection: Provides shelter for cars, trucks, boats, or other vehicles from sun, rain, and snow.
- Outdoor Storage: Ideal for storing lawn equipment, tools, or other items that require protection from the elements.
- Outdoor Events: Can be used as a temporary covered space for gatherings, workshops, or other outdoor activities.
The carport offers 100% UV protection and is water-resistant, ensuring your belongings are protected.

Image 5.1: Visual representation of the carport's performance in sunny, rainy, and snowy conditions, highlighting UV protection, waterproofing, and snow load capacity.

Image 5.2: The carport providing shelter for two vehicles, demonstrating its spacious capacity.

Image 5.3: A collage showing the carport's versatility for different uses, including vehicle protection and outdoor events.
6. Maintenance
Regular maintenance will extend the lifespan of your carport and ensure its continued safety and functionality.
- Cleaning: Clean the roof panels and frame periodically with mild soap and water. Avoid abrasive cleaners or tools that could damage the finish.
- Fastener Check: Annually, or after severe weather, inspect all bolts, nuts, and screws. Tighten any that have become loose.
- Snow Removal: In snowy conditions, regularly remove accumulated snow from the roof to prevent exceeding the 35 PSF snow load capacity. Use a soft brush or broom to avoid damaging the roof panels.
- Damage Inspection: Check for any signs of rust, dents, or structural damage. Address any issues promptly to prevent further deterioration.
7. Troubleshooting
This section addresses common issues you might encounter with your carport.
- Carport Leaks:
- Ensure all roof panels are correctly overlapped and securely fastened.
- Check for any gaps or damage to the seam taping.
- Verify that all bolts securing the roof panels are tight.
- Instability/Wobbling:
- Confirm that the carport is properly anchored to the ground.
- Check all frame connections and ensure bolts are fully tightened.
- Ensure the ground surface is level and stable.
- Difficulty During Assembly:
- Refer to the detailed assembly guide for specific steps.
- Ensure you have sufficient personnel for assembly (multiple people are required).
- Do not overtighten bolts until the entire frame is aligned.
- Bent or Damaged Parts:
- If parts are bent or damaged upon arrival, contact MELLCOM customer service for replacements. Do not attempt to force damaged parts into place.
8. Specifications
| Brand | MELLCOM |
| Model Number | X-309 |
| Material | Metal (Galvanized Steel Frame, Galvanized Metal Roof) |
| Color | Gray |
| Product Dimensions (Approx.) | 20 ft (Width) x 30 ft (Length) x 9.5 ft (Max Ceiling Height) |
| Item Weight | 794 pounds |
| Snow Load Capacity | 35 PSF |
| Wind Resistance | Up to 100 MPH |
| UV Protection | Yes (100%) |
| Water Resistance Level | Water Resistant |
| Assembly Required | Yes |
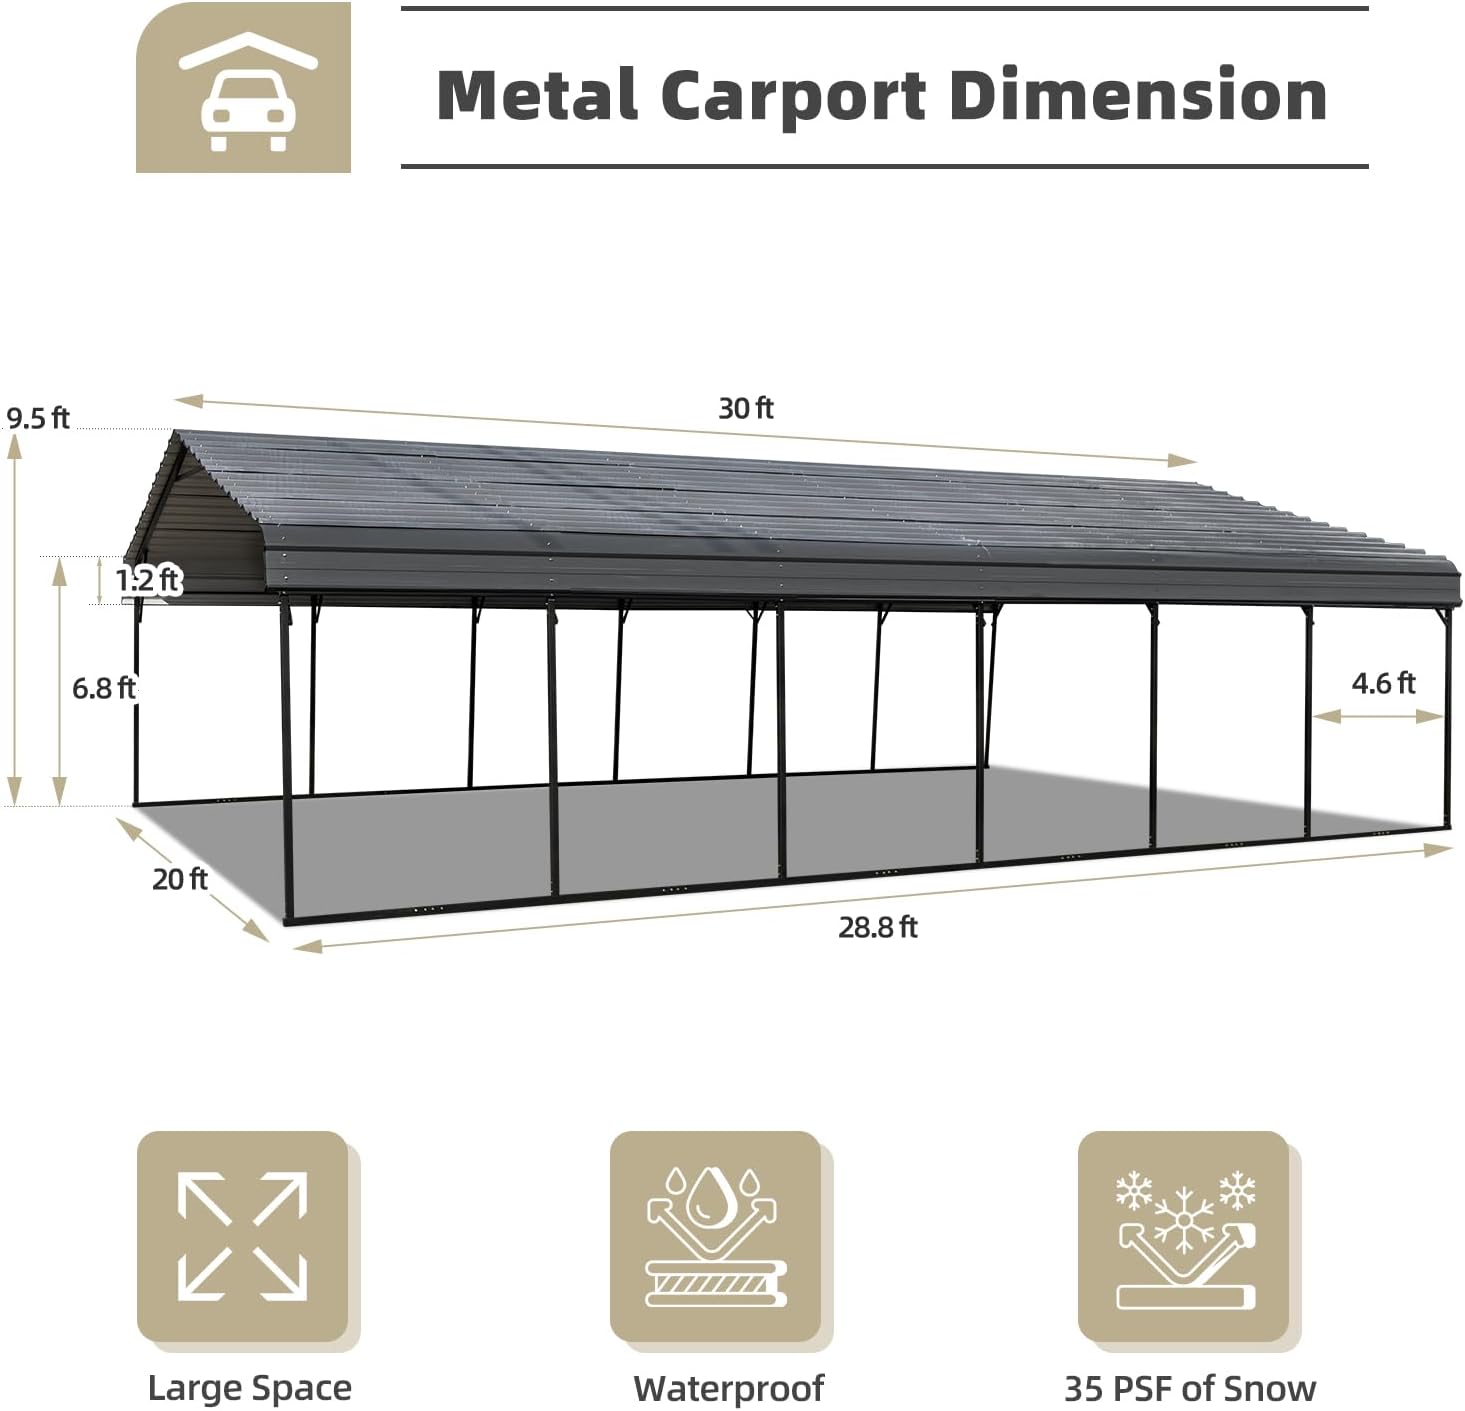
Image 8.1: Diagram illustrating the key dimensions of the MELLCOM Carport, including height, width, and length.
9. Warranty and Support
For specific warranty information, including terms, conditions, and duration, please refer to the warranty card included with your product or contact MELLCOM customer service directly. Keep your purchase receipt as proof of purchase.
If you have any questions, require replacement parts, or need technical assistance, please contact MELLCOM customer support through the retailer where the product was purchased or visit the official MELLCOM website for contact details.