1. Product Overview
The HUAGZIMO 51/52 MCU Demo Board Development Kit is designed as a comprehensive soldering practice and learning platform. This kit is not a finished product and requires assembly through soldering. It integrates 17 independent modules to facilitate learning about various electronic components and their functionalities.
Key integrated modules include:
- Power USB to serial port
- Buzzer
- DC motor drive
- Stepper motor drive
- LCD12864 display interface
- LCD1602 display interface
- Relay
- ISP download socket
- Reset circuit
- 8x8 matrix keyboard
- 1x4 independent buttons
- Infrared emission
- Infrared reception
- DS18B20 interface (temperature sensor)
- Flowing light (LED array)
- Digital tube (7-segment display)
This kit helps users understand printed circuit boards, electronic components, and practice soldering skills.
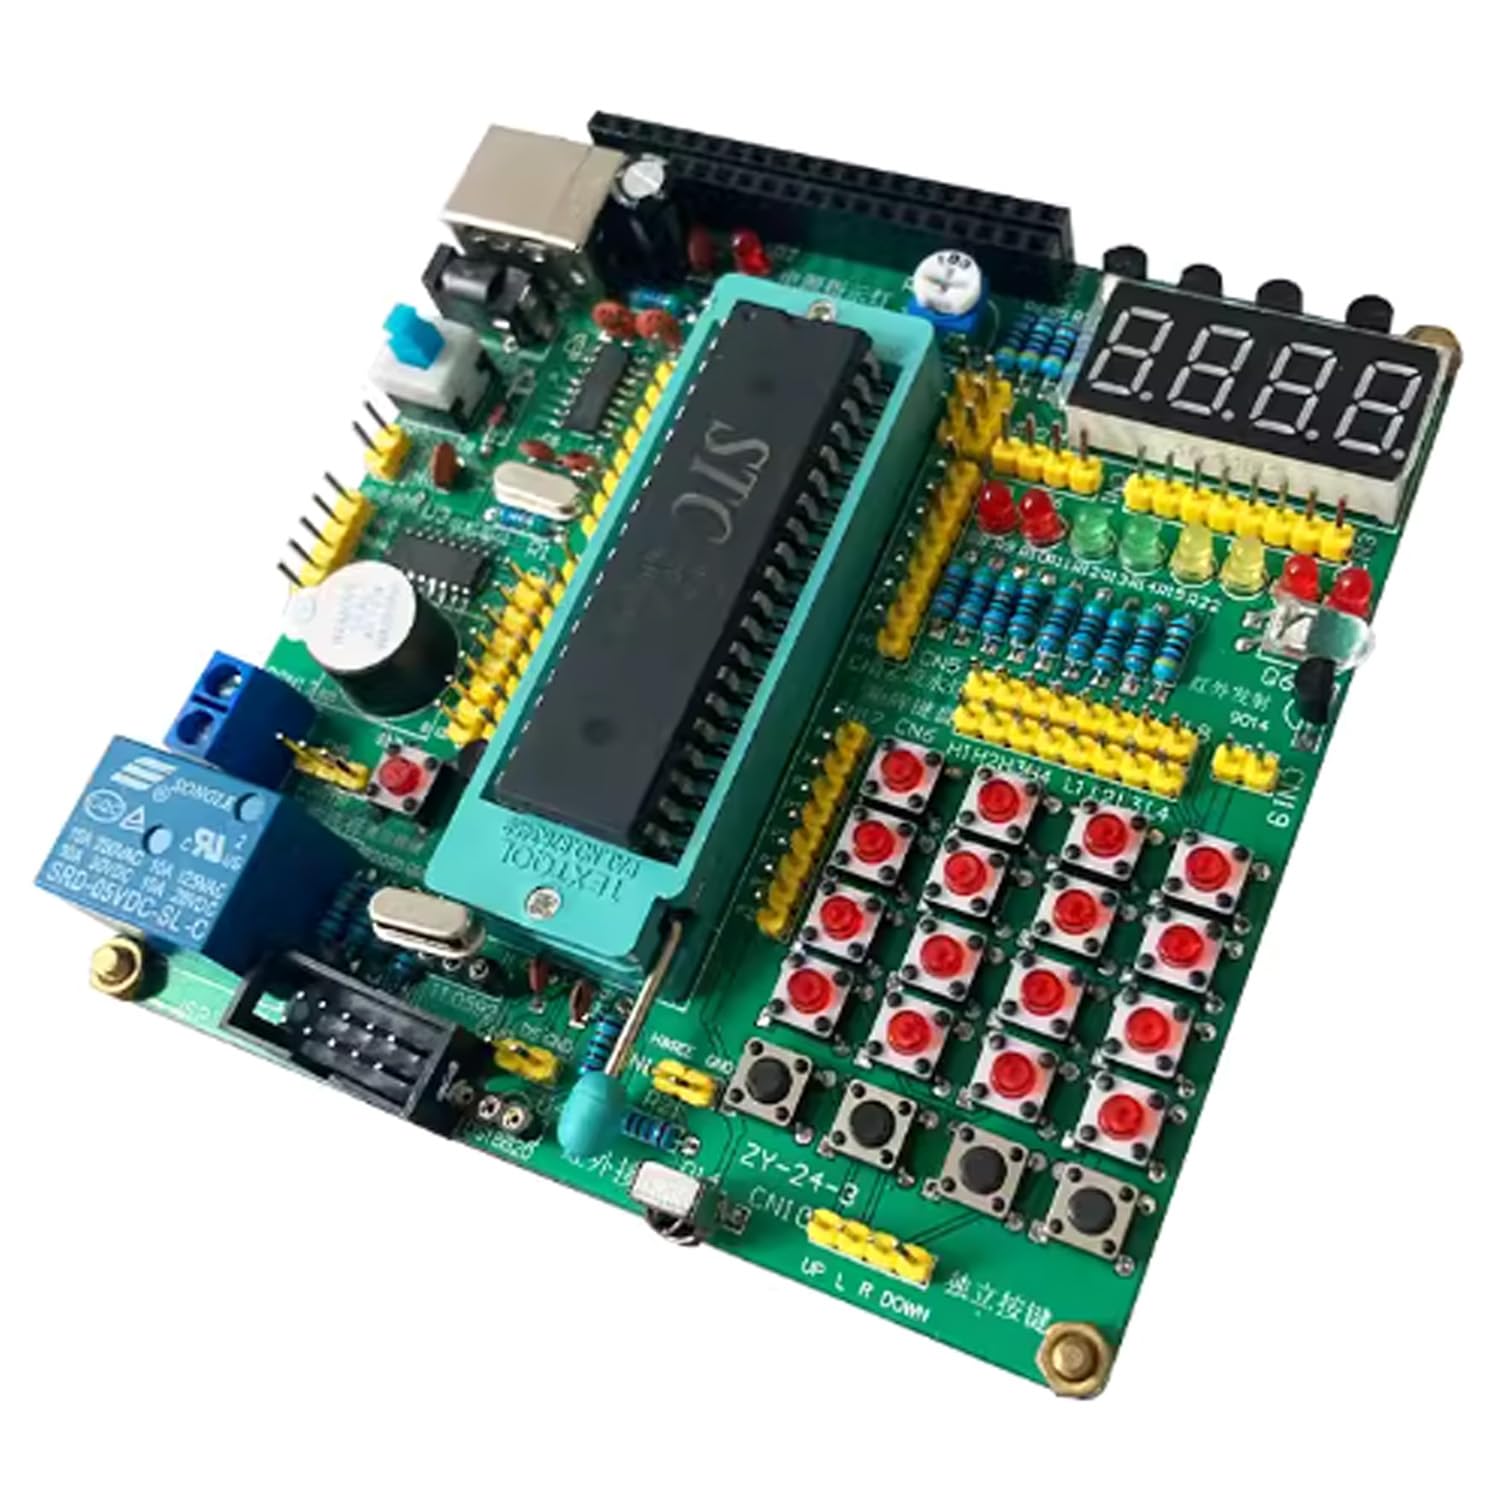
Figure 1: Overview of the HUAGZIMO 51/52 MCU Demo Board with key components labeled.
2. Setup and Assembly
This kit requires self-soldering. Follow these steps for proper assembly:
- Component Identification: Before starting, identify all components using the provided packing list. The PCB board is clearly mapped and labeled, which aids in component placement.
- Soldering Process: Solder each component to its designated location on the PCB board. Pay close attention to polarity for components like diodes, LEDs, and integrated circuits (ICs). Ensure all solder joints are clean and secure to prevent short circuits or poor connections.
- Power Connection: Once all components are soldered, connect a 5V DC power supply to the board.
- Initial Test: After assembly, perform an initial power-on test to check for basic functionality, such as the power indicator LED.

Figure 2: Individual components of the kit before assembly.

Figure 3: Schematic diagram for reference during assembly and troubleshooting.
3. Operating Instructions
The HUAGZIMO 51/52 MCU Demo Board supports various functionalities. Below are instructions for operating some of the key modules:
3.1 General Operation Overview
The following video demonstrates the various functionalities of the 51/52 MCU Demo Board, including LED control, button input, digital display, motor control, relay activation, LCD output, and buzzer sound generation.
Video 1: Demonstration of the 51/52 MCU Demo Board's various functions, including LED, matrix button, digital tube, stepped motor, relay, LCD displays, and buzzer.
3.2 Running LED Light
The board features a series of LEDs that can be programmed to create flowing light patterns. This demonstrates basic output control from the MCU.
3.3 4x4 Matrix Keyboard
The 4x4 matrix keyboard allows for user input. Each button press can be detected and processed by the MCU, enabling interactive projects.
3.4 Digital Tube Display
The digital tube (7-segment display) can be used to display numerical or simple character output, useful for counters, timers, or status indicators.
3.5 Stepped Motor Control
The stepper motor drive interface allows for precise control of a stepper motor's rotation, demonstrating motor control principles.
3.6 Relay Control
The integrated relay can be used to switch higher voltage or current circuits, demonstrating how an MCU can control external power systems.
3.7 LCD1602 Display
The LCD1602 display interface provides a 2-line, 16-character display for text output, useful for displaying messages or data.
3.8 LCD12864 Display
The LCD12864 display interface offers a graphical display capability, allowing for more complex text and simple graphics output.
3.9 Buzzer Functionality
The buzzer can be programmed to produce various tones and melodies, demonstrating sound output capabilities.
4. Maintenance
To ensure the longevity and proper functioning of your HUAGZIMO 51/52 MCU Demo Board, follow these maintenance guidelines:
- Storage: Store the board in a dry, dust-free environment away from direct sunlight and extreme temperatures.
- Cleaning: Use a soft, dry brush or compressed air to remove dust from the board. For stubborn grime, a cotton swab lightly dampened with isopropyl alcohol can be used, ensuring the board is completely dry before powering on.
- Handling: Always handle the board by its edges to avoid touching components or solder joints, which can introduce static electricity or oils.
- Power Supply: Always use a stable 5V DC power supply to prevent damage to the MCU and other components.
5. Troubleshooting
If you encounter issues with your assembled kit, consider the following troubleshooting steps:
- Power Check: Ensure the power supply is correctly connected and providing the specified 5V DC. Check for any loose power connections.
- Solder Joints: Carefully inspect all solder joints for cold joints (dull, grainy appearance), bridges (solder connecting two unintended points), or missing connections. Re-solder as necessary.
- Component Orientation: Verify that all polarized components (diodes, LEDs, electrolytic capacitors, ICs) are installed with the correct orientation. Incorrect polarity can prevent functionality or damage components.
- Component Placement: Double-check that each component is placed in its correct location on the PCB according to the board markings.
- Short Circuits: Look for any accidental short circuits, especially between adjacent pins of ICs or on the power rails.
- Software/Firmware: If programming the MCU, ensure the correct firmware is uploaded and the development environment is configured properly.
If the kit still does not function after these checks, please contact customer support for further assistance.
6. Specifications
| Feature | Detail |
|---|---|
| Manufacturer | HUAGZIMO |
| Model Number | 51/52 MCU Demo Bard |
| Item Weight | 1.76 ounces (50 Grams) |
| Package Dimensions | 5.9 x 3.9 x 0.39 inches |
| Material | Metal |
| Power Source | DC |
| Display Style | LCD (supports LCD1602, LCD12864) |
| Included Components | 51/52 MCU Demo Bard (kit components) |
| Batteries Required | No |
7. Warranty and Support
This product is a DIY soldering kit. While every effort is made to ensure all components are included and functional, issues can arise during assembly.
- Missing Components: If any components are missing from your kit upon arrival, please contact us immediately for replacements.
- Technical Assistance: For any questions regarding assembly, programming, or troubleshooting, please contact our customer support team. We are available to provide professional help and guidance.
Please refer to the contact information provided with your purchase for support inquiries.