
WAVLINK WLAMJP-WN572HP3-C
WAVLINK Outdoor AC1200 Wi-Fi Range Extender
Model: WLAMJP-WN572HP3-C
1. Introduction
The WAVLINK Outdoor AC1200 Wi-Fi Range Extender is designed to expand your existing Wi-Fi network coverage, providing a stable and high-speed internet connection in outdoor environments. This device supports IEEE 802.11a/b/g/n/ac wireless standards and can operate in various modes including Access Point, Repeater, Router, and WISP, making it suitable for a wide range of applications from large enterprises and cafes to detached houses and outdoor areas.
2. Product Overview
2.1 Package Contents
Please verify that all items listed below are included in your package:
- 1 x Wi-Fi AP/Range Extender/Mesh Extender Unit
- 4 x Detachable Omnidirectional Antennas
- 1 x RJ45 Network Cable
- 1 x POE Converter
- 1 x Power Adapter
- 1 x Main Unit Holder
- 2 x Cable Ties
- 1 x Screw Set
- 1 x Quick Guide

Figure 2.1: WAVLINK Outdoor AC1200 Wi-Fi Range Extender and its included accessories, including the main unit, antennas, cables, power adapter, and mounting hardware.
2.2 Device Layout
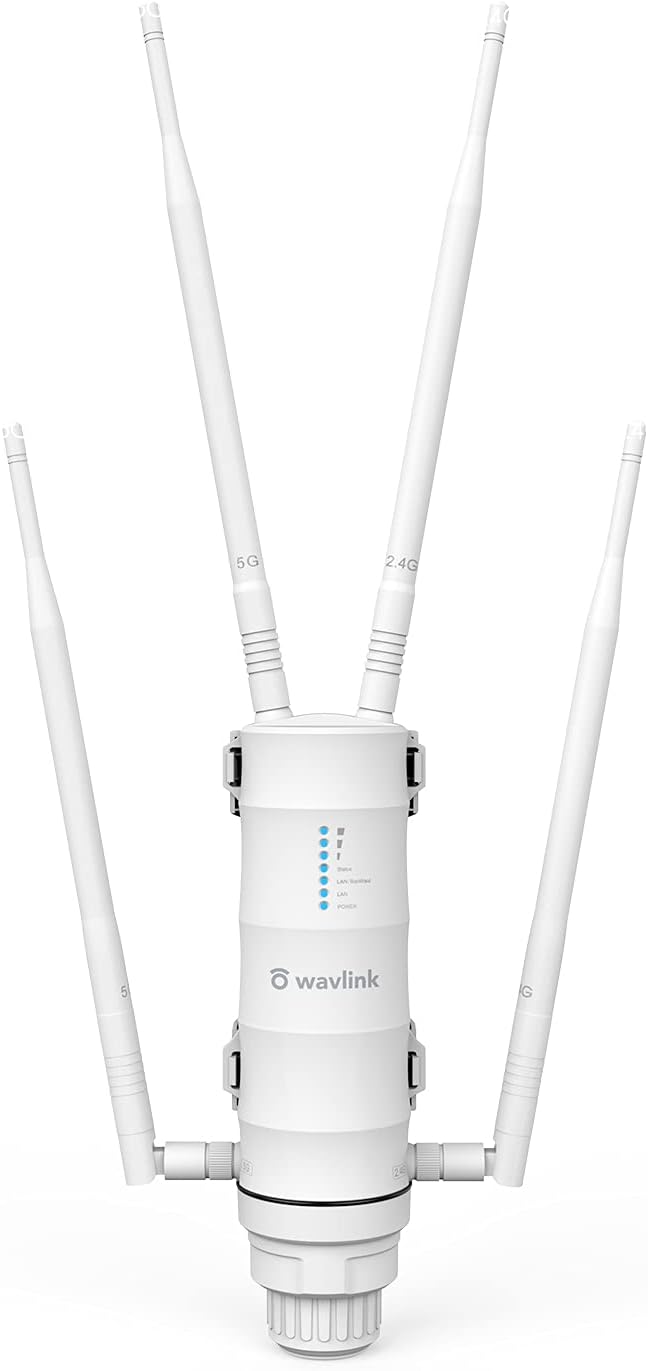
Figure 2.2: Front view of the WAVLINK Outdoor AC1200 Wi-Fi Range Extender, showing the four detachable antennas, LED indicators for Power, WAN, LAN, Wi-Fi, and signal strength.

Figure 2.3: Bottom view of the device, highlighting the 10/100/1000Mbps WAN port, 10/100/1000Mbps LAN port, POE In port for power, and a Ground (GND) terminal.
3. Specifications
| Feature | Description |
|---|---|
| Ports | 1 x 10/100/1000Mbps WAN, 1 x 10/100/1000Mbps LAN |
| Buttons | 1 x Reset Button |
| LED Indicators | 1 x Power, 1 x WAN, 1 x LAN, 1 x Wi-Fi, 3 x Signal Strength |
| Power Supply | DC24V / 0.6A Power over Ethernet (Passive PoE) |
| Rated Voltage/Frequency Input | 100-240Va.c. 50/60Hz |
| Standards | IEEE 802.11a/b/g/n/ac |
| Speed | IEEE 802.11ac: Up to 867Mbps, IEEE 802.11n: Up to 300Mbps, IEEE 802.11g: Up to 54Mbps, IEEE 802.11b: Up to 11Mbps, IEEE 802.11a: Up to 54Mbps |
| Frequency Band | 2.4GHz, 5GHz |
| Wireless Security | WPA-PSK/ WPA2-PSK Encryption |
| Antennas | 4 x 7dBi Detachable Omnidirectional Antennas |
| Product Dimensions | 6 x 6 x 22 cm; 760 g |

Figure 3.1: Illustration of AC1200 dual-band capabilities, showing 2.4GHz at 300Mbps and 5GHz at 867Mbps, supporting various applications like 4K streaming and gaming.
4. Setup
4.1 Physical Installation
- Attach Antennas: Screw the four detachable omnidirectional antennas onto the corresponding ports on the device.
- Mounting: Use the included main unit holder, cable ties, and screw set to securely mount the device in your desired outdoor location. Ensure the device is positioned for optimal signal coverage and is protected from direct harsh weather if possible, despite its waterproof design.
- Power Connection (PoE): Connect one end of the RJ45 network cable to the POE IN port on the device. Connect the other end of this cable to the POE converter. Then, connect the power adapter to the POE converter and plug it into a power outlet.
- Network Connection: If using the device in Router or Access Point mode, connect your main network's LAN cable to the WAN port of the device. If using it as a Repeater, a direct LAN connection to the WAN port is not always required for initial setup, but can be used for configuration.

Figure 4.1: Example of outdoor installation, showing the device mounted on a pole, extending Wi-Fi coverage to a patio area.
4.2 Initial Configuration
The device can be configured via a web browser. Refer to the included Quick Guide for the default IP address and login credentials. Typically, you will connect your computer or smartphone to the device's default Wi-Fi network (SSID usually found on the device label or quick guide) and then navigate to the web interface using a browser.
- Connect to Device Wi-Fi: On your computer or smartphone, connect to the Wi-Fi network broadcast by the WAVLINK extender (e.g., "WAVLINK_XXXX").
- Access Web Interface: Open a web browser and enter the default IP address (e.g., 192.168.10.1) or domain name provided in the Quick Guide.
- Login: Enter the default username and password (e.g., admin/admin).
- Select Operating Mode: Follow the on-screen wizard to select your desired operating mode (Repeater, AP, Router, or WISP) and configure the necessary settings.
- Configure Network Settings:
- Repeater Mode: Scan for your existing Wi-Fi network, select it, and enter its password. The extender will then broadcast an extended network (often with "_EXT" appended to the original SSID).
- Access Point (AP) Mode: Connect the device's WAN port to your router via an Ethernet cable. The device will then create a new Wi-Fi network.
- Router Mode: Connect the device's WAN port to your modem. The device will act as your main router, providing DHCP and NAT services.
- WISP Mode: Connect wirelessly to an existing Wi-Fi hotspot (e.g., public Wi-Fi) and share the internet connection via its own Wi-Fi network or LAN ports.
- Set Wi-Fi Name and Password: Customize the SSID (Wi-Fi name) and password for your new or extended network.
- Save Settings: Apply the changes and restart the device if prompted.
5. Operating Modes
The WAVLINK Outdoor AC1200 Wi-Fi Range Extender offers multiple operating modes to suit various networking needs:
5.1 Repeater Mode
In Repeater mode, the device extends the range of an existing wireless network. It receives the wireless signal from your main router and re-transmits it, effectively eliminating Wi-Fi dead zones. This mode is ideal for extending coverage to outdoor areas or distant parts of your property.
5.2 Access Point (AP) Mode
When configured as an Access Point, the device connects to a wired network (via its WAN port) and broadcasts a new wireless network. This is useful for adding Wi-Fi capability to a wired-only network or for creating a separate Wi-Fi network in a specific area.
5.3 Router Mode
In Router mode, the device acts as a primary router for your network. It connects to your internet service provider's modem via the WAN port and provides internet access to all connected devices, managing IP addresses and network traffic.
5.4 WISP Mode
WISP (Wireless Internet Service Provider) mode allows the device to connect wirelessly to an existing public Wi-Fi hotspot or another wireless network and then share that internet connection with multiple devices via its own Wi-Fi network or LAN ports. This is useful for sharing a single public Wi-Fi connection among several users or devices.

Figure 5.1: The device supports Easy Mesh, enabling the construction of a stable and seamless mesh Wi-Fi environment for extended coverage.
6. Maintenance
- Keep Clean: Regularly wipe the device with a soft, dry cloth to remove dust and dirt. Do not use liquid cleaners or aerosols.
- Ventilation: Ensure the device has adequate ventilation. Do not block any ventilation openings.
- Firmware Updates: Periodically check the WAVLINK official website for firmware updates. Keeping the firmware updated ensures optimal performance, security, and access to new features.
- Environmental Conditions: While designed for outdoor use, avoid exposing the device to extreme temperatures or direct, prolonged exposure to harsh weather conditions beyond its rated specifications.
7. Troubleshooting
7.1 No Power / LEDs Off
- Ensure the power adapter is securely connected to the POE converter and plugged into a working electrical outlet.
- Verify that the RJ45 cable from the POE converter is correctly inserted into the device's POE IN port.
7.2 Cannot Access Web Management Page
- Ensure your computer or smartphone is connected to the extender's Wi-Fi network or directly via an Ethernet cable.
- Verify that you are using the correct default IP address or domain name (refer to the Quick Guide).
- Clear your browser's cache and cookies, or try a different web browser.
- Temporarily disable any firewall or antivirus software on your computer.
- Try resetting the device to factory defaults by pressing and holding the Reset button for about 10 seconds while the device is powered on. Note: This will erase all custom settings.
7.3 Poor Signal Strength or Frequent Disconnections
- Relocation: Move the extender closer to your main router or access point. Ensure there are minimal obstructions (walls, large metal objects) between the extender and the main Wi-Fi source.
- Antenna Adjustment: Adjust the orientation of the four antennas for better signal reception and transmission.
- Interference: Check for potential sources of interference (e.g., cordless phones, microwave ovens, Bluetooth devices) and try to move them away from the extender.
- Channel Optimization: In the web management interface, try changing the Wi-Fi channel for both 2.4GHz and 5GHz bands to a less congested one.
- Firmware Update: Ensure the device's firmware is up to date.
8. Warranty & Support
WAVLINK products are designed for reliability and performance. For detailed warranty information, please refer to the warranty card included with your product or visit the official WAVLINK website.
If you encounter any issues that cannot be resolved using the troubleshooting steps in this manual, please contact WAVLINK customer support. You can usually find contact information (email, phone, or support portal) on the WAVLINK official website or in the Quick Guide.
Please have your product model number (WLAMJP-WN572HP3-C) and a detailed description of the issue ready when contacting support.
Ask a question about this manual
Ask about setup, troubleshooting, compatibility, parts, safety, or missing instructions. Manuals+ will review the question and use this page’s manual context to help answer it.