1. Introduction
This manual provides detailed instructions for the installation, operation, and maintenance of your Geloo Universal Motorcycle Tachometer. This device is designed to provide essential riding information including speed, RPM, odometer readings, fuel level, and time. It is compatible with 1, 2, and 4-cylinder motorcycles.
2. Product Features
- Suitable for 1, 2, and 4-cylinder motorcycles.
- Supports both km/h and mph speed display, with a range of 0 to 199 km/h (miles).
- Odometer displays 0 to 999999 kilometers (miles) and trip distance up to 999.9 kilometers (miles).
- RPM display range from 0 to 13,000 rpm.
- Freely switchable between km/h and mph.
- Integrated 1-6 gear indicator and neutral gear (N) indicator.
- Multifunction display: speedometer, odometer, fuel level, clock.
- Equipped with LCD backlight for clear visibility day or night.

Figure 2.1: Geloo Motorcycle Tachometer installed on a motorcycle dashboard, providing a clear view of its digital display. The display indicates speed, RPM, gear, and other essential riding data.

Figure 2.2: This image illustrates the versatility of the Geloo Motorcycle Tachometer, showing its digital display at the center, surrounded by different types of motorcycles (dirt bikes, cruisers, sport bikes) it is compatible with, including 1, 2, and 4-cylinder models.
3. Package Contents
- Motorcycle Tachometer Unit
- Mounting Bracket
- Speed Sensor
- Wiring Harness
- Installation Hardware (nuts, washers, screws, clips)
4. Specifications
| Specification | Value |
|---|---|
| Manufacturer | Geloo |
| Product Model Number | GJ010-GJ-009 |
| Material | Acrylonitrile Butadiene Styrene (ABS) |
| Package Dimensions | 20.3 x 13.2 x 10.1 cm |
| Item Weight | 720 grams |
| Battery Required | No |
5. Setup and Installation
Careful installation is crucial for the correct functioning of the tachometer. It is recommended that installation be performed by a qualified technician if you are unfamiliar with motorcycle electrical systems.
5.1 Mounting the Tachometer
- Select a suitable location on your motorcycle's handlebars for the tachometer, ensuring it does not obstruct your view or control.
- Attach the provided mounting bracket (Figure 5.1) to the desired location using the supplied hardware. Ensure it is securely fastened.
- Mount the tachometer unit onto the bracket.

Figure 5.1: Mounting bracket and associated hardware required to securely attach the Geloo Motorcycle Tachometer.
5.2 Speed Sensor Installation
- Locate an appropriate position near the wheel (front or rear, depending on your motorcycle's setup) to install the speed sensor (Figure 5.2). The sensor detects wheel rotation to calculate speed and distance.
- Ensure the sensor is securely mounted and positioned correctly to detect the wheel's rotation or a magnet on the wheel.
- Route the sensor cable safely, avoiding moving parts and heat sources, to the tachometer unit.

Figure 5.2: The speed sensor and its accompanying hardware. This sensor is crucial for accurate speed and odometer readings.
5.3 Wiring Connections
The tachometer comes with a multi-wire harness (Figure 5.3) that needs to be connected to your motorcycle's electrical system. Refer to your motorcycle's service manual for specific wiring diagrams. Below is a general guide for common connections:
- Red Wire: Connect to the motorcycle's positive power supply (+12V, usually ignition switched).
- Black Wire: Connect to the motorcycle's ground (-).
- Orange Wire: Connect to the left turn signal positive.
- Light Blue Wire: Connect to the right turn signal positive.
- Dark Blue Wire: Connect to the headlight positive.
- Green Wire: Connect to the neutral gear indicator.
- Yellow/White Wire: Connect to the fuel level sensor.
- Brown Wire: Connect to the speed sensor signal wire.
- Yellow/Black Wire: Connect to the RPM signal wire (from ignition coil or CDI unit).
- Other Wires (if present): Refer to the specific wiring diagram provided with your unit or consult a professional.
Important Note: The RPM function is not compatible with electronic fuel injection (EFI) engines. If your motorcycle has a full electronic injection (EFI) engine, the RPM function will not operate correctly, though other functions should work as intended.
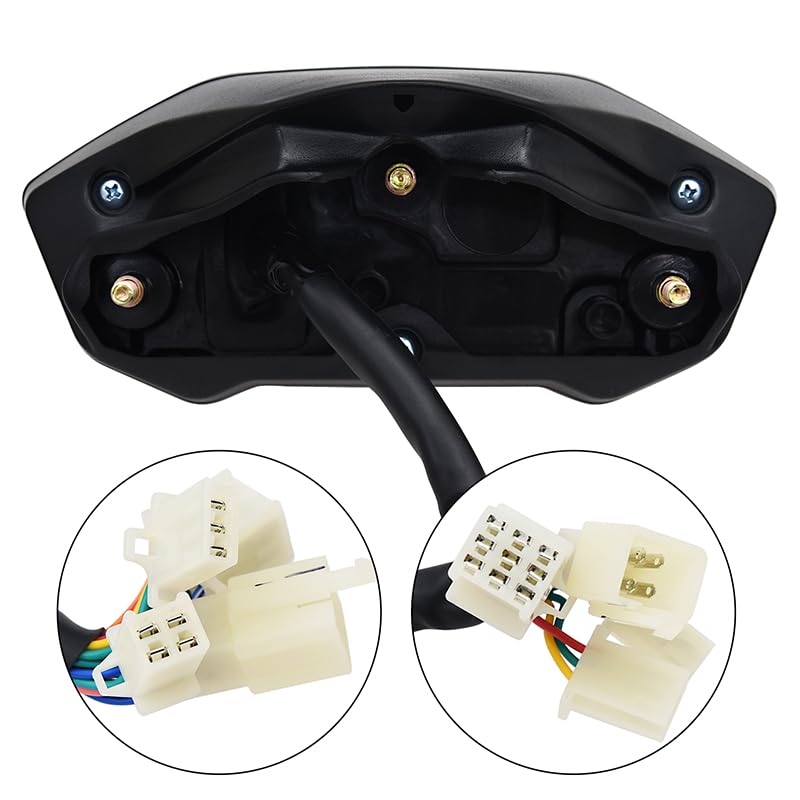
Figure 5.3: Detailed view of the wiring harness and connectors included with the Geloo Motorcycle Tachometer.
6. Operating Instructions
Once installed and powered on, the tachometer will display various information. The specific buttons (usually labeled 'SET' and 'SEL') on the unit are used to navigate modes and adjust settings.
6.1 Display Modes
- Speed Display: Shows current speed in km/h or mph.
- RPM Display: Shows engine revolutions per minute.
- Odometer (ODO): Displays total accumulated distance.
- Trip Meter (TRIP): Displays distance for the current trip, resettable.
- Gear Indicator: Shows the current gear (1-6) or Neutral (N).
- Fuel Level: Indicates the approximate fuel level.
- Clock: Displays the current time.
6.2 Setting Units (km/h to mph)
To switch between kilometers per hour (km/h) and miles per hour (mph), typically:
- With the ignition on, press and hold the 'SET' button (or similar) for a few seconds until the unit display starts to flash.
- Use the 'SEL' button (or similar) to toggle between km/h and mph.
- Press 'SET' again to confirm your selection and exit the setting mode.
6.3 Adjusting Wheel Circumference and Pulse Settings
For accurate speed and odometer readings, you may need to calibrate the wheel circumference and speed sensor pulse settings. This process usually involves entering a setup mode:
- Access the calibration mode (often by holding both 'SET' and 'SEL' buttons during power-on, or a specific sequence).
- Wheel Circumference (C): Input your wheel's circumference in millimeters (e.g., 1500-2999mm). Measure your wheel's circumference accurately or consult your motorcycle's specifications.
- Speed Sensor Pulse (P): Set the pulse count (e.g., 1-10) based on the number of magnets or triggers your speed sensor uses per wheel revolution.
- Cylinder Factor (F): For RPM accuracy, set the cylinder factor (e.g., 1-4) corresponding to your motorcycle's engine type (1, 2, or 4 cylinders).
- Save settings and exit calibration mode.
7. Maintenance
The Geloo Motorcycle Tachometer is designed for durability and requires minimal maintenance.
- Cleaning: Wipe the display and unit with a soft, damp cloth. Avoid abrasive cleaners or solvents that could damage the screen or casing.
- Connections: Periodically check all wiring connections to ensure they are secure and free from corrosion.
- Sensor: Ensure the speed sensor is clean and free from debris that might interfere with its operation.
- Water Resistance: The unit is designed to be waterproof, but avoid prolonged submersion or high-pressure washing directly on the display.
8. Troubleshooting
- No Power/Display:
- Check all power connections (red wire to +12V, black wire to ground).
- Ensure the motorcycle's battery is charged.
- Check for blown fuses in the motorcycle's electrical system.
- Inaccurate Speed/Odometer:
- Verify the speed sensor is correctly installed and detecting wheel rotation.
- Recalibrate the wheel circumference (C) and speed sensor pulse (P) settings as described in Section 6.3.
- Check the speed sensor wiring for damage or loose connections.
- RPM Not Working (or Inaccurate):
- Important: The RPM function is not compatible with electronic fuel injection (EFI) engines. If your motorcycle has an EFI engine, this function will not work.
- For carbureted engines, ensure the RPM signal wire (yellow/black) is correctly connected to the ignition coil or CDI unit.
- Verify the cylinder factor (F) setting is correct for your engine type (1, 2, or 4 cylinders).
- Inaccurate Fuel Level:
- Check the connection to the motorcycle's fuel level sensor (yellow/white wire).
- Ensure the fuel sensor itself is functioning correctly.
- Gear Indicator Issues:
- Check the connection to the neutral gear sensor (green wire) and individual gear sensors if applicable.
9. Warranty and Support
Specific warranty information for this product is not provided in the available documentation. For warranty claims or technical support, please contact the seller or manufacturer directly through your purchase platform. Ensure you have your purchase details and model number (GJ010-GJ-009) ready when contacting support.


