1. Introduction
This manual provides detailed instructions for the safe installation, operation, and maintenance of your Kreiaoer 52-inch Ceiling Fan with Lights. Please read this manual thoroughly before installation and retain it for future reference.
1.1 Safety Information
- Ensure the power is turned off at the circuit breaker before installation or maintenance.
- All electrical connections must comply with local codes and ordinances, as well as the National Electric Code (NEC).
- Consult a qualified electrician if you are unfamiliar with electrical wiring.
- The mounting structure must be capable of supporting the weight of the fan (approximately 35 lbs).
- Do not bend the blade holders during installation or cleaning.
- Keep children away from the fan during operation.
2. Package Contents
Verify that all components listed below are included in your package. If any parts are missing or damaged, contact customer support.
- Ceiling Fan Motor Housing
- Retractable Fan Blades (4)
- LED Light Kit with Acrylic Lamp Cover
- Remote Control
- Short Downrod (4.7 inches / 10 cm)
- Long Downrod (9.8 inches / 25 cm)
- Mounting Bracket
- Canopy
- Hardware Pack (screws, wire nuts, etc.)
- Instruction Manual

Figure 2.1: Exploded view of the Kreiaoer Ceiling Fan components.
3. Setup and Installation
Follow these steps carefully to install your ceiling fan. Professional installation is recommended if you are unsure about any steps.
3.1 Pre-Installation Checks
- Power Disconnection: Turn off power at the main circuit breaker to prevent electrical shock.
- Mounting Location: Ensure the ceiling joist or support structure can hold the fan's weight.
- Wiring: Confirm existing wiring meets local electrical codes.
3.2 Mounting the Fan
- Attach the mounting bracket to the ceiling outlet box using the provided screws. Ensure it is securely fastened.
- Select the appropriate downrod (4.7 inches or 9.8 inches) based on your ceiling height. The fan measures 52 inches when extended and 19 inches when retracted.
- Feed the electrical wires from the fan motor through the chosen downrod.
- Secure the downrod to the fan motor assembly.
- Carefully lift the fan assembly and hang it on the mounting bracket hook.
3.3 Electrical Connections
- Connect the fan's electrical wires to the household wiring according to the wiring diagram in the manual (typically black to black, white to white, and green/bare copper to ground). Use wire nuts to secure connections.
- Tuck the wires neatly into the outlet box.
3.4 Attaching the Canopy and Blades
- Slide the canopy up to the ceiling and secure it to the mounting bracket with the provided screws, ensuring a clean, flush fit.
- Attach the retractable fan blades to the motor housing as per the instructions.
3.5 Installing the Light Kit
- Connect the light kit wires to the corresponding wires from the fan motor.
- Secure the LED light kit and acrylic lamp cover to the bottom of the fan motor housing.

Figure 3.1: Detail of downrod options and sealed lampshade.
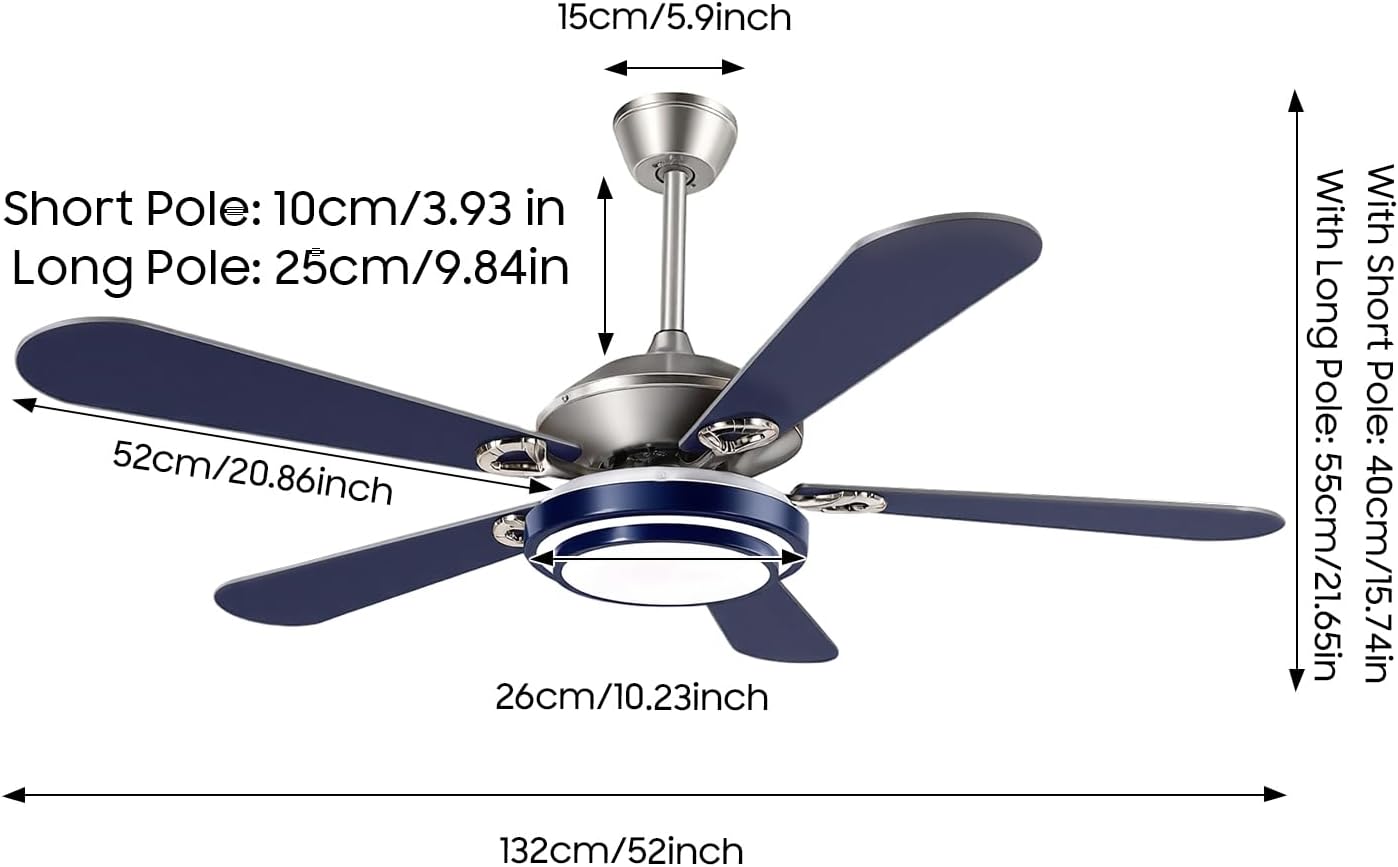
Figure 3.2: Fan dimensions and downrod lengths for flexible installation.
4. Operating Instructions
Your Kreiaoer ceiling fan is controlled by the included remote control. Ensure batteries are installed correctly in the remote.
4.1 Remote Control Functions
- Fan ON/OFF: Press the fan button to turn the fan on or off.
- Fan Speed Adjustment: Cycle through 3 wind speed settings (Low, Medium, High) to adjust airflow.
- Light ON/OFF: Press the light button to turn the light on or off.
- Light Color Temperature: Adjust the LED light through 3 color options (Warm Light 3000K, Neutral Light, White Light 6000K).
- Light Dimming: Hold the light button to dim or brighten the light.
- Timer Function: Set the fan to turn off automatically after 1, 2, or 4 hours.
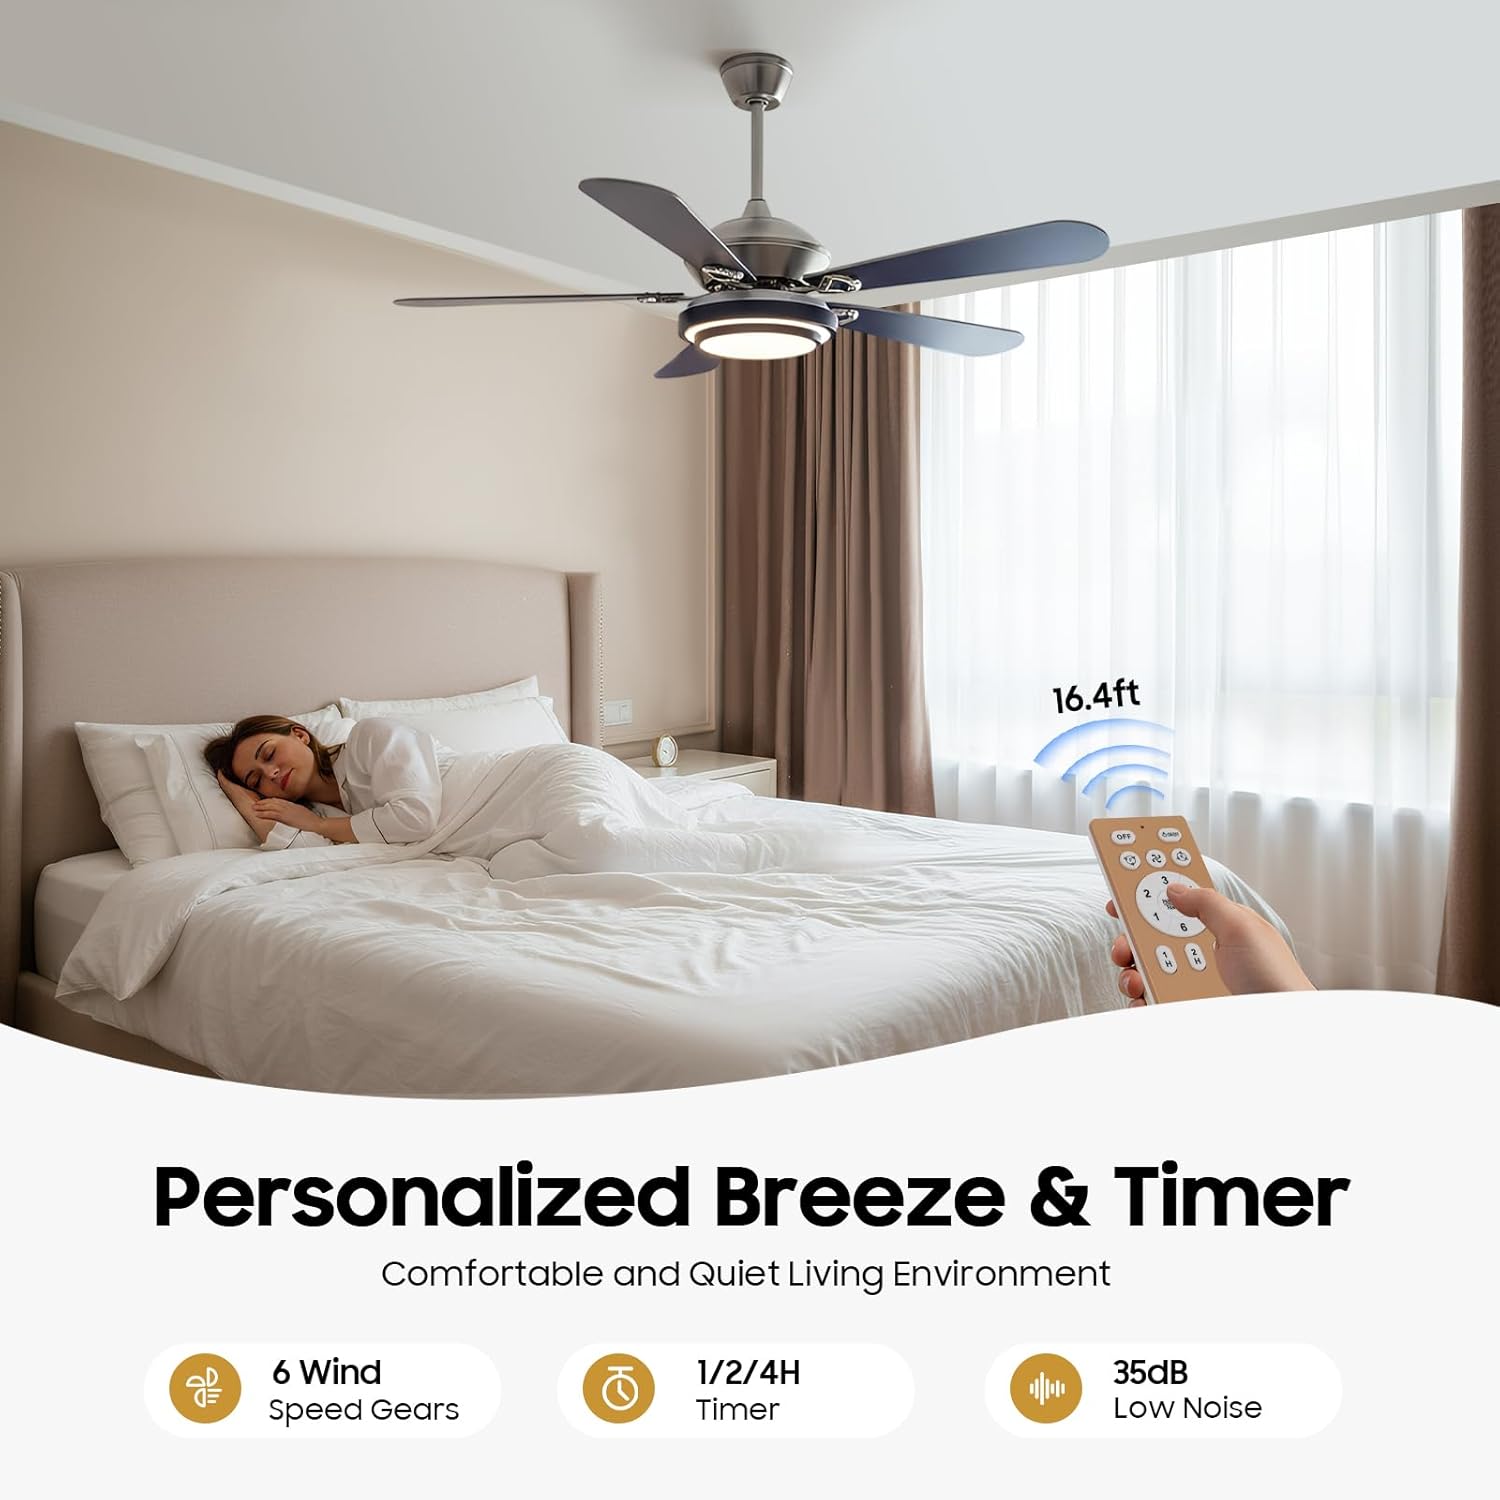
Figure 4.1: Remote control features for personalized comfort.

Figure 4.2: Adjustable 3-tone lighting options.
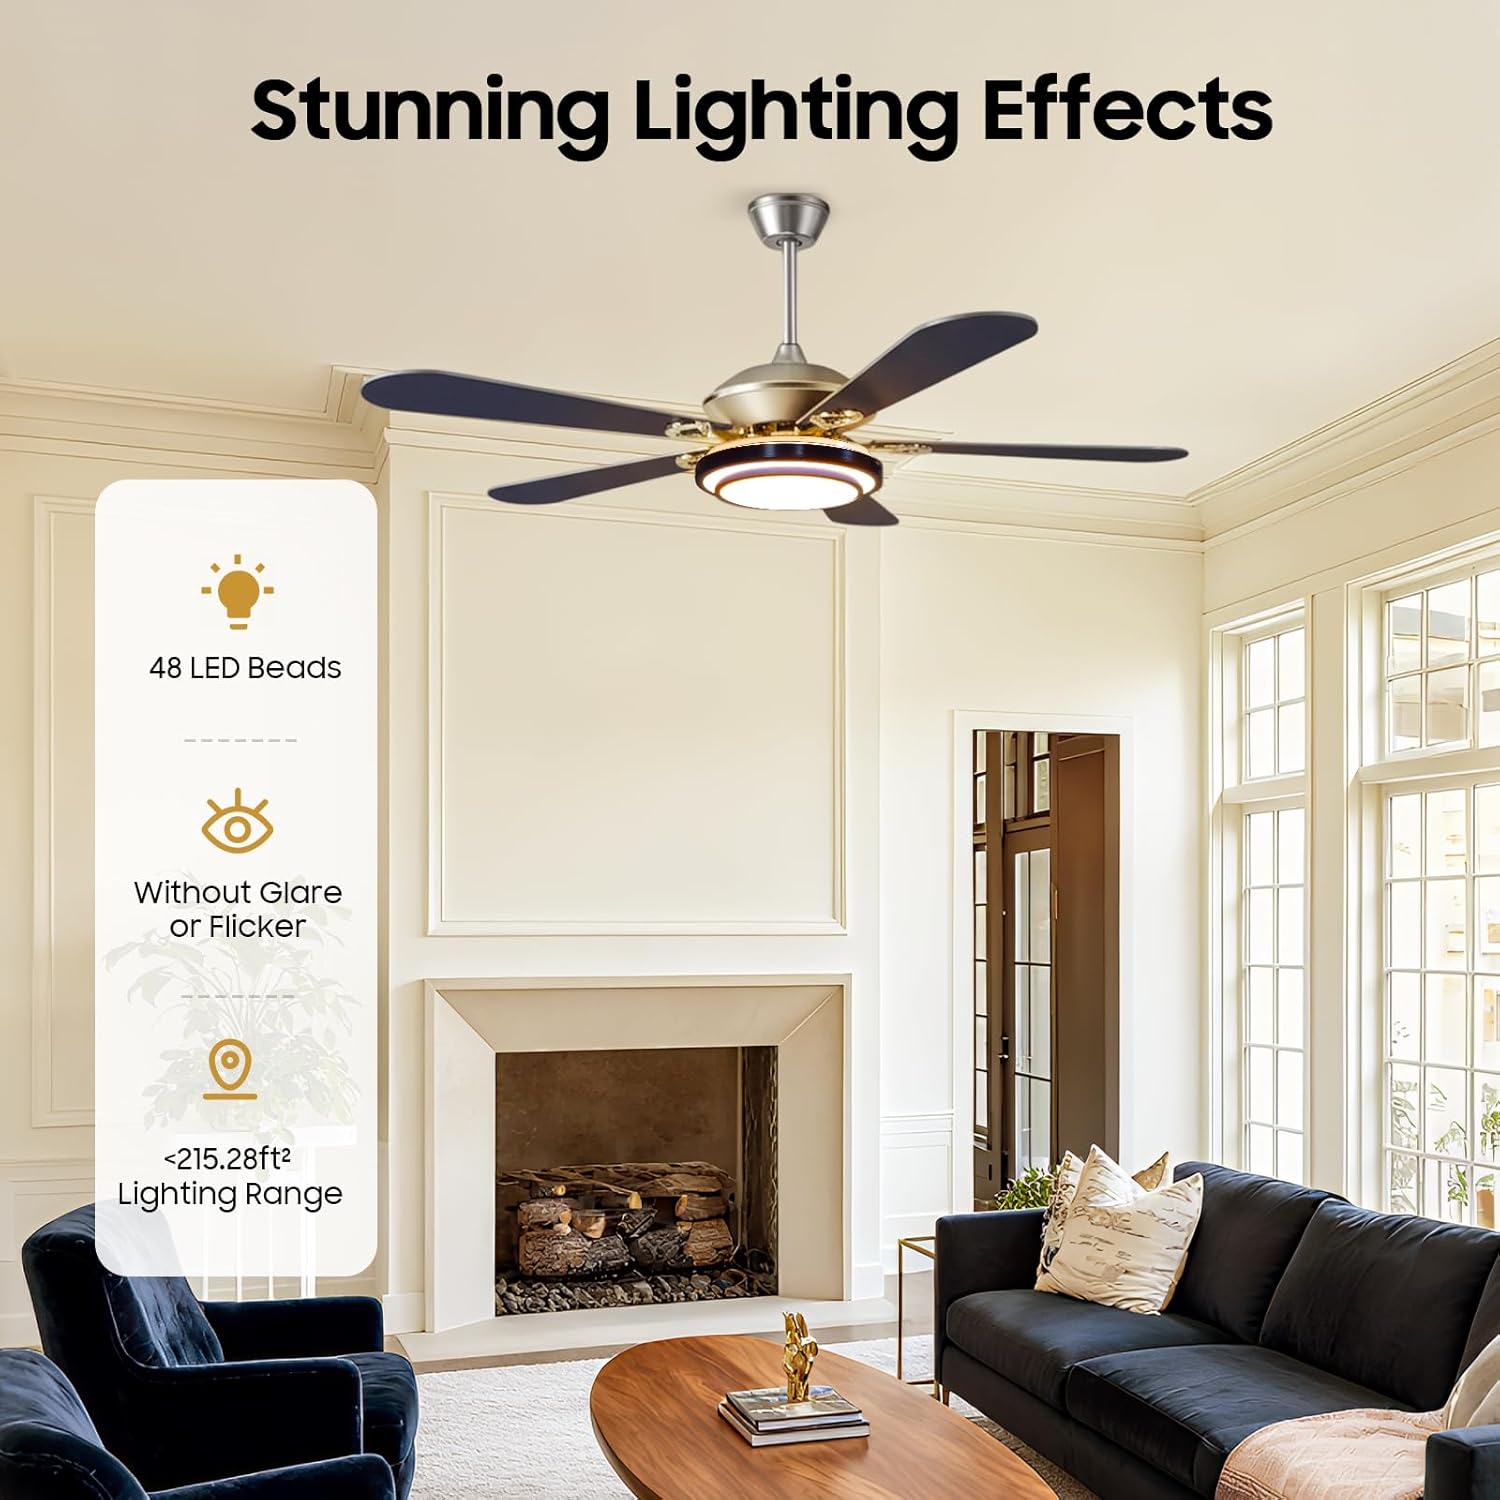
Figure 4.3: Features of the integrated LED lighting.
4.2 Seasonal Operation (Forward/Reverse)
The fan features a reversible motor for year-round comfort. A switch on the fan body (or remote, if applicable, though not specified for this model) controls the direction.
- Summer Mode (Forward): Blades rotate counter-clockwise to create a downward airflow, producing a cooling effect.
- Winter Mode (Reverse): Blades rotate clockwise to create an upward airflow, circulating warm air trapped near the ceiling.

Figure 4.4: Seasonal airflow direction.
5. Maintenance
Regular maintenance ensures the longevity and optimal performance of your ceiling fan.
- Cleaning: Use a soft, damp cloth to clean the fan blades and motor housing. Do not use abrasive cleaners or solvents.
- Blade Cleaning: The ABS retractable blades can be gently wiped. Ensure the fan is off and blades are fully retracted or extended for safe cleaning.
- Light Cover: The acrylic lamp cover can be wiped clean with a soft cloth.
- Tightness Check: Periodically check all screws and connections for tightness. Retighten as necessary.
- Motor Lubrication: The pure copper motor is designed for quiet operation and longevity and typically does not require lubrication.
Important: Always turn off the power at the circuit breaker before performing any cleaning or maintenance.
6. Troubleshooting
If you experience issues with your ceiling fan, refer to the following troubleshooting guide. If the problem persists, contact customer support.
| Problem | Possible Cause | Solution |
|---|---|---|
| Fan does not start | No power to the fan; Loose wire connections; Remote control battery low or not paired. | Check circuit breaker; Ensure all wire connections are secure; Replace remote battery or re-pair remote. |
| Light does not work | Loose wire connection to light kit; LED light failure; Remote control issue. | Check light kit wiring; Contact support for LED replacement; Check remote battery/pairing. |
| Fan wobbles | Loose blades or mounting screws; Unbalanced blades; Improperly secured mounting bracket. | Ensure all blade and mounting screws are tight; Use a balancing kit (not included) if necessary; Verify mounting bracket is firmly attached to the ceiling. |
| Noisy operation | Loose screws; Motor housing rubbing; Blades hitting an obstruction. | Check and tighten all screws; Ensure no wires are rubbing against the motor housing; Verify blades have clear clearance. |
| Remote control not responding | Low or dead batteries; Remote not paired with fan; Obstruction between remote and receiver. | Replace batteries; Refer to remote pairing instructions (if applicable); Ensure clear line of sight. |
7. Specifications
| Feature | Detail |
|---|---|
| Brand | Kreiaoer |
| Model Number | HG-HCX-2748-US |
| Electric Fan Design | Ceiling Fan |
| Size | 52 inches (extended) |
| Product Dimensions (D x W x H) | 52"D x 52"W x 20"H |
| Material | Metal body, Acrylic lamp cover, ABS retractable blades, Copper motor |
| Power Source | AC |
| Voltage | 120 Volts |
| Wattage | 56 watts |
| Light Type | LED |
| Number of Blades | 4 |
| Number of Speeds | 3 |
| Controller Type | Remote Control |
| Mounting Type | Ceiling Mount |
| Indoor/Outdoor Usage | Indoor |
| Included Components | 1*ceiling fan |
8. Warranty and Support
8.1 Warranty Information
Kreiaoer products are manufactured to high-quality standards. While specific warranty details are not provided in this manual, please retain your proof of purchase for any warranty claims. For information regarding warranty coverage, please contact Kreiaoer customer support.
8.2 Customer Support
If you have any questions, require assistance with installation, or encounter any issues not covered in this manual, please contact Kreiaoer customer support. Our team is available to provide assistance and ensure your satisfaction.
For the most up-to-date contact information, please visit the official Kreiaoer website or refer to the product packaging.