1. Introduction
This manual provides detailed instructions for the setup, operation, maintenance, and troubleshooting of your Opqpq ODM301 Max Microscope. Designed for students, adults, and educational environments, this biological microscope offers up to 1200X magnification, a 7-inch IPS display, and versatile connectivity options for an enhanced viewing experience.

The ergonomic design of the microscope helps reduce eye and neck strain during prolonged observation.

An excellent STEM tool for budding scientists, suitable for various educational settings.
2. Package Contents and Setup
2.1 Package Contents
Before beginning, please verify that all items are present in the package:
- 1 x Opqpq ODM301 Max Biological Digital Microscope with Screen
- 1 x Power Cable
- 1 x HDMI Cable
- 1 x Power Adapter
- 5 x Prepared Slides
- 5 x Blank Slides
- 1 x 32GB Micro SD Card
- 1 x Carrying Case

The complete packing list, including the microscope, cables, slides, SD card, and carrying case.

A 32GB Micro SD card is included for storing photos and videos.
2.2 Initial Setup
- Unpack: Carefully remove all components from the carrying case.
- Power On: Connect the microscope to the power adapter using the USB-C cable. The internal 2000mAh rechargeable battery provides up to 3 hours of use, but it is recommended to charge fully before first use.
- Adjust Screen: The 7-inch IPS display can be adjusted up to 120 degrees for optimal viewing comfort.
- Insert SD Card: Ensure the 32GB Micro SD card is properly inserted into the designated slot for recording.

The 7-inch display offers a 120-degree adjustable viewing angle for comfort.
3. Operating Instructions
3.1 Placing and Adjusting Specimens
- Place Slide: Securely place a prepared or blank slide onto the double-layer precision X-Y mechanical stage.
- Adjust X-Y Stage: Use the X-Y stage controls to precisely manipulate the slide horizontally (X-axis) and vertically (Y-axis) for accurate positioning of your specimen.
- Focus: Use the coarse and fine focus knobs to bring the specimen into sharp view on the 7-inch IPS display.

The double-layer precision stage allows for precise X and Y axis manipulation of slides.

Enhanced precise control allows for quick and effective analysis of specimens.
3.2 Magnification and Illumination
- Select Objective Lens: Rotate the revolving nosepiece to select the desired objective lens for magnification up to 1200X.
- Adjust LED Lights: The microscope features dual LED lights. Use the bottom light for transparent specimens on slides and the top light for observing opaque, real objects. Adjust brightness as needed.

Dual LED illumination provides versatile lighting for both transparent and opaque specimens.

Achieve powerful magnification up to 1200X to observe intricate details.
3.3 Capturing and Sharing Discoveries
- Photo/Video Capture: Use the built-in controls to capture 8MP photos and 1080P videos directly to the inserted 32GB Micro SD card.
- WiFi Connectivity: Connect the microscope to your Android or iOS device via WiFi for real-time viewing, zooming, and capturing. Files can be saved to both your phone and the SD card. The WiFi range is up to 16 feet (5 meters).
- USB/HDMI Output: Connect the microscope to a larger display such as a projector, PC, laptop (Windows and Mac OS compatible), or TV using the USB or HDMI output for group observation and easy data sharing. No additional software is required for plug-and-play functionality.
- Measurement Scale: Utilize the detailed measurement scale feature with each lens for accurate specimen sizing.

Capture your discoveries with 8MP photos and 1080P videos.

Effortlessly manage and share observations via WiFi and the dedicated app.

Connect to external displays via USB or HDMI for a larger viewing experience.
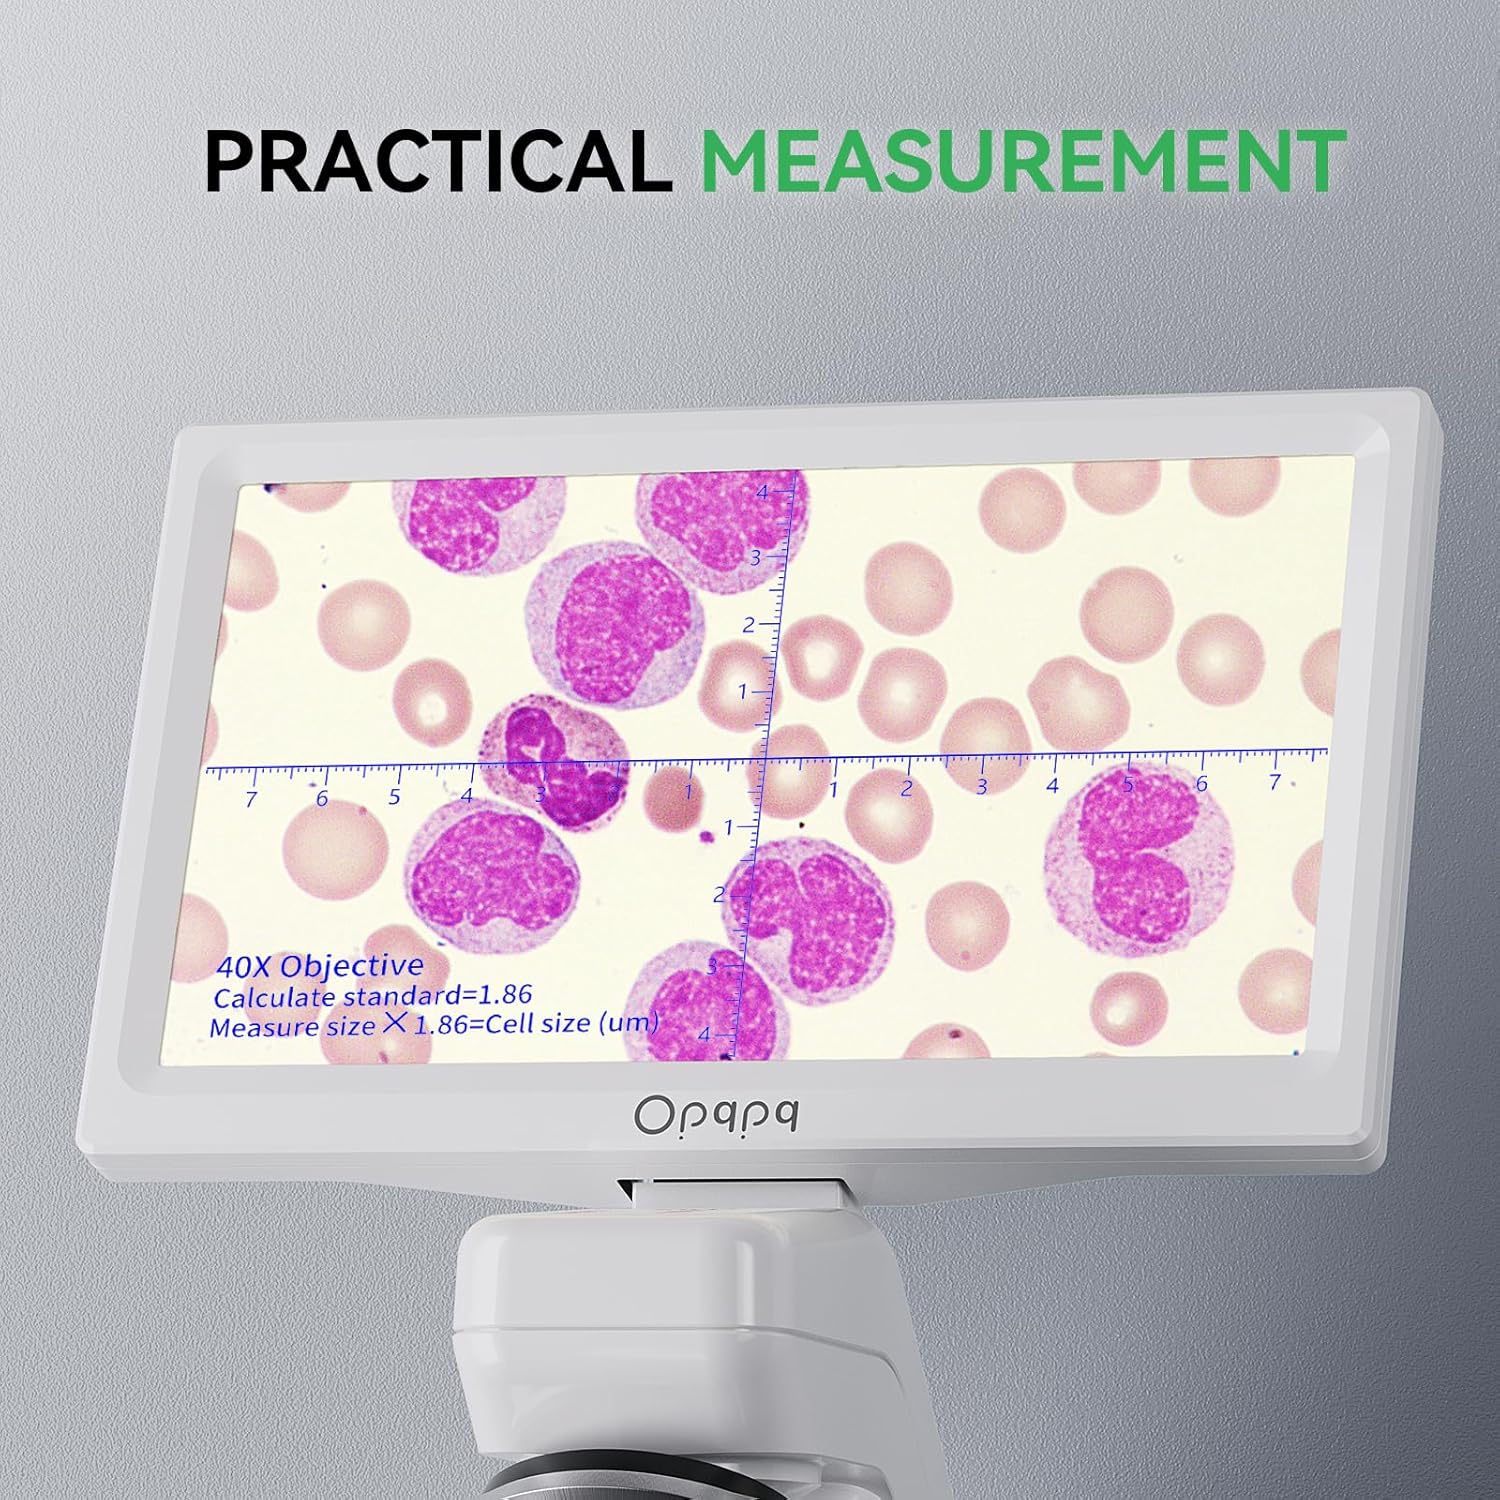
The practical measurement scale aids in accurate specimen sizing.
3.4 Example Observations
The Opqpq ODM301 Max Microscope allows for detailed observation of various microscopic life forms and structures:
- Observe detailed motions like semen's tail and paramecium movements.
- Examine blood cells and other biological specimens.
- Study the intricate structures of prepared slides, such as plant cells or insect parts.
Video demonstrating the observation of various microorganisms and biological samples under the Opqpq ODM301 Max Microscope.
Video showing the microscopic view of semen under the ODM301 Max microscope.
Video illustrating the observation of Paramecium movement under the ODM301 Max microscope.
Video showcasing the view of blood cells under the ODM301 Max digital microscope.
4. Maintenance
Proper maintenance ensures the longevity and optimal performance of your microscope.
- Cleaning: Use a soft, lint-free cloth to clean the exterior of the microscope. For optical components, use specialized lens cleaning solutions and cloths to avoid scratches.
- Storage: Store the microscope in its provided carrying case in a dry, dust-free environment when not in use.
- Battery Care: To prolong battery life, avoid fully discharging the battery frequently. Charge the microscope regularly, even if not in constant use.
5. Troubleshooting
If you encounter issues with your microscope, refer to the following common problems and solutions:
| Problem | Possible Cause | Solution |
|---|---|---|
| No image on screen | Microscope not powered on; screen brightness too low; objective lens not correctly aligned. | Ensure power is connected and unit is on; adjust screen brightness; rotate objective lens into place. |
| Blurry image | Improper focus; dirty lens or slide; incorrect magnification setting. | Adjust coarse and fine focus knobs; clean lenses and slide; select appropriate magnification. |
| Cannot connect via WiFi/App | WiFi not enabled on microscope; device out of range; app not installed or updated. | Ensure WiFi is active on microscope; move device closer (within 16ft); install/update the app. |
| Cannot record photos/videos | SD card full or not inserted; SD card corrupted. | Check SD card insertion and available space; format or replace SD card. |
For further assistance, please contact customer support.
6. Specifications
| Feature | Specification |
|---|---|
| Model Name | ODM301 Max |
| Brand | Opqpq |
| Magnification Maximum | 1200 x |
| Display | 7-inch IPS Display (178 Degrees Real Angle of View) |
| Illumination | Top and Bottom LED Lights |
| Connectivity | WiFi (Android/iOS App), USB, HDMI |
| Photo Resolution | 8MP |
| Video Resolution | 1080P |
| Storage | 32GB Micro SD Card (included) |
| Battery | 2000mAh Lithium Ion (up to 3 hours use) |
| Material | 7'' IPS Display + ABS Stand |
| Color | White |
| Item Weight | 0.03 ounces (0.85 Grams) |
| Package Dimensions | 12.65 x 10 x 8.75 inches |
7. Warranty and Support
For any technical questions or support, please contact Opqpq customer service.
Customer Service Email: cs@opqpq.com
Opqpq is committed to providing high-quality products and excellent customer service. Please retain your proof of purchase for any warranty claims.