Newentor Q8
Newentor Indoor Outdoor Thermometer Wireless User Manual
Model: Q8
1. Introduction
Thank you for choosing the Newentor Indoor Outdoor Thermometer. This device is designed to provide accurate and reliable temperature and humidity readings for both your indoor and outdoor environments, helping you maintain a comfortable and healthy living space. Please read this manual thoroughly before use to ensure proper operation and longevity of your device.

Image 1.1: Newentor Indoor Outdoor Thermometer Main Unit and Remote Sensors
Monitoring temperature and humidity is crucial for health and comfort. Extreme conditions can lead to various issues, including respiratory problems, skin dryness, and discomfort. This thermo-hygrometer helps you proactively manage your environment.

Image 1.2: Importance of Monitoring Temperature and Humidity
2. Product Overview
2.1 Key Features
- Accurate Readings: Provides precise indoor and outdoor temperature and humidity measurements.
- Comfort Indicator: Displays comfort levels (DRY, GOOD, HUMID) based on humidity.
- MAX/MIN Records: Tracks maximum and minimum temperature and humidity for 24 hours, 48 hours, or all-time.
- Wireless Transmission: Up to 328ft (100m) wireless range in open air for remote sensors.
- Large LCD Display: 4-inch screen with backlight for easy readability, even in low light.
- Multiple Sensors: Supports connection of up to 3 remote sensors (this package includes 2).
- Temperature Unit Switch: Easily switch between Fahrenheit (°F) and Celsius (°C).
- Low Battery Indicator: Alerts when batteries need replacement.

Image 2.1: Key Features Overview

Image 2.2: Air Comfort Indicator

Image 2.3: Large and Clear Display

Image 2.4: Wireless Transmission Range
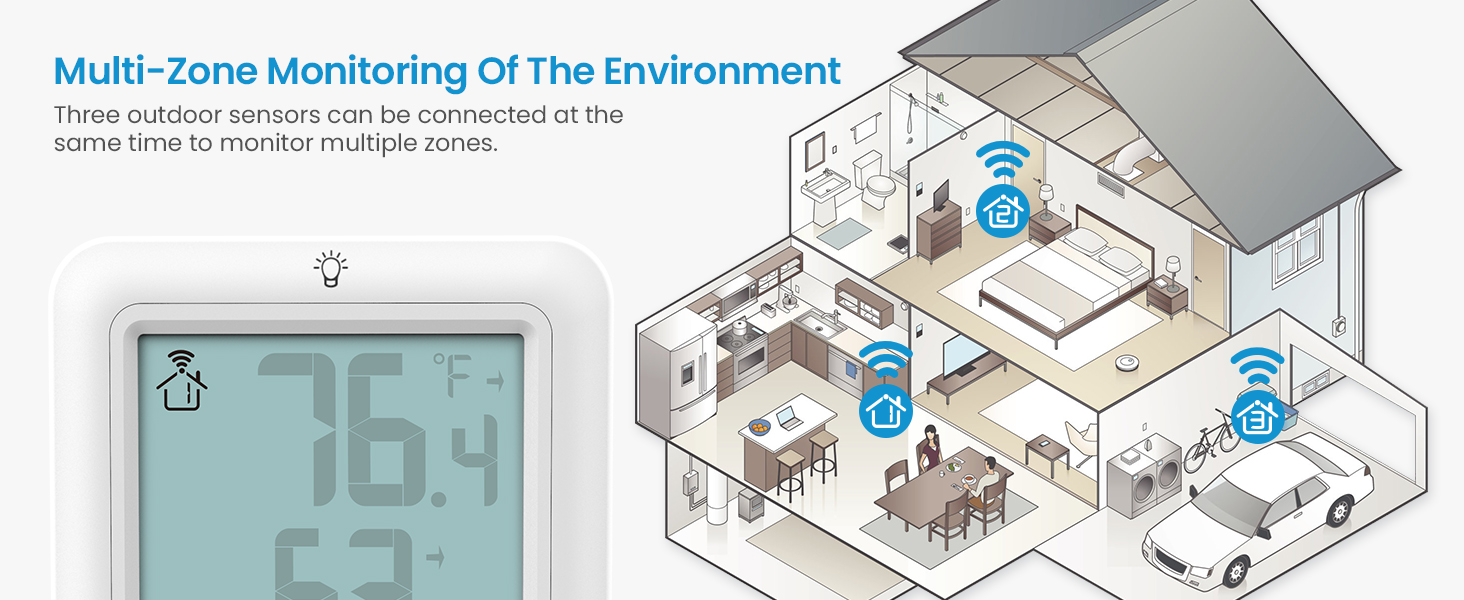
Image 2.5: Multi-Zone Monitoring
2.2 Package Contents
- 1 x Indoor Thermometer Main Unit
- 2 x Remote Sensors
- 1 x User Manual
3. Setup
3.1 Battery Installation
The main unit and remote sensors require batteries for operation (not included).
- Main Unit: Open the battery compartment on the back of the main unit. Insert 3 x AAA batteries, ensuring correct polarity (+/-). Close the compartment.
- Remote Sensors: Open the battery compartment on the back of each remote sensor. Insert 2 x AA batteries into each sensor, ensuring correct polarity (+/-). Close the compartment.
Note: It is recommended to insert batteries into the remote sensors first, then the main unit, to facilitate automatic pairing.
3.2 Placement
Optimal placement ensures accurate readings and reliable wireless transmission.
- Main Unit: Place the main unit indoors, away from direct sunlight, heat sources, or vents that could affect temperature readings. It can be placed on a tabletop using its integrated stand or mounted on a wall.
- Remote Sensors: Place remote sensors outdoors or in other areas you wish to monitor (e.g., garage, basement, patio). Ensure they are protected from direct rain and sunlight for best accuracy and longevity. Avoid placing them near large metal objects or strong electromagnetic interference.

Image 3.1: Placement Options
3.3 Pairing Sensors
The main unit should automatically connect to the remote sensors once batteries are installed. If connection is not established:
- Ensure both the main unit and sensors have fresh batteries.
- Bring the sensors closer to the main unit.
- Press the 'CH' button on the main unit to cycle through channels. If a sensor is not displayed, press and hold the 'CH' button for 3 seconds to initiate a search for all available sensors.
- On the remote sensor, press the 'TX' button to manually send a signal to the main unit.
4. Operating Instructions
4.1 Display Overview
The large LCD display shows the following information:
- Top Section: Outdoor temperature and humidity (from the currently selected remote sensor).
- Middle Section: Indoor temperature and humidity.
- Bottom Section: Comfort Indicator (DRY, GOOD, HUMID).
- Trend Arrows: Indicate whether temperature/humidity is rising, falling, or stable.
- Low Battery Icon: Appears when batteries need replacement.

Image 4.1: Display with Backlight Feature
4.2 Button Functions
| Button | Function |
|---|---|
| CH | Press to cycle through remote sensor channels (1, 2, 3). Press and hold for 3 seconds to search for all sensors. |
| °C/°F | Press to switch between Celsius and Fahrenheit temperature units. |
| MAX/MIN | Press to view MAX/MIN records (24H / 48H / ALL TIME). Press and hold for 3 seconds to clear records. |
| Light Bulb Icon (Top) | Press to activate backlight for 10 seconds. |
4.3 MAX/MIN Records
The device records the highest and lowest temperature and humidity values. To access these records:
- Press the MAX/MIN button repeatedly to cycle through:
- Maximum values for the last 24 hours.
- Minimum values for the last 24 hours.
- Maximum values for the last 48 hours.
- Minimum values for the last 48 hours.
- Maximum values for all time.
- Minimum values for all time.
- To clear the MAX/MIN records, press and hold the MAX/MIN button for 3 seconds while viewing the records.

Image 4.2: MAX/MIN Records and Trend Indicator
5. Maintenance
- Cleaning: Wipe the main unit and sensors with a soft, damp cloth. Do not use abrasive cleaners or solvents.
- Battery Replacement: Replace batteries when the low battery indicator appears on the display. Always replace all batteries in a unit at the same time with new ones.
- Storage: If storing the device for an extended period, remove all batteries to prevent leakage. Store in a cool, dry place.
6. Troubleshooting
| Problem | Possible Cause | Solution |
|---|---|---|
| No display on main unit. | Batteries are dead or incorrectly inserted. | Check battery polarity or replace with new AAA batteries. |
| Outdoor reading shows "--". | Sensor out of range, low sensor battery, or interference. | Move sensor closer to main unit. Replace sensor batteries (AA). Reduce interference from other electronics. Press and hold 'CH' button on main unit to re-scan. |
| Inaccurate readings. | Sensor/unit placed in direct sunlight, near heat/cold sources, or in high humidity. | Relocate the unit/sensor to a more stable environment, away from extreme conditions. Allow time for readings to stabilize. |
| Cannot switch between channels. | Only one sensor is connected or within range. | Ensure multiple sensors are powered on and within range. Press 'CH' button to cycle. |
7. Specifications
| Feature | Detail |
|---|---|
| Brand | Newentor |
| Model Name | Q8 |
| Color | White |
| Display Type | Digital LCD |
| Power Source (Main Unit) | 3 x AAA Batteries (not included) |
| Power Source (Remote Sensor) | 2 x AA Batteries (not included) |
| Wireless Range | Up to 328 feet (100 meters) in open air |
| Temperature Accuracy | ±1.8°F (±1°C) |
| Humidity Accuracy | ±5% |
| Outer Material | Plastic |
| Item Weight | 10.5 ounces (approx.) |
| Included Components | Indoor thermometer, remote sensor (x2), user manual |
8. Warranty and Support
Newentor products are designed for reliability and performance. For warranty information or technical support, please refer to the contact details provided with your product packaging or visit the official Newentor website. Please retain your proof of purchase for warranty claims.
For further assistance, you may contact Newentor customer service directly. Details can often be found on the brand's official Amazon store page or their dedicated support portal.
Thank you for choosing Newentor.
Related Documents - Q8
 |
Newentor Indoor Outdoor Thermometer User Manual Comprehensive guide for the Newentor Indoor Outdoor Thermometer, covering setup, functions, features like temperature and humidity trends, ice alerts, comfort display, product specifications, and troubleshooting. |
 |
Newentor Weather Station: FAQ and Troubleshooting Guide Answers common questions and provides troubleshooting methods for the Newentor Weather Station, covering email activation, time synchronization, Wi-Fi password issues, public Wi-Fi connection, and battery replacement. |
 |
Newentor Weather Station Troubleshooting Guide A comprehensive guide addressing common issues and questions regarding the Newentor Weather Station, covering backlight functionality, time and date settings, sensor connectivity, data accuracy, and more. |
 |
Newentor Weather Station: Power Adapter and Battery Operation Explore the Newentor weather station's power options, including 4 brightness levels (HI-MED-LOW-OFF) with the 5.0V adapter and temporary 15-second backlight when using batteries. |
 |
Newentor Weather Station Troubleshooting Guide Frequently asked questions and troubleshooting tips for the Newentor Weather Station, covering data inconsistencies, sensor connectivity, screen issues, and more. |
 |
Newentor Weather Station Troubleshooting Guide A guide to common problems and solutions for the Newentor Weather Station, covering backlight issues, sensor connection, time zone and time setting, screen behavior, remote sensor readings, and alarm clock setup. |