1. Product Overview
This manual provides detailed instructions for the assembly, operation, and maintenance of your Feonase Queen Bed Frame. This platform bed features a luxury wingback headboard with button tufting, an integrated charging station, and a sturdy wooden slat support system, designed for comfort and convenience.

Image 1.1: Full view of the Feonase Queen Bed Frame, showcasing the upholstered wingback headboard, integrated charging station, and dark gray fabric.

Image 1.2: Front view of the bed frame, highlighting the button-tufted headboard and the accessible charging station on top.
2. Safety Information
Please read and understand all safety warnings before assembly and use of this product. Failure to follow these instructions may result in injury or damage to the product.
- Do not exceed the maximum recommended load of 1000 pounds. Overloading can compromise the structural integrity of the bed frame.
- Exercise caution during assembly to avoid pinch points. Keep hands and fingers clear of moving parts.
- Always follow the assembly instructions carefully. Incorrect assembly can lead to instability or collapse of the bed frame.
- Ensure all bolts and screws are securely tightened before use. Periodically check and re-tighten as necessary.
- Keep small parts and packaging materials away from children to prevent choking hazards.
3. Package Contents
Before beginning assembly, ensure all components listed in your physical parts list are present and undamaged. While a detailed parts list is not provided in this manual, typical components include:
- Headboard with integrated charging station
- Side Rails (Left and Right)
- Footboard
- Wooden Slats
- Center Support Beam(s)
- Support Legs
- Hardware Pack (bolts, screws, washers, Allen wrench)

Image 3.1: Illustration of key structural components: thickened wood slats, solid support legs, and the central cross support system.
4. Setup and Assembly
Assembly is designed to be straightforward, with all pieces typically labeled with sequence numbers. While one person can assemble the bed, having two people is recommended for ease and speed.
Before You Begin:
- Clear a spacious area for assembly.
- Unpack all components and lay them out, verifying against your included parts list.
- Keep the hardware pack organized.
Assembly Steps (General Guide):
- Attach Side Rails: Connect the side rails to the headboard and footboard using the provided hardware. Ensure all connections are snug but do not overtighten initially.
- Install Center Support: Assemble and attach any central support beams and legs to the bed frame structure.
- Place Slats: Position the wooden slats across the bed frame. The slats are typically attached with Velcro for easy placement and noise reduction. Ensure the EVA strips are properly seated between the slats and the metal frame.
- Final Tightening: Once all components are in place, systematically tighten all bolts and screws securely.
- Position Bed: Carefully move the assembled bed frame to its desired location.
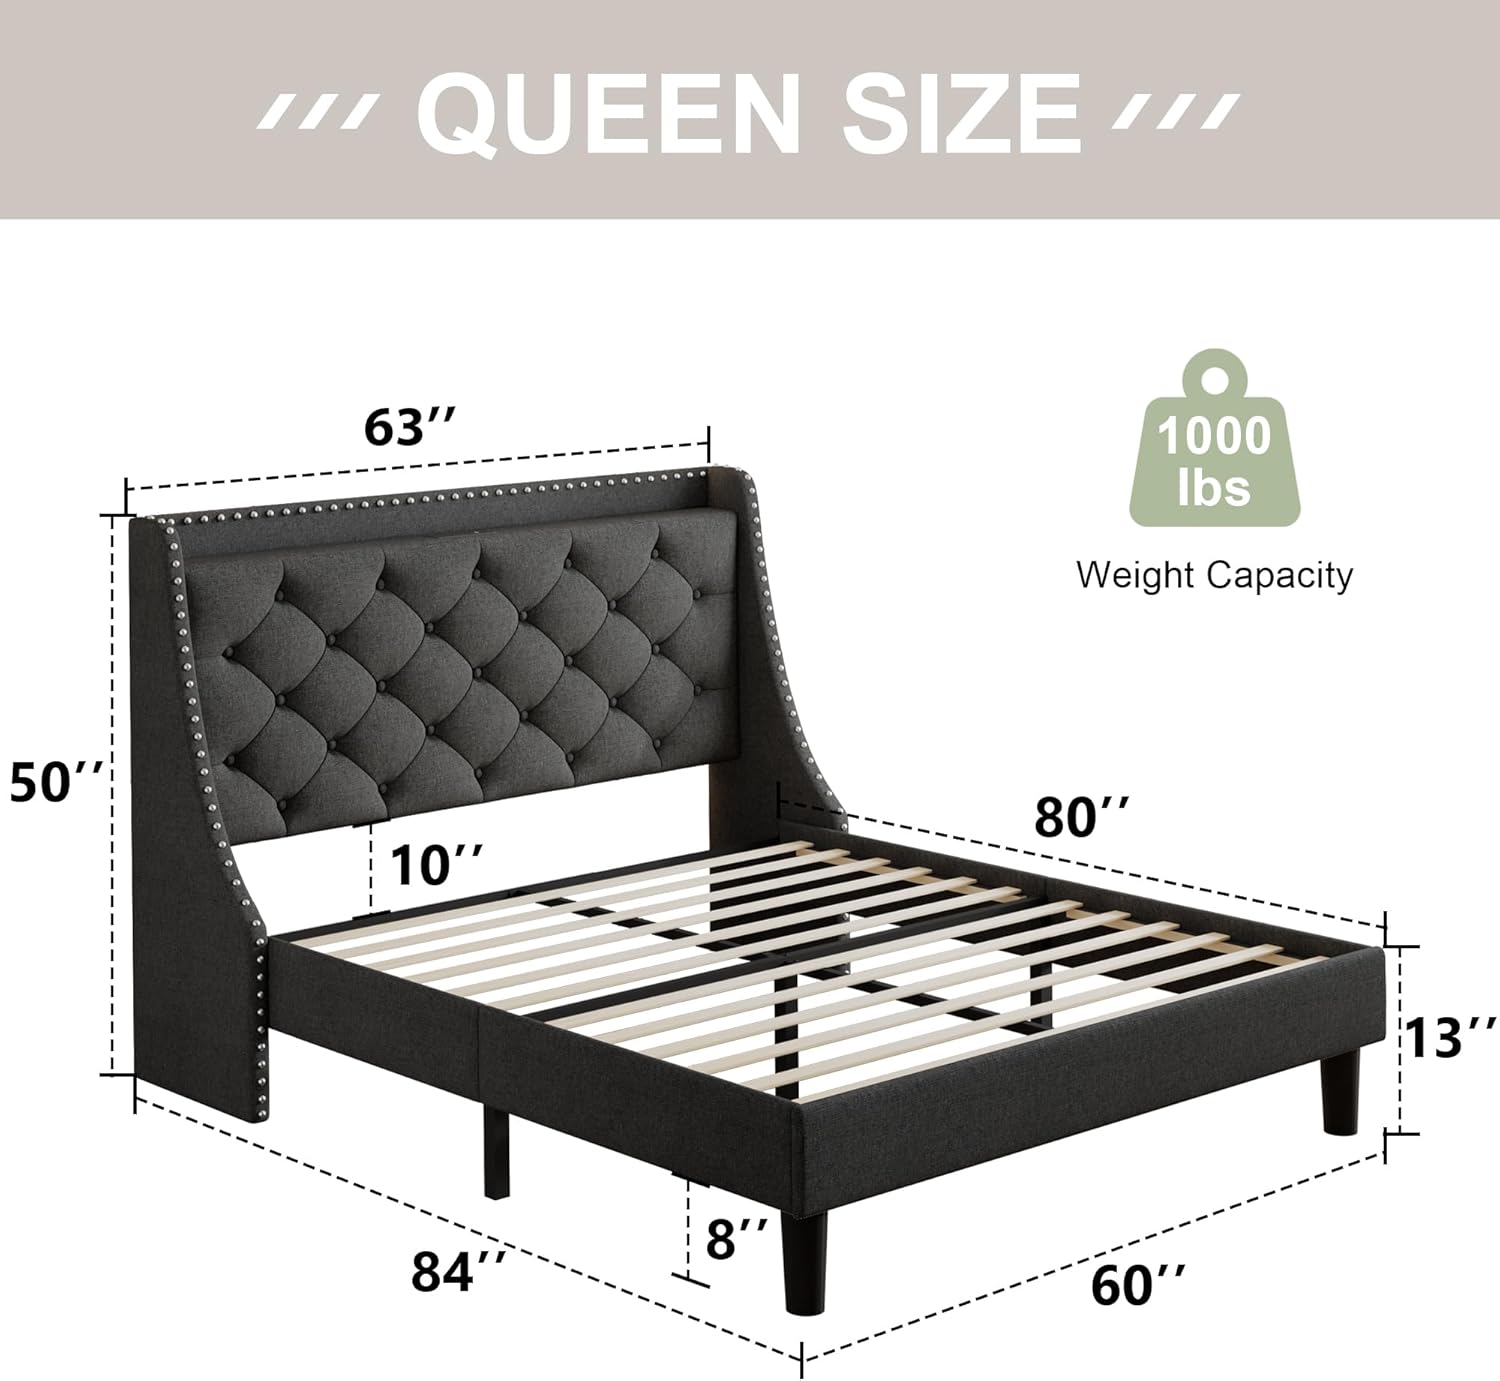
Image 4.1: Diagram illustrating the overall dimensions of the Queen size bed frame, including headboard height, width, and length.
5. Operating Instructions
Charging Station:
The headboard is equipped with a convenient charging station for your electronic devices.
- Power Connection: Locate the power cord extending from the bed frame and plug it into a standard 110V/12A wall outlet.
- AC Outlets: Two standard AC outlets are provided for plugging in lamps, laptops, or other small appliances.
- USB Ports: Two 5V/2A USB ports are available for charging smartphones, tablets, and other USB-powered devices.
Headboard Storage:
The top surface of the headboard offers approximately 4 inches of flat storage space. This area is suitable for placing small, frequently used items such as mobile phones, books, remote controls, or decorative items.

Image 5.1: Close-up view of the headboard's top surface, showing the integrated 2 AC outlets, 2 USB ports, and the storage ledge with devices charging.
6. Maintenance
Cleaning:
- For routine cleaning of the upholstered fabric, wipe with a dry cloth to remove dust and light debris.
- For spills or stains, use a mild fabric cleaner specifically designed for upholstery. Always test the cleaner on an inconspicuous area first to ensure it does not cause discoloration or damage.
- Avoid using harsh chemicals, abrasive cleaners, or excessive moisture, as these can damage the fabric and frame.
Structural Care:
- Periodically (e.g., every 3-6 months) inspect all assembly bolts and screws. Re-tighten any loose connections to maintain the bed frame's stability and prevent noise.
- Ensure the support legs are making firm contact with the floor. If the bed is moved, check leg stability.
7. Troubleshooting
This section addresses common issues you might encounter with your bed frame.
Noise Issues:
- Symptom: Squeaking or creaking sounds during use.
- Solution: Check all assembly bolts and screws. Tighten any that are loose. Ensure the wooden slats are properly seated and the EVA strips (if present) are correctly positioned between the slats and the metal frame to absorb shock and reduce friction.
Charging Station Not Working:
- Symptom: Devices do not charge when plugged into AC outlets or USB ports.
- Solution: Verify that the bed frame's main power cord is securely plugged into a functional wall outlet. Test the wall outlet with another appliance to confirm it has power. Ensure your devices are properly connected to the charging ports.
Instability:
- Symptom: The bed frame feels wobbly or unstable.
- Solution: Re-check all assembly hardware and tighten any loose connections. Ensure all support legs are firmly attached and are making even contact with the floor. If on an uneven surface, consider using furniture glides or shims to level the bed.
8. Specifications
| Brand | Feonase |
| Model | Queen Bed Frame B0D2L7MPL6 |
| Size | Queen |
| Material | Wood, Upholstered Fabric (Linen) |
| Color | Dark Gray |
| Product Dimensions (L x W x H) | 2.13L x 1.6W x 1.27H Meters (approx. 84"L x 63"W x 50"H) |
| Item Weight | 83 Pounds |
| Maximum Recommended Load | 1000 Pounds |
| Charging Station | 2 AC Outlets (110V/12A), 2 USB Ports (5V/2A) |
| Underbed Clearance | 8 inches |
| Special Feature | Squeak Resistant Design |
| Care Instructions | Wipe with Dry Cloth |

Image 8.1: View illustrating the 8-inch underbed clearance, providing space for storage.

Image 8.2: Detail of the 16-inch broad wingback headboard, featuring button tufting and decorative nailhead trim.
9. Warranty and Support
For specific warranty information, product support, or to report any issues, please refer to the documentation included with your purchase or contact the seller directly through your purchase platform. The manufacturer is Feonase.