1. Introduction
Thank you for choosing the ELECTROPRIME BT-A5 LED Display Bedside FM Clock Radio with Bluetooth Speaker. This device combines multiple functionalities including a digital clock, FM radio, Bluetooth speaker, and USB MP3 player, designed for convenience and versatility in your home or office. This manual provides detailed instructions on how to set up, operate, and maintain your device to ensure optimal performance.
2. Safety Information
- Do not expose the device to rain, moisture, or extreme temperatures.
- Avoid placing the device near heat sources such as radiators, heat registers, stoves, or other apparatus (including amplifiers) that produce heat.
- Use only attachments/accessories specified by the manufacturer.
- Clean only with a dry cloth. Do not use liquid cleaners or aerosol cleaners.
- Do not block any ventilation openings. Install in accordance with the manufacturer's instructions.
- Protect the power cord from being walked on or pinched, particularly at plugs, convenience receptacles, and the point where they exit from the apparatus.
3. Package Contents
Please check the package for the following items:
- ELECTROPRIME BT-A5 Clock Radio Unit
- USB Charging Cable (for DC 5V 1A power input)
- User Manual
4. Product Overview
Familiarize yourself with the various parts and controls of your BT-A5 clock radio.
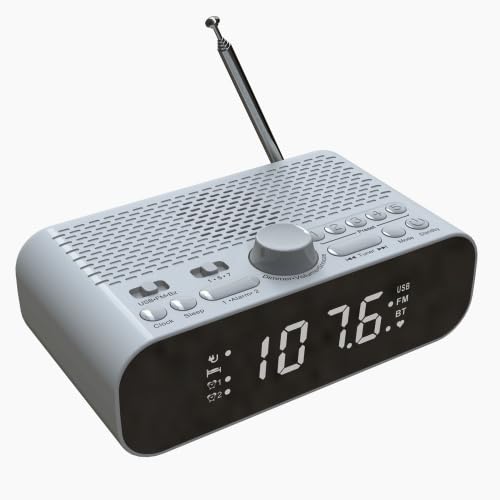
Figure 4.1: Front View
This image shows the front of the BT-A5 clock radio, highlighting the large LED display which shows the time and current mode (USB, FM, BT). Below the display, indicators for Alarm 1 and Alarm 2 are visible. The overall color is white.
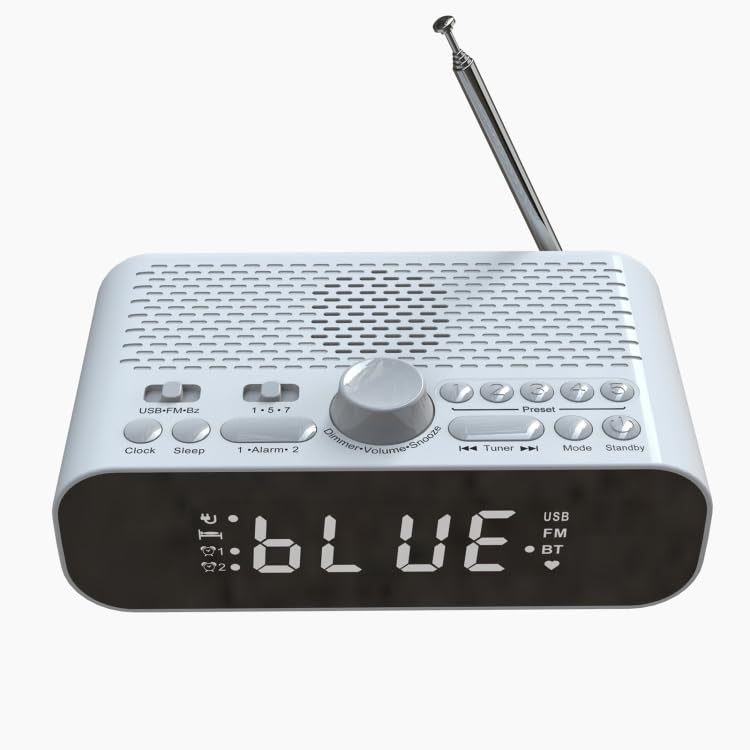
Figure 4.2: Top View
This image displays the top panel of the BT-A5, featuring various control buttons and a central rotary dial. Buttons include USB-FM-Bz, Clock, Sleep, 1-Alarm-2, Preset, Mode, Standby, and navigation buttons. The rotary dial controls Dimmer, Volume, and Snooze functions. An extendable antenna is visible at the back.
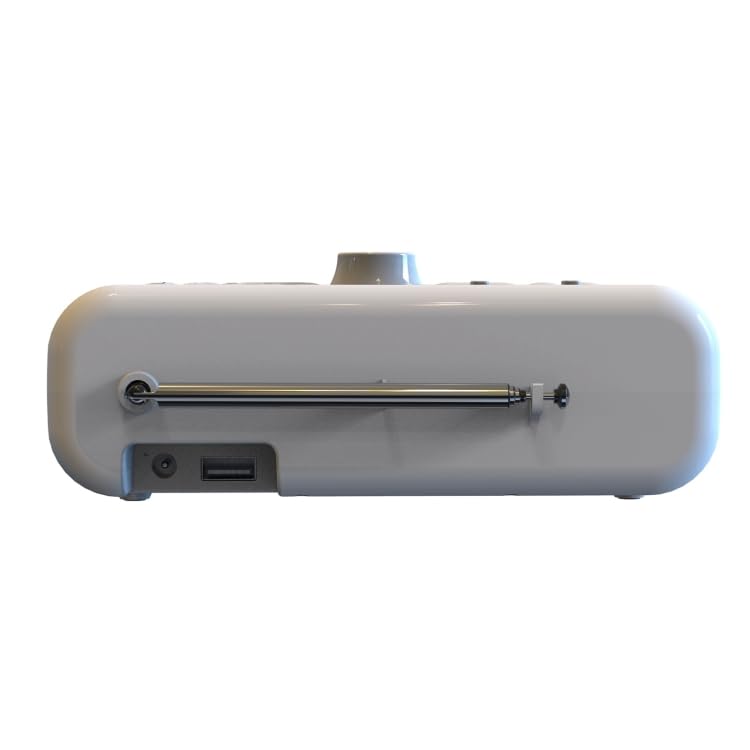
Figure 4.3: Side View
This image shows the side profile of the BT-A5 clock radio. On the left side, a DC charging port and a USB port are clearly visible. The base of the extendable whip antenna is also shown, indicating its connection point to the unit.
Control Buttons and Ports:
- LED Display: Shows time, mode, and other information. Brightness adjustable.
- USB-FM-Bz Button: Selects alarm sound source (USB, FM, Buzzer).
- Clock Button: Used for setting the time.
- Sleep Button: Sets automatic shutdown time.
- 1-Alarm-2 Buttons: Independent buttons for setting Alarm 1 and Alarm 2.
- Dimmer/Volume/Snooze Dial: Rotary dial for adjusting display brightness, volume, and activating snooze.
- Preset Buttons: For storing and recalling FM radio stations.
- Tuner Buttons (◄◄ / ►►): For tuning FM radio stations or navigating tracks in USB/Bluetooth mode.
- Mode Button: Switches between FM, Bluetooth, and USB playback modes.
- Standby Button: Powers the unit on/off or puts it into standby mode.
- USB Port: For playing MP3 music from a USB disk.
- DC Charging Port: For connecting the power adapter (DC 5V 1A).
- Whip Antenna: Extendable antenna for FM radio reception.
5. Setup
- Power Connection: Connect the provided USB charging cable to the DC charging port on the side of the unit. Connect the other end to a compatible USB power adapter (DC 5V 1A, not included) and plug it into a wall outlet. The unit has a built-in rechargeable battery for portable use.
- Initial Power On: Press the 'Standby' button to turn on the device. The LED display will light up.
- Antenna Adjustment: For optimal FM radio reception, extend the whip antenna fully and adjust its position.
6. Operating Instructions
6.1. Setting the Clock
- Press and hold the 'Clock' button until the hour digits start flashing.
- Rotate the 'Dimmer/Volume/Snooze' dial to adjust the hour. Press the dial to confirm.
- The minute digits will start flashing. Rotate the dial to adjust the minutes. Press the dial to confirm.
- The clock is now set. The device features clock power-off memory.
6.2. Setting Alarms (Alarm 1 & Alarm 2)
The device supports two independent alarms with customizable sound sources and schedules.
- Press and hold the '1-Alarm-2' button for Alarm 1 (or press again for Alarm 2) until the alarm time digits flash.
- Rotate the 'Dimmer/Volume/Snooze' dial to set the alarm hour, then press the dial to confirm.
- Rotate the dial to set the alarm minutes, then press the dial to confirm.
- Alarm Sound Source: Press the 'USB-FM-Bz' button repeatedly to cycle through alarm sound sources: USB (U disk), FM radio, or Buzzer. Confirm your selection.
- Alarm Schedule: Press the '1-Alarm-2' button repeatedly to cycle through schedule settings: Single (one-time), Working Day (Monday-Friday), or Daily (every day). Confirm your selection.
- The alarm is now set. The corresponding alarm indicator (Alarm 1 or Alarm 2) will appear on the display.
6.3. FM Radio Operation
- Press the 'Mode' button until 'FM' appears on the display.
- Automatic Scan: Press and hold the 'Mode' button to automatically scan and store available FM stations.
- Manual Tuning: Use the 'Tuner' buttons (◄◄ / ►►) to manually tune to a specific frequency.
- Preset Stations: Use the 'Preset' buttons to recall your 5 favorite stored channels. To store a favorite channel, tune to the desired station, then press and hold one of the 'Preset' buttons (1-5) until the display confirms storage.
- Adjust volume using the 'Dimmer/Volume/Snooze' dial.
6.4. Bluetooth Pairing
- Press the 'Mode' button until 'BT' (Bluetooth) appears on the display. The device will enter pairing mode, indicated by a flashing 'BT' icon.
- On your mobile phone or other Bluetooth-enabled device, enable Bluetooth and search for available devices.
- Select 'BT-A5' from the list of found devices.
- Once paired, the 'BT' icon on the display will stop flashing and remain solid. You can now play audio from your connected device through the BT-A5 speaker.
- Adjust volume using the 'Dimmer/Volume/Snooze' dial on the unit or from your connected device.
6.5. USB Playback
- Insert a USB disk containing MP3 music files into the USB port on the side of the unit.
- Press the 'Mode' button until 'USB' appears on the display. The device will automatically start playing MP3 files from the USB disk.
- Use the 'Tuner' buttons (◄◄ / ►►) to skip tracks.
- Adjust volume using the 'Dimmer/Volume/Snooze' dial. The device features playback power-off memory.
6.6. Snooze and Sleep Functions
- Snooze: When an alarm sounds, press the 'Dimmer/Volume/Snooze' dial to activate the snooze function. The alarm will temporarily stop and sound again after the preset snooze time. You can set the snooze duration.
- Sleep Timer: Press the 'Sleep' button repeatedly to set an automatic shutdown time (e.g., 15, 30, 45, 60, 75, 90 minutes). The device will automatically turn off after the selected duration.
6.7. Display Brightness Adjustment
Rotate the 'Dimmer/Volume/Snooze' dial when the device is in clock display mode (not playing audio) to adjust the LED display brightness. There are 3 adjustable brightness levels.
7. Maintenance
- Cleaning: Wipe the surface of the device with a soft, dry cloth. Do not use abrasive cleaners, waxes, or solvents as they may damage the finish.
- Storage: If not using the device for an extended period, store it in a cool, dry place away from direct sunlight and extreme temperatures.
- Battery Care: To prolong the life of the built-in rechargeable battery, avoid fully discharging it frequently. Charge the device regularly.
8. Troubleshooting
| Problem | Possible Cause | Solution |
|---|---|---|
| Device does not power on. | Low battery or no power connection. | Ensure the device is connected to a power source (DC 5V 1A) or that the built-in battery is charged. |
| No sound from speaker. | Volume too low; incorrect mode; Bluetooth not connected. | Increase volume using the dial. Ensure correct mode (FM, BT, USB) is selected. Re-pair Bluetooth if necessary. |
| Poor FM radio reception. | Antenna not extended or poor signal area. | Fully extend the whip antenna and adjust its position. Try moving the unit to a different location. |
| Bluetooth pairing fails. | Device not in pairing mode; too far from source; interference. | Ensure the BT-A5 is in Bluetooth mode and 'BT' is flashing. Move the devices closer. Turn off other Bluetooth devices nearby. |
| USB playback not working. | USB format not supported; no MP3 files; USB disk issue. | Ensure USB disk contains MP3 files. Check if the USB disk is properly inserted. Try a different USB disk. |
9. Specifications
| Feature | Specification |
|---|---|
| Model | BT-A5 |
| Connectivity Technology | Bluetooth 5.0, USB |
| Tuner Technology | FM |
| FM Frequency Range | 87.5-108MHz |
| USB File Format | MP3 |
| Display | LED (White light), 3-level adjustable brightness |
| Screen Size | 80x26mm |
| Speaker | 2 inch full range speaker + bass diaphragm |
| Power Source | Battery Powered (Built-in rechargeable battery) |
| Battery Capacity | 1500mAh |
| Power Input | DC 5V 1A |
| Power Consumption | 2W |
| Automatic Sleep Time | 15-90 minutes |
| Dimensions (L x W x H) | 160x95x60mm |
| Weight | 350g |
| Special Features | Snooze, Alarm, Radio, Charging Port, Clock Power-off Memory, Playback Power-off Memory |
10. Warranty and Support
This product comes with a standard manufacturer's warranty. For detailed information regarding warranty terms and conditions, please refer to the warranty policy provided at the time of purchase or contact ELECTROPRIME customer support.
If you encounter any issues or have questions not covered in this manual, please contact our customer support team for assistance. You can typically find contact information on the product packaging or the official ELECTROPRIME website.