Huuger 7954TC
Huuger L Shaped Gaming Desk with Power Outlets and LED Lights
Model: 7954TC
1. Introduction
Thank you for choosing the Huuger L Shaped Gaming Desk. This manual provides detailed instructions for the assembly, operation, and maintenance of your new desk. Designed for both gaming and home office use, this desk features an L-shaped configuration, integrated power outlets, vibrant LED lighting, elevated monitor shelves, and convenient headphone hooks. Please read this manual thoroughly before assembly and use to ensure proper setup and safe operation.

Image: The Huuger L Shaped Gaming Desk fully set up with dual monitors, keyboard, mouse, and other gaming peripherals, showcasing the integrated LED lighting.
2. Safety Instructions
To prevent injury or damage to the product, please observe the following safety guidelines:
- Ensure all components are securely fastened before use. Regularly check and tighten screws as needed.
- Do not exceed the desk's weight capacity. Distribute weight evenly across the desk surface.
- Keep liquids away from electrical components, including power outlets and LED lights, to prevent electric shock or damage.
- Only use the provided power cord and ensure it is properly plugged into a grounded outlet.
- Avoid placing hot items directly on the desk surface without protective padding.
- Keep small parts and packaging materials away from children to prevent choking hazards.
- Assemble the desk on a soft, clean surface to prevent scratches.
3. Package Contents
Before beginning assembly, verify that all parts listed below are present and undamaged. If any parts are missing or damaged, please contact customer support.
- L-shaped Desktop Panels (Main and Side Sections)
- Elevated Monitor Shelf Panels
- Desk Frame Components (Legs, Support Bars)
- Integrated Power Strip (4 AC Outlets, 2 USB Ports, 1 Type-C Port)
- LED Light Strip with Smart Controller
- Headphone Hooks (2 units)
- Adjustable Leveling Feet
- Assembly Hardware (Screws, Allen Wrench, etc.)
- Instruction Manual
4. Setup and Assembly Instructions
Assembly is designed to be straightforward. Please follow the numbered steps and diagrams carefully. All necessary tools are included.
- Prepare the Area: Clear a spacious, clean, and soft area for assembly to prevent damage to the desk components.
- Assemble the Frame: Begin by connecting the main frame components using the provided screws. Ensure all connections are snug but do not overtighten until all parts are aligned.
- Attach Desktop Panels: Carefully place the L-shaped desktop panels onto the assembled frame. Secure them with the designated screws.
- Install Monitor Shelves: Attach the elevated monitor shelf panels to the main desktop. These are designed to raise your monitors for ergonomic viewing.
- Integrate Power Strip: Insert the power strip into its designated recessed slot on the desktop. Connect the power cable.
- Apply LED Lights: Adhere the LED light strip to the underside of the monitor shelves or desired locations. Connect the smart controller to the LED strip and power source.
- Attach Headphone Hooks: Secure the headphone hooks to the desired locations on the desk frame.
- Adjust Leveling Feet: Once the desk is in its final position, adjust the leveling feet at the bottom of each leg to ensure stability and prevent wobbling.
- Final Tightening: Once all components are in place and aligned, go back and securely tighten all screws.

Image: An overhead view of the Huuger L Shaped Gaming Desk, illustrating its structure and the placement of the LED lights and power strip.

Image: A diagram demonstrating the ergonomic advantage of the elevated monitor stand, promoting better posture.

Image: Detailed views of the headphone hook, lacing bar for stability, and adjustable leveling feet for uneven floors.
5. Operating Instructions
5.1. LED Lights Operation
The integrated LED lights can be controlled via the smart controller attached to the light strip or through a dedicated smartphone application.
- Smart Controller: Use the buttons on the physical controller to switch the lights on/off, change between 12 scene modes, adjust brightness, and modify speed.
- Smartphone App: Download the compatible app (refer to packaging or product information for app name). The app allows for more advanced control, including selecting from 60,000 colors, activating mic mode (lights react to sound), music mode (lights sync with music), and setting timing modes.

Image: A detailed view of the RGB LED strips and the smart controller, along with icons representing various app control features like color selection, mic mode, music mode, and timing.
5.2. Power Outlets Usage
The desk includes a built-in power strip for convenient device charging and power supply.
- 4 Standard AC Outlets: Provide 125V/12A power for standard electronic devices.
- 2 USB Ports: Deliver 5V/3A power for charging smartphones, tablets, and other USB-powered devices.
- 1 Type-C Port: Provides 5V/3A power for charging compatible Type-C devices.
- Ensure the desk's main power cord is securely plugged into a wall outlet before using the integrated power strip.

Image: A close-up view of the recessed power strip, highlighting the 4 AC outlets, 2 USB ports, and 1 Type-C port.
6. Maintenance
Proper maintenance will extend the life and appearance of your desk.
- Cleaning: Wipe the desk surfaces with a damp cloth. Avoid harsh chemicals or abrasive cleaners that may damage the finish.
- Hardware Check: Periodically inspect all screws and connections to ensure they remain tight. Retighten as necessary.
- Electrical Components: Keep the power outlets and LED lights free from dust and debris. Do not attempt to disassemble or repair electrical components yourself.
7. Troubleshooting
If you encounter any issues with your desk, please refer to the following common solutions:
- Desk is Wobbly:
- Ensure all assembly screws are fully tightened.
- Adjust the leveling feet at the bottom of each leg to compensate for uneven floor surfaces.
- LED Lights Not Working:
- Check if the LED strip is properly connected to the smart controller and the power source.
- Ensure the desk's main power cord is plugged into a functional wall outlet.
- Verify the smart controller is turned on.
- Power Outlets Not Providing Power:
- Confirm the desk's main power cord is securely plugged into a live wall outlet.
- Test the wall outlet with another device to ensure it is functional.
- Check for any tripped circuit breakers in your home.
If the issue persists after trying these steps, please contact Huuger customer support.
8. Specifications
| Brand | Huuger |
| Model Number | 7954TC |
| Desk Design | L-shaped Computer Desk |
| Product Dimensions (D x W x H) | 50.4"D x 18.9"W x 29.2"H |
| Working Surface Diagonal Length | 33.5 Inches |
| Color | Black |
| Top Material Type | Engineered Wood (Carbon Fiber Texture) |
| Base Material | Alloy Steel |
| Finish Type | Polished / Matte |
| Item Weight | 20.91 Kilograms |
| Special Features | Integrated Power Outlets (4 AC, 2 USB, 1 Type-C), LED Lights, Monitor Shelves, Headphone Hooks, Adjustable Leveling Feet |
| Assembly Required | Yes (All tools included) |
| Product Care Instructions | Wipe with Damp Cloth |
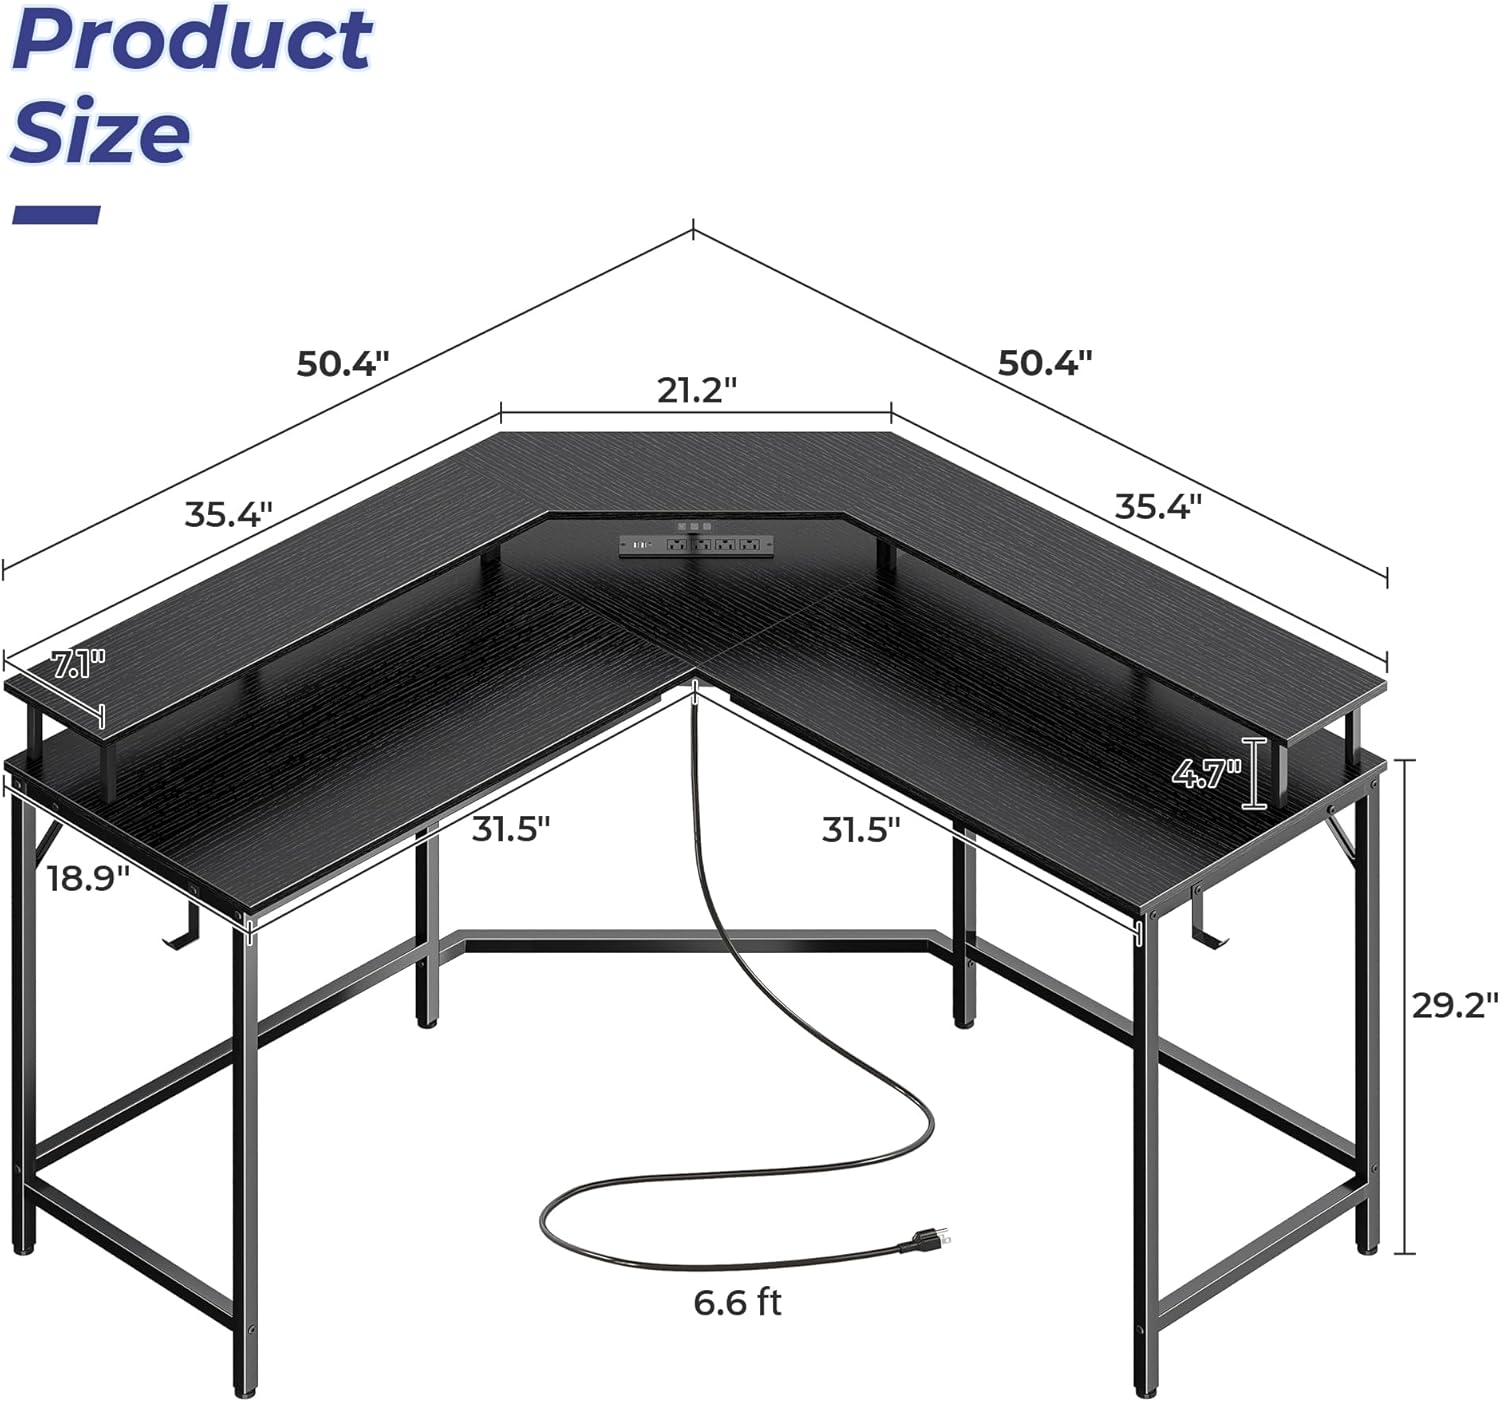
Image: A detailed diagram illustrating the dimensions of the Huuger L Shaped Gaming Desk.

Image: A close-up view of the wooden grain desktop, highlighting its durable, scratch-resistant, and easy-to-maintain surface.
9. Warranty and Support
For specific warranty information, please refer to the documentation included with your purchase or contact the retailer. For technical support, missing parts, or any other inquiries, please reach out to Huuger customer service through their official website or the platform where the product was purchased.
Ask a question about this manual
Ask about setup, troubleshooting, compatibility, parts, safety, or missing instructions. Manuals+ will review the question and use this page’s manual context to help answer it.