PSIDE PBTS 370 B3
PARKSIDE PBTS 370 B3 Belt Sander User Manual
Model: PBTS 370 B3 | Brand: PSIDE
1. Introduction
This manual provides essential information for the safe and efficient operation, maintenance, and troubleshooting of your PARKSIDE PBTS 370 B3 Belt Sander. Please read this manual thoroughly before operating the machine to ensure proper use and to prevent injury or damage.
1.1 Safety Instructions
Always observe the following safety precautions:
- Read and understand all instructions before operating the tool.
- Wear appropriate personal protective equipment (PPE), including safety glasses, hearing protection, and a dust mask.
- Ensure the work area is clean, well-lit, and free from obstructions.
- Keep children and bystanders away from the operating area.
- Do not operate the tool in damp or wet conditions.
- Always disconnect the power supply before performing any adjustments, maintenance, or when changing accessories.
- Secure the workpiece firmly before sanding.
2. Product Overview
2.1 Components
The PARKSIDE PBTS 370 B3 Belt Sander features the following key components:
- Powerful 370 W induction motor for quiet and low-vibration operation.
- Adjustable sanding belt, capable of horizontal and vertical positioning.
- Swiveling support table (0-45°) with an adjustable angle stop (-60-0-60°).
- Sanding disc with hook-and-loop fastener for easy sandpaper changes.
- Connection for external dust extraction.
- Dust-proof ON/OFF switch.
2.2 Product Views

Figure 1: Overall view of the PARKSIDE PBTS 370 B3 Belt Sander, showcasing its compact design and main components including the belt and disc sanding areas.
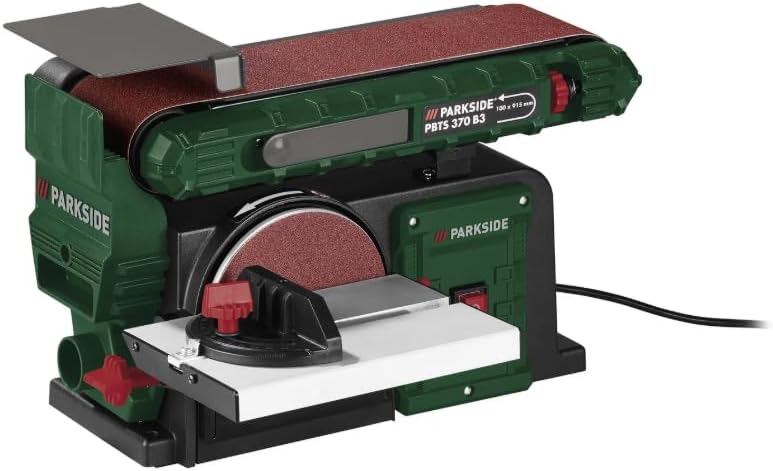
Figure 2: Front view of the sander, highlighting the sanding disc with its adjustable support table and angle stop, as well as the power switch.

Figure 3: Side view of the sander, showing the adjustable belt sanding arm and the robust base for stable operation.

Figure 4: Rear view of the sander, illustrating the dust extraction port and the overall sturdy construction.
3. Setup
3.1 Unpacking and Inspection
- Carefully remove the sander and all accessories from the packaging.
- Inspect the tool for any signs of damage during transit. Do not operate if damaged.
- Verify that all included accessories are present: 1 pre-mounted sanding paper, 1 pre-mounted sanding belt, 1 cross stop, and 1 set of mounting tools.
3.2 Assembly
The main components of the sander are pre-assembled. You may need to attach the cross stop and ensure the sanding paper and belt are correctly seated.
- Attach the cross stop to the swiveling support table as per the diagrams in the quick start guide (not included in this manual).
- Ensure the pre-mounted sanding paper on the disc and the sanding belt are securely in place and tensioned correctly. Refer to the maintenance section for replacement instructions.
3.3 Connecting to Power
Connect the power cable to a standard 230V AC outlet. Ensure the power switch is in the 'OFF' position before plugging in the tool.
4. Operation
4.1 Basic Sanding
- Ensure the workpiece is securely clamped or held.
- Turn on the sander using the dust-proof ON/OFF switch.
- Apply gentle, even pressure to the workpiece against the sanding surface (belt or disc). Avoid excessive force, which can lead to poor results or motor strain.
- Move the workpiece smoothly across the sanding surface for uniform material removal.
- Turn off the sander when finished and wait for all moving parts to stop before handling the workpiece or tool.
4.2 Adjusting the Sanding Belt
The sanding belt can be adjusted horizontally or vertically to suit different sanding tasks. Loosen the locking mechanism, pivot the belt arm to the desired position, and re-tighten the mechanism securely.
4.3 Using the Swiveling Support Table and Angle Stop
The support table for the sanding disc can be swiveled from 0° to 45°. The angle stop can be set from -60° to 60° to guide the workpiece for precise angled sanding. Loosen the table and stop locking knobs, adjust to the desired angle, and tighten firmly before use.
4.4 Dust Extraction
For optimal dust collection and a cleaner work environment, connect an external dust extraction system to the designated port on the sander. This significantly reduces airborne dust and improves visibility during operation.
5. Maintenance
5.1 Cleaning
- Always disconnect the power cord before cleaning.
- Regularly clean the tool to remove dust and debris, especially from ventilation openings and moving parts. Use a soft brush or compressed air.
- Do not use harsh chemicals or abrasive cleaners.
5.2 Sanding Belt/Paper Replacement
- Sanding Belt: Release the belt tensioning lever, slide the old belt off, and slide a new belt (91.5 x 10 cm) onto the rollers. Re-engage the tensioning lever and ensure the belt is centered.
- Sanding Paper (Disc): The sanding disc uses a hook-and-loop fastener. Peel off the old paper and press a new 15 cm diameter sanding paper firmly onto the disc, ensuring it is centered.
5.3 Storage
Store the sander in a clean, dry place, out of reach of children and away from direct sunlight or extreme temperatures.
6. Troubleshooting
| Problem | Possible Cause | Solution |
|---|---|---|
| Machine does not start | No power supply Faulty switch | Check power connection and outlet Contact qualified service personnel |
| Poor sanding results | Worn sanding belt/paper Incorrect pressure Wrong grit size | Replace sanding belt/paper Apply even, moderate pressure Use appropriate grit for the material |
| Excessive vibration | Loose components Damaged sanding belt/disc | Check all fasteners and tighten Inspect and replace damaged sanding media |
| Dust not being extracted | Dust port clogged Extraction system not connected/working | Clear dust port Ensure extraction system is properly connected and operational |
7. Specifications
| Parameter | Value |
|---|---|
| Power Connection | 370 W |
| No-load Speed | 2980 min⁻¹ |
| Sanding Belt Speed | 7.5 m/s |
| Material | Aluminum, Steel, Plastic |
| Dimensions (L x W x H) | 46 x 36 x 28 cm |
| Sanding Disc Diameter | Approx. 15 cm |
| Sanding Belt Dimensions | Approx. 91.5 x 10 cm |
| Power Cable Length | Approx. 2 m |
| Weight | Approx. 11.5 kg |
| Voltage | 230 Volts |
| Amperage | 16 Amperes |
| Included Sanding Grit | 80 (Medium) |
8. Warranty and Support
For warranty information and technical support, please refer to the documentation provided with your purchase or contact the manufacturer directly. Keep your proof of purchase for warranty claims.