ELECTROPRIME TBD0603340703
User Manual for ELECTROPRIME A2769 7-Inch Android Navigation System
Model: TBD0603340703
Introduction
This manual provides detailed instructions for the installation, operation, and maintenance of your ELECTROPRIME A2769 7-Inch Android Navigation System. This device is designed to enhance your in-car experience with navigation, multimedia playback, and connectivity features. Please read this manual thoroughly before using the product to ensure proper operation and to prevent damage.
Setup
Package Contents
Before installation, please verify that all components listed below are present in your package. If any items are missing or damaged, please contact your retailer.
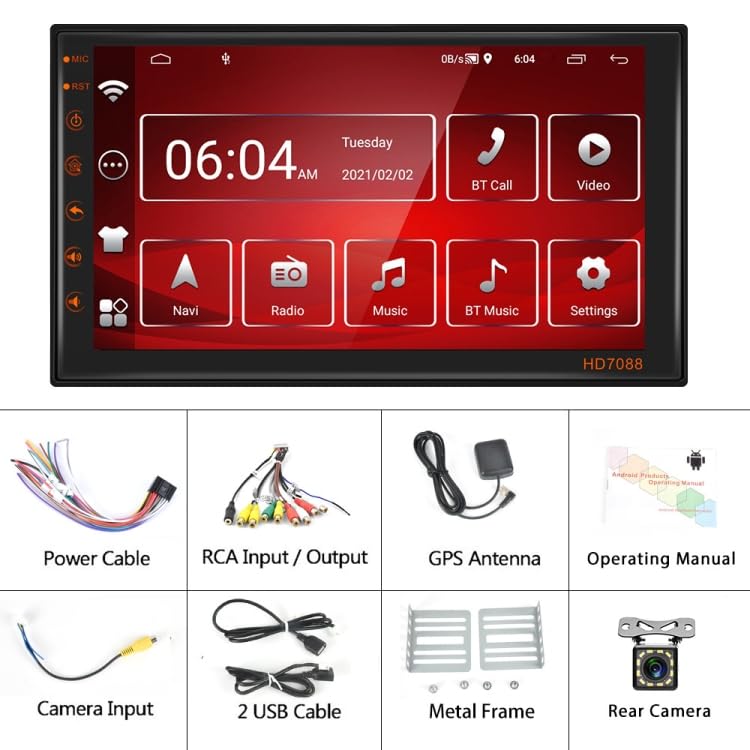
Figure 1: Included Components. This image displays the complete set of items you should find in your product package, including the main head unit, various cables for power and audio/video connections, a GPS antenna, a rear camera, mounting accessories, and the user manual.
- Main Android Navigation Unit (1)
- Power Cable (1)
- RCA Input/Output Cables (1 set)
- GPS Antenna (1)
- Operating Manual (1)
- Camera Input Cable (1)
- USB Cables (2)
- Metal Frame (1 set)
- Rear Camera (1)
Product Overview and Dimensions
Familiarize yourself with the main unit and its physical dimensions before installation.

Figure 2: Main Unit and Rear Camera. This image shows the front display of the car navigation system, featuring its user interface, alongside the compact rear camera unit.
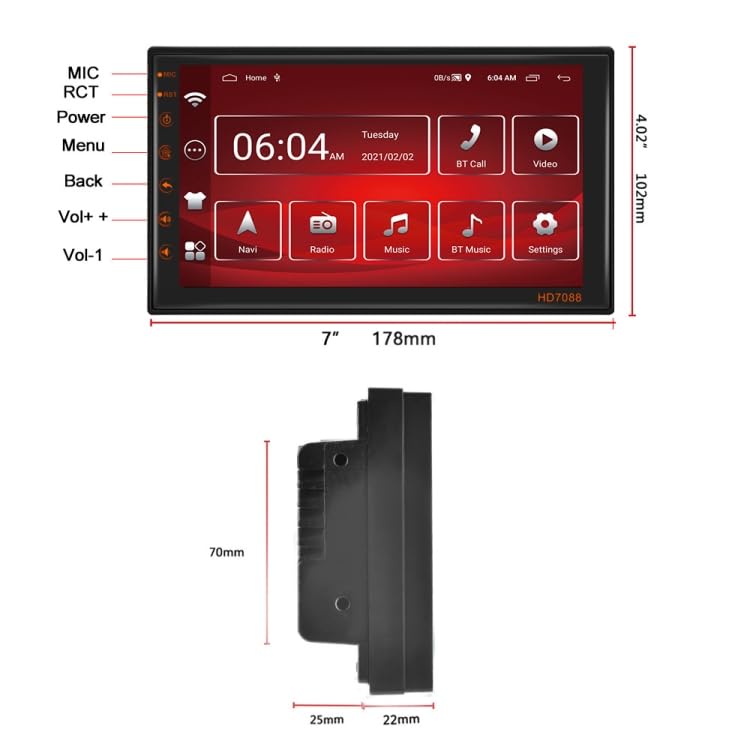
Figure 3: Product Dimensions. This diagram illustrates the precise measurements of the main unit, including its width (178mm), height (102mm), and various depth measurements from a side profile view, crucial for installation planning.
The unit measures approximately 178mm (7 inches) in width and 102mm (4.02 inches) in height. Detailed depth measurements are provided in Figure 3 for proper fitting into your vehicle's dashboard.
Installation Guidelines
Installation of this car navigation system requires technical knowledge and experience with car electrical systems. It is highly recommended to have the unit installed by a qualified professional to avoid damage to the product or your vehicle.
- Safety First: Disconnect the vehicle's battery before beginning any installation work to prevent electrical shorts.
- Wiring: Carefully follow the wiring diagram provided in the separate operating manual. Ensure all connections are secure and properly insulated.
- Connect the Power Cable to the vehicle's power supply (ACC, B+, GND).
- Connect RCA Input/Output cables for external audio/video devices.
- Connect the GPS Antenna to a location with clear sky view for optimal signal reception.
- Connect the Camera Input cable and the Rear Camera for reverse assistance.
- Utilize the USB Cables for connecting external storage or charging devices.
- Mounting: Use the provided Metal Frame to securely mount the unit into the dashboard. Ensure the unit is firmly seated and does not obstruct any vehicle controls or airbags.
- Testing: After installation, reconnect the battery and perform a functional test of all features before fully reassembling the dashboard.
Operating Instructions
Basic Operation
- Power On/Off: The unit will typically power on automatically with the vehicle's ignition. To manually power off, press and hold the power button (refer to the main unit diagram in Figure 3 for button locations).
- Touchscreen Interface: Navigate through menus and applications by tapping, swiping, and dragging on the 7-inch touchscreen.
- Home Screen: The main screen provides quick access to key functions such as Navigation, Radio, Music, Bluetooth, and Settings.
- Volume Control: Adjust volume using the physical buttons on the unit or the on-screen controls.
Key Functions
- Navigation (Navi): Tap the "Navi" icon to launch the pre-installed navigation application. Ensure the GPS antenna is properly connected for accurate positioning.
- Radio: Select the "Radio" icon to access the FM/AM tuner. Use the on-screen controls to scan for stations, save presets, and adjust frequency.
- Music: Tap "Music" to play audio files from connected USB devices or internal storage. The unit supports various audio formats.
- Bluetooth (BT Music / BT Call):
- Pairing: Go to Bluetooth settings on the unit and enable Bluetooth. On your mobile device, search for available devices and select "ELECTROPRIME A2769" (or similar name). Enter the PIN if prompted (usually "0000" or "1234").
- BT Music: Stream audio from your paired mobile device.
- BT Call: Make and receive hands-free calls. Use the built-in microphone for communication.
- Video: Select "Video" to play video files from connected USB devices or internal storage. The unit supports common video formats.
- Settings: Access system settings to configure display, sound, network (WiFi), language, date/time, and other preferences.
Rear Camera Operation
When the vehicle is shifted into reverse gear, the unit will automatically display the feed from the connected rear camera, assisting with parking and maneuvering. Ensure the camera is properly installed and connected to the camera input.
Maintenance
- Cleaning the Screen: Use a soft, lint-free cloth slightly dampened with water or a screen cleaner specifically designed for electronics. Do not use abrasive cleaners or solvents.
- Software Updates: Periodically check the manufacturer's website or contact support for available software updates to ensure optimal performance and access to new features.
- General Care: Avoid exposing the unit to extreme temperatures, direct sunlight for prolonged periods, or excessive moisture. Do not attempt to disassemble the unit.
Troubleshooting
If you encounter issues with your ELECTROPRIME A2769, refer to the following common problems and solutions:
| Problem | Possible Cause | Solution |
|---|---|---|
| Unit does not power on. | Loose power connection, blown fuse, vehicle battery issue. | Check power cable connections. Inspect vehicle's fuse box for blown fuses. Ensure vehicle battery is charged. |
| No sound. | Volume too low, mute enabled, loose speaker wires, incorrect audio source. | Increase volume. Check if unit is muted. Verify speaker wire connections. Select correct audio source (Radio, USB, BT Music). |
| GPS signal weak or no signal. | GPS antenna not properly connected or obstructed. | Ensure GPS antenna is securely connected and placed in a location with a clear view of the sky (e.g., dashboard, windshield). |
| Bluetooth connection issues. | Device not in pairing mode, incorrect PIN, interference. | Ensure both devices are in pairing mode. Re-enter PIN. Move closer to the unit. Try unpairing and re-pairing. |
| Rear camera not displaying. | Camera not connected, reverse trigger wire not connected, faulty camera. | Check camera input cable connection. Verify reverse trigger wire is correctly connected to vehicle's reverse light circuit. Test camera if possible. |
If the problem persists after trying these solutions, please contact a qualified service technician or ELECTROPRIME customer support.
Specifications
| Feature | Detail |
|---|---|
| Model | A2769 |
| Brand | ELECTROPRIME |
| Screen Size | 7 Inch |
| Operating System | Android |
| Memory (RAM + ROM) | 2GB RAM + 16GB Storage |
| Connectivity | WiFi, Bluetooth, USB |
| Navigation | Built-in GPS |
| Included Camera | Rear Camera (Standard+12Lights Camera spec) |
| Item Part Number | TBD0603340703 |
| Package Weight | 1.10 kgs / 2.43 lb |
| Package Size | 22cm x 14cm x 12cm / 8.66inch x 5.51inch x 4.72inch |
Warranty and Support
Specific warranty details for the ELECTROPRIME A2769 are not provided in this document. Please refer to the warranty card included with your product or visit the official ELECTROPRIME website for comprehensive warranty information and terms and conditions.
For technical support, troubleshooting assistance beyond this manual, or service inquiries, please contact ELECTROPRIME customer support through their official channels. Contact information can typically be found on the product packaging, the official website, or the purchase receipt.