1. Product Overview
The Wishiot ESP32 Lora V3 Development Board Kit is a versatile module designed for IoT applications, integrating WiFi, Bluetooth Low Energy (BLE), and LoRa connectivity. It features an ESP32-S3FN8 microprocessor, a SX1262 LoRa chip, and a 0.96-inch OLED display for real-time information. This kit is compatible with the Arduino development environment, simplifying programming and debugging.
The board includes comprehensive protection measures such as voltage regulation, ESD protection, short-circuit protection, and RF shielding to ensure reliable operation.

Image 1.1: The Wishiot ESP32 Lora V3 Development Board Kit.
2. What's in the Box
The Wishiot ESP32 Lora V3 Development Board Kit includes the following components:
- ESP32 Lora V3 development board
- 915MHz U.FL to SMA Connector Antenna
- JST 1.25mm-2P Connector
- 2.54 pin headers (no welding required)

Image 2.1: Contents of the Wishiot ESP32 Lora V3 Development Board Kit, including the main board, antenna, and connectors.
3. Key Features
- Powerful Processing: Equipped with ESP32-S3FN8 microprocessor with dual-core Xtensa LX7 architecture running at up to 240 MHz.
- Versatile Connectivity: Seamlessly integrates WiFi, LoRa, and Bluetooth Low Energy (BLE) connectivity.
- Enhanced User Experience: Features a 0.96-inch OLED display for easy commissioning and real-time information display.
- Reliable Protection: Includes comprehensive protection measures such as voltage regulation, ESD protection, short-circuit protection, and RF shielding.
- Simplified Development: Compatible with the Arduino development environment and equipped with a CP2102 USB-to-serial chip for convenient program download and debugging.
4. Setup Instructions
Follow these steps to set up your ESP32 Lora V3 Development Board:
- Connect the LoRa Antenna: Carefully connect the 915MHz U.FL to SMA Connector Antenna to the LoRa antenna port on the development board. Ensure a secure connection.
- Connect Power: Use a USB Type-C cable to connect the development board to a power source (e.g., computer USB port, USB power adapter). The board will power on, and the OLED display will initialize.
- Install Drivers (if necessary): The CP2102 USB-to-serial chip typically allows for automatic driver installation on Windows 7 or above, and is supported by Arduino development environments. If issues arise, refer to the CP2102 driver documentation.
- Prepare Development Environment: Install the Arduino IDE and necessary ESP32 board support packages and LoRa libraries to begin programming.

Image 4.1: Detailed view of the 915MHz 2dBi antenna and its U.FL to SMA connector.

Image 4.2: Labeled diagram showing the LoRa antenna port, Type-C port, and other components.
Video 4.1: Demonstration of connecting the 915MHz antenna and USB Type-C power to the Wishiot ESP32 Lora V3 Development Board.
5. Operating Instructions
Once the board is set up and powered, you can begin programming and interacting with it. The 0.96-inch OLED display provides immediate feedback on the board's status and data.
- Programming: Connect the board to your computer via the USB Type-C port. Open your Arduino IDE, select the correct board and port, and upload your sketch. The CP2102 chip facilitates this process.
- OLED Display Interaction: Your code can utilize the OLED display to show sensor readings, network status (WiFi/LoRa), messages, or debugging information.
- Button Usage: The board includes a reset button and a programming/user button. The programming button can be used for entering bootloader mode or as a general-purpose input in your applications.
- LoRa Communication: Implement LoRa communication in your code to send and receive data over long distances. The 915MHz antenna is crucial for this functionality.
- WiFi/BLE Connectivity: Utilize the ESP32's built-in WiFi and BLE capabilities for local network communication or short-range device interaction.
Video 5.1: A demonstration of the Wishiot ESP32 Lora V3 in operation, showing data transmission and reception on the OLED display.

Image 5.1: Screenshot illustrating the Arduino development environment with LoRa library examples, demonstrating ease of programming.
6. Specifications
Detailed technical specifications for the Wishiot ESP32 Lora V3 Development Board Kit:
| Feature | Parameter |
|---|---|
| Master Chip | ESP32-S3FN8 (Xtensa 32-bit LX7 dual-core processor) |
| LoRa Chip | SX1262 |
| Max. TX Power | 20dB - 22dBm |
| Max. RX Sensitivity | -139dBm |
| Hardware Resources | 7*ADC1+2*ADC2, 7*Touch, 3*UART, 2*I2C, 2*SPI, etc. |
| Memory | 384KB ROM, 512KB SRAM, 16KB RTC SRAM, 8MB Flash |
| Interface | Type-C USB, 2*1.25 Lithium battery port, LoRa ANT(IPEX1.0), 2*2.54mm Header Pin*18 |
| USB to Serial Chip | CP2102 |
| Battery (Not included) | 3.7V Lithium (1.25mm X 2 socket) battery power supply and charging |
| Display Size | 0.96 inch OLED |
| CPU Speed | 240 MHz |
| RAM Memory Installed Size | 512 KB |
| Memory Storage Capacity | 8 MB |
| Connectivity Technology | USB, Wi-Fi |
| Operating System | Linux |
| Processor Count | 2 |
| Total USB Ports | 1 |
| Item Dimensions L x W x H | 19.76"L x 1"W x 0.4"H (approx. 50.2mm x 25.5mm x 10.2mm) |

Image 6.1: Manufacturer's detailed specifications table for the WiFi LoRa 32 V3.
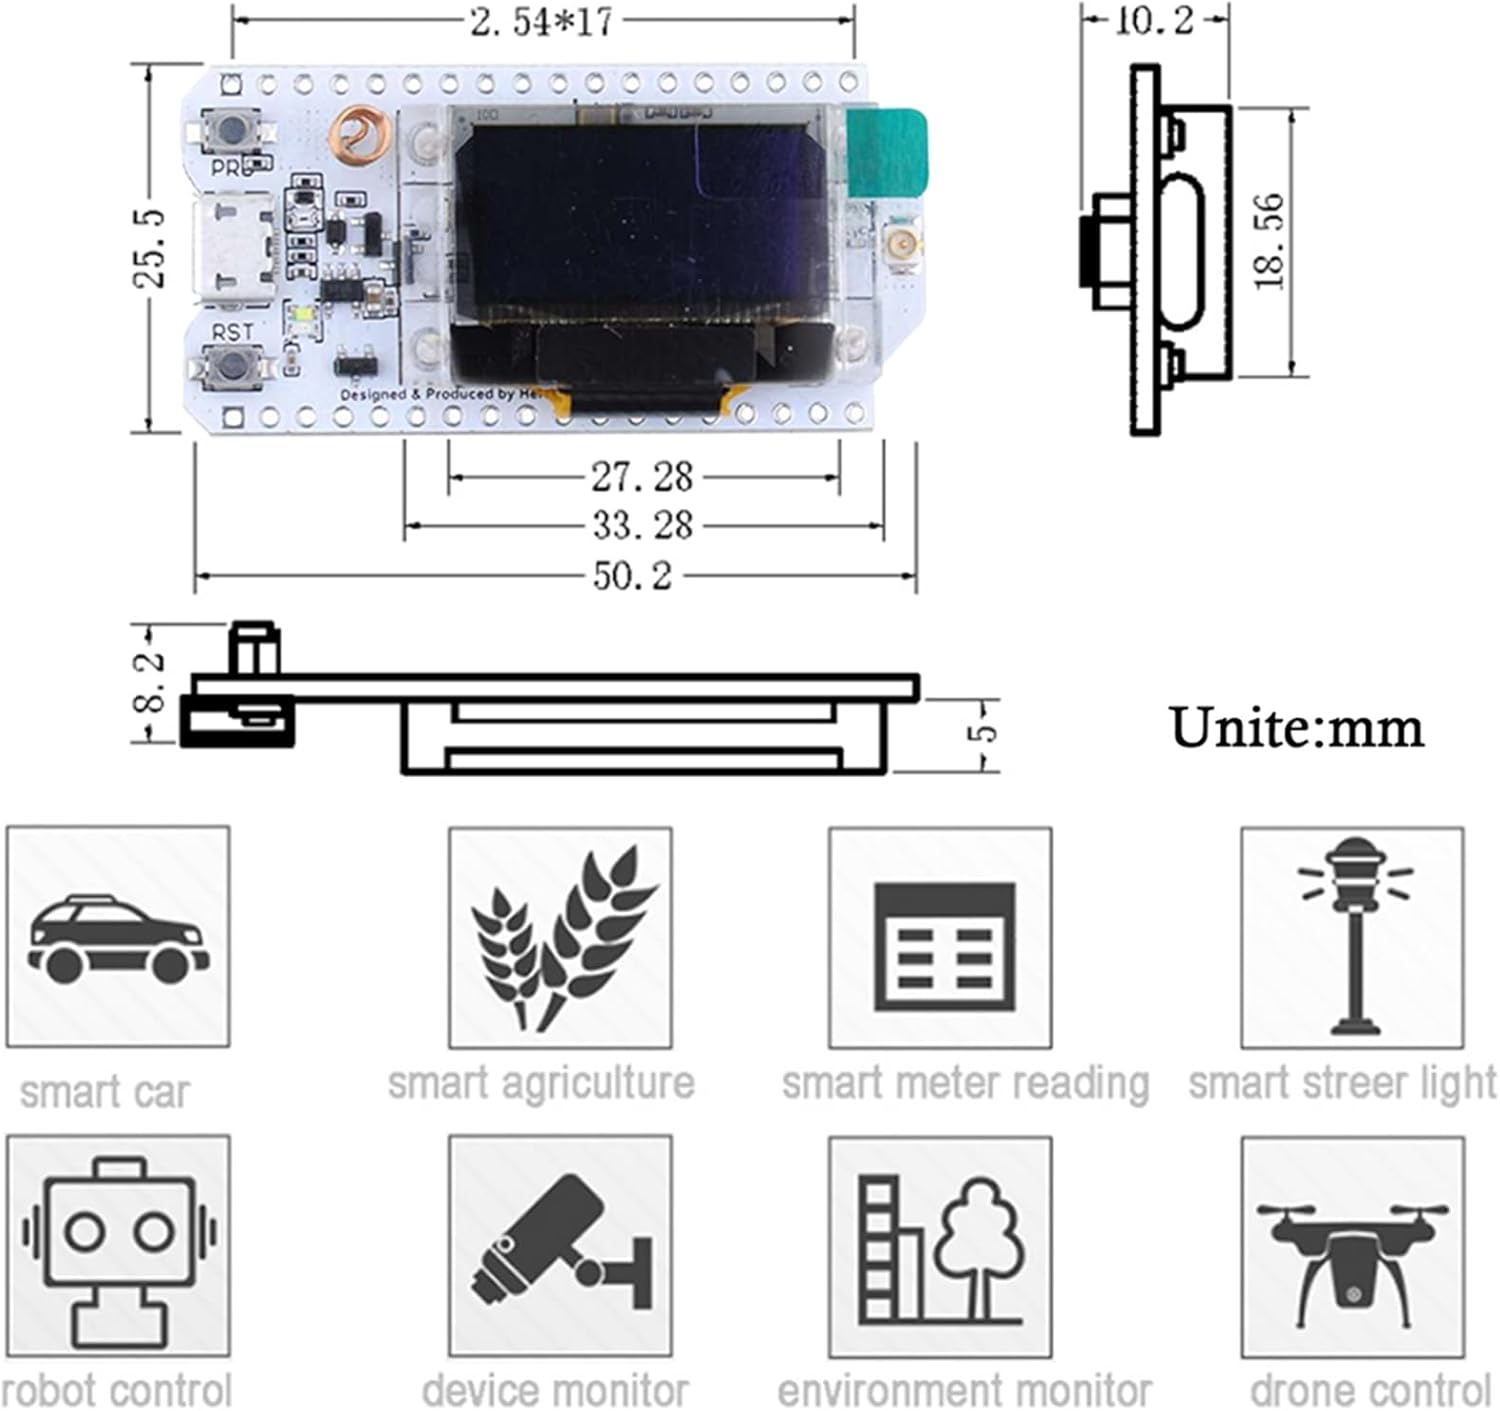
Image 6.2: Dimensional drawing of the ESP32 Lora V3 development board in millimeters.
7. Troubleshooting
- Board Not Powering On:
- Ensure the USB Type-C cable is securely connected to both the board and a functional power source.
- Try a different USB cable or power adapter.
- Check for any visible damage to the board or USB port.
- OLED Display Not Working:
- Verify that your code correctly initializes and writes to the OLED display.
- Ensure the display is properly seated if it's a separate component (though typically integrated).
- Upload Errors in Arduino IDE:
- Confirm the correct board (e.g., ESP32 Dev Module) and COM port are selected in the Arduino IDE.
- Press and hold the 'BOOT' or 'PRG' button (if available) while uploading, then release after upload starts.
- Install or update the CP2102 USB-to-serial driver.
- LoRa Communication Issues:
- Ensure the 915MHz antenna is securely connected to the LoRa antenna port.
- Verify that both transmitting and receiving devices are configured for the same frequency and LoRa parameters (spreading factor, bandwidth, coding rate).
- Check the range and environmental factors that might interfere with LoRa signals.
- WiFi/BLE Connection Problems:
- Double-check SSID and password for WiFi connections.
- Ensure the device is within range of the WiFi access point or BLE peer.
- Verify that the WiFi antenna (the coiled copper wire on the board) is not obstructed.
8. Maintenance
To ensure the longevity and optimal performance of your ESP32 Lora V3 Development Board, consider the following maintenance guidelines:
- Handle with Care: Avoid dropping the board or subjecting it to excessive physical stress.
- Static Discharge: Always handle the board in an ESD-safe environment to prevent damage from static electricity.
- Cleanliness: Keep the board free from dust, dirt, and moisture. Use a soft, dry brush or compressed air for cleaning. Avoid using liquids.
- Storage: Store the board in a dry, cool environment, preferably in its original packaging or an anti-static bag, when not in use.
- Power Supply: Use only appropriate power supplies (5V via USB Type-C or 3.7V via JST connector) to prevent damage.
9. Warranty and Support
This product is manufactured by Wishiot. For specific warranty information, please refer to the seller's return policy or contact Wishiot directly. General return policy allows for returns within 30 days of purchase.
For technical support, programming guides, or community forums, please refer to the official documentation for ESP32-S3 and LoRa development, or visit the Wishiot store page for additional resources.
Manufacturer: Wishiot
Model Number: FZ2886S+FZ3681-DIY
ASIN: B0D2DBRR6T