
1. Introduction
This manual provides essential information for the safe and efficient installation, operation, and maintenance of the Winsmith Speed Reducer, Model 920Mdt. This unit is designed for industrial power transmission applications, reducing input speed to a desired output speed while increasing torque.
Please read this manual thoroughly before attempting to install or operate the speed reducer. Retain this manual for future reference.
2. Safety Information
Always observe standard industrial safety practices when working with power transmission equipment. Failure to follow safety instructions can result in serious injury or equipment damage.
- Ensure all power sources are disconnected and locked out before installation, maintenance, or inspection.
- Wear appropriate personal protective equipment (PPE), including safety glasses, gloves, and protective footwear.
- Do not operate the speed reducer if guards are removed or damaged.
- Verify proper lubrication levels before initial operation and during routine maintenance.
- Avoid contact with moving parts during operation.
3. Product Overview
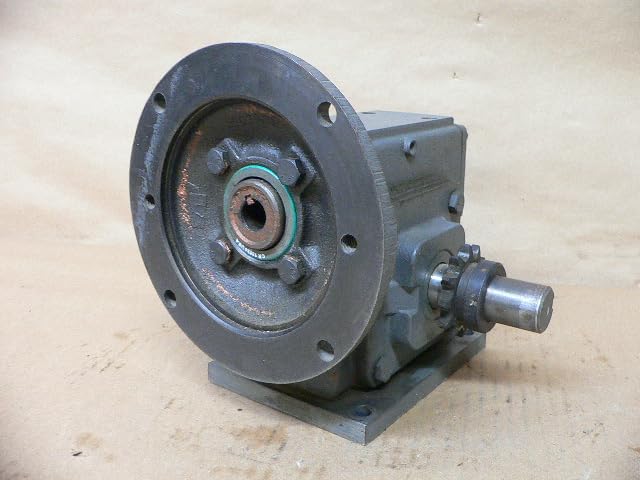
Figure 1: Winsmith Speed Reducer Model 920Mdt. This image shows the overall view of the speed reducer unit, highlighting its robust construction and input/output shafts.
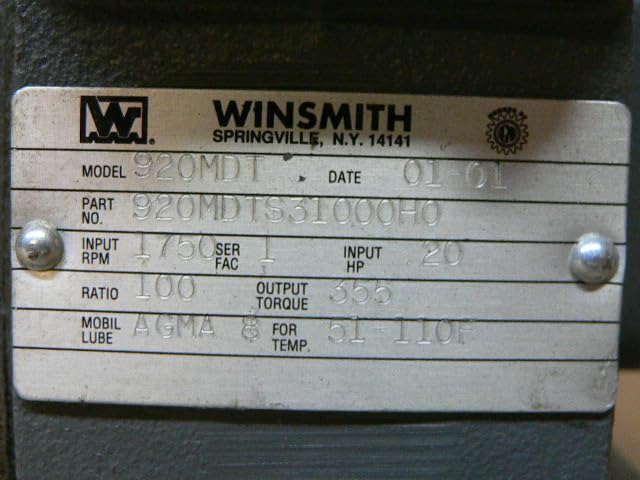
Figure 2: Winsmith Speed Reducer Nameplate. This image displays the product's identification plate, detailing the model number (920MDT), part number (920MDTS31000H0), input RPM (1750), service factor (1), input HP (20), ratio (100), output torque (355), Mobil Lube (AGMA 8), and operating temperature range (51-110F).
The Winsmith Model 920Mdt is a robust speed reducer designed for demanding industrial applications. It features a durable housing and precision-engineered gears to ensure reliable performance and longevity. Key specifications are detailed on the product nameplate (Figure 2).
4. Setup and Installation
- Mounting: Securely mount the speed reducer to a rigid, level foundation capable of supporting its weight and operational forces. Use appropriate fasteners and ensure proper alignment with the motor and driven equipment.
- Alignment: Precision alignment of the input and output shafts with the motor and driven equipment is critical to prevent premature wear and failure. Use a dial indicator or laser alignment tool for best results.
- Lubrication: Verify that the speed reducer is filled with the correct type and amount of lubricant as specified on the nameplate (AGMA 8). Check the oil level indicator, if present, and add lubricant if necessary.
- Guarding: Install all necessary safety guards around rotating shafts and couplings before operation.
- Electrical Connections: Ensure the motor driving the speed reducer is correctly wired and grounded according to local electrical codes and manufacturer instructions.
5. Operating Instructions
Before starting, perform a final check of all connections, mounting, and lubrication levels.
- Initial Start-up: Start the motor and allow the speed reducer to run for a short period (e.g., 15-30 minutes) without load. Monitor for unusual noises, vibrations, or excessive heat.
- Load Application: Gradually apply the load to the driven equipment. Continue to monitor the speed reducer's performance.
- Normal Operation: During normal operation, periodically check for signs of overheating, leaks, or unusual sounds. The operating temperature range is specified as 51-110°F (10.5-43.3°C) on the nameplate.
- Shut Down: To shut down, disconnect power to the motor and allow the system to come to a complete stop.
6. Maintenance
Regular maintenance is crucial for extending the lifespan and ensuring the reliable operation of your Winsmith Speed Reducer.
- Lubrication Checks: Check lubricant levels weekly or monthly, depending on operating conditions. Maintain the specified oil level.
- Lubricant Replacement: Replace lubricant annually or every 2500 operating hours, whichever comes first. Use AGMA 8 lubricant as specified.
- Visual Inspection: Periodically inspect the housing for cracks, leaks, or damage. Check shafts for signs of wear or corrosion.
- Fastener Torque: Verify that all mounting bolts and fasteners are securely tightened.
- Cleaning: Keep the exterior of the speed reducer clean to facilitate heat dissipation and inspection.
7. Troubleshooting
| Problem | Possible Cause | Solution |
|---|---|---|
| Excessive Noise | Low lubricant level, worn bearings, misalignment, loose mounting bolts. | Check/add lubricant, inspect/replace bearings, check alignment, tighten bolts. |
| Overheating | Insufficient lubricant, incorrect lubricant type, excessive load, poor ventilation. | Check/add correct lubricant, reduce load, ensure proper airflow. |
| Oil Leakage | Damaged seals, loose fasteners, excessive internal pressure. | Inspect/replace seals, tighten fasteners, check breather (if applicable). |
| Vibration | Misalignment, unbalanced load, worn components, loose mounting. | Check alignment, balance load, inspect/replace worn parts, tighten mounting. |
If troubleshooting steps do not resolve the issue, contact a qualified technician or the manufacturer for assistance.
8. Specifications
| Attribute | Value |
|---|---|
| Model | 920Mdt |
| Part Number | 920Mdts31000h0 |
| Input RPM | 1750 |
| Service Factor | 1 |
| Input HP | 20 |
| Ratio | 100 |
| Output Torque | 355 |
| Lubricant Type | AGMA 8 |
| Operating Temperature | 51-110°F (10.5-43.3°C) |
| Product Dimensions | 7.48 x 7.87 x 8.27 inches |
| Item Weight | 33 pounds |
| Manufacturer | Winsmith |
9. Warranty and Support
This Winsmith Speed Reducer is listed as a used item. Therefore, standard manufacturer warranties may not apply. Please refer to the seller's terms and conditions at the time of purchase for any applicable warranty or return policies.
For technical support or inquiries regarding this specific unit, it is recommended to contact the original manufacturer, Winsmith, or a certified industrial equipment service provider, referencing the model and part numbers provided in this manual.