Introduction
This manual provides essential information for the proper installation, operation, and maintenance of the Vivotek AM-71G Outdoor Conduit Box. Please read this manual thoroughly before installation to ensure correct usage and to prevent damage to the product or associated equipment. Retain this manual for future reference.
Product Overview
The Vivotek AM-71G is an outdoor conduit box designed to provide a secure and weather-resistant enclosure for cable connections and mounting of compatible Vivotek surveillance cameras. Constructed from durable aluminum alloy and finished in white, it offers IP66 and IP67 environmental ratings, ensuring protection against dust and water ingress.
Key Features:
- Durable aluminum alloy construction.
- White finish for aesthetic integration.
- 3/4" pipe thread for standard conduit connections.
- IP66 and IP67 rated for outdoor use, providing protection against dust and powerful water jets, and temporary immersion.
- Compatible with a range of Vivotek surveillance cameras.
What's in the Box:
- Vivotek AM-71G Outdoor Conduit Box (1 unit)
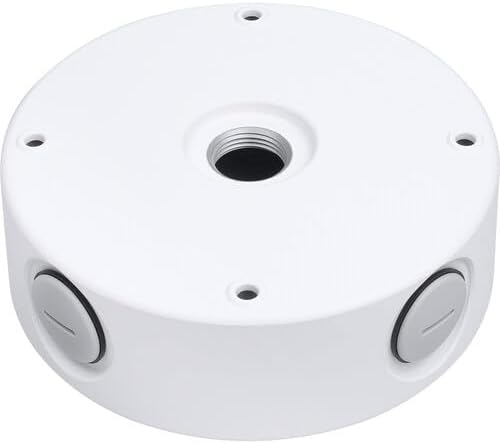
This image displays the Vivotek AM-71G Outdoor Conduit Box. It is a circular, white aluminum alloy box with a central threaded opening for conduit connection and multiple sealed ports around its circumference for cable entry. The design is robust, suitable for outdoor surveillance camera installations.
Safety Information
Always observe the following safety precautions during installation and maintenance:
- Installation should be performed by qualified personnel only and in accordance with all local electrical codes and regulations.
- Ensure all power is disconnected before performing any installation or maintenance procedures.
- Do not modify the product in any way. Unauthorized modifications may void the warranty and pose safety risks.
- Use only approved tools and accessories for installation.
- Verify that the mounting surface can support the combined weight of the conduit box and the camera.
- Ensure all connections are properly sealed to maintain the IP66/IP67 rating.
Setup and Installation
The AM-71G conduit box is designed for outdoor use and provides a secure mounting point and cable management solution for compatible Vivotek cameras. Follow these steps for proper installation:
Tools and Materials Required:
- Drill and appropriate drill bits
- Screwdriver
- Mounting screws and anchors (suitable for your mounting surface)
- Conduit and fittings (3/4" NPT compatible)
- Sealant (if required for additional weatherproofing)
Installation Steps:
- Select Mounting Location: Choose a sturdy, flat surface capable of supporting the conduit box and the camera. Ensure the location provides optimal camera coverage and allows for easy conduit routing.
- Mark Drilling Points: Use the conduit box as a template to mark the drilling points for mounting screws. Ensure the marks are level and accurately spaced.
- Drill Holes: Drill pilot holes at the marked points, appropriate for your chosen mounting screws and anchors.
- Mount the Conduit Box: Secure the AM-71G conduit box to the mounting surface using appropriate screws and anchors. Ensure it is firmly attached and stable.
- Connect Conduit: Route your 3/4" NPT conduit into the central threaded opening of the conduit box. Ensure a tight and secure connection to maintain environmental integrity.
- Route Cables: Pass necessary camera cables through the conduit and into the conduit box. Utilize the side ports with their sealed grommets for additional cable entry if needed, ensuring proper sealing after cable insertion.
- Mount Camera: Attach the compatible Vivotek camera to the conduit box according to the camera's specific installation instructions. Ensure all camera mounting screws are tightened securely.
- Final Sealing: Verify that all openings, including unused side ports and the conduit connection, are properly sealed to maintain the IP66/IP67 rating.
Compatible Vivotek Cameras:
- FD9167-HT-v2
- FD9367-EHTV-v2
- IB9367-EHT-v2
- IB9367-EHT-v2 (5-50mm)
- FD9365-EHTV-v2
- FD9187-HT-V3
- FD9387-EHTV-V3
- FD9391-EHTV-v2
- IB9365-EHTV-v2
- IB9387-EHTV-V3
- IB9391-EHTV-v2
Maintenance
The Vivotek AM-71G Outdoor Conduit Box requires minimal maintenance. Regular inspections are recommended to ensure its continued performance and integrity.
- Periodic Inspection: Annually inspect the conduit box for any signs of physical damage, corrosion, or wear. Check the integrity of all seals and connections.
- Cleaning: If necessary, clean the exterior of the conduit box with a soft, damp cloth. Do not use harsh chemicals or abrasive cleaners, as these may damage the finish or seals.
- Seal Integrity: Ensure that all cable entry points and the conduit connection remain tightly sealed to prevent water and dust ingress. Replace any damaged grommets or seals immediately.
Troubleshooting
This section addresses common issues that may arise with the Vivotek AM-71G Outdoor Conduit Box. As the conduit box is a passive component, most issues relate to installation integrity.
| Problem | Possible Cause | Solution |
|---|---|---|
| Water or dust ingress inside the box. | Improperly sealed conduit connection or cable entry points. Damaged seals or grommets. | Inspect all connections and seals. Re-tighten conduit fittings. Ensure cable grommets are properly seated. Replace any damaged seals or grommets. Apply additional weather-grade sealant if necessary. |
| Conduit box feels loose after installation. | Mounting screws are not tight enough or anchors are insufficient for the mounting surface. | Re-tighten all mounting screws. If the issue persists, consider using stronger anchors or relocating to a more secure mounting surface. |
| Camera does not mount correctly to the box. | Incompatible camera model or incorrect mounting procedure. | Verify that your camera model is listed as compatible with the AM-71G. Refer to the camera's instruction manual for specific mounting steps. |
Specifications
| Attribute | Value |
|---|---|
| Model Number | AM-71G |
| Material | Aluminum Alloy |
| Color | White |
| Pipe Thread | 3/4" NPT |
| Environmental Rating | IP66, IP67 |
| Product Dimensions | 6.77 x 6.77 x 2.12 inches (17.2 x 17.2 x 5.4 cm) |
| Item Weight | 2.54 pounds (1.15 kg) |
| Manufacturer | Vivotek |
Warranty and Support
For warranty information and technical support regarding your Vivotek AM-71G Outdoor Conduit Box, please refer to the official Vivotek website or contact their customer service directly. Keep your purchase receipt as proof of purchase for warranty claims.
Note: As this product is listed under a "Generic" brand on some platforms, please refer to the manufacturer "Vivotek" for official support and warranty details.