1. Introduction
Thank you for choosing the ZEYUMEE Wireless Switch Pro Controller. This controller is designed for use with Nintendo Switch, Switch Lite, and Switch OLED consoles, offering an enhanced gaming experience with features such as wake-up function, Turbo, 6-axis Gyro, and programmable back buttons. Please read this manual carefully before use to ensure proper operation and maintenance.

Image 1.1: Front view of the ZEYUMEE Wireless Switch Pro Controller, showcasing its ergonomic design and button layout.
2. Package Contents
- 1 x ZEYUMEE Wireless Switch Pro Controller
- 1 x USB-C Charging Cable
- 1 x User Manual
3. Product Overview
Familiarize yourself with the buttons and components of your controller.

Image 3.1: Detailed diagram illustrating the various buttons and ports on the ZEYUMEE Wireless Switch Pro Controller, including joysticks, D-pad, action buttons (X, Y, A, B), shoulder buttons (L, R, L1, R1, L2, R2), Capture, Minus, Plus, Home, Turbo, 4 LED lights, Type-C port, and Connect Key.
Button Functions:
- Left Joystick: Directional control.
- Right Joystick: Camera or aiming control.
- D-pad: Directional input, typically for menu navigation or specific game actions.
- X/Y/A/B Buttons: Standard action buttons.
- L/R Buttons: Shoulder buttons.
- L1/R1 Buttons: Top trigger buttons.
- L2/R2 Buttons: Bottom trigger buttons.
- Capture Button: Takes screenshots.
- Minus (-) Button: Select or back button.
- Plus (+) Button: Start or menu button.
- Home Button: Returns to the console's home screen, also used for wake-up.
- Turbo Button (T): Activates or deactivates turbo function for other buttons.
- 4 LED Lights: Indicate player number, connection status, and charging status.
- Type-C Port: For charging the controller.
- Connect Key: Used for initial pairing with the console.
- M1/M2 Buttons: Programmable back buttons for macro functions.
4. Specifications
| Feature | Description |
|---|---|
| Connectivity | Wireless Bluetooth |
| Battery Capacity | 600 mAh |
| Charging Time | Approx. 2-3 hours |
| Usage Time | Approx. 8-10 hours |
| Wireless Range | Up to 10 meters (33 feet) |
| Sensors | 6-axis Gyroscope |
| Vibration | HD Vibration (adjustable) |
| Programmable Buttons | M1, M2 (back buttons) |
| Weight | 9.6 ounces (approx. 272g) |
| Dimensions | 6.73 x 4.57 x 2.76 inches (Package Dimensions) |
5. Setup
5.1 Connecting to Nintendo Switch/Switch Lite/Switch OLED
Initial Pairing:
- On your Nintendo Switch console, go to the HOME Menu.
- Select "Controllers" > "Change Grip/Order".
- On the ZEYUMEE controller, press and hold the "Connect Key" (small button next to the Type-C port) for 3-5 seconds until the 4 LED lights start flashing rapidly.
- The console will detect the controller. Once paired, the corresponding player LED(s) on the controller will light up solid.
Reconnection:
After initial pairing, simply press the "Home Button" on the controller to wake it up. The controller will automatically attempt to reconnect to the last paired console. Ensure the console is awake or in sleep mode for the wake-up function to work.

Image 5.1: Illustration showing the controller wirelessly connected to a console, highlighting the wake-up feature by pressing the Home button.
5.2 Charging the Controller
Connect the supplied USB-C charging cable to the Type-C port on the controller and the other end to a USB power source (e.g., console dock, USB wall adapter, computer USB port). The LED indicators will show charging status. Once fully charged, the LEDs will turn off or change color depending on the model.

Image 5.2: Visual representation of the controller's 600mAh high-capacity battery, indicating 2-3 hours charging time for 8-10 hours of usage.
6. Operating Instructions
6.1 Turbo Function
The Turbo function allows a button to be pressed repeatedly as long as you hold it down, or to continuously fire without holding the button.
- Setting Turbo: Press and hold the "Turbo (T)" button, then press the button you wish to set Turbo for (e.g., A, B, X, Y, L1, R1, L2, R2, M1, M2). Release both buttons. The button now has Turbo enabled.
- Adjusting Turbo Speed: (If supported) While holding the Turbo button, move the Right Joystick Up or Down to cycle through different Turbo speeds (e.g., slow, medium, fast).
- Clearing Turbo: Press and hold the "Turbo (T)" button, then press the button with Turbo enabled again. Release both. Alternatively, to clear all Turbo settings, press and hold the "Turbo (T)" button for 5 seconds.

Image 6.1: Visual explanation of Gyroscope Sensor, TURBO Continuous Fire Function, and Macro Programming Function.
6.2 6-Axis Gyroscope Sensor
The controller features a built-in 6-axis gyroscope chip that recognizes directional changes, allowing for precise motion control in compatible games. This enhances aiming, steering, and overall immersion.
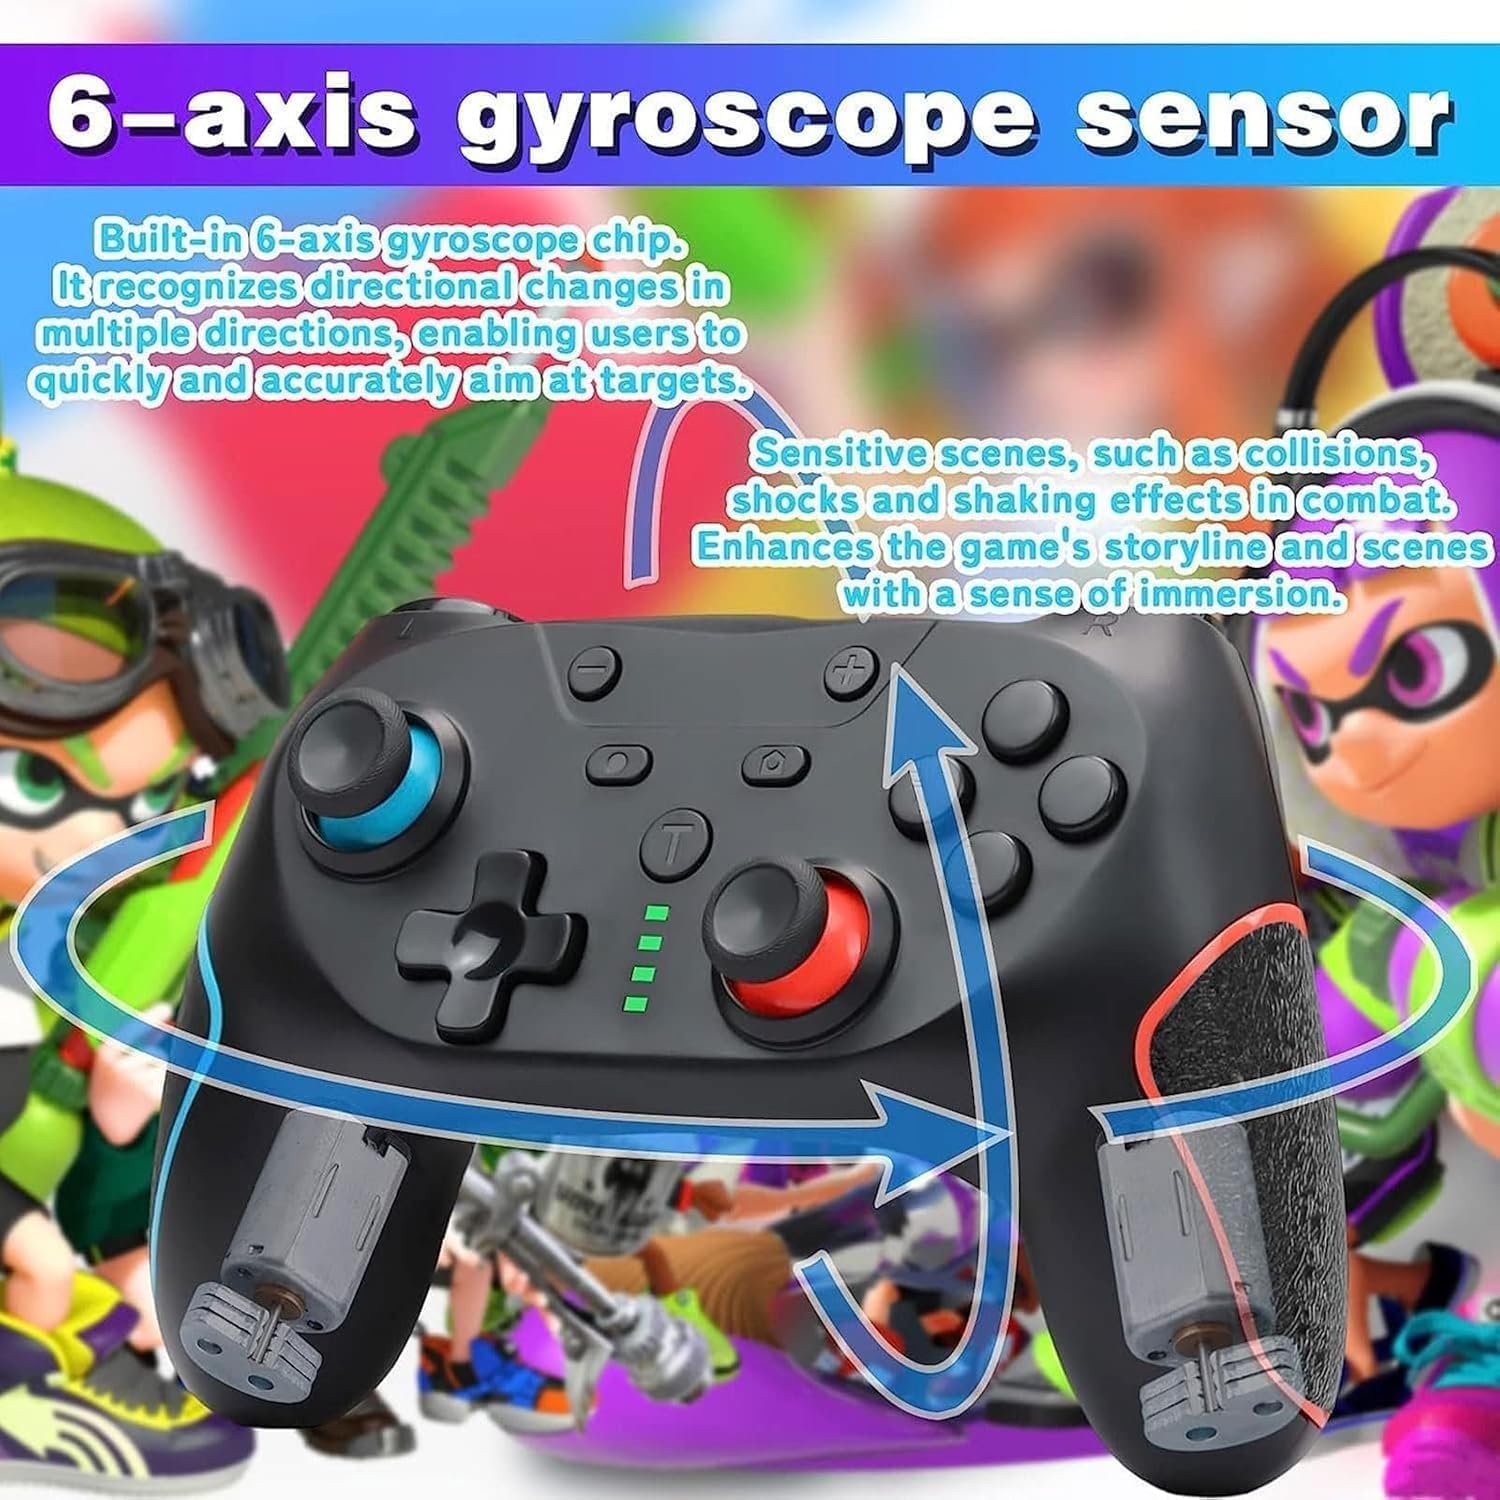
Image 6.2: Diagram illustrating the 6-axis gyroscope sensor's ability to detect directional changes and enhance aiming and immersion in games.
6.3 Programmable Back Buttons (M1/M2)
The M1 and M2 back buttons can be programmed to perform single button presses or complex sequences (macros) of other buttons.
- Programming a Macro:
- Press the "Programming Switch" (often a small button near M1/M2 or a combination like M1/M2 + T) to enter programming mode. The indicator light may flash.
- Press the M1 or M2 button you wish to program.
- Input the sequence of buttons you want to record (e.g., A, B, X, Y, L1, R1, D-pad directions).
- Press the "Programming Switch" again to save and exit programming mode. The indicator light will stop flashing.
- Using a Macro: Simply press the programmed M1 or M2 button to execute the recorded sequence.
- Clearing a Macro: Enter programming mode, then press the M1 or M2 button you want to clear, and then exit programming mode without inputting any sequence. Refer to the specific instructions for your controller model if this method does not work.

Image 6.3: Diagram showing the M1 and M2 back buttons and their use for editing programs and implementing various game combinations.
6.4 HD Vibration Adjustment
The controller supports HD vibration with adjustable intensity levels to provide realistic feedback during gameplay.
- Adjusting Vibration: While the controller is connected, press and hold the "Turbo (T)" button and move the Left Joystick Up or Down to cycle through different vibration intensities (e.g., 0%, 30%, 70%, 100%). Release the Turbo button to set the desired level.

Image 6.4: Visual representation of the four HD vibration intensity levels: 0%, Weak (30%), Moderate (70%), and Strong (100%).
7. Maintenance
- Cleaning: Use a soft, dry cloth to clean the controller. For stubborn dirt, slightly dampen the cloth with water or a mild cleaning solution. Do not use harsh chemicals or abrasive materials.
- Storage: Store the controller in a cool, dry place away from direct sunlight, extreme temperatures, and humidity.
- Battery Care: To prolong battery life, avoid fully discharging the controller frequently. If storing for an extended period, charge the controller to about 50% every few months.
- Avoid Drops: Protect the controller from drops and impacts, which can damage internal components.
8. Troubleshooting
8.1 Controller Does Not Connect/Pair
- Ensure the controller is charged.
- Make sure the console is updated to the latest system software.
- Verify you are following the correct pairing steps (Section 5.1).
- Try restarting both the controller (by holding the Home button for 10 seconds) and the console.
- If multiple controllers are paired, try disconnecting others or resetting Bluetooth connections on the console.
8.2 Buttons/Joysticks Are Unresponsive
- Ensure the controller is properly connected and charged.
- Test the controller in a different game or menu to rule out game-specific issues.
- Reset the controller by inserting a pin into the small reset hole (if present, usually near the Type-C port) or by holding the Home button for 10 seconds.
- Clean around the buttons/joysticks to remove any debris.
8.3 Controller Does Not Charge
- Ensure the USB-C cable is securely connected to both the controller and the power source.
- Try a different USB-C cable and/or a different USB power source.
- Verify the power source is providing sufficient power (e.g., a wall adapter is generally better than a computer USB port for faster charging).
9. Warranty and Support
This product comes with a standard manufacturer's warranty. For specific warranty terms, please refer to the documentation included with your purchase or contact the retailer. If you encounter any issues not covered in this manual or require further assistance, please contact ZEYUMEE customer support through the platform where you purchased the product.