Y&H MPPT-60A
Y&H MPPT Solar Charge Controller User Manual
Model: MPPT-60A
1. Introduction
This manual provides detailed instructions for the installation, operation, and maintenance of the Y&H MPPT Solar Charge Controller, Model MPPT-60A. This device is designed to efficiently manage power flow from your solar panels to your battery bank, ensuring optimal charging and system protection. It is compatible with 12V, 24V, 36V, and 48V battery systems and supports various battery types including sealed lead-acid, gel, flooded, and lithium batteries.

Figure 1: Y&H MPPT 60A Solar Charge Controller (Front View)
This image shows the Y&H MPPT 60A Solar Charge Controller, featuring an orange and clear casing, a digital display, and control buttons. The USB ports are visible on the front panel.
2. Key Features
- 100% MPPT Technology: Utilizes Maximum Power Point Tracking to maximize power harvest from solar panels.
- High Efficiency: Achieves up to 98% tracking efficiency and 99% peak conversion efficiency.
- Automatic Voltage Detection: Automatically switches for 12V, 24V, 36V, and 48V battery systems.
- Advanced Charging: Features a 4-stage charging algorithm (Bulk Charge, Constant Charging, Float Charge, Equalize Boost) to optimize battery performance and prolong battery life.
- Versatile Battery Compatibility: Suitable for sealed lead-acid, gel, flooded, and lithium battery types.
- Built-in DSP Controller: High-performance Digital Signal Processor for reliable operation.
- Comprehensive Protections: Includes PV over current, PV short circuit, PV reverse polarity, battery over-voltage, battery over-discharge, load over current, load short circuit, and over-temperature protection.
- User-Friendly Interface: Simple installation and easy configuration with a clear display.
- Troubleshooting Function: Integrated features to assist in diagnosing system issues.
- High PV Input: Supports a maximum PV input voltage of 150VDC.
- High Solar Power Input: Capable of handling up to 2880W of solar input power for the 60A model.

Figure 2: Overview of Y&H MPPT Solar Charge Controller Key Features
This image highlights the main features of the Y&H MPPT Solar Charge Controller, including 100% MPPT technology, auto-switching for various battery voltages, 3-stage charging (note: manual states 4-stage), built-in DSP controller, troubleshooting function, and compatibility with multiple battery types.
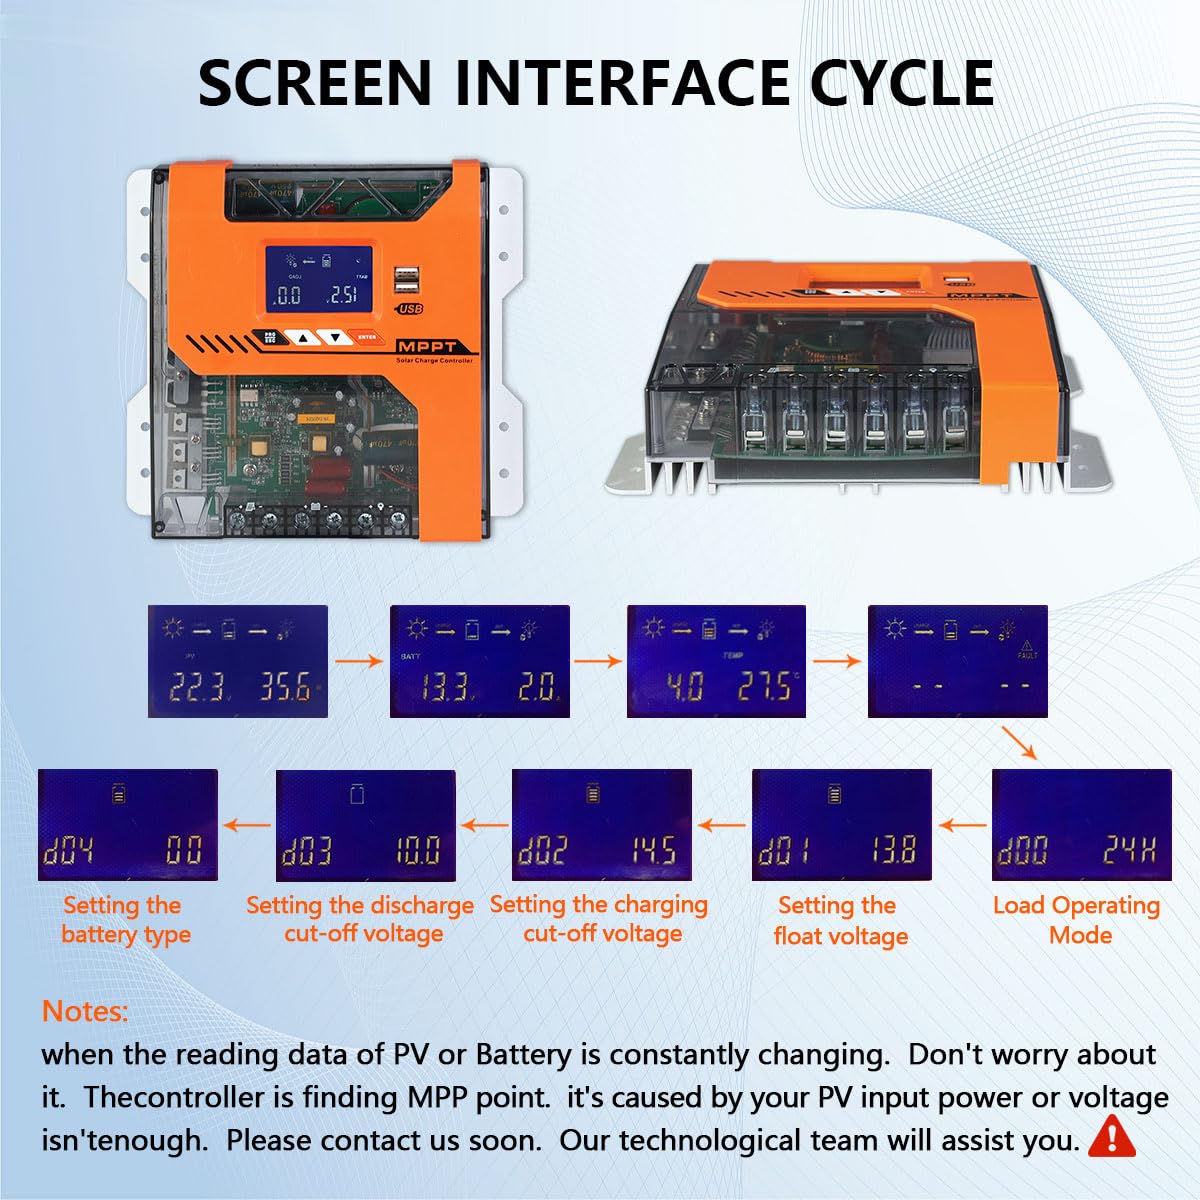
Figure 3: Eight All-Around Protections
This image illustrates the eight protective features of the controller: PV over current, PV short circuit, PV reverse polarity, battery over voltage, battery over discharge, load over current protection, load short circuit protection, and over temperature protection.
3. Setup and Installation
Before installation, ensure all components are present and undamaged. It is recommended to install the controller in a well-ventilated area, away from direct sunlight and moisture. Always connect the battery first, then the solar panels, and finally the load.
3.1 Connection Sequence
- Connect the Battery: Connect the positive and negative terminals of your battery bank to the corresponding battery terminals on the charge controller. Ensure correct polarity. The controller will automatically detect the battery voltage (12V/24V/36V/48V).
- Connect the Solar Panels: Connect the positive and negative terminals of your solar panel array to the PV input terminals on the charge controller. Ensure correct polarity. The controller will begin charging the battery.
- Connect the DC Load (Optional): If using a DC load directly from the controller, connect its positive and negative terminals to the load output terminals.
Important Safety Note: Always ensure all connections are secure and tight to prevent loose contacts and potential hazards. The controller includes reverse polarity protection for PV input, but careful wiring is always recommended.

Figure 4: Typical System Connection Diagram
This diagram illustrates the connection flow: solar panels connect to the MPPT controller, which then connects to the battery bank. An optional inverter can be connected to the battery for AC loads, and DC loads can be connected directly to the controller's load output.
4. Operating Instructions
The Y&H MPPT Solar Charge Controller features a clear LCD display and intuitive buttons for monitoring and setting parameters.
4.1 Display Interface
The display cycles through various screens showing real-time data such as PV voltage, battery voltage, charging current, load status, and temperature. Use the "PRO/ESC" and "ENTER" buttons to navigate and confirm selections.

Figure 5: Screen Interface Cycle and Parameter Setting
This image shows the various display screens that cycle on the controller, presenting information such as PV input, battery status, and temperature. It also illustrates the sequence for setting parameters like battery type, discharge cut-off voltage, charge cut-off voltage, float voltage, and load operating mode.
4.2 Parameter Settings
To customize the controller's operation, you can adjust several parameters:
- Battery Type (d04): Select the type of battery connected (e.g., sealed, gel, flooded, lithium). This setting is crucial for proper charging.
- Discharge Cut-off Voltage (d03): Set the minimum battery voltage at which the load will be disconnected to prevent over-discharge.
- Charge Cut-off Voltage (d02): Set the maximum battery voltage at which charging will stop to prevent overcharge.
- Float Voltage (d01): Set the voltage at which the battery will be maintained after reaching full charge.
- Load Operating Mode (d00): Configure how the DC load output operates (e.g., always on, dusk-to-dawn, timed).
Note: When the reading data of PV or Battery is constantly changing, do not worry about it. The controller is finding the Maximum Power Point (MPP). This is caused by your PV input power or voltage not being sufficient. If issues persist, contact technical support.
4.3 Charging Process (4-Stage)
The controller employs an intelligent 4-stage charging process to optimize battery health and longevity:
- Bulk Charge: Charges the battery at its maximum current until it reaches a set voltage.
- Constant Charging: Maintains a constant voltage while the current gradually decreases.
- Float Charge: Reduces the voltage to a lower level to maintain the battery at full charge without overcharging.
- Equalize Boost: Periodically applies a higher voltage to equalize cell voltages and prevent sulfation, especially for flooded batteries.

Figure 6: MPPT 4-Stage Charging Mode
This graph illustrates the four stages of the MPPT charging process: Bulk Charge, Constant Charging, Float Charge, and Equalize Boost. It explains how these stages work together to prolong battery life by preventing sulfation and optimizing charge cycles.
5. Maintenance
Regular maintenance ensures the longevity and optimal performance of your Y&H MPPT Solar Charge Controller.
- Cleanliness: Keep the controller clean and free from dust and debris. Use a dry, soft cloth for cleaning.
- Connections: Periodically check all wiring connections to ensure they are secure and free from corrosion.
- Ventilation: Ensure the installation area remains well-ventilated to prevent overheating. Do not block the cooling fins.
- Environmental Conditions: Protect the controller from extreme temperatures, direct water exposure, and high humidity.
6. Troubleshooting
This section provides guidance for common issues. The controller has a built-in troubleshooting promotion function to assist in diagnosing problems.
| Problem | Possible Cause | Solution |
|---|---|---|
| Controller display is off or unresponsive. | No power from battery or solar panels; loose connections; internal fault. | Check battery and solar panel connections. Ensure battery voltage is within operating range. If problem persists, contact support. |
| Battery not charging or charging slowly. | Insufficient solar input; incorrect battery type setting; faulty solar panels or wiring. | Verify solar panel connections and ensure adequate sunlight. Check battery type setting on the controller. Inspect solar panels for damage. |
| Load output not working. | Battery voltage too low (over-discharge protection); load over current; incorrect load operating mode setting. | Check battery voltage. Reduce load or disconnect faulty load. Verify load operating mode setting. |
| Display data constantly changing (PV/Battery). | Controller is actively finding the Maximum Power Point (MPP); insufficient PV input power/voltage. | This is normal operation. If it persists and charging is ineffective, ensure your solar array is adequately sized for your system. |
| Controller freezes or crashes. | Software anomaly; power fluctuation; internal component issue. | Disconnect all power (PV and battery) for a few minutes, then reconnect battery first, then PV. If the issue recurs, contact technical support. |
7. Specifications
| Parameter | Value |
|---|---|
| Model | MPPT-60A |
| System Voltage | 12V / 24V / 36V / 48V Auto |
| Max PV Input Voltage | 150 VDC |
| Max Solar Input Power (for 60A model) | 12V System: 720W 24V System: 1440W 36V System: 2160W 48V System: 2880W |
| Rated Charge Current | 60A |
| Dimensions (L x W x H) | 24 x 21.2 x 7.5 cm (9.45 x 8.35 x 2.95 inches) |
| Weight | 1.23 kg (2.71 lbs) |
| Manufacturer | Y&H |
| Color | Orange |
Note: Specifications are subject to change without prior notice.
8. Warranty and Support
For warranty information, please refer to the documentation provided with your purchase or contact the seller directly. Y&H products typically come with a manufacturer's warranty covering defects in materials and workmanship.
8.1 Technical Support
If you encounter any issues not covered in this manual or require further assistance, please contact Y&H customer support. When contacting support, please have your product model (MPPT-60A) and purchase details ready.
For the latest information and support resources, visit the official Y&H website or the platform where you purchased the product.
Ask a question about this manual
Ask about setup, troubleshooting, compatibility, parts, safety, or missing instructions. Manuals+ will review the question and use this page’s manual context to help answer it.