Introduction
This manual provides comprehensive instructions for the installation, operation, and maintenance of your LPHUMEX Universal Ceiling Fan Remote Control Kit. This kit is designed to add remote control functionality to most AC motor ceiling fans, allowing you to control fan speed, light, and set timers conveniently.
Important Safety Information: Always disconnect power to the ceiling fan at the circuit breaker before attempting any installation or maintenance. If you are unsure about electrical wiring, consult a qualified electrician.
What's in the Box?
Your LPHUMEX Universal Ceiling Fan Remote Control Kit includes the following components:
- 2 x Fan Remotes
- 2 x Small Size Receivers
- Wire Nuts
- Mounting Screws
- Wall Remote Holder

Image: The complete kit contents, including two white remote controls, two black receiver units, orange wire nuts, and small mounting screws.
Setup and Installation
Receiver Dimensions
The LPHUMEX receiver is designed with a smaller profile to fit more easily into various ceiling fan canopies. Before installation, it is recommended to check the available space in your fan's canopy against the receiver dimensions.
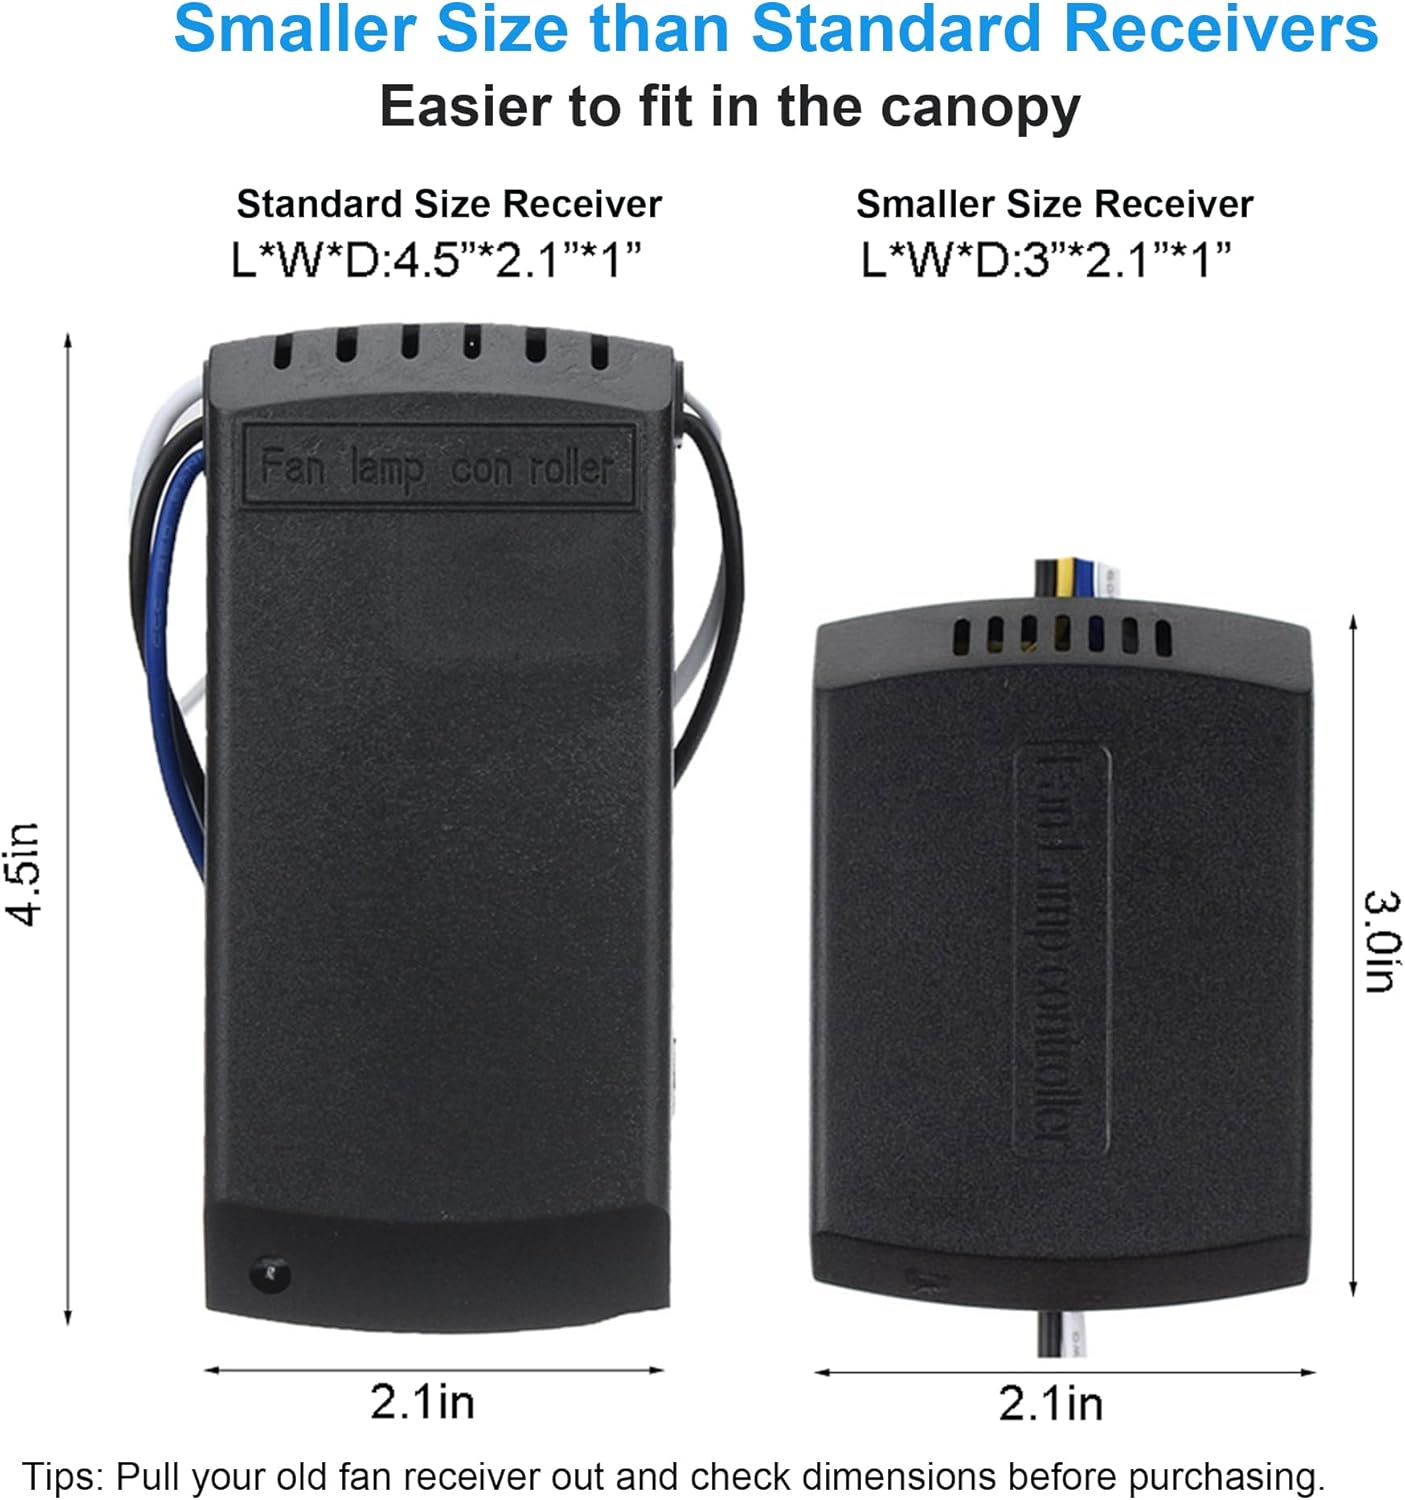
Image: A visual comparison illustrating the compact size of the LPHUMEX receiver (3.0in x 2.1in x 1in) compared to a standard receiver (4.5in x 2.1in x 1in), highlighting its suitability for smaller spaces.
Wiring Connection Guide
Follow these steps carefully to install the receiver unit into your ceiling fan:
- Disconnect Power: Ensure power to the ceiling fan is turned off at the circuit breaker before beginning.
- Identify Wires: Locate the main power wires (AC Neutral Line, AC Live Line) and the fan/light wires from your ceiling fan.
- Connect Input Wires: Connect the receiver's input wires to the main power supply. Typically, the white wire from the receiver connects to the AC Neutral Line (usually white), and the black wire from the receiver connects to the AC Live Line (usually black).
- Connect Output Wires: Connect the receiver's output wires to your ceiling fan. The black wire from the receiver connects to the fan's live wire, and the blue wire from the receiver connects to the light's live wire. The neutral wire from the fan/light connects to the neutral wire from the main power supply.
- Secure Connections: Use the provided wire nuts to secure all connections firmly.
- Position Receiver: Carefully tuck the receiver into the ceiling fan canopy, ensuring no wires are pinched.
- Restore Power: Once all connections are secure and the receiver is safely housed, restore power at the circuit breaker.

Image: A detailed wiring diagram illustrating how to connect the receiver to the main power supply and the ceiling fan's motor and light wires using color-coded connections.
Remote Pairing
The remotes included in this kit come pre-paired with their respective receiver units and are set to different frequencies out of the box. No manual pairing process is typically required for initial setup. Each remote will operate only the fan it is paired with.
Operating Instructions
The remote control provides convenient access to all functions of your ceiling fan and light. Ensure 2 AAA batteries are installed in the remote control (batteries not included).

Image: Close-up of the remote control, highlighting the fan speed buttons (LOW, MED, HI, STOP), light ON/OFF button, and timing buttons (1H, 2H, 4H, 8H).
- Fan Speed Control:
- HI: Sets fan to high speed.
- MED: Sets fan to medium speed.
- LOW: Sets fan to low speed.
- STOP: Turns the fan off.
- Light Control:
- LIGHT ON/OFF: Toggles the ceiling fan light on or off. Note: This kit does not support dimming functionality. The light will only turn ON or OFF.
- Timing Function:
Set the fan to automatically turn off after a specified duration:
- 1H: Fan turns off after 1 hour.
- 2H: Fan turns off after 2 hours.
- 4H: Fan turns off after 4 hours.
- 8H: Fan turns off after 8 hours.
Maintenance
- Cleaning: Wipe the remote control and receiver (if accessible) with a soft, dry cloth. Do not use abrasive cleaners or solvents.
- Battery Replacement: When the remote control's range decreases or it becomes unresponsive, replace the AAA batteries. Ensure correct polarity when inserting new batteries.
- Environmental Conditions: Avoid exposing the remote and receiver to excessive moisture, heat, or direct sunlight.
Troubleshooting
| Problem | Possible Cause | Solution |
|---|---|---|
| Remote not responding / Fan or light not working | No power to the fan; Dead batteries in remote; Incorrect wiring; Receiver malfunction. | Check circuit breaker; Replace remote batteries; Verify all wire connections are secure; Contact support if issue persists. |
| Light does not dim | This kit does not support dimming. | This is normal operation. The light function is ON/OFF only. |
| Fan does not reverse direction | This kit does not support fan reverse. | This is normal operation. If your fan has a reverse switch, it must be operated manually on the fan body. |
| Receiver does not fit in canopy | Canopy space is too small. | While the receiver is small, some fan canopies are extremely compact. Double-check the dimensions before purchase. Ensure wires are neatly tucked. |
| Remote makes a beep sound with every button press | Normal operation. | The beep sound is an audible confirmation of button presses and cannot be disabled. |
Specifications
- Product Dimensions: 5.7 x 4.72 x 2.32 inches
- Item Weight: 11.7 ounces
- Compatible Devices: AC Motor Ceiling Fan Light
- Special Feature: Timing (1H, 2H, 4H, 8H)
- Color: White (Remote), Black (Receiver)
- Max Number of Supported Devices (per kit): 2 (referring to the two remote/receiver sets in this pack)
- Manufacturer: LPHUMEX
- Country of Origin: China
Warranty and Support
For warranty information and customer support, please refer to the product packaging or contact the seller directly through your purchase platform. LPHUMEX is committed to providing quality products and assistance.