1. Introduction
This manual provides essential information for the safe operation and maintenance of your HYTOBP S165max drone. Please read it thoroughly before first use to ensure proper functionality and to prevent damage.

Image 1.1: The HYTOBP S165max drone in flight, showcasing its design and capabilities.
2. Package Contents
Verify that all items listed below are included in your package. If any items are missing or damaged, please contact customer support.
- 1 x HYTOBP S165max Drone
- 1 x Remote Control
- 1 x Instruction Manual
- 1 x Screwdriver
- 4 x Spare Main Blades
- 1 x USB Charging Cable
- 1 x Drone Battery (additional batteries may be included depending on package)

Image 2.1: All components included in the standard HYTOBP S165max drone package.
3. Product Overview
3.1. Drone Features
- 1080P Adjustable Camera: The integrated camera offers 1080P resolution and can be adjusted 90 degrees for varied shooting angles.
- Brushless Motors: Equipped with upgraded brushless motors for enhanced power, longer lifespan, reduced noise, and improved wind resistance.
- Multiple Flight Modes: Supports three-speed modes, trajectory flight, and gesture control.
- One-Button Operations: Features one-button takeoff, landing, and emergency stop for ease of use.
- Altitude Hold: Maintains a stable altitude for steady flight and photography.
- Foldable Design: Lightweight and foldable for easy portability.

Image 3.1: The 90° adjustable 1080P camera for versatile aerial photography.

Image 3.2: Brushless motors provide efficient and stable flight performance.

Image 3.3: Various flight modes including three speed settings, trajectory, and gesture control.

Image 3.4: Key operational features: One-Button Takeoff, Emergency Stop, and Altitude Hold.
4. Setup
4.1. Battery Installation and Charging
- Ensure the drone and remote control are powered off before handling batteries.
- Insert the drone battery into the designated compartment on the drone until it clicks securely.
- For the remote control, open the battery cover and insert the required AAA batteries (included), observing correct polarity.
- Connect the drone battery to the USB charging cable and plug it into a standard 5V 2A charging adapter. The red light will illuminate during charging and turn off when fully charged.

Image 4.1: The drone battery and its USB charging method.
4.2. Propeller Installation
If propellers are not pre-installed or need replacement, use the provided screwdriver to attach them. Ensure each propeller is correctly oriented and securely fastened to its motor shaft.
4.3. App Connection
- Scan the QR code in the instruction manual to download the official drone application. Check for and install any available updates.
- Grant all necessary permissions (local network access, positioning, photo album access) when prompted during app installation.
- Turn on the drone. On your mobile device, go to Wi-Fi settings and connect to the drone's Wi-Fi network.
- Open the downloaded app to establish the connection with the drone.
5. Operating Instructions
5.1. Basic Flight Controls
- One-Button Takeoff/Landing: Press the designated button on the remote control for automatic takeoff or landing.
- Altitude Hold: The drone will automatically maintain its current altitude, allowing for stable hovering.
- Emergency Stop: In case of an emergency, press the emergency stop button to immediately halt the drone's motors.
5.2. Advanced Flight Modes
- Three Speed Modes: Adjust the drone's speed to suit your flying environment and skill level.
- Trajectory Flight: Draw a path on your mobile device screen within the app, and the drone will follow it automatically.
- Gesture Control: Perform specific hand gestures to trigger photo or video recording.
- Headless Mode: In headless mode, the drone's orientation is relative to the pilot, simplifying control regardless of the drone's front direction.

Image 5.1: Features like 3D Rotation, Altitude Hold, and Three Speeds enhance flight experience.

Image 5.2: One-Button Takeoff, Headless Mode, and Trajectory Flight simplify drone operation.

Image 5.3: Gesture control allows for intuitive photo and video capture.
6. Maintenance
- Cleaning: Use a soft, dry cloth to clean the drone and remote control. Avoid using liquids or solvents.
- Propeller Inspection: Regularly check propellers for any damage or deformation. Replace damaged propellers immediately using the spare parts provided.
- Battery Care: Fully charge the drone battery before each flight. Store batteries in a cool, dry place away from direct sunlight and extreme temperatures. Do not overcharge or over-discharge batteries.
- Storage: When not in use for extended periods, store the drone in a safe, dry place. Remove batteries from the remote control if storing for a long time.
7. Troubleshooting
Refer to the table below for common issues and their solutions.
| Problem | Solution |
|---|---|
| No response when controlling the drone |
|
| Battery cannot be charged / The battery is not working |
|
| App cannot connect to the drone |
|
| The drone cannot avoid obstacles |
|
| The drone flies in one direction or cannot be controlled normally when taking off |
|
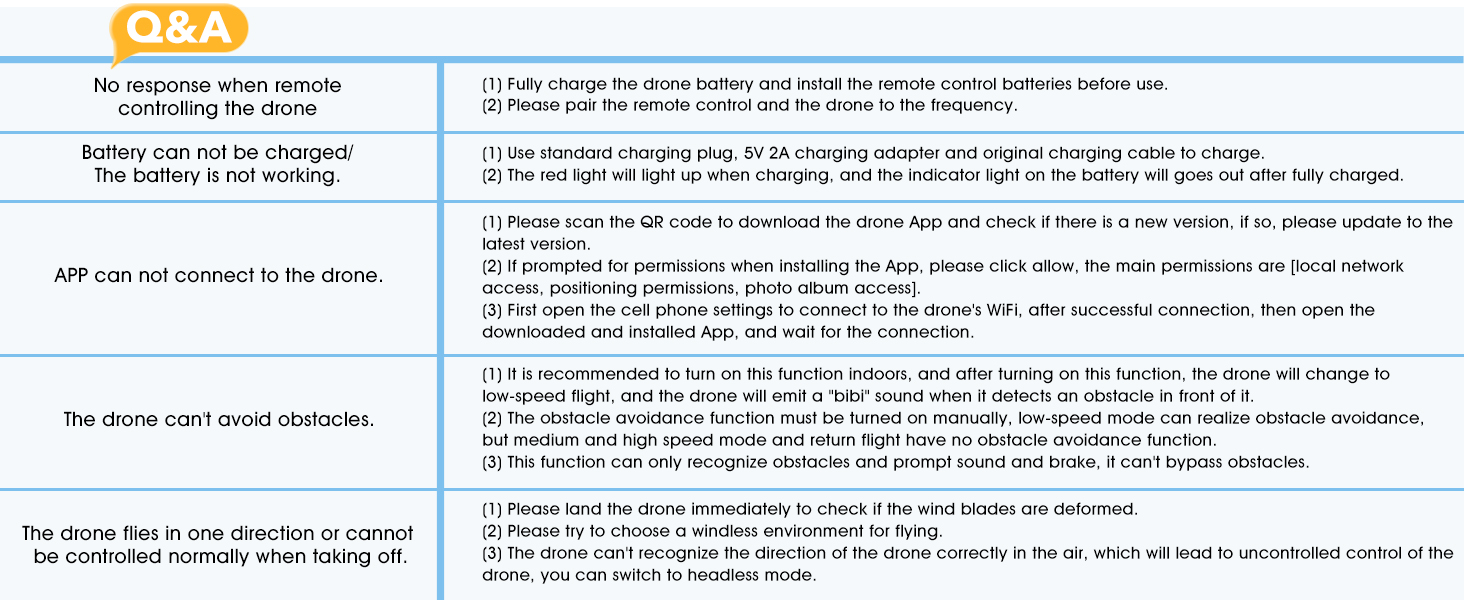
Image 7.1: Visual representation of common troubleshooting steps.
8. Specifications
| Feature | Detail |
|---|---|
| Brand | HYTOBP |
| Model | S165max |
| Product Dimensions | 25 x 16 x 8 cm |
| Item Weight | 123 g |
| Batteries | 1 AAA battery required (included for remote), Drone battery (included) |
| Mirror Adjustment | Remote Control (for camera angle) |
| Connectivity Technology | USB (for charging) |
| Video Capture Format | MP4 |
| Control Type | Remote Control |
9. Warranty and Support
HYTOBP is committed to providing high-quality products and satisfactory after-sales service. For any issues or support needs, please contact us using the information below.
- Phone: +1 (617) 259-4732
- Email: hytobp@htwlkj.net
Please retain your proof of purchase for warranty claims.

Image 9.1: HYTOBP's commitment to customer satisfaction.

Image 9.2: Contact details for HYTOBP customer support.