1. Product Overview
The DashRC RunCam Night Eagle 3 V2 is a high-performance FPV camera designed for exceptional low-light and night flight capabilities. Featuring advanced night vision technology and a compact design, it delivers clear and detailed imagery for drone enthusiasts.
Key Features:
- Professional Night Vision: Equipped with a back-illuminated Pixel sensor, offering 11390 mV/Lux-sec starlight night vision for superior low-light performance.
- High-Definition Imaging: Provides 1500TVL resolution with Wide Dynamic Range (WDR) for balanced and crisp footage. Supports switchable 16:9 and 4:3 screen formats.
- Integrated OSD: On-Screen Display provides essential flight information such as battery voltage, pilot name, and timer.
- Low Latency: Achieves approximately 26.2ms video latency, ensuring responsive real-time video feedback.
- Compact and Lightweight: Weighs only 8.5g, minimizing impact on drone performance. Features joystick control support and PAL/NTSC compatibility.

Image 1: Front view of the RunCam Night Eagle 3 V2 FPV Night Camera, showcasing its compact design and lens.

Image 2: Promotional banner highlighting the RunCam Night Eagle 3 as a starlight night vision FPV camera.
2. Package Contents
Verify that all items listed below are included in your package:
- Camera (with Lens Cap) x1
- 6pin FPV Silicone Cable x1
- Set of Screws x1
- 5D-OSD Menu Cable x1
- Manual x1 (This document)

Image 3: Visual representation of the RunCam Night Eagle 3 V2 package contents.
3. Setup and Installation
3.1 Physical Installation
The RunCam Night Eagle 3 V2 is designed for micro FPV drone applications. Ensure proper mounting to prevent vibration and secure the camera firmly using the provided screws.
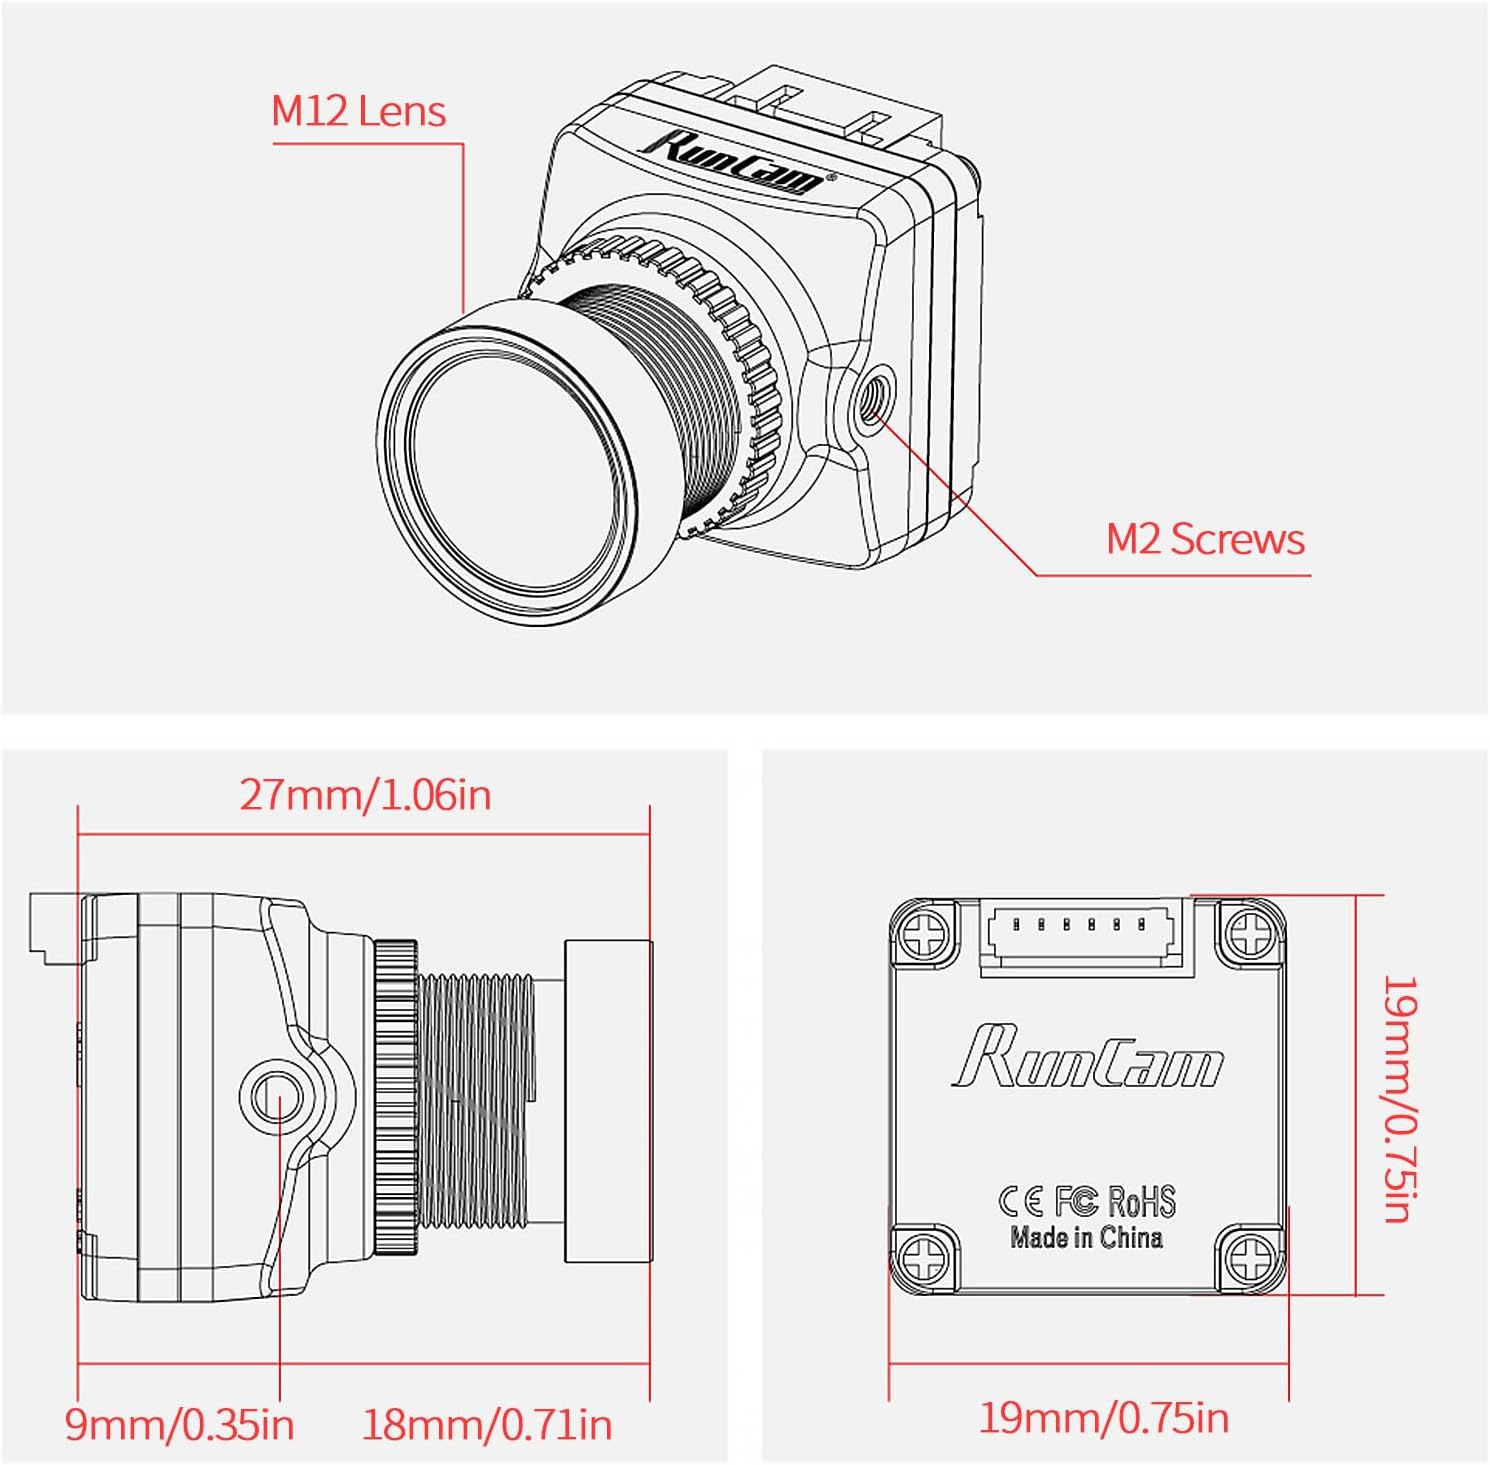
Image 4: Detailed dimensions of the RunCam Night Eagle 3 V2 camera for precise mounting.
- Dimensions: 19mm x 19mm x 27mm (0.75 x 0.75 x 1.06 inches).
- Mounting: Utilize the M2 screw holes on the camera body for secure attachment.
- Lens: The camera features an M12 lens. Ensure it is clean and free from obstructions.
3.2 Wiring Diagram
Connect the camera to your flight controller or video transmitter using the 6pin FPV Silicone Cable. Refer to your flight controller's manual for specific wiring instructions. The typical pinout is as follows:
- Red: VCC (Power Input)
- Black: GND (Ground)
- Yellow: Video Out
- White: OSD Data (for OSD control)
- Blue/Green: Not typically used for basic FPV setup, refer to specific flight controller documentation if available.

Image 5: Rear view of the camera, illustrating the 6-pin connector for wiring.
Important: Always double-check wiring connections before applying power to avoid damage to the camera or other components.
4. Operating Instructions
4.1 Powering On
Once correctly wired, the camera will power on automatically when power is supplied to your FPV system. The video feed will be transmitted to your FPV goggles or monitor.
4.2 OSD Menu Navigation
The 5D-OSD Menu Cable allows you to access and adjust camera settings. Connect the 5D-OSD Menu Cable to the camera's OSD port. Use the joystick on the cable to navigate the on-screen menu:
- Press Center: Enter/Confirm selection.
- Up/Down: Navigate menu options.
- Left/Right: Adjust values or switch sub-menus.
Common adjustable settings include:
- Video Format: Switch between PAL and NTSC.
- Aspect Ratio: Select 16:9 or 4:3.
- Image Settings: Brightness, Contrast, Saturation, Sharpness.
- OSD Display: Enable/disable OSD elements like voltage, timer, pilot name.
4.3 Night Vision Operation
The Night Eagle 3 V2 automatically leverages its high-sensitivity sensor for optimal performance in low-light conditions. No manual activation is typically required for night vision functionality. The camera is designed to provide clear images even in near-dark environments.
5. Maintenance
- Lens Cleaning: Gently clean the camera lens with a soft, lint-free cloth. For stubborn smudges, use a lens cleaning solution specifically designed for optical surfaces. Avoid abrasive materials.
- Storage: Store the camera in a dry, dust-free environment when not in use. Keep the lens cap on to protect the lens from scratches and dust.
- Environmental Protection: While designed for FPV use, avoid exposing the camera to extreme temperatures, direct water immersion, or harsh chemicals.
- Cable Inspection: Periodically inspect all cables for signs of wear, fraying, or damage. Replace damaged cables immediately to ensure reliable operation.
6. Troubleshooting
- No Video Output:
- Check all wiring connections, especially power (VCC, GND) and video signal.
- Ensure the camera is receiving adequate power.
- Verify that your FPV receiver/goggles are on the correct frequency and channel.
- Poor Image Quality (Blurry/Distorted):
- Clean the camera lens.
- Check for physical damage to the lens or sensor.
- Adjust image settings (sharpness, contrast) via the OSD menu.
- Ensure the lens is securely tightened and focused (if adjustable).
- OSD Not Displaying:
- Verify the 5D-OSD Menu Cable is correctly connected.
- Check OSD settings in the camera menu to ensure OSD elements are enabled.
- Ensure your flight controller is correctly configured to pass OSD data if applicable.
- Intermittent Video Signal:
- Inspect all cables for loose connections or damage.
- Check for potential electromagnetic interference from other drone components.
- Ensure adequate power supply to the camera.
7. Specifications
| Feature | Specification |
|---|---|
| Brand | DashRC |
| Model Name | Night Eagle 3 V2 |
| Item Weight | 8.5g (0.019lb) / 1.6 ounces (packaged) |
| Product Dimensions | 19 x 19 x 27 mm (0.75 x 0.75 x 1.06 inches) |
| Special Features | Night Vision, OSD Support |
| Photo Sensor Technology | Back-illuminated Pixel sensor |
| Video Capture Resolution | 1500TVL (720p output) |
| Video Capture Format | MP4 (for recorded footage, if applicable via external DVR) |
| Connectivity Technology | USB (for OSD menu cable connection) |
| Camcorder Type | Action Camera (FPV Camera) |
| FOV | 125° Wide Angle |
| Latency | Approximately 26.2ms |
| Screen Format | Switchable 16:9 / 4:3 |
| Video System | PAL / NTSC Switchable |
8. Warranty and Support
For warranty information and technical support, please refer to the official DashRC website or contact your retailer. Keep your proof of purchase for any warranty claims.
- Warranty: Specific warranty terms and duration may vary by region and retailer. Please consult the documentation provided at the time of purchase or the manufacturer's official website.
- Technical Support: If you encounter issues not covered in this manual, please visit the DashRC support page or contact their customer service for assistance.