
1. Introduction
Thank you for choosing the BLACK+DECKER CE1100G-B2 Multifunction Espresso Coffee Maker. This appliance is designed to provide a versatile and high-quality coffee experience, allowing you to prepare delicious espresso, coffee from Nespresso and Dolce Gusto capsules, and frothed milk for various beverages. Please read this manual carefully before first use to ensure proper operation and maintenance.
2. Important Safety Information
Always follow basic safety precautions when using electrical appliances to reduce the risk of fire, electric shock, and/or injury to persons.
- Before connecting the appliance to the electrical outlet, ensure that the voltage is compatible with the product specifications (220V).
- Do not immerse the appliance, cord, or plug in water or other liquids.
- Unplug from outlet when not in use and before cleaning. Allow to cool before putting on or taking off parts, and before cleaning the appliance.
- Do not operate any appliance with a damaged cord or plug, or after the appliance malfunctions or has been damaged in any manner.
- Keep the appliance and its cord out of reach of children.
- Use only attachments/accessories specified by the manufacturer.
3. Product Components and Package Contents
Familiarize yourself with the parts of your coffee maker.

Figure 1: Angled view of the BLACK+DECKER CE1100G-B2 Coffee Maker with two cups.

Figure 2: Front view of the coffee maker, showing control panel and portafilter area.

Figure 3: Side view of the coffee maker, highlighting the water reservoir.
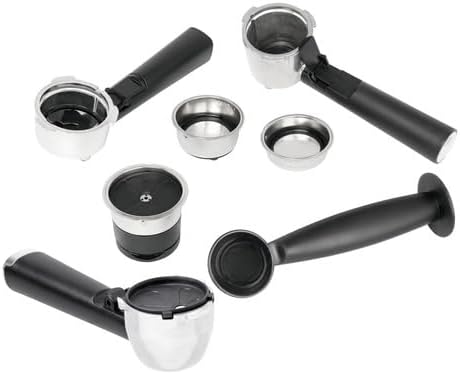
Figure 4: Included accessories: filter holder for ground coffee, short and long coffee filters, Nespresso and Dolce Gusto capsule adapters, and a measuring spoon.
Package Contents:
- BLACK+DECKER CE1100G-B2 Espresso Coffee Maker
- Portafilter for ground coffee
- Small filter for short/single espresso
- Large filter for long/double espresso
- Nespresso capsule adapter
- Dolce Gusto capsule adapter
- Measuring spoon
- User Manual
4. Setup
- Unpacking: Carefully remove all packaging materials and accessories. Retain packaging for future storage or transport.
- Initial Cleaning: Before first use, wash all removable parts (water reservoir, portafilter, filters, drip tray) with warm soapy water. Rinse thoroughly and dry. Wipe the exterior of the appliance with a damp cloth.
- Positioning: Place the coffee maker on a stable, flat, heat-resistant surface, away from walls and heat sources. Ensure adequate ventilation.
- Fill Water Reservoir: Fill the 1.5L water reservoir with fresh, cold water. Do not exceed the MAX fill line.
- First Use Cycle (Priming): To prepare good coffee and preheat the internal system, we recommend running a cycle with only water. Fill the water tank, place a large cup under the dispenser, and run a brewing cycle without coffee or capsules. Repeat this process 2-3 times.
5. Operating Instructions
5.1 Brewing Espresso with Ground Coffee
- Ensure the water reservoir is filled.
- Insert the desired filter (small for single espresso, large for double espresso) into the portafilter.
- Add ground coffee to the filter. For a single espresso, use one level scoop; for a double, use two. Tamp the coffee lightly.
- Attach the portafilter to the brewing head by aligning it and twisting it firmly to the right until it locks.
- Place one or two preheated cups under the portafilter spouts.
- Press the brew button. The CE1100G-B2 does not stop automatically; you must manually stop the flow by pressing the brew button again when the desired amount of coffee is reached.
- Once brewing is complete, carefully remove the portafilter and discard the used coffee grounds.
5.2 Brewing with Nespresso or Dolce Gusto Capsules

Figure 5: Inserting a capsule into the appropriate adapter.
- Ensure the water reservoir is filled.
- Select the appropriate capsule adapter (Nespresso or Dolce Gusto) and insert it into the portafilter.
- Place your chosen capsule into the adapter.
- Attach the portafilter with the capsule adapter to the brewing head, twisting firmly to lock.
- Place a cup under the dispenser.
- Press the brew button. Manually stop the flow by pressing the brew button again when the desired coffee volume is reached.
- After brewing, carefully remove the portafilter and discard the used capsule.
5.3 Frothing Milk

Figure 6: Using the steam wand to froth milk.
- Fill a stainless steel frothing pitcher with cold milk (preferably whole milk) up to one-third full.
- Turn the function knob to the steam icon. Wait for the steam indicator light to illuminate, indicating the machine has reached frothing temperature.
- Position the steam wand just below the surface of the milk.
- Open the steam knob to release steam. Move the pitcher up and down slowly to create foam.
- Once desired foam and temperature are achieved, close the steam knob and turn the function knob back to the standby position.
- Wipe the steam wand immediately with a damp cloth to prevent milk residue from drying.
6. Maintenance and Cleaning
Regular cleaning ensures optimal performance and extends the life of your coffee maker.
- Daily Cleaning: After each use, remove and empty the drip tray. Wash the drip tray, water reservoir, portafilter, and filters with warm, soapy water. Rinse thoroughly and dry.
- Steam Wand Cleaning: After frothing milk, immediately wipe the steam wand with a damp cloth. Periodically, remove the tip of the steam wand and rinse it to clear any milk blockages.
- Exterior Cleaning: Wipe the exterior of the coffee maker with a soft, damp cloth. Do not use abrasive cleaners or scouring pads.
- Descaling: Depending on water hardness, descaling should be performed every 2-3 months. Use a commercial descaling solution suitable for coffee machines and follow the product's instructions. Run the descaling solution through the machine, then rinse by running several cycles with fresh water.
- Automatic Shutdown: The machine features an automatic shutdown function after 25 minutes of inactivity to save energy.
7. Troubleshooting
| Problem | Possible Cause | Solution |
|---|---|---|
| Coffee not brewing / No water flow | Water reservoir empty; Machine not primed; Clogged filter/portafilter; Machine needs descaling. | Fill water reservoir; Run a priming cycle; Clean filter/portafilter; Perform descaling. |
| Coffee is too weak or watery | Insufficient coffee grounds; Coffee too coarsely ground; Brewing too long; Capsule not pierced correctly. | Increase coffee amount; Use finer grind; Manually stop brewing earlier; Ensure capsule is properly seated. |
| Coffee is too strong or bitter | Too much coffee grounds; Coffee too finely ground; Brewing too short. | Reduce coffee amount; Use coarser grind; Manually stop brewing later. |
| Milk not frothing properly | Steam wand clogged; Insufficient steam pressure; Milk not cold enough. | Clean steam wand; Ensure machine is at frothing temperature; Use cold milk. |
| Leaking from portafilter area | Portafilter not properly locked; Gasket worn; Too much coffee grounds. | Ensure portafilter is firmly locked; Inspect/replace gasket; Reduce coffee amount. |
8. Specifications
- Model: CE1100G-B2
- Brand: BLACK+DECKER
- Voltage: 220V
- Power: 1100W
- Water Reservoir Capacity: 1.5 Liters
- Pressure: 20 Bar
- Material: Stainless Steel
- Color: Black and Purple
- Dimensions (Product): 32 x 27 x 35 cm (approx.)
- Weight (Product): 5.84 kg (approx.)
- Special Features: Compatible with Nespresso and Dolce Gusto capsules, Stainless steel finish, Automatic shutdown after 25 minutes.
9. Warranty and Support
This product comes with a manufacturer's warranty against defects in materials and workmanship. For specific warranty terms and conditions, please refer to the warranty card included with your product or contact BLACK+DECKER customer support.
For technical assistance, spare parts, or service, please contact your local BLACK+DECKER authorized service center or visit the official BLACK+DECKER website for support information.
- Extended Warranty Options: Additional extended warranty plans may be available for purchase, offering coverage for 12 or 24 months against failures and defects. Please check with your retailer for details.


