ALL FORTUNE KF68209
ALL FORTUNE Solar Chandelier Outdoor KF68209 Instruction Manual
Model: KF68209 | Brand: ALL FORTUNE
Introduction
This manual provides detailed instructions for the installation, operation, and maintenance of your ALL FORTUNE Solar Chandelier Outdoor. This 14-inch farmhouse-style pendant light is designed for outdoor use in gazebos, pergolas, and canopies, offering dimmable warm white lighting with solar power and smart dual-mode activation.

Image: The ALL FORTUNE Solar Chandelier Outdoor installed in a gazebo, illustrating its key features: dimmable lighting, timing control, two operational modes, and solar power.
What's in the Box
Please verify that all components are present before beginning installation:
- Solar Chandelier Unit (with 4 shatterproof bulbs)
- Solar Panel
- Adjustable Chain (37.4 inches)
- Remote Control
- USB-C Charging Cable
- Installation Hardware (e.g., Gazebo Hook)
- Instruction Manual (this document)
Specifications
| Brand | ALL FORTUNE |
| Model Number | KF68209 |
| Dimensions | 12"L x 12"W x 14"H (Chandelier Frame) |
| Adjustable Chain Length | 37.4 inches |
| Material | Metal |
| Color | Black |
| Light Source Type | LED (4 shatterproof bulbs, E26 ST58 type) |
| Light Color | Warm White (2700 Kelvin) |
| Brightness | Up to 450 Lumens (Dimmable: 25%, 50%, 75%, 100%) |
| Power Source | Solar Powered (3600mAh battery) |
| Voltage | 3.7 Volts |
| Working Time | 8-10 hours (after full charge) |
| Special Features | Adjustable Height, Dimmable, Energy Efficient, Timer (3h, 5h, 8h), Waterproof |
| Control Method | Remote Control, Touch (on unit) |
| Water Resistance Level | Waterproof |
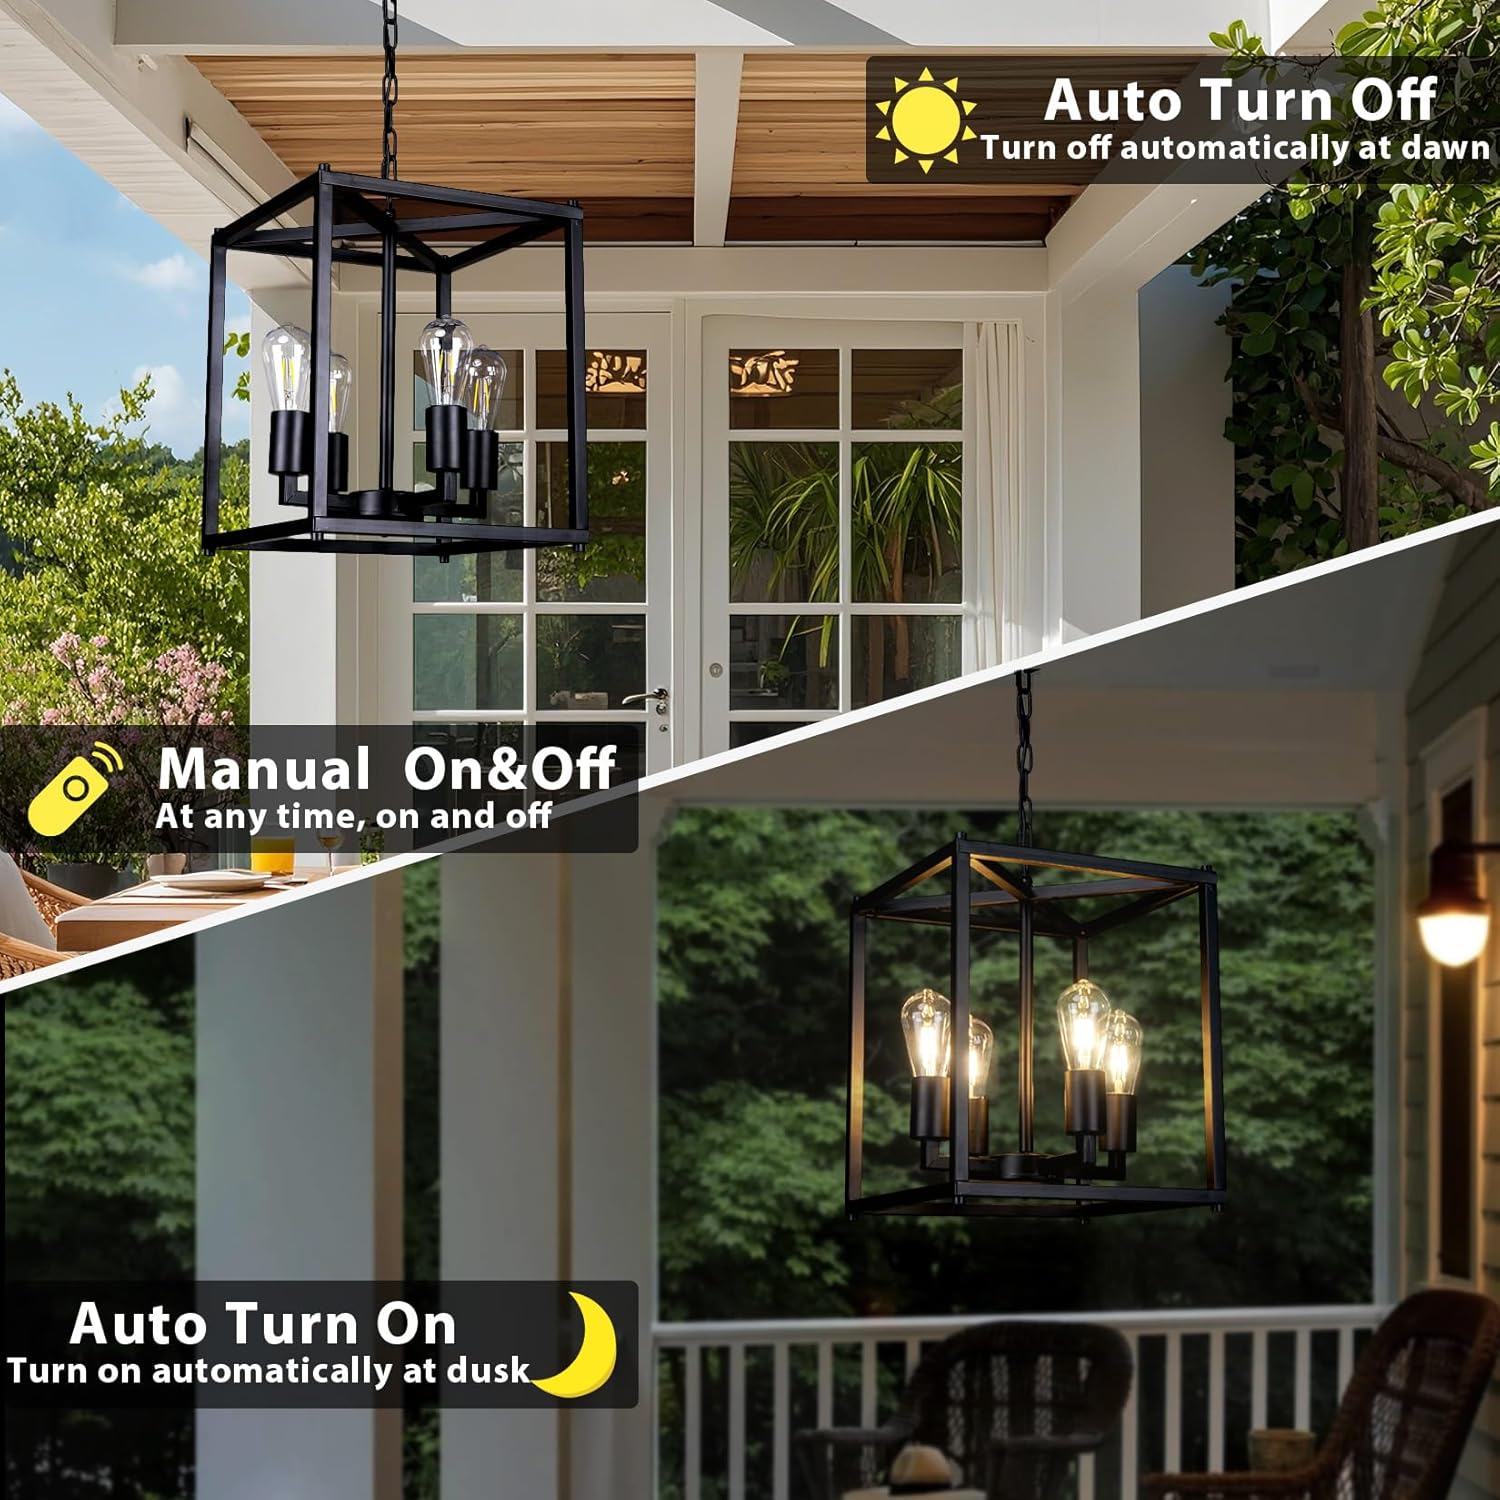
Image: Detailed product parameters including dimensions, solar panel, battery capacity, and a specifications table.
Setup and Installation
The ALL FORTUNE Solar Chandelier is designed for quick and simple assembly. Follow these steps for proper installation:
- Unpack Components: Carefully remove all items from the packaging and ensure all parts listed in the "What's in the Box" section are present and undamaged.
- Assemble Chandelier Frame: Connect the frame components as per the included diagrams. Ensure all connections are secure.
- Install Bulbs: Gently screw the four shatterproof LED bulbs into their respective sockets.
- Attach Chain: Securely attach the adjustable chain to the top of the chandelier frame and to the ceiling mount. The chain length can be adjusted to suit your desired hanging height.
- Mount Solar Panel: Choose a location for the solar panel that receives direct sunlight for at least 6-8 hours daily. This is crucial for optimal charging. The solar panel can be mounted separately from the chandelier.
- Connect Solar Panel: Connect the solar panel cable to the chandelier unit.
- Initial Charge: For best performance, allow the solar panel to charge the chandelier's battery for a full day (6-8 hours) in direct sunlight before first use. You may also use the provided USB-C cable for an initial charge if immediate use is desired.

Image: Visual guide to product details, including high-quality construction, easy height adjustment mechanism, robust connections for assembly, and the type of plastic bulbs used.
Operating Instructions
Your solar chandelier features smart dual-mode activation and adjustable settings for customized lighting.
Power On/Off and Modes
- Automatic Mode: The chandelier will automatically turn on at dusk and turn off at dawn, provided the solar panel receives sufficient charge during the day.
- Manual Mode: Use the remote control to manually turn the light on or off at any time. This overrides the automatic sensor.

Image: Illustration of the chandelier's automatic dusk-to-dawn functionality and the option for manual control via remote.
Adjustable Brightness
The remote control allows you to adjust the brightness to four levels:
- 25% Brightness
- 50% Brightness
- 75% Brightness
- 100% Brightness (up to 450 lumens)

Image: Visual representation of the four adjustable brightness settings (25%, 50%, 75%, 100%) available for the chandelier.
Timer Function
Set the chandelier to turn off automatically after a specific duration using the remote control:
- 3-hour timer
- 5-hour timer
- 8-hour timer
Maintenance
To ensure the longevity and optimal performance of your ALL FORTUNE Solar Chandelier, follow these maintenance guidelines:
- Cleaning: Periodically wipe the solar panel and chandelier frame with a soft, damp cloth to remove dust, dirt, and debris. This ensures efficient solar charging and maintains the aesthetic appeal. Avoid abrasive cleaners.
- Solar Panel Placement: Regularly check that the solar panel remains free from obstructions (e.g., leaves, snow) and is positioned to receive maximum direct sunlight.
- Weather Resistance: The chandelier is designed to be waterproof, sunproof, windproof, and snowproof. However, during extreme weather conditions, consider taking extra precautions if possible, such as temporarily relocating the solar panel to a sheltered area if it's easily accessible.
- Bulb Replacement: The chandelier uses E26 ST58 plastic bulbs. If a bulb needs replacement, ensure you use a compatible shatterproof LED bulb.

Image: The solar chandelier and its panel demonstrating resistance to various weather conditions, including rain, sun, wind, and snow.
Troubleshooting
If you encounter issues with your solar chandelier, refer to the following common problems and solutions:
| Problem | Possible Cause | Solution |
|---|---|---|
| Light does not turn on at night. |
|
|
| Light is dim or flickers. |
|
|
| Remote control not working. |
|
|
Warranty Information
This product comes with an extended warranty. For specific details regarding warranty coverage, duration, and claims, please refer to the documentation included with your purchase or contact ALL FORTUNE customer support directly. Optional protection plans may also be available for purchase separately.
Customer Support
For any questions, technical assistance, or support regarding your ALL FORTUNE Solar Chandelier, please contact our customer service team. Online customer service is available to assist with installation and any other inquiries.
Please visit the ALL FORTUNE store on Amazon or refer to the contact information provided in your product packaging for the most up-to-date support channels.
ALL FORTUNE Store Link: ALL FORTUNE Amazon Store
Ask a question about this manual
Ask about setup, troubleshooting, compatibility, parts, safety, or missing instructions. Manuals+ will review the question and use this page’s manual context to help answer it.