Scheppach C-LT300-X (5910904900)
Scheppach C-LT300-X 2-in-1 Cordless Trimmer User Manual
Model: C-LT300-X (5910904900)
Brand: Scheppach
1. Introduction
Thank you for choosing the Scheppach C-LT300-X 2-in-1 Cordless Trimmer. This versatile tool is designed for efficient trimming of grass and precise edging of lawns, offering cordless convenience with the Scheppach IXES 20V battery system. This manual provides essential information for safe operation, assembly, maintenance, and troubleshooting to ensure optimal performance and longevity of your device.

Figure 1.1: The Scheppach C-LT300-X 2-in-1 Cordless Trimmer, shown with the included 2Ah battery, charger, and two spools of trimmer line. This image provides an overview of the complete product package.

Figure 1.2: The Scheppach IXES 20V battery platform, illustrating the wide range of compatible tools. This system allows you to use the same battery across multiple Scheppach devices, enhancing versatility and convenience.
2. Safety Instructions
Always observe the following safety precautions to prevent injury and damage to the tool.
2.1 General Safety
- Read and understand all instructions before operating the tool.
- Keep children and bystanders away while operating the trimmer.
- Do not operate the tool in wet conditions or in the rain.
- Always inspect the work area for objects that could be thrown by the trimmer line.
2.2 Electrical Safety
- Use only the specified battery and charger for this tool.
- Do not charge batteries in damp or wet locations.
- Protect the battery from heat, direct sunlight, and fire.
- Never short-circuit the battery terminals.
2.3 Personal Safety
- Wear appropriate personal protective equipment (PPE), including eye protection, long pants, sturdy footwear, and hearing protection.
- Do not overreach. Maintain proper footing and balance at all times.
- Avoid accidental starting. Ensure the switch is in the off-position before inserting the battery pack.
- Do not operate the trimmer if you are tired, ill, or under the influence of drugs or alcohol.
3. Product Components
Familiarize yourself with the main components of your Scheppach C-LT300-X trimmer:
- Trimmer Head: Houses the cutting line and motor.
- Telescopic Shaft: Allows for length adjustment for ergonomic use.
- Main Handle: With integrated safety switch.
- Auxiliary Handle: Adjustable for comfortable grip and control.
- Battery Compartment: For inserting the 20V battery.
- Plant Protection Guard: Foldable guard to protect delicate plants.
- Edging Wheel: For precise lawn edging.
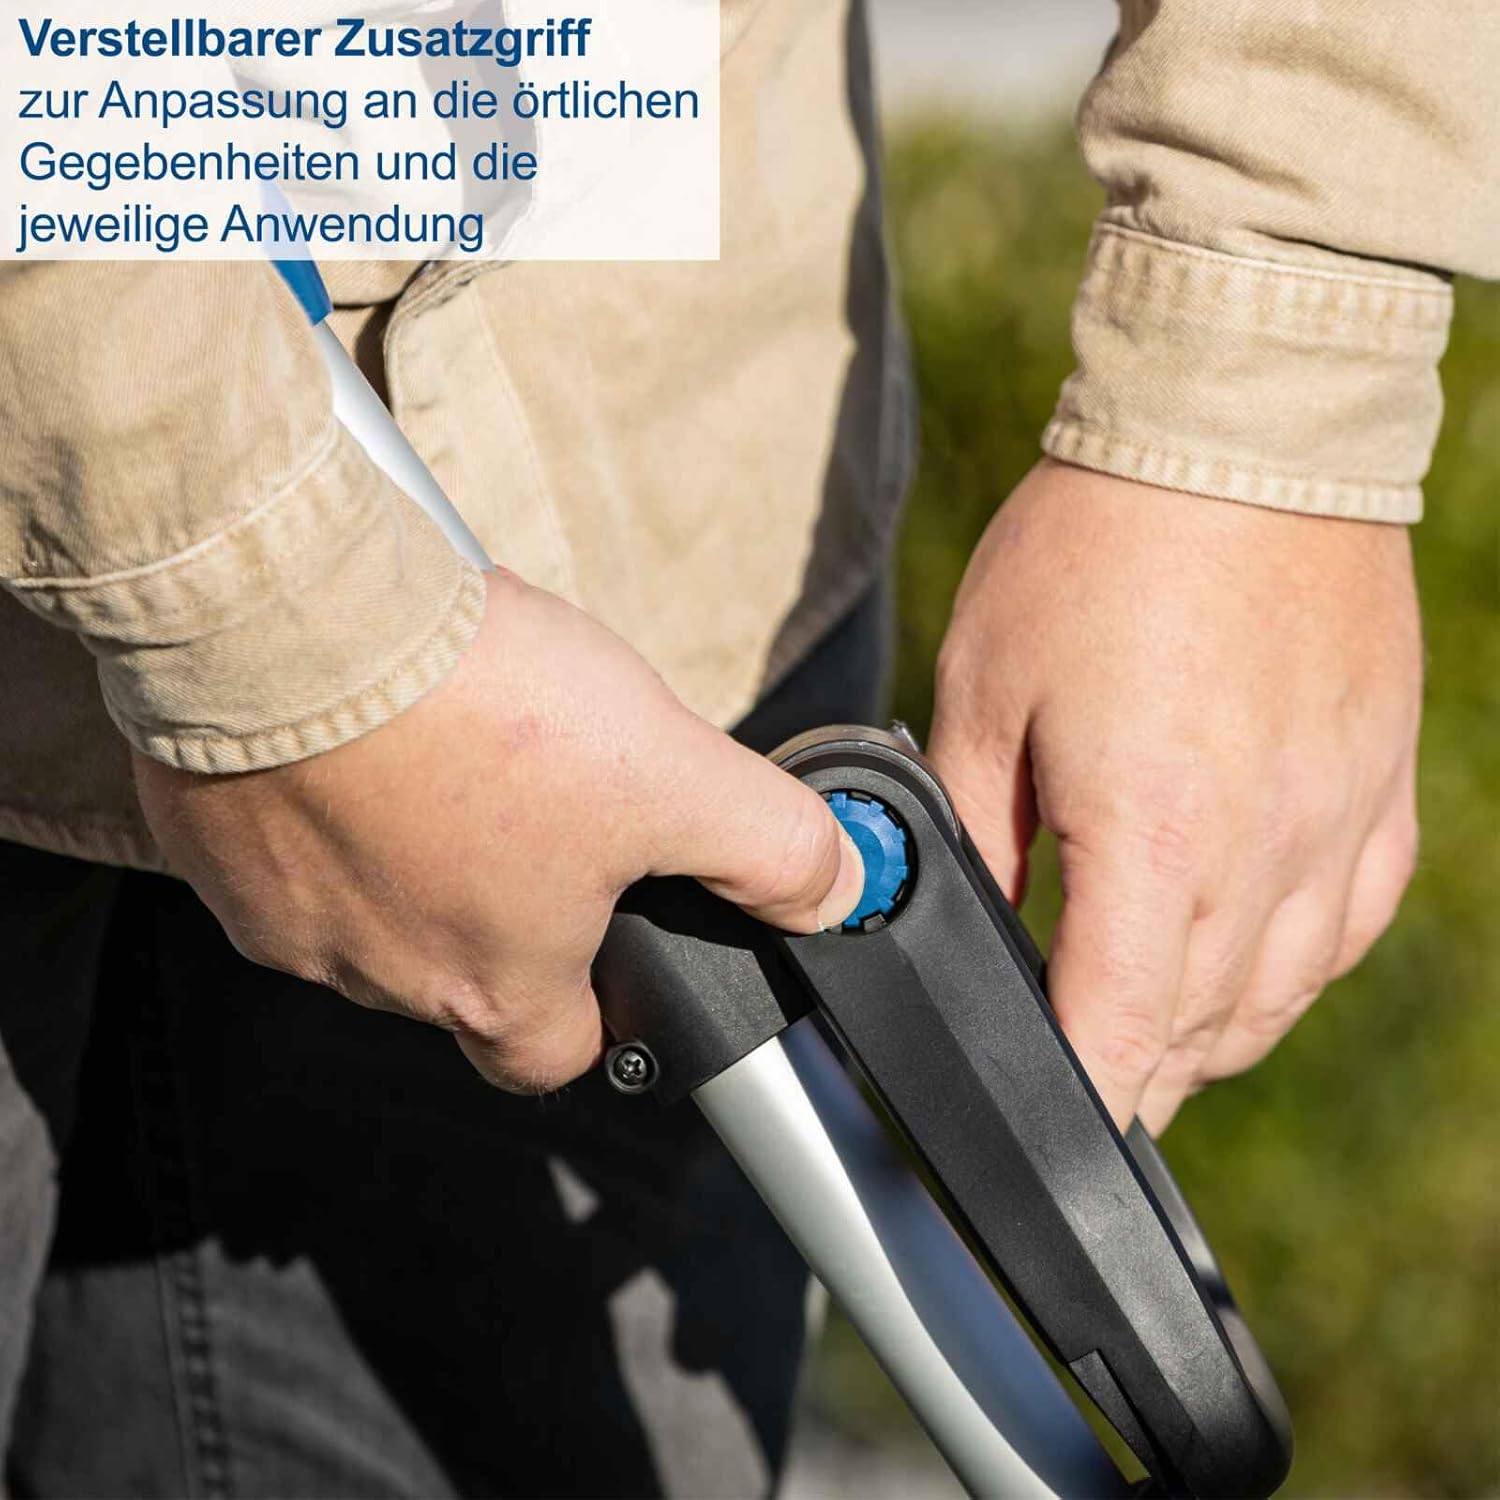
Figure 3.1: Adjustable auxiliary handle. This handle can be positioned to suit your height and working posture, providing enhanced comfort and control during operation.

Figure 3.2: Foldable plant protection guard. This guard can be deployed to prevent accidental damage to flowers, shrubs, and other delicate garden features while trimming.
4. Setup
4.1 Assembly
Follow these steps to assemble your trimmer:
- Attach the auxiliary handle to the main shaft and secure it firmly.
- Ensure the trimmer head is securely fastened to the lower shaft.
- Adjust the telescopic shaft to your desired working height.
4.2 Battery Charging and Installation
The trimmer operates on a 20V battery. Before first use, fully charge the battery.
- Connect the charger to a power outlet.
- Insert the battery pack into the charger. The indicator light will show charging status.
- Once fully charged, remove the battery from the charger.
- To install, slide the charged battery pack into the battery compartment on the trimmer until it clicks into place.
- To remove, press the battery release button and slide the battery out.
4.3 Adjusting the Trimmer Head
The trimmer head can be adjusted for different cutting angles and for edging.

Figure 4.1: Tool-free motor head adjustment. The trimmer head can be easily adjusted to various angles without the need for additional tools, allowing for versatile cutting and edging.
5. Operation
5.1 Starting and Stopping
- To start: Press the safety lock-off button and then squeeze the trigger switch.
- To stop: Release the trigger switch.
5.2 Trimming Function
Hold the trimmer firmly with both hands. Swing the trimmer from side to side, keeping the cutting line parallel to the ground. Maintain a safe distance from obstacles and ensure the plant protection guard is in place if working near delicate plants.

Figure 5.1: Trimmer use on a slope. The adjustable features of the C-LT300-X make it ideal for maintaining grass on uneven terrain and slopes, ensuring comfortable and effective operation.
5.3 Edging Function
To switch to edging mode, rotate the trimmer head 90 degrees. Use the edging wheel to guide the trimmer along the edge of your lawn or pathway, creating a clean, precise cut.

Figure 5.2: Rotatable cutting head. The trimmer head can be rotated 90 degrees, allowing for easy conversion from trimming to precise lawn edging, even in hard-to-reach areas.
5.4 Automatic Line Feed
The trimmer features an automatic line feed system. When the line wears down, it will automatically extend more line as needed during operation. Avoid intentionally bumping the head to feed line, as this can cause premature wear.
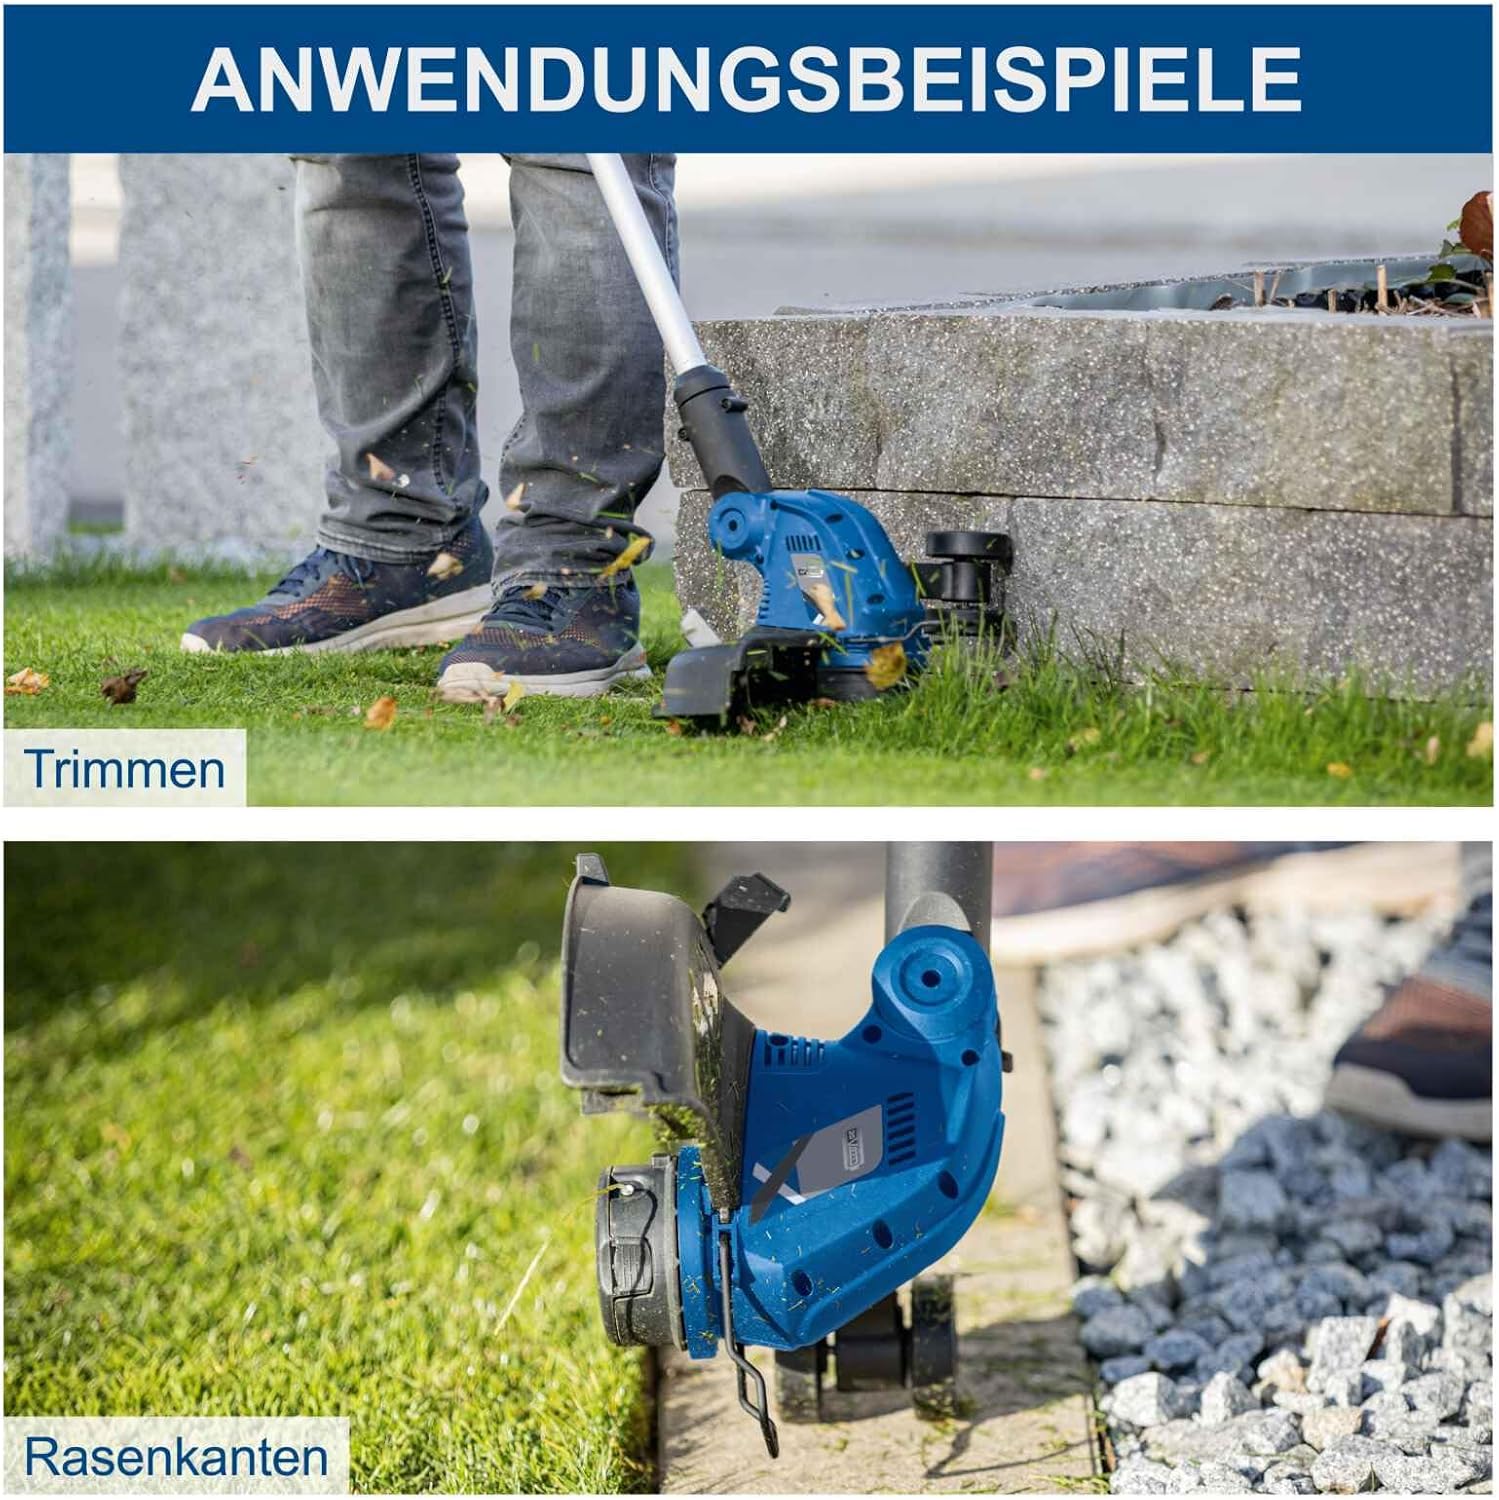
Figure 5.3: Application examples. The top image shows the trimmer in use for general grass trimming, while the bottom image demonstrates its capability for precise lawn edging along a paved surface.
6. Maintenance
6.1 Cleaning
- Always remove the battery pack before cleaning.
- Clean the trimmer housing with a damp cloth. Do not use harsh chemicals or abrasive cleaners.
- Remove any grass clippings or debris from the trimmer head and guard.
6.2 Replacing the Trimmer Line Spool
When the trimmer line runs out, replace the spool with a new one. The process is tool-free and straightforward.
- Ensure the battery is removed.
- Press the tabs on the side of the spool cover and remove it.
- Remove the empty spool.
- Insert a new pre-wound spool, ensuring the line is threaded through the eyelet.
- Replace the spool cover, ensuring it clicks securely into place.
6.3 Storage
- Store the trimmer in a dry, secure place, out of reach of children.
- Remove the battery pack before storing for extended periods.
- Store batteries in a cool, dry place, away from direct sunlight.
7. Troubleshooting
Refer to the table below for common issues and their solutions.
| Problem | Possible Cause | Solution |
|---|---|---|
| Trimmer does not start | Battery not inserted correctly Battery discharged Safety switch not engaged | Re-insert battery Charge battery Ensure safety button is pressed before trigger |
| Trimmer line breaks frequently | Incorrect line type Line worn or old Cutting against hard surfaces | Use recommended line diameter (1.6mm) Replace spool with new line Avoid contact with concrete, rocks, etc. |
| Poor cutting performance | Line too short Motor overloaded Debris in head | Allow automatic line feed Reduce cutting load Clean trimmer head |
If the problem persists after attempting these solutions, please contact customer support.
8. Technical Specifications
Key technical data for the Scheppach C-LT300-X trimmer:
- Model: C-LT300-X (5910904900)
- Power Source: Battery-powered (20V IXES system)
- Cutting Width: Max. 300 mm
- Line Diameter: 1.6 mm (single nylon line)
- Telescopic Shaft Adjustment: Max. 270 mm
- Product Dimensions (L x W x H): 124 x 34 x 12.7 cm
- Item Weight: 4 Kilograms
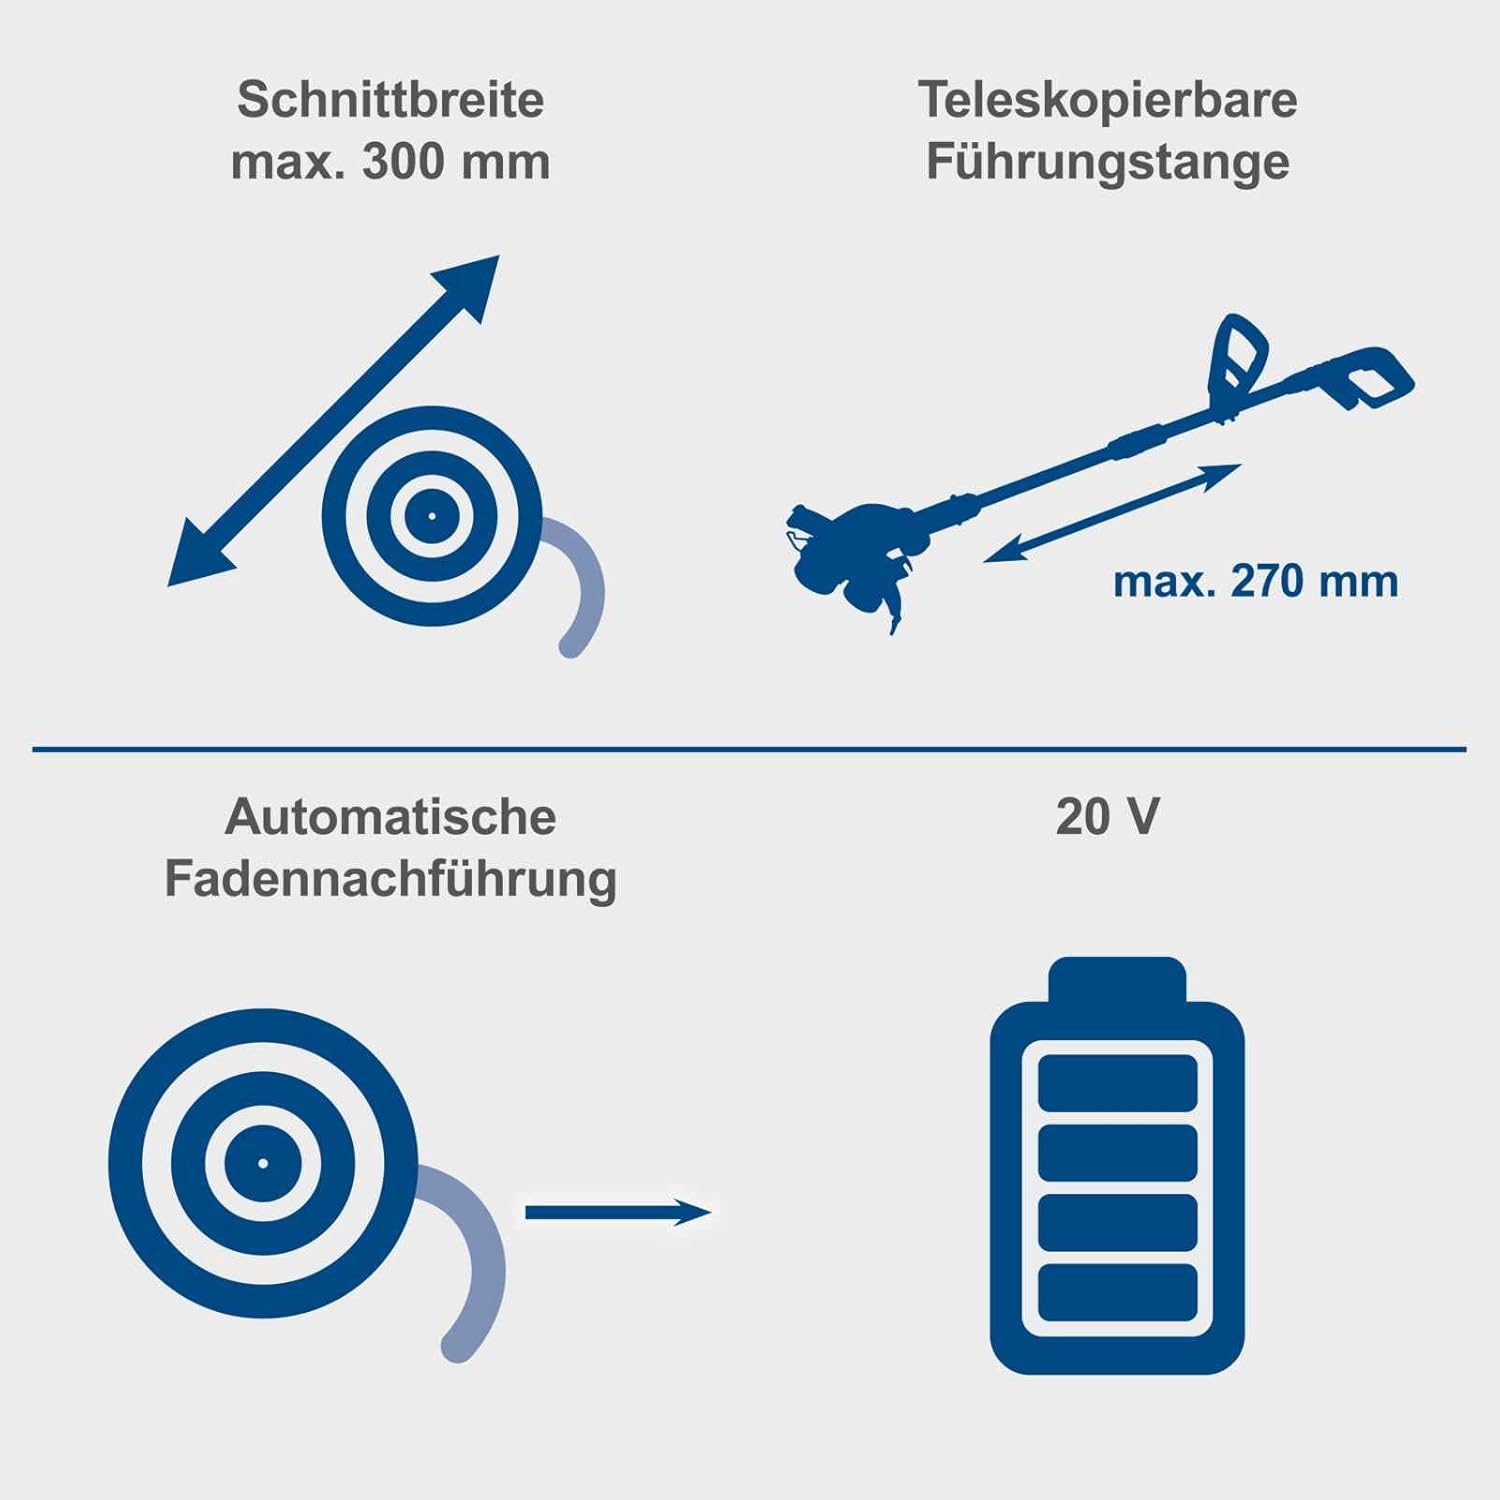
Figure 8.1: Technical specifications diagram. This visual summary highlights key dimensions and features, including the maximum cutting width of 300mm, telescopic shaft extension up to 270mm, automatic line feed, and 20V battery compatibility.
9. Warranty and Support
For warranty information, please refer to the warranty card included with your product or visit the official Scheppach website. If you require technical assistance, spare parts, or have any questions not covered in this manual, please contact Scheppach customer support through their official channels.
Related Documents - C-LT300-X (5910904900)
 |
Scheppach C-LT300-X Akku-Rasentrimmer Bedienungsanleitung Offizielle Bedienungsanleitung für den Scheppach C-LT300-X Akku-Rasentrimmer. Finden Sie Informationen zur sicheren Verwendung, Montage und Wartung dieses Gartengeräts. |
 |
Scheppach C-LT300-X Akku-Rasentrimmer Bedienungsanleitung Umfassende Bedienungsanleitung für den Scheppach C-LT300-X Akku-Rasentrimmer. Enthält Informationen zu Sicherheit, Bedienung, Wartung und technischen Daten. |
 |
scheppach C-PHTS410-X Akku-Multifunktionsgerät Bedienungsanleitung Die Originalbetriebsanleitung für das scheppach C-PHTS410-X Akku-Multifunktionsgerät. Enthält wichtige Informationen zur sicheren Verwendung, Montage, Bedienung und Wartung. |
 |
Scheppach C-PHTS410-X Cordless Multi-Function Device User Manual Comprehensive user manual for the Scheppach C-PHTS410-X cordless multi-function device, covering safety instructions, product description, technical data, and operating guidelines for hedge trimming and pole saw functions. |
 |
Scheppach C-HTGS200-X Akku-Gras- und Strauchschere Bedienungsanleitung Umfassende Bedienungsanleitung für die Scheppach C-HTGS200-X Akku-Gras- und Strauchschere. Erfahren Sie alles über sichere Bedienung, Wartung und technische Daten für optimale Gartenergebnisse. |
 |
Scheppach PMT520 Multifunctional Petrol Device Manual This manual provides comprehensive instructions for the Scheppach PMT520 multifunctional petrol device, covering setup, operation, maintenance, and safety guidelines for various attachments including a grass trimmer, hedge trimmer, and pole pruner. |
Ask a question about this manual
Ask about setup, troubleshooting, compatibility, parts, safety, or missing instructions. Manuals+ will review the question and use this page’s manual context to help answer it.