1. Introduction
This manual provides instructions for the assembly, operation, and maintenance of the EasyAgo STEM Robot Toy Model Car Kits, Model K96183. This kit allows for the construction of five different models and features dual control via a remote control unit or a mobile application. It is designed to provide an engaging building and play experience.

Figure 1: The EasyAgo STEM Robot Toy Model Car Kit in its main configuration, alongside other possible builds.
2. Safety Information
WARNING: CHOKING HAZARD - Small parts. Not for children under 3 years.
- Adult supervision is recommended during assembly and play.
- Keep small parts away from young children to prevent choking.
- Do not expose the product to extreme temperatures or moisture.
- Ensure batteries are inserted correctly according to polarity markings.
3. Package Contents
Verify that all components are present in the box:
- Building block pieces (sorted into numbered bags)
- Main control module
- Remote control unit
- Instruction manual

Figure 2: Overview of the product components included in the package.
4. Assembly Instructions
The EasyAgo STEM Robot Kit allows for the construction of five distinct models. Refer to the included detailed instruction booklet for step-by-step guidance on building each model.
4.1 Model Configurations
The kit supports the following 5-in-1 model configurations:
- Engineering Little Superman
- Loading car small bend
- Iron pliers Huang Dalili
- Forklift Round Handsome
- Bulldozer Bago

Figure 3: The five distinct models that can be assembled from the kit.
4.2 General Assembly Tips
- Sort pieces by color and type before starting.
- Follow the numbered steps in the instruction manual carefully.
- Ensure all connections are secure to prevent parts from detaching during play.
- Some parts may require firm pressure to connect.

Figure 4: Building blocks are organized into bags for easier assembly.
5. Power Module and Battery Installation
The main control module powers the robot. It requires 3 x 1.5V AA batteries (not included).
5.1 Battery Installation for Main Control Module
- Locate the battery compartment on the main control module.
- Use a small screwdriver to open the battery compartment cover.
- Insert 3 x 1.5V AA batteries, ensuring correct polarity (+/-).
- Replace the battery compartment cover and secure it with the screw.
5.2 Battery Installation for Remote Control
The remote control unit also requires batteries (not included). Refer to the remote control's specific instructions for battery type and installation.

Figure 5: The main control module with its battery compartment and power switch.
6. Operating Instructions
The robot can be controlled using either the included remote control or a dedicated mobile application.
6.1 Remote Control Operation
Turn on the main control module and the remote control. The remote control allows for basic movement and directional control of the assembled robot.
6.2 Mobile App Control
- Download the App: Scan the QR code provided on the product packaging or in the instruction manual to download the 'KeeYee Go' application.
- Connect: Ensure Bluetooth is enabled on your mobile device. Open the app and follow the on-screen instructions to connect to the robot's main control module.
- Control Modes: The app offers various control modes:
- Remote Mode: Standard joystick-like controls for movement.
- Path Mode: Draw a path on your device screen, and the robot will follow it.
- Program Mode: Program a sequence of actions for the robot to perform.
- Gyroscope Mode: Control the robot's movement by tilting your mobile device.
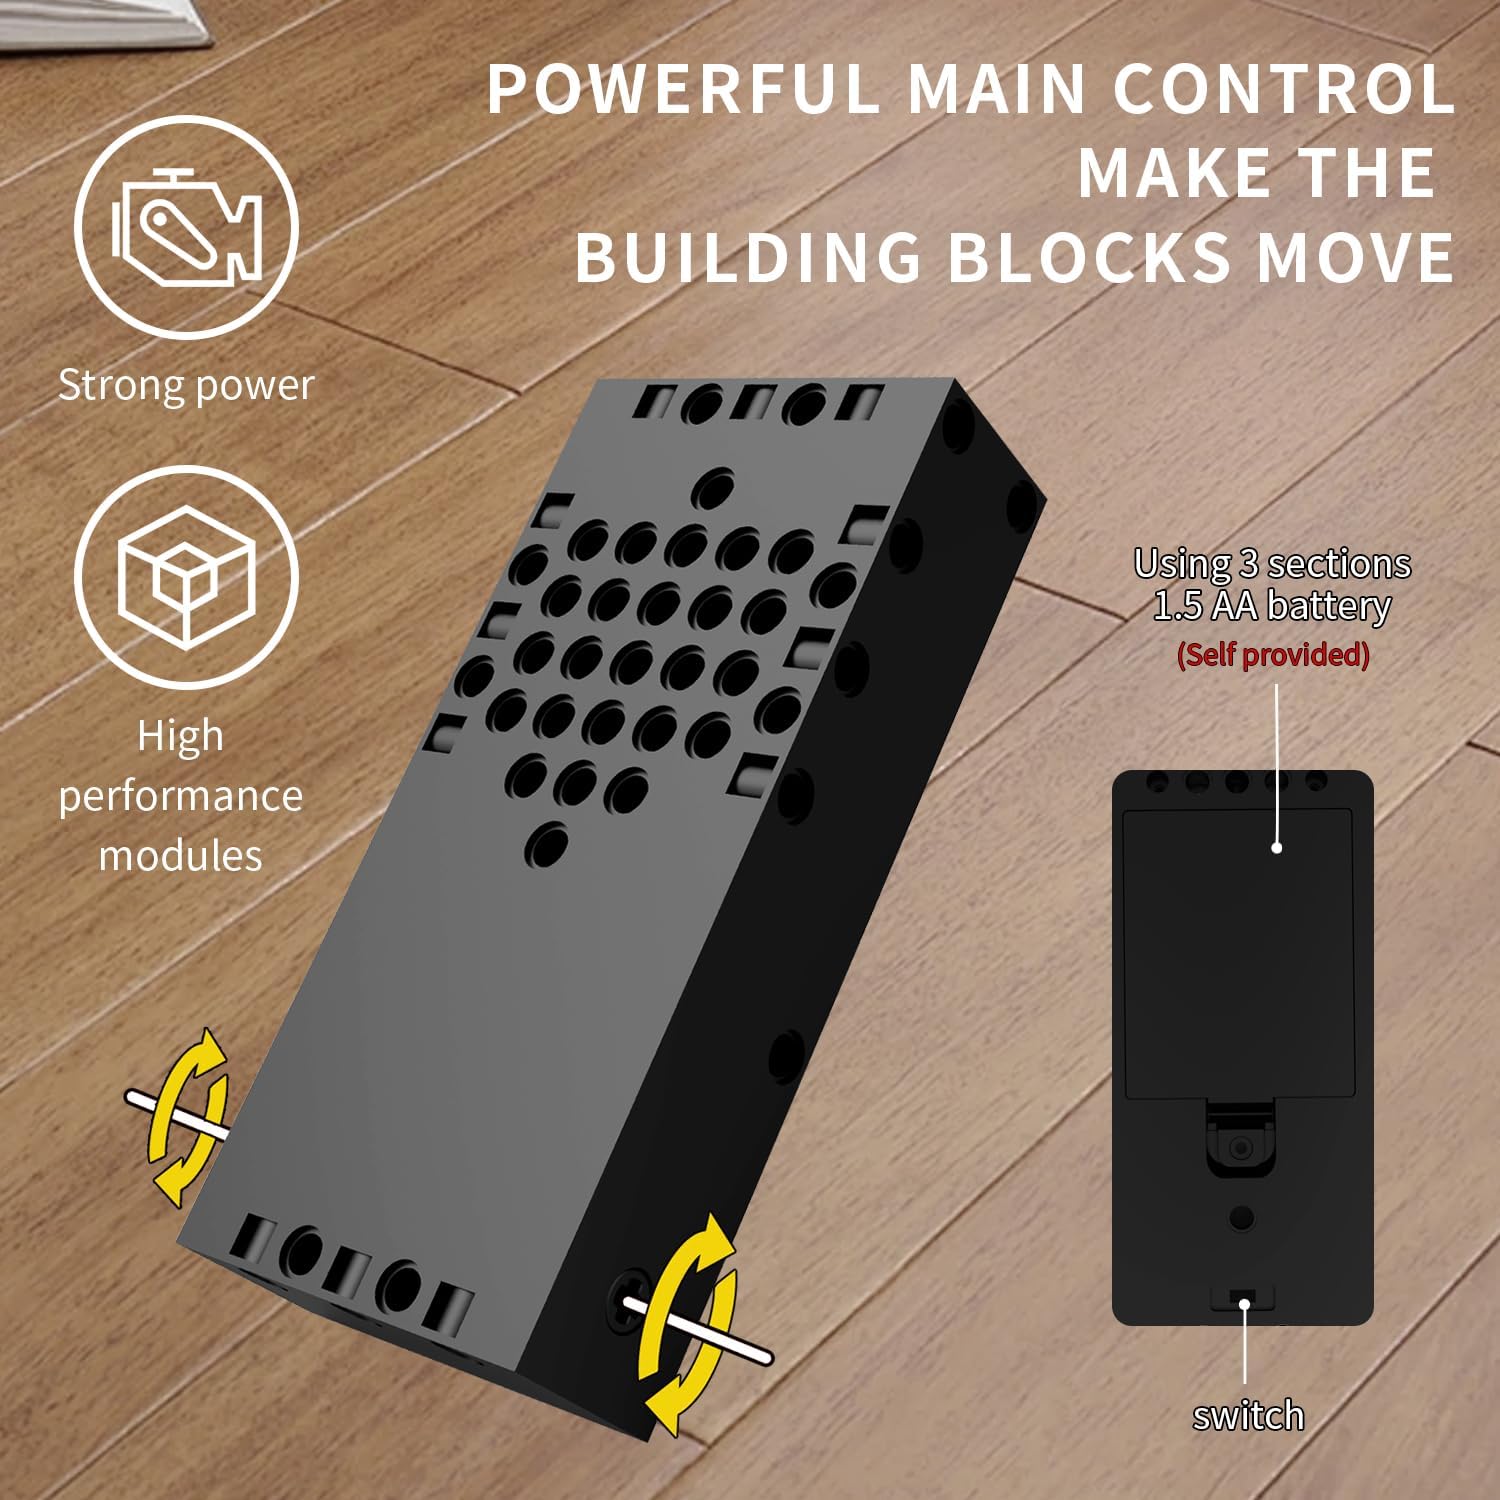
Figure 6: The robot can be controlled via the included remote or a mobile application.

Figure 7: Gyroscope mode allows control by tilting the mobile device.

Figure 8: Path mode enables drawing custom routes for the robot.
7. Maintenance
7.1 Cleaning
- Wipe the robot and its components with a dry, soft cloth.
- Do not use water or cleaning solutions, as this may damage electronic components.
7.2 Storage
- Store the robot and its parts in a cool, dry place away from direct sunlight.
- Remove batteries from the main control module and remote control if the product will not be used for an extended period.
8. Troubleshooting
| Problem | Possible Cause | Solution |
|---|---|---|
| Robot does not turn on. | Batteries are dead or incorrectly installed. | Replace batteries with new 1.5V AA batteries, ensuring correct polarity. Check power switch position. |
| Robot does not respond to remote/app. | Not paired, out of range, or interference. | Ensure both robot and controller are on. Re-pair the device. Move closer to the robot. Avoid areas with strong electronic interference. |
| App cannot find the robot. | Bluetooth is off or app issue. | Ensure Bluetooth is enabled on your mobile device. Restart the app and the robot. Reinstall the app if necessary. |
| Robot movement is inconsistent or tracks skip. | Loose connections, surface type, or debris in tracks. | Check all building block connections, especially around the drive system. Operate on hard, smooth surfaces. Clear any debris from the tracks. |
9. Specifications
- Model Number: K96183
- Product Dimensions: 7.8 x 2.7 x 9.8 inches
- Item Weight: 1.28 pounds
- Power Source: 3 x 1.5V AA batteries (for main control module, not included)
- Control: Remote Control, Mobile App (KeeYee Go)
- Recommended Age: 6 years and up
10. Warranty and Support
10.1 Warranty Information
EasyAgo products are designed for quality and durability. For specific warranty details, please refer to the product packaging or contact customer support. Keep your purchase receipt as proof of purchase.
10.2 Customer Support
If you have any questions, require assistance, or encounter issues not covered in this manual, please contact EasyAgo customer support through the retailer's platform or visit the official EasyAgo store page: