1. Introduction
This manual provides detailed instructions for the installation, operation, and maintenance of your KUIPERAUTO Headlight Assembly. Please read this manual thoroughly before installation and use to ensure proper function and safety. This product is designed to replace original headlight units in compatible vehicles, enhancing visibility and vehicle aesthetics.
2. Important Safety Information
- Always disconnect the vehicle's battery before performing any electrical work to prevent electrical shock or damage to the vehicle's electrical system.
- Wear appropriate personal protective equipment, including safety glasses and gloves, during installation.
- Ensure all connections are secure and properly insulated to prevent short circuits.
- If you are unsure about any step of the installation process, consult a qualified automotive technician.
- Dispose of old parts responsibly according to local regulations.
3. Package Contents
Verify that all components are present and undamaged before beginning installation.
- 1 x Pair of Headlights (Left + Right)
- 1 x Pair of Bumper Parking Lights (Left + Right)
- Black housing (integrated into the headlight assembly)
- Note: High/Low Beam bulbs (9005+9006) are not included and must be purchased separately.

Image: Contents of the KUIPERAUTO Headlight Assembly package, showing both headlight units and bumper parking lights.
4. Compatibility
This KUIPERAUTO Headlight Assembly is compatible with the following vehicle models:
- 2003-2006 Chevy Silverado 1500 2500 3500 HD Models
- 2003-2006 Chevrolet Avalanche 1500 2500 (Fits Models without Cladding Only)
- 2007 Silverado 1500 2500 3500 (Fits Models with Halogen Headlights Only)
Please verify your vehicle's make, model, and year to ensure proper fitment before installation. Refer to your vehicle's owner's manual for specific headlight type requirements.

Image: Reminder to confirm vehicle model compatibility before purchase.
5. Setup (Installation)
The KUIPERAUTO Headlight Assembly is designed for direct fitment, replacing OEM parts with precision. However, professional installation is recommended due to the electrical nature of the product and potential complexities with wiring for advanced features like sequential turn signals and DRLs.
5.1 Pre-Installation Steps
- Gather Tools: You will typically need a socket wrench set, screwdrivers, and possibly wire strippers/crimpers if custom wiring is required.
- Disconnect Battery: Always disconnect the negative terminal of your vehicle's battery before starting any electrical work.
- Access Headlight Assembly: Depending on your vehicle model, this may involve removing the grille, bumper, or fender liners. Consult your vehicle's service manual for specific instructions.
- Remove Old Headlights: Unbolt the existing headlight assembly and disconnect all electrical connectors.
5.2 Installation Steps
- Install New Headlights: Carefully position the new KUIPERAUTO Headlight Assembly into the mounting hole. Ensure it aligns correctly with the vehicle's body.
- Secure Headlights: Bolt the new assembly into place using the original mounting points.
- Connect Wiring: Connect the electrical connectors. For models with LED Sequential Turn and DRL features, additional wiring may be necessary. The product features uniquely designed connections and clips for ease of installation. If wiring instructions are not provided or unclear, it is strongly advised to seek professional assistance to ensure correct functionality and avoid damage.
- Test Functionality: Before reassembling the vehicle's front end, reconnect the battery and test all headlight functions: low beam, high beam, turn signals (including sequential), and DRLs.
- Reassemble: Once all functions are verified, reassemble any removed vehicle components (grille, bumper, etc.).

Image: Rear view of the headlight assembly, highlighting the low beam, beam adjuster, turn signal, and high beam bulb locations for installation reference.
5.3 Headlight Alignment
Proper headlight alignment is crucial for safe driving and to avoid blinding oncoming traffic. After installation, perform the following alignment check:
- Park the vehicle on a level surface, approximately 10 to 25 feet from a wall.
- Ensure the lights are aimed directly at the wall.
- The centerlines of the headlights should not be any higher than 3.5 feet above the ground.
- Adjust the beam using the integrated beam adjuster screws (refer to the 'Easy to Install' image for location) until the cutoff line is correct.
6. Operating Instructions
Your KUIPERAUTO Headlight Assembly features advanced lighting functions designed for optimal visibility and safety.
6.1 Daytime Running Lights (DRL)
The integrated DRLs provide enhanced visibility during daylight hours, automatically activating when the vehicle is running. These lights feature a clear, bright illumination.
6.2 Sequential Turn Signals
When the turn signal is activated, the amber LEDs illuminate in a sequential pattern, providing a clear and modern indication of your turning intentions to other drivers.
6.3 High and Low Beam Functionality
The headlight assembly supports standard high and low beam functions. The updated reflectors and chromium plating process ensure a perfect lighting pattern with a clear cutoff line, expanding driving vision without causing glare to oncoming traffic.

Image: Illustration of the DRL (Daytime Running Light) and sequential turn signal operation.

Image: Visual representation of the Z-shaped cutoff line for low beam and the broader illumination of the high beam.

Image: Comparison illustrating the improved lighting pattern with no dark spots or shadows, and reduced glare for oncoming drivers.
7. Maintenance
Proper maintenance ensures the longevity and optimal performance of your headlight assembly.
7.1 Cleaning
- Regularly clean the outer lens with a soft cloth and mild automotive soap or glass cleaner.
- Avoid abrasive cleaners or harsh chemicals that could damage the lens material.
- Rinse thoroughly with water to remove any cleaning residue.
7.2 Durability and Sealing
The headlight assembly is constructed with high-quality, wear-resistant, and UV-resistant professional plastics to prevent yellowing and cracking from prolonged exposure. The seams between the lens and housing utilize high-permeability sealant, providing IP67 waterproof, anti-fog, and dust-proof protection.
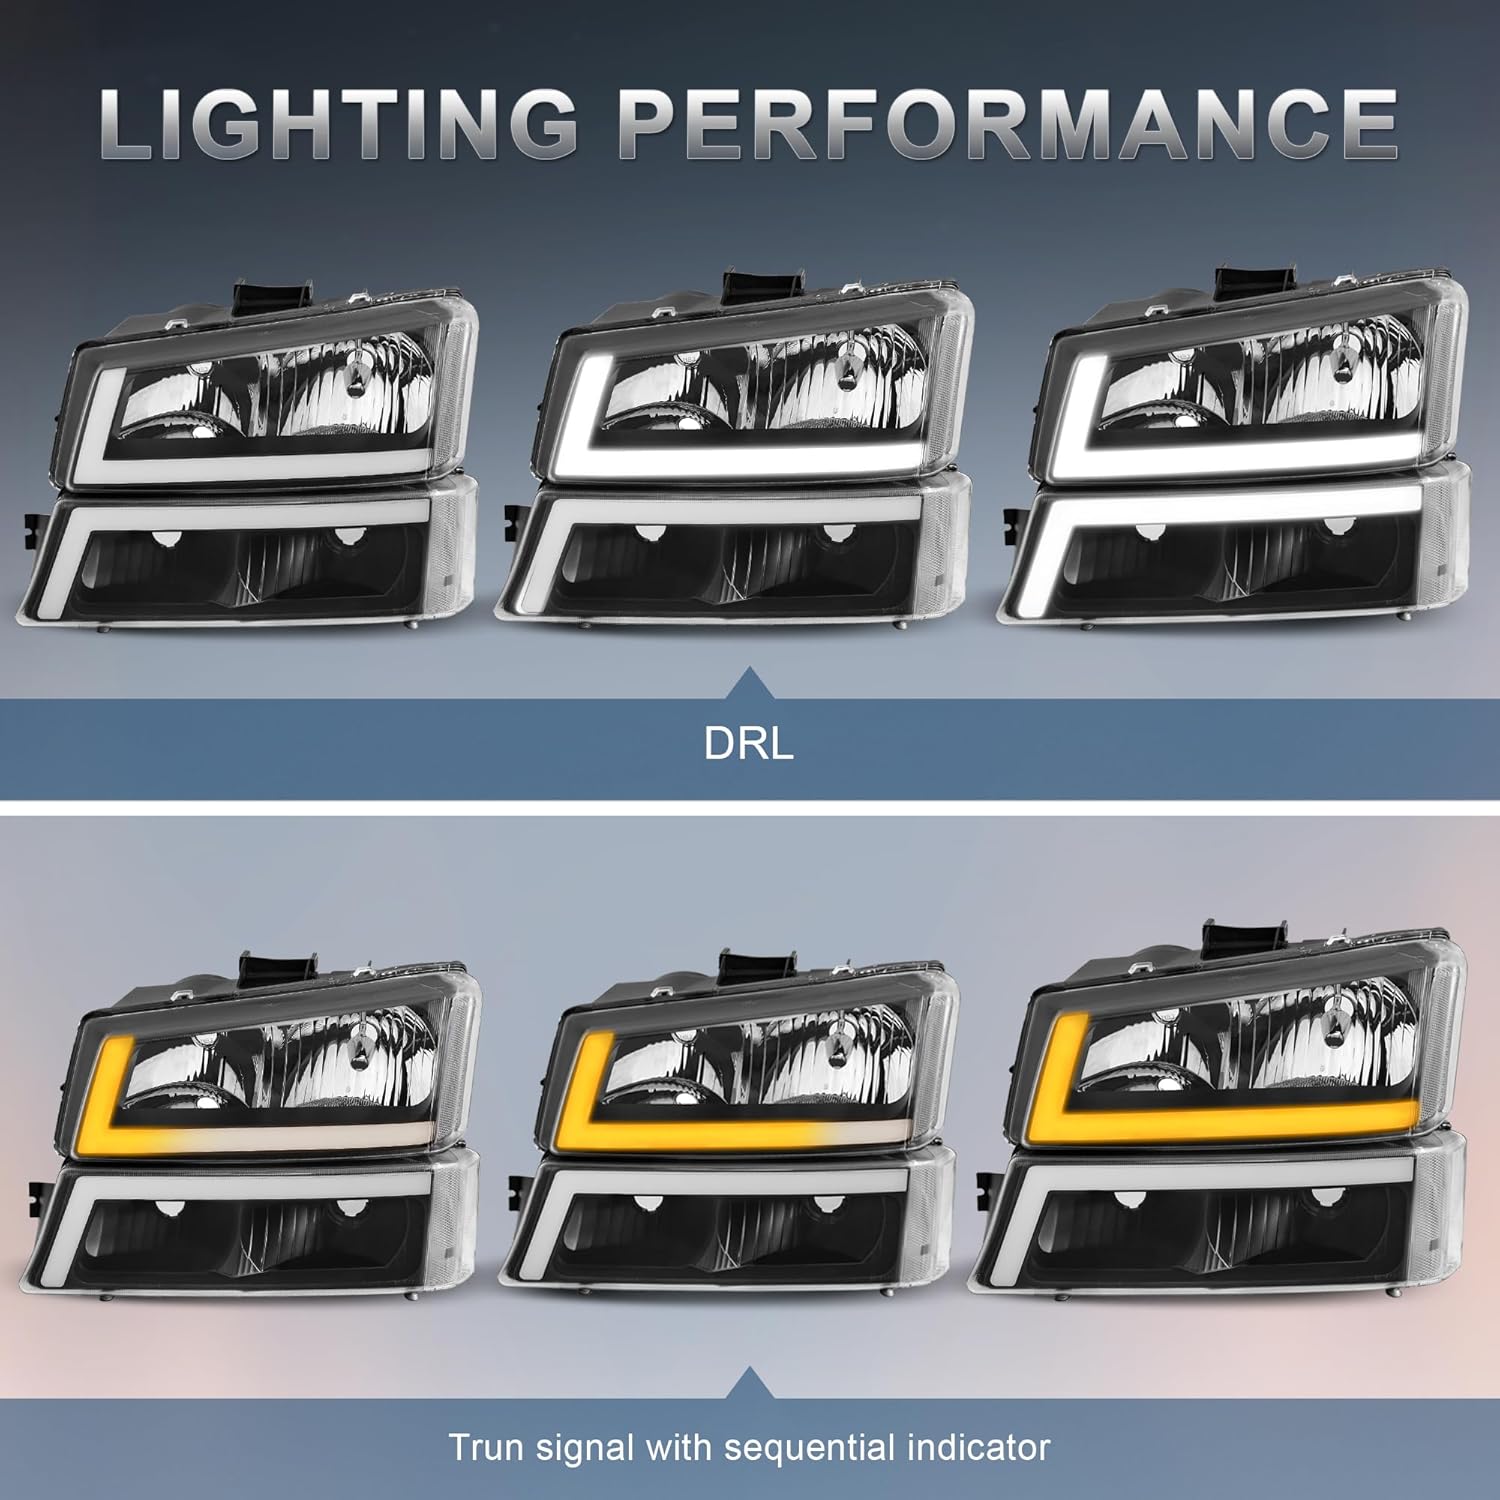
Image: Illustration of the durable, UV-resistant, and dust-proof lens material.
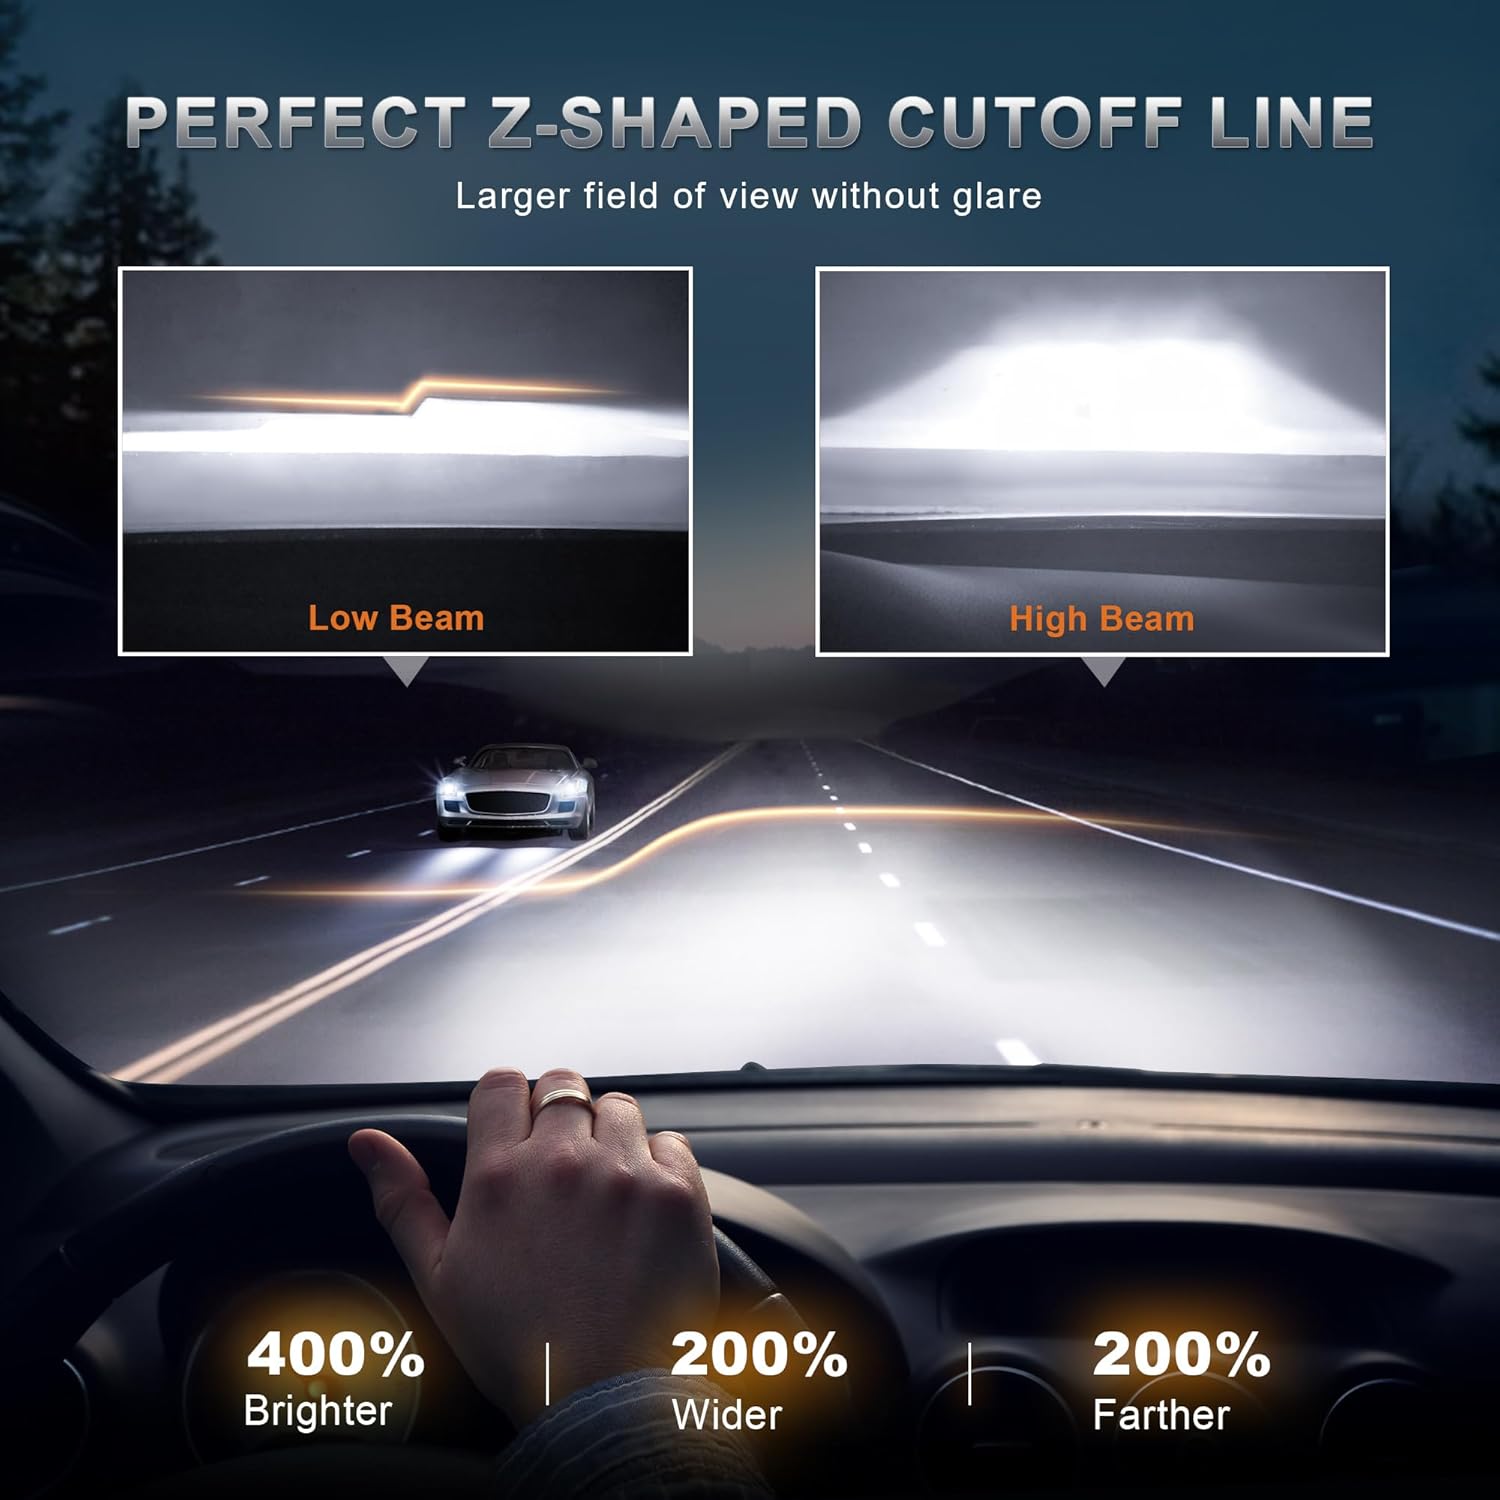
Image: Depiction of the headlight's IP67 waterproof and anti-fog sealing performance.

Image: Visual emphasizing the weatherproof construction designed to prevent moisture and dust ingress.
8. Troubleshooting
This section addresses common issues you might encounter with your headlight assembly.
8.1 Moisture Inside Lens
- Issue: Condensation or moisture appears inside the headlight lens.
- Possible Causes: While the product is designed to be waterproof (IP67), extreme temperature changes or improper sealing during installation can sometimes lead to minor condensation.
- Solution: Small amounts of condensation often dissipate on their own. Ensure all seals and gaskets are properly seated. If moisture persists or is excessive, inspect for cracks or damage to the housing or lens, or contact customer support.
8.2 Lights Not Functioning / Incorrect Wiring
- Issue: Headlights, DRLs, or turn signals do not light up or function incorrectly (e.g., sequential turn signals not working).
- Possible Causes: Incorrect wiring connections, loose connections, blown fuse, or faulty bulbs (if applicable).
- Solution:
- Verify all electrical connections are secure and correctly wired according to your vehicle's specific wiring diagram.
- Check the vehicle's fuse box for any blown fuses related to the lighting system.
- Ensure bulbs (if not integrated LEDs) are properly seated and functional.
- If issues persist, professional automotive electrical diagnosis is recommended.
8.3 Uneven Light Beam
- Issue: Headlight beam appears uneven or misaligned.
- Possible Causes: Improper installation or incorrect adjustment.
- Solution: Refer to Section 5.3 Headlight Alignment and adjust the beam using the integrated adjusters.
9. Specifications
| Feature | Specification |
|---|---|
| Brand | KUIPERAUTO |
| Model Number | B0D1R446Y1 |
| Color | Black/Clear/Clear |
| Light Source Type | Halogen (for main beams), LED (for DRL/Sequential Turn) |
| Lens Material | Polycarbonate |
| Special Feature | Waterproof, UV-resistant, Anti-fog |
| Wattage | 130 watts (total, estimated for halogen bulbs) |
| Certifications | SAE&DOT Approved |
| Waterproof Rating | IP67 |
10. Warranty and Support
10.1 Manufacturer's Warranty
This KUIPERAUTO Headlight Assembly comes with a 1-Year Manufacturer Warranty. This warranty covers defects in materials and workmanship under normal use. It does not cover damage caused by improper installation, accident, misuse, abuse, or unauthorized modifications.
10.2 Return Policy
Products purchased through Amazon are subject to Amazon's return policy, typically allowing returns for refund or replacement within 30 days of receipt. Please refer to your Amazon order details for specific return instructions.
10.3 Customer Support
For technical assistance, warranty claims, or any questions regarding your KUIPERAUTO product, please contact KUIPERAUTO customer service through the retailer where the product was purchased (e.g., Amazon's messaging system for sellers). Please have your order number and product model (B0D1R446Y1) available when contacting support.